Wooden planters look great placed outside on a patio or balcony or even inside your home. Unfortunately, wood is a natural material that will break down over time. To prevent the wood from rotting prematurely due to the moisture inside the box, you can take some steps to protect it.
If you’re wondering how to waterproof a wooden planter box and protect it from moisture, keep reading.

Credit: Shutterstock
How to seal a wooden planter box
Planter box waterproofing is quite simple. You will need some supplies for this job, however. You can start by gathering the following:
- Newspaper
- Masking tape
- Thick industrial plastic liner
- Oil-based varnish/ oil-based wood sealant/ Flex Seal spray
- Paintbrush
- Sandpaper
- Carpenter stapler
- Polyurethane-based/ silicone-based caulk
- Scissors
- Measuring tape
Once you’ve got all the supplies you need, you can start the waterproofing process. Here’s how to do it.
Step 1: Prepare the planter box
Before you can waterproof the inside of a wood planter box, you will need to prepare it. Start by sanding down the inside of the box to create a rough surface for the sealant of your choice to stick to.
Once the surface is prepared, make sure to brush away any dust. The dust will interfere with how well the sealant sticks. If you have a compressor, you can use compressed air to blow out all the dust. If not, simply use a paintbrush or something similar to brush off all the dust.
More on this: How to Build a Planter Box Out of Wood
Step 2: Seal the box
For this step, you will need the caulk. Squeeze some caulk onto all the joins where the different wooden panels come together. Once the substance is applied, smooth it over with your finger to form a seal and create a smooth finish.
Once you’re done, you might need to leave the caulk to dry for up to four days. If you’re unsure of the curing time, read the instructions on the packaging. Make sure the box is kept away from any sources of heat and moisture during this time.
Step 3: Apply the wood preservative
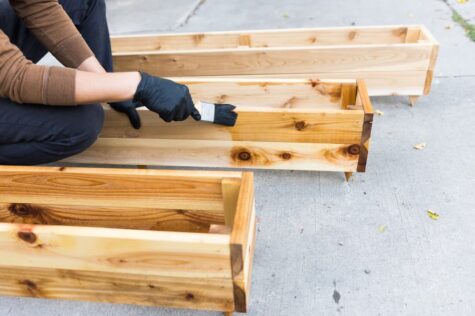
Once the caulk is dry, you can move on to the wood preservative. How you apply it, will depend on what kind of preservative you’ll be using. If you opt to go with an oil-based varnish or oil-based wood sealant then you will need a brush to apply it.
Use some masking tape to create straight lines if you don’t want to paint the whole box. Apply the varnish/sealant according to the instructions on the container. Leave it to dry for around 4 to 6 hours before applying a second coat. In some cases, you will need a third coat, but the instructions will tell you. Once dry, you can move on to the bottom of the planter.
Paint the bottom of your planter in the same way you did the inside. The bottom will also be in contact with water quite frequently due to standing on a wet surface. The drainage holes will let water out of the box that will most likely spread and pool under your planter. If it isn’t protected as well, you will have problems with rot quite quickly.

Credit: Shutterstock
If you chose to go with Flex Seal spray instead, you will need to prepare your box if you don’t want it to go everywhere. Use masking tape to close off the top and create a straight line. Don’t press down the masking tape since you’ll be adding newspaper just under the edge to protect the rest of the box. When you’ve applied the masking tape and newspaper, you should only be able to see the inside of the box.
Once ready, give the Flex Seal a good shake before spraying a decent layer on the inside of your box. Make sure to cover it all, even the inside of the drainage holes. The instructions on the container should be able to tell you how thick to make the layer and if you’ll need to apply a second coat. Leave the spray to dry according to the instructions before moving on.
Make sure you also give the same treatment to the bottom of the box. Because of the drainage holes, the bottom will also frequently be in contact with moisture. Protect the rest of the box by using masking tape and newspaper, once done spray the bottom with Flex Seal and let it dry.
Step 4: Line the planter box
For the last step, you will need thick industrial plastic to use as a liner for your box. The plastic will further protect the wood against water damage, making it even more waterproof.
Use a measuring tape to measure the inside of your box including the bottom and sides in your measurement. Once done, use these measurements to cut the correct sized plastic liner for your box.
Line up the plastic liner with the top edge of one of the sides. Use a carpenter stapler and staple it in place around halfway up the side on the inside of the box. The top piece of plastic will be loose, but don’t worry about that just yet.
Flatten out the plastic until it covers the bottom completely and contours nicely with the inside of the box. Place another staple on the bottom of the box close to the side to keep the plastic in place. Now you can flatten out the rest of the side you already stapled once and place more staples on the same line to keep the plastic attached to that side. You can do the same at the bottom following the side you already stapled in place.
Turn your box around and line up the opposite side of the plastic. Follow the same procedure to secure it in place as the first side. Once done, you can move on to the remaining sides, lining up the plastic and stapling it in place.
You should now be left with the four flaps at the corners where the plastic doesn’t fit the box as well as the 4 loose edges above your staple line.
For the four loose corners, neatly press the plastic as far into the corner as you can and staple it in place on both sides of the flap. When finished, you can neatly fold over the flap and staple it to one of the sides to get it out of the way. Do the same with all four corners.
For the loose edges, make a small cut in the corners. Fold the sides down by tugging them in between the wood and the plastic twice. Staple the neat edge in place all around.
Congratulations! You now have a waterproof planter box.
See Also : Best Waterproof Liners For Planter Boxes

A well treated planter box will look great for years to come. Image credit: @planterboxez
FAQs
Should wood planters be sealed?
Yes, wood planters will rot very quickly if left untreated especially if it is made from softwood. Sealing your planter will increase its life expectancy and keep it looking great for much longer.
What can I put in the bottom of a wooden planter?
Seal your planter with a plastic liner before filling the bottom with filter media such as gravel, stones, broken ceramic, broken glass or plastic bottles. This will ensure the wood is protected against water damage and improve drainage from your planter by keeping the drainage holes open.
Read more on this: How to fill a wooden planter box
How can I prevent my wooden planter from rotting?
Seal it! The best way to keep your wooden planter from rotting is to seal it with oil-based wood preservative or sealant spray. You can also line the inside of your box with a plastic liner to reduce the contact between the moist soil and the wooded box.

Save this pin for later


