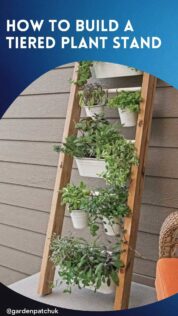
Building your own furniture can be a great project for the family to do together. There are loads of free garden furniture plans online that you can try at home.
Interested in building something simple? Let’s start with creating a tiered wooden plant stand for your garden.
How to build a tiered wooden plant stand
This project suits a beginner that is new to woodwork. You will need a few materials and some tools before you begin. Here’s a list to get you started:
Supplies and tools list
- 120-grit sandpaper
- 4d galvanised nails
- Water-resistant wood glue
- Seven 2.5 metre (8 feet) long 1×2 wooden planks
- Framing square
- Handsaw
- Tape measure
- Wood preservative or stain

Build this simple tiered plant stand in a few steps. Credit: The Family Handyman
Method
This little tiered platform for your plants is very simple to build. You’ll only be required to measure out two different lengths and then stack them in order. Here’s how it works:
Step 1: Get your materials and tools
The first step will be to get all the tools and materials you’ll require to complete your project. You can find the required list above. For your choice of wood, consider cedar due to its longevity outside. Once you have everything you need, you’re ready to move on to the next step.
Step 2: Cut the wood
For this step, you will need seven 2.5 metre (8 feet) long 1x2s. Use the tape measure and measure out twenty-seven 27.3 cm (10 ¾ inch) pieces and sixteen 50.8cm (20 inch) pieces. Once you’re sure of the measurements, make sure to draw a straight line on the 1x2s. You can use the framing square to achieve this.
Line up one edge of the framing square with the edge of the plank. The other edge of the square should create a perfect 90° angle on the wood. Simply draw a line with a pencil.
Once you’re sure your measurements are correct and you have a straight line to work with, use a saw to create your shortened pieces of 1x2s. Don’t throw away any scrap pieces since you’ll be using those for the spacing later on.
Step 3: Create the base of your tiered plant stand
You will need the framing square to create the base you’ll be working on. Place a 50 cm (20-inch) piece of wood in the 90° bend of the framing square. Place another piece next to it so you don’t forget about it and a third piece next to the second piece of wood. On top of all three pieces, place another 20-inch piece at a 90° angle so that it lines up with the other edge on your framing square.
Once you are sure piece one and piece four line up perfectly, place some wood glue in between them in the corner where they join and press together. Only hammer a nail through them both to secure them together once you’re sure they form a perfect 90° corner. Hammer a second nail in close to the first to make sure it’s impossible for them to shift position. Make sure the nails stay as close to the middle of the wood as possible to prevent splitting.
Once your first corner is secured, move the framing square to the other corner. Line up the third and fourth pieces of wood to form another 90° angle just like the first. Apply some glue and keep the wood in place by hammering in two nails. Just remember the fourth piece of wood needs to stay on top of the rest.
Your second piece of wood is still unsecured at this point. To measure where it needs to go, use a short 27cm piece of wood. Simply place the 27 cm piece of wood on top of the fourth piece of wood you just secured. Line up the edges and one corner. Where the short plank stops, use it as a ruler and draw a line with your pencil.
You can now remove the short piece of wood, line up the long central piece with the line you just created and make sure it is square by using the framing square. Once you’re sure of the placement, place a bit of glue on the end and hammer it in place with two nails onto the centre of the fourth piece. You should now have a structure that looks something like this – Ш.
You now have only one side left to attach. Move to the other side and take your framing square with you. Place wooden piece number 5 parallel with wooden piece number 4. Make sure the corner lines up square with pieces 1,2 and 3. You can use the small 27cm wooden piece again to measure where the central piece should be attached.
Place some glue on all the contact areas and hammer the last wooden plank in place on top of the other 3. Make sure to use two nails on the corners to prevent any movement in the structure.
The last piece you need to attach is the central piece that forms a cross with the other central piece. Use a shorter piece of wood to measure where this piece should be attached, starting at the last two corners you hammered in place. Once you have your line, simply add a bit of glue and hammer this piece in place. Your platform should now look something like this – ⊞.

Credit: Shutterstock
Step 4: Start stacking
Now that your frame is complete, you can start the stacking process. For this layer, you will need three short 27 cm (10 ¾ inch) pieces. Place your base so that the ends of the top three pieces face you. Take your three short pieces and line them up parallel with their ends facing away from you.
You can get the spacing right by using the scrap pieces of 1x2s lying around. Place the scrap pieces upright between the other pieces to create a one-inch spacing. Once in place, you can glue and then hammer a nail through the first short plank to secure it in place.
Continue on placing two more short pieces next to the one you just secured. Space them the same as the first one, use some glue and then hammer them in place on both ends. Congratulations, you just finished your first tier.
Step 5: Create the second tier.
For the second tier, you will need ten 50cm (20 inch) planks and eleven 27cm (10 ¾ inch) pieces. Place the platform so that the first tier is on your left closest to you. Now you can place a long plank in the middle of your structure so that it overlaps the ends of the three short planks you just placed. Make sure it covers their ends perfectly before placing a bit of glue on all the contact points and hammering it in place with one nail on each edge and one nail in the middle of the structure.
At the back of the structure, you can place another long plank parallel with the one in the centre. Put a little glue on all three contact points and secure it in place with nails.
You will need a short plank for the last piece of this layer. Take the short piece and place it parallel with the central piece in the right corner on the front of the structure. Line it up nicely and glue as well hammer a nail through each contact point.
For the next three layers, do exactly the same thing, except alternate the placing so that the planks criss-cross and leave some space between each layer. Put some glue between the contact points and hammer a nail through the planks to keep them in place.
Once you’ve used up all 10 of the 50 cm planks set out for this tier, you’ve reached the height of your next platforms. There will now be 7 layers in total and 4 layers above your previous platform.
Now you can fill up the square on the top left with short planks. Make sure to measure the spacing with scrap pieces. You will need 3 short planks to accomplish this task. Once you’re done with that platform, move to the bottom right corner.
You will need the remaining three short planks set out for this tier to complete this platform. Make sure to measure the distance between the planks with the scrap pieces before glueing and hammering them in place.

Glue and hammer the planks into place. Credit: The Family Handyman
Step 6: Create the last tier
For this last step, you will need the remaining 13 short pieces. You’ll only be working with the top right corner at this stage. Place one short plank over the ends of your newly created platform on the left of your structure. Glue all the contact points and hammer a nail into each end to secure it. Place the other short plank parallel with the first on the right edge, glue and hammer the ends into place.
Continue with the criss-cross layering until you only have three planks left. These three planks will now create the last platform. Space them nicely by using the scrap pieces of wood before you glue and hammer them in place with nails.
Congratulations, the hard part is now over.
Step 7: Treat the wood
To treat the wood, you will need to first sand away all the sharp edges and splinters. Use the 120-grit sandpaper to gently round off the edges and remove any splinters.
The only thing you have left to do now is to make sure the wood won’t get damaged by any weather conditions or pests. To do this take the wood preservative or stain and generously paint the whole structure with it, inside and out.
Allow the first layer to dry before applying a second coating. Your project is now complete! Place it where ever you like. It works both in and outdoors.

Carefully apply wood preservative to the finished plant stand. Credit: Shutterstock
FAQs
What is the best wood to build outdoor furniture with?
Teak or cedar is the best wood for garden furniture. These woods are weather resistant and won’t warp when exposed to moisture. They also contain natural oils that make them pest-resistant.
How do you make wood weather resistant?
You will need to apply a wood sealer. There are a variety of wood sealers to choose from so make sure to do your research beforehand. Some woods don’t require a sealer since they are naturally weather resistant.
Can you put wooden furniture outside permanently?
Yes, depending on the type of wood. Woods that are naturally weather-resistant can be left out in the elements permanently. You will have to do slight maintenance every now and then to keep them in great shape, however.
Source
https://www.familyhandyman.com/project/make-your-own-tiered-plant-stand/

Save this pin for later


