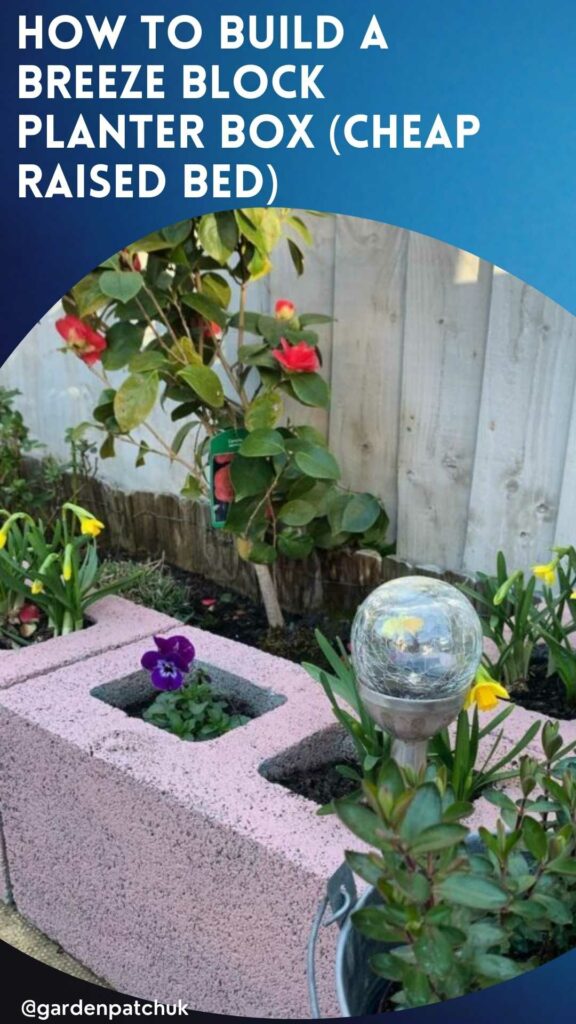
If you’re thinking of adding a new planter box to your garden, why not try making one from breeze blocks?
A breeze block planter box is durable and easy to build. You can make it as large and as tall as you need it to be and place it directly on the ground.
In this post, we’ll guide you through the process of building a breeze block planter box step by step. We’ll also share some concrete block planter box ideas with you. But first, let’s get the definitions straight to avoid any confusion.

Image credit: @the_pink_house8
Breeze blocks vs concrete blocks – What’s the difference?
Breeze blocks are made from concrete and a cinder aggregate such as bottom ash or fly ash that’s left behind after burning coal. Breeze is a synonym for ash. By contrast, concrete blocks contain stone and sand and are heavier though often they may look the same.
Good to know: Blocks are usually larger than bricks. Standard breeze and concrete blocks are 440mm x 215mm x 100mm.
To build DIY planter boxes, you can use both breeze (or cinder) blocks and concrete blocks. Hollow as well as filled blocks work just as well. Modern, store-bought breeze and concrete blocks are safe and durable.
Important: Breeze blocks come in two main types: stretch and pillar. Stretch breeze blocks have concave edges. Pillar breeze blocks have flat edges. For this project, use pillar breeze blocks. Or mix the two, making sure you have enough pillar breeze blocks for the corners of the planter.
How to build a breeze block planter box step by step
Begin by figuring out how large you want the planter box to be and get enough breeze blocks. You can then level the ground and start laying the blocks following the steps below. You won’t be needing mortar or any other adhesive.
Note: Our instructions are for an approximately 8 feet long by 4 feet wide rectangular planter box using two layers of blocks.
Materials and tools you need
- Breeze blocks x 32 (16 per level)
- Reinforcing bars x 8 (or more)
- Landscape fabric
- Large hammer
- Flat shovel
- Spirit level
- Framing square
- Scissors
- Measuring tape
Step 1 – Prepare the ground
You can build a breeze block planter box directly on soil, grass, gravel, or just about any other surface. But make sure that the surface is level.
If you’re building it on soil, mark the area and level the soil with a flat shovel. Use a level to make sure the marked area really is flat.
Step 2 – Lay the first breeze block layer
Once the surface is level, start laying the foundational layer of breeze blocks. Start from one of the edges and work your way around slowly and carefully.
If you’re using a mix of stretch blocks and pillar blocks, lay the pillar blocks at the four corners.
Use a framing square to make sure the corners are at a 90-degree angle. Then use the level to check that the side blocks are straight and level.
Step 3 – Add in the reinforcement bars (optional)
If you’re using filled-in breeze blocks or building the planter box on a hard surface, you can skip this step.
Hammering a few reinforcement bars into hollow breeze blocks will help keep the bottom layer in place. It will also make adding the second layer easier. The blocks below will be less likely to shift from their place.
Using a hammer, drive a reinforcement bar into each of the six bricks making up the corners and shorter edges. Alternate their placement within the breeze block squares so that they provide the best support.
The reinforcement bars should be poking out of the first layer of breeze blocks but they shouldn’t be visible after you lay the second layer. Drive them into the soil so that they don’t reach more than 2/3 of the height of the second layer of blocks.
Step 4 – Line the breeze block planter with landscape fabric
Before you add the second layer of blocks, add the landscape fabric. It can keep the soil in nicely and improve drainage.
Stretch out the fabric inside the planter. Pierce it with the ends of the reinforcement bars. Lay it over the bricks you’ve put down, but make sure the edges don’t spill past them. The top blocks will go over it and hold it in place.
Step 5 – Lay the second layer
Now it’s time to lay the second layer of breeze blocks. You don’t want to stack them in single file columns, or they may topple.
Lay them in an offset pattern as bricklayers do, to weave them together for better support.
Make sure that you lay them over the edge of the landscape fabric. The edges of the fabric shouldn’t be visible.
Step 6 – Pour in the soil
When your breeze block planter box is ready, you can fill it with soil.
Tip: Since a tall planter box can eat up a lot of soil, you can add some straw at the bottom too.
How do you make a concrete block planter box?
The process of building a concrete block planter box is similar to that of building a breeze block planter box.
If the blocks are filled, you won’t be using reinforcement bars. Also, depending on the concrete block size, you may have to buy more or fewer blocks.
Start by levelling the ground and then lay the first layer of blocks. Add the landscape fabric and place the second layer over it. Use the same offset bricklaying method.
For more guidance, refer to the guide above. You’ll be following the same main steps.
Breeze block planter box ideas
Keen to build some planter boxes out of breeze blocks? The rectangular block planter box in our guide is just one version. Here are a few other ideas to inspire you to make your own:
Square breeze block planter
With fewer breeze blocks you can build a square planter box. Place it by a wall or in another empty space. This example uses filled blocks, but you can also adapt it to concrete blocks or classic breeze blocks. It’s quick and easy to make.

Image credit: Pinterest
E-Shaped square breeze block planter
Need lots of planting space? Try this big E-shaped breeze block planter. It’s essentially a mix of three rectangular planters with two square ones. Note that this one too uses a double layer of breeze blocks. The bottom layer is buried underground, with the blocks laid horizontally for drainage.

Image credit: theownerbuildernetwork
Colourful breeze block planters
Got an odd number of breeze blocks? Don’t forget that each one can stand on its own as a small planter. Combine it with other blocks into a geometrical design to reinvent a corner of your garden. Paint the blocks for a more vibrant look. Tip: If you need to add a bottom to some breeze blocks, use waterproof glue and a piece of landscaping fabric. It’s enough to keep the soil in.

Image credit: Pinterest
Entryway breeze block planter box
For this design, you can use either classic hollowed breeze blocks or filled cement blocks. The latter can be more elegant if you build it along your front steps. Paint the blocks to make them blend in with the surroundings. If you want to make it tall but don’t want to use too much soil, fill the planter with upright hollow breeze blocks or rocks. Use soil only for the topmost breeze block layer.

Image credit: Pinterest
Stacked painted breeze block planter boxes
Do you enjoy painting? Transform boring, grey breeze blocks into works of art. Draw on them directly or use a stencil to get the task done faster. Let the breeze blocks dry and stack them any way you like.

Image credit: Pinterest
The wrap up
A breeze block planter box is a smart and inexpensive way to create a raised bed in your garden. It doesn’t take too much work and the best part is that it can last longer than wooden raised beds while requiring less maintenance. Whether you already have some spare breeze blocks or cement blocks, or plan to buy some, we say go for it!
You might also want to try: 5 steps to a DIY concrete planter box
Save this pin for later


