7 Easy Pallet Planter Box Ideas

When you next receive a delivery that’s packaged on wooden pallets, why not turn the pallets into something useful? Pallets are usually constructed from good, solid wood and from an environmental point of view, it’s such a waste to not use them again. So read on for some ideas on how to upcycle your pallets into stylish planters.

Most pallets come in a standard size of 48×40 inches with each deck board being 3.5 inches wide. They usually have 7 horizontal wooden planks on the front and 3 box-like horizontal supports on the back. Some of the designs below refer to cutting planks 2, 4, and 6; these refer to the front of the pallet. Some designs use the back supports to make shelves for plant pots.

Pallets make ideal planter boxes because most of them have been pressure treated. As pallets can be splintery, it’s usually a good idea to sand down your pallets before sawing. So get your protective gloves and goggles on, grab some sandpaper, sand the surface of the wood down well, and then choose a stylish design for your pallets.

1. Wall-supported pallet grow box

wall-supported pallet grow box

Image credit: @balconygardenweb

You will need some wire to make plant holders, some paints and brushes and perhaps some willing helpers!

2. Wall-mounted shelf pallet planter box

shelf pallet planter box reassembled on your wall

Remodel a pallet into wall-mounted plant shelves. Image credit: @athomewithshannon_x

This design will look perfect on a sunny wall or if you wish to brighten a shady spot, you can add plenty of shade-loving plants. To make this design, you will need some dexterity with a saw, nails and screws to make the planter boxes, L plates to attach the boxes to the wall, a liner to make your planter box waterproof, and something to stain, decorate or varnish the wood plus a paintbrush.

  1. Separate the front from the back of the pallet by removing the nails which hold it in place. Using a pry bar and pliers may be necessary. Pallets are built sturdily! See the YouTube videos below, which explain how to do this in detail and make sure you wear protective gloves and eyewear. You will finish with 2 parts – one has 7 planks of horizontal wood which you will cut and use as backing boards and other pieces of wood with nails removed, which will make your planter boxes.
  2. Cut backing boards. Mark the pallet into pieces 3-5 planks tall to make a backing board in wood, onto which you will add the planter boxes. These can be any shape you like within the dimension of the pallet measurements. Cut the shapes to suit the area you will place the planter boxes.
  3. Make the boxes. Use leftover pieces of wood to create boxes, by cutting 4 pieces to make each box. You need a base, then 3 sides of equal height to make a box. The missing fourth side will be the backing wood. Make sure these boxes will fit onto the backing boards before you cut them! It is a good idea to select horizontal or vertical boards as the pattern and then assemble these bits in box format to see what they will look like. Once decided, screw the corners together and attach them to the base; now you have a 3 sided box to attach to the background board shapes already cut. These boxes will become your plant holders. Then nail the boxes to the backing shapes.
  4. Make several boxes to suit your space. Don’t make them too deep as the soil becomes heavier with watering.
  5. Let’s decorate! Now you can stain, paint or varnish the wood to suit your space. Filled with green leaves, these plant boxes will have plenty of colour, so neutral tones will work well for the planter boxes. You can just varnish them if you prefer a natural look. You can also enlist the help of children to print shapes using stampers.
  6. Line the boxes so that they are waterproof and do not drip water. Cut either plastic bags or recycled bubble wrap to fit each individual planter box and staple it in.
  7. Attach them to the wall. Almost there! You can assemble them in rows or just have one – it depends on your taste and the space available.
  8. Soil. Fill the boxes with soil and you are ready to plant.

3. Stacked pallet planter box

stacked pallet planter box

This planter looks like a star when viewed from above. Image credit: @dont_buy_it_make_it

This use of pallets requires skilled carpentry. You will make 5 boxes, sequentially smaller in size, which then fit one on top of each other to make a planter. The corners of the boxes almost look like a star shape when seen from a bedroom or above, so this planter will look excellent from many viewpoints in a garden.

This type of upcycled planter looks great on a lawn or patio and you can use different soil in each planter box, enabling you to combine plants that would not normally grow so well together. Try placing heather, which needs more acid soil, next to flowering alyssum, pansies, petunias, or busy Lizzies, which prefer a more neutral soil PH.

To make this box:

Decide on the size of the biggest box first, then cut the planks to suit. Assemble 4 planks in a box shape so that you can see the size as you progress to box number 2 and so on.

Make the boxes by nailing the corners together. If you want to use planks for the base as well, save the offcuts for this purpose and fix them to the base of the box.

Drainage. If you use wood for the base, you need to allow for some drainage. Drill several holes in each box base. The largest planter box will rest on soil so this may not need a base.

Place the largest box on the lawn or in the location. Don’t fill this with soil just yet, if you are planning to decorate but you can add bricks, some pebbles, gravel, or sand in the centre, as this will be covered by another planter box. Adding these will also help drainage.

Assembly. Place box 2 at right-angles on top of the first box. Continue to add boxes sequentially and at right angles to the previous one, remembering to add some pebbles in the centre of the boxes except the highest one, which will be full of soil.

Stability. Secure each box to the one below with nails if it feels unstable. The weight of the soil normally keeps the shape in place. Now the planter box is assembled, you can decide if you are happy with the natural look of the pallet or if you prefer to add a stain, oil, or varnish.

What will you plant? If you’re planting herbs or other edible plants you’ll need to use a suitable stain, varnish, or paint for the planter. Try tung oil, raw linseed oil, hemp oil, or an eco-friendly wood stain. If the flowers are purely decorative, then you don’t need to worry too much.

You might like: What is the best wood for a planter box?

4. Four pallet upright cube planter

four pallet upright cube planter

You’ll need a lot of soil to fill this pallet planter! Image credit: Sandy Jensen

If you have several pallets and lots of space, you can stand 4 pallets vertically to make a cube planter. This makes a stunning centrepiece on any lawn and will be the envy of your dinner guests! It can also encourage discussion about sustainable wood and the value of recycling and upcycling.

This will be a large planter and it needs to be secure so that your strimmer or lawnmower doesn’t damage it once assembled.

Sand down each of the pallets and stand them vertically. Then attach the corners of each pallet together with nails.

Fill the base of the pallet planter with leftover stones or bricks because a planter this size will hold a lot of compost! This planter is a good size for a tree which would benefit from the added drainage the pebbles will bring. Most pallets have been pressure treated, so wood rot shouldn’t be much of an issue.

Read more: How to fill a wooden planter box

Top up with some garden soil and compost and the planter is perfect for a big shrub or even tree. A yucca plant would look amazing in something this deep and it will grow to fit the available space. A small maple would add dazzling autumnal colour too.

If you want to add flowers to the outside of this cube planter, then make a shelf for flower pots along the outside. Add a plank of wood in the space under one of the horizontal planks, and nail it in securely. Once a shelf is in place, you can add small annuals or succulents mixed with marigolds, petunias, etc. The great thing about this type of planter is that you can vary the soil in each pot.

Childhood beach mementos. These shelves can also be filled with decorative stones that little ones collect from every beach they’ve visited or as a useful storage space for small garden toys.

5. Single pallet herb garden

single pallet herb garden

Create a pallet herb garden. Image credit: @hayloft_to_home_xx

Have you got a warm, south-facing wall? Transform a pallet into a herb garden. Pallets are practically ready-made plant holders, just add a plank to the base of the horizontal supports and fill with herbs to create a rustic, countryside feel in your back garden. You could paint the name of each herb on the pallet if you’re feeling artistic! Hang the pallet up or lean it against a wall and enjoy the aroma and taste of fresh herbs all summer.

6. Horizontal pallet planter with tea holder

If you’re a gardener, my guess is that you make frequent cups of tea to refresh you while you are out and about in your garden. This pallet idea gives you both a new planter and a solid mug holder!

7. Segmented pallet planter box 

segmented pallet planter box

Grow plants with differing soil needs together. Image credit: @1001pallets

If you have plants that each require different soils, then using a pallet to separate them works really well. You can decorate the pallet so visitors notice the plants, not the recycled wood.

  1. Place the pallet on the ground and saw off planks 2, 4 and 6, allowing the remaining planks to be the border of your planter boxes.
  2. Fill in the gaps! Use the sawn wood to fill the spaces in the individual spaces so that each box is separated from its neighbour.
  3. These can now be painted, stained and varnished to suit your space. This will allow room for 6 different plants and you can put ericaceous soil in one to suit a blueberry and sandy soil in another for a succulent. Normal compost in another for herbs like basil and your new planter is full.

Plans for pallet planter boxes 

Here are some ideas to help you use your pallets as planter boxes.

https://www.wikihow.com/Build-a-Planter-Box-from-Pallets

https://www.youtube.com/watch?v=iV4lxbpEaAY

https://www.youtube.com/watch?v=iV4lxbpEaAY

Tina’s tips for your pallet box planters

  1. If you’re adding pots to your pallet planter shelves, don’t use really heavy plant pots such as earthenware pots. The extra weight may cause the wood to break.
  2. For super eco-friendly pots, make your own out of old plastic peanut butter containers or yoghurt pots. Simply drill a few holes in the base to aid the drainage. Use leftover waterproof paint from other DIY projects to decorate. Individual pots can be given to keen, young artists who may like to experiment with using handprints or shell shapes to paint around.
7 EASY PALLET PLANTER BOX IDEAS-min

Save this pin for later
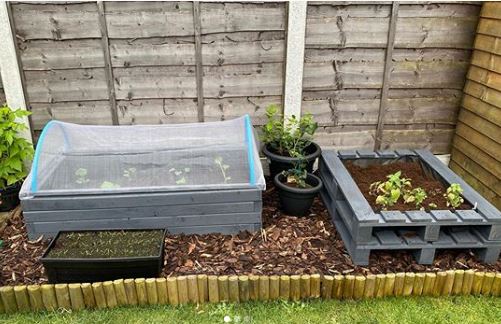
How to Make a DIY Pallet Planter: 5 Ideas Anyone Can Build

We’ve given you suggestions for making your own wooden, concrete, flower and vegetable planter boxes but what about repurposing a humble wooden pallet?

pallet planter box

Upcycle an old pallet into something beautiful. Image credit @paaaigesplants

Pallets are everywhere, in fact, there are more pallets in Europe than people! These ubiquitous storage structures are usually made from pine or oak, soft and hard woods, and sometimes a mixture of both.

Pallets are cheap and easy to get hold of, you’ve most likely taken delivery of paving slabs or building supplies that were attached to a pallet and there are almost always people trying to get rid of them on local social media pages and free ads.

Pallets are pretty robust structures as they’re designed to support heavy loads. Left untreated, they will last for around 5 years but if painted or varnished, you can extend their life for many more years. Let’s take a look at some easy DIY pallet planter box ideas:

How to make wooden planters from pallets

There are a few different pallet planter box ideas below and it’s handy to have the following tools to hand to build them.

What you will need

tools diy

Build up a trusty tool collection for all your DIY garden projects. Photo by Eugen Str on Unsplash

1. Wall-mounted pallet planter

Pallets are plant shelves waiting to happen and we love this simple wall-mounted, DIY pallet planter box. To make a similar planter, you’ll need one pallet.

You can cut an existing pallet down to fit your wall space if you don’t want to mount an entire pallet, they can be pretty heavy, especially when you add soil into the mix.

You can also lean a pallet against a wall or fence if you don’t want to drill any holes.

Wall-mounted pallet planter

Fill a colourful pallet wall planter with beautiful blooms. Image credit: @holyislandgin

If you turn your pallet over, you’ll see there are usually 3 supporting batons underneath, you can use these to create your planter troughs or, if you want more shelves, you can turn the pallet the other way round, removing any planks you don’t need.

Now is the time to paint or stain your pallet, try choosing a colour to match existing furniture, go bright or paint it a bold, dark colour to stand out against a fence.

If you’re using the supporting batons to make your planting troughs. All you need to do is cut a length of weed membrane that’s the same width as your pallet and just over 4 times the depth of the plank.

Fold the weed membrane fabric in half and simply staple the top of one edge along the inside length of the pallet baton. Do exactly the same on the other side so you’re left with a hanging fabric base in which you will place your plants.

If you want more than 3 shelves, you’ll need to nail the planks you’ve removed from the front of the pallet to the back, taking care to line them up. No one wants a wonky shelf! You can nail the planks into the supporting batons. Create your fabric trough liners in the same way as above.

Here’s a handy tutorial that shows you how to make a pallet wood planter box.

2. Pallet box planter

Pallet box planter

Image credit: @pinebarrenpalletworks

This beautiful pallet planter wouldn’t look out of place in a modern, urban garden. With its clean lines and neat boxes, it just needs some striking palms and trailing plants to bring it to life.

You can make a similar pallet panel by turning a large pallet sideways, carefully removing all the planks and then nailing them closely together. You may need to get hold of some additional planks if you don’t have any spare pallets to hand. When done, sand it thoroughly to remove any staining, paint and splinters. Try varnishing the pallet or use an exterior wood dye to achieve the finish you’d like.

You can use spare pallet planks to make the small pallet planter boxes. Cut a length for the bottom of the box and cut 4 sides to fit. Glue the pieces in place and add nails when the glue has set for extra stability. Sand the boxes to remove any sharp edges or splinters, then screw the boxes onto the pallet panel.

3. Pallet herb planter box

Pallet herb planter box

Create a useful herb planter box from pallets. Image credit: @allie_wilson_home

Another clever vertical pallet planter idea, we love this dark pallet with painted herb names. The pallet’s supporting batons have been turned into shelves to hold potted herbs.

Use a pallet plank or wood offcut to make a base for the pots to sit in. You can simply nail this to the bottom of the pallet’s supporting batons. Don’t forget to line the base of the pallet shelf with plastic to stop it from rotting.

4. Trough pallet planter

Trough pallet planter

This wooden pallet planter box looks gorgeous filled with cottage garden flowers. Image credit: @amagardener

For a more rustic take on a pallet wood planter box, you can create a trough planter.

You’ll need to break a pallet apart to make this planter so have your crowbar at the ready! The size of the planter box you can make will depend on the size and amount of pallets you have.

Here’s a handy guide to building a DIY pallet planter, along with useful pallet planter box plans to help you visualise exactly what you need to do.

5. Easy Pallet Planter

This sweet pallet planter is a great starting point if you’re new to DIY.

It was created by chopping a pallet down, fixing the two sides to each other with pallet offcuts and nailing spare planks over the gaps between the pallet planks on each side.

Easy Pallet Planter

Image credit: @kiwimummycowgirl

Plastic lining can then be stapled to the inside of the planter to form the bottom of your planter, or you can nail extra planks to the bottom if you prefer a sturdier base.

Don’t forget to paint your pallet planter or leave it a natural colour for a more rustic look.

When you’ve created your wood pallet planter box, take a look at some other garden pallet projects that you can get stuck into. You could kit out your whole garden in stylish, inexpensive and easy to make pallet furniture!

HOW TO MAKE A DIY PALLET PLANTER 5 IDEAS ANYONE CAN BUILD-min

Save this pin for later

How to Make a Simple DIY Pallet Gazebo for Cheap

If you have a green patch in your garden, it would be a shame to let it go to waste. You can, of course, plant flowers or vegetables there, but wouldn’t it be great to also have a place to sit and enjoy a bit of fresh air?

A gazebo can be a smart addition to your garden. At first glance, it may seem like a big expense. But with moderate carpentry skills and some pallets, you can build a gazebo without headaches—and enjoy the whole experience.

Why pallets? They’re inexpensive, easy to find, and putting them together won’t take much time either.

So, where do you start?

How to build a gazebo out of pallets step by step

To build a gazebo from pallets, you’ll need—in addition to the pallets—some extra lumber and some shingles.

Pallets are perfect for building the gazebo deck, but they’re not suitable for the whole structure. You will have to get wooden beams for the posts.

This is what you’ll need to build a square gazebo, which is also the easiest model. You can put it up in less than a day.

Materials you’ll need:

Tools you’ll need:

Now let’s take things one step at a time.

Step 1 – Find the right spot

Before you get to work, you need to prepare the spot. Don’t place your gazebo in a spot that gets too much direct sunlight as you’ll likely find it too hot inside. UV radiation will also damage the wood before long.

Don’t forget about the view either—aim for a good one. It would be great if you have some shrubbery in the vicinity so you can also create a sense of privacy.

The most important part, though, is that you choose a flat surface. Uneven terrain will make building a gazebo much harder.

Finally, measure the surface area of your chosen spot and see if it would fit a decent-sized gazebo. Will you have to clear some space around it and maybe sacrifice some plants?

We say go for it as a gazebo is a good long-term investment. Just try not to upset the whole garden in the process.

Step 2 – Gather the pallets

stack of wooden pallets

It’s easy to source free pallets for an inexpensive DIY gazebo. Credit: Shutterstock

Where can you find pallets? You’ll have to ask around, mostly at large department stores in your area. Many of them have stacks of pallets that are not reusable and they frankly don’t know what to do with them.

They probably won’t pay you to take them off their hands, but they might be nice enough to deliver them to your door. Otherwise, you’ll have to find someone who can deliver them to your home.

Tip: Take as many pallets as you can. Some might be broken or have various defects, and you don’t want to run out of usable materials. Plus, you can use them later for other DIY pallet projects around the house.

Step 3 – Build the gazebo deck out of pallets

Examine the pallets and select those that look in the best shape and don’t require much cleaning. Depending on the size of the pallets, lie them on the ground and make a square shape out of them.

Important: The sides of the square should be smaller than the lengths of the rim joists you bought.

Once you’re satisfied with the shape and size of the deck, screw the pallets together.

If there’s too much space between the planks in the pallets, you’ll want to add an extra layer to your deck. You can do this by cutting planks out of the rest of the pallets.

Once again, you’ll have to fit them over the deck area, making sure it’s completely covered and there are no gaps. Nail the planks to the pallets underneath.

Step 4 – Put up the support posts

The four posts that support the roof go at the corners of the deck. You’ll have to anchor the posts so the whole structure can withstand strong winds.

The best way to do that is to dig holes at the four corners of the deck, place the posts inside, and pour some concrete to fill the holes.

At this point, you may need some help to plumb the posts and check that they are perfectly perpendicular before the concrete starts to dry. You will attach the posts to the decking later.

Important: You’ll need to allow 12-24 hours for the concrete to be perfectly dry. So you might as well take a break and start planning the upper part of the gazebo.

Step 5 – Build joist and banisters

This is the part where you get to show how creative you can be. Examine the pallets you have left and identify the parts that would look best as joists.

For that, you’ll have to break some pallets apart. Make sure all the parts are the same height.

Use screws to attach the joists to the deck. If the upper part looks good enough, you can do without banisters.

Step 6 – Build the roof

Remember the beams you bought for joists? Measure one side of the square and cut the beams to measure. Fix the rim joists on top of the support posts, using galvanised screws.

You have two options for the roof. You can make it flat if you want to be done quickly. Or you can build a real roof, a slanted one, which is better as it allows the rainwater to drain fast.

You can use parts taken from the pallets for this purpose. Or you can have four beams that go from each corner and attach to a central wood piece.

Normally, gazebo roofs are made with plywood boards, but spare planks from the pallets can be used just as well.

Nail the planks to the roof beams making sure there are no gaps. Cover the planks with tar paper and then you can do the shingling.

Your gazebo is now ready.

Some extra tips for building an amazing gazebo from pallets

Here are some ideas to make your new pallet gazebo not just good but great.

In the end, building a gazebo from pallets can transform your garden and keep your hands busy in a good way. So go ahead and do it. Also, check out our full list of gazebo ideas to add comfort to your garden.

HOW TO MAKE A SIMPLE DIY PALLET GAZEBO FOR CHEAP

Save this pin for later

26 DIY Pallet Garden Ideas of Things to Make With Pallets

It really makes me very happy that gardens in the UK are slowly moving away from perfect lawns and manicured flower beds. Although I love the symmetry and order of French gardens and Italian gardens, there’s a rustic charm that comes with slightly chaotic cottage gardens and vintage decor.

As gardeners embrace a “looser” style to their gardens, we’re also seeing a trend for unique, handmade furniture – often the result of DIY projects. What’s the best material for these rough-and-ready builds? Well, more often than not, it’s the humble pallet.

There are several reasons why DIY garden pallet projects are popular. First, there are an abundance of pallets – millions of them are used every year in retail and shipping – so they’re easy and cheap to get hold of. Because they’re designed for transporting heavy goods, pallets are also really robust, and come in practical proportions. You don’t need to worry so much about measuring when your materials are already standardised!

Finally, there’s the aesthetic that pallets can bring to a garden. Old pallets come in fantastic, pre-weathered wood with a beautiful patina, instantly creating a charm and homeliness. Even if you source relatively new pallets, they come as a perfect blank slate, ready to be painted or sculpted however you need. The result is a beautiful piece of pallet furniture that’s totally unique and bespoke to your garden.

So, ready to save some pallets from landfill and start getting creative with some bespoke, DIY garden pallet projects?

DIY Pallet Garden Planters

Using old pallets to build raised garden planters is one of the most popular upcycling garden projects. However, there are all kinds of pallet furniture ideas for displaying plants. Pallets are typically made from sturdy, weather-resistant wood, and come in uniform sizes, making them pretty much the perfect material for DIY. Plus, they’ll age beautifully.

1. Raised Bed

Here’s what a classic raised planter made from a reused pallet looks like. Fresh, functional, and especially attractive when combined with contrasting shapes and colours, like the pebble border and the round pots on either side.

2. Leaning pot holder

Leaning a pallet against a wall is an easy way to create a low-cost, rustic plant stand. This idea is particularly useful if you’re renting (and don’t want to drill permanent shelves anywhere), or need ways to squeeze extra greenery into a small garden.

3. Rugged pot holder

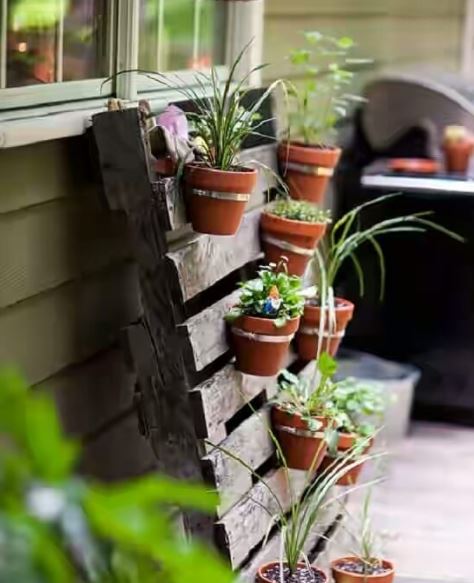
Like the rugged look of an unpainted pallet? Me too! There’s nothing wrong with leaving your wood pallet raw and exposed. To emphasise the old wood, stick to simple plant pots – like this collection of terracotta.

4. Vegetable patch

When you’re organising a limited planting space – particularly a vegetable patch – adding a bit of height can help you keep things separate. In this kitchen garden, pallets have been used to create an area to grow catnip, away from the other veggies. It’ll help you keep track of what’s what!

5. Plant pot tower

Here’s a different way that you can use deconstructed pallets to display your plants, that needs just two strong hooks in your wall. Take a flat section of the pallet and screw your pots or planters directly to the wood. Then use two loops of rope to hang the pallet to the wall hooks, adding more sections below if you have more plants.

6. Hanging basket holder

DIY garden pallet ideas using salvaged pallets on the wall as plant racks

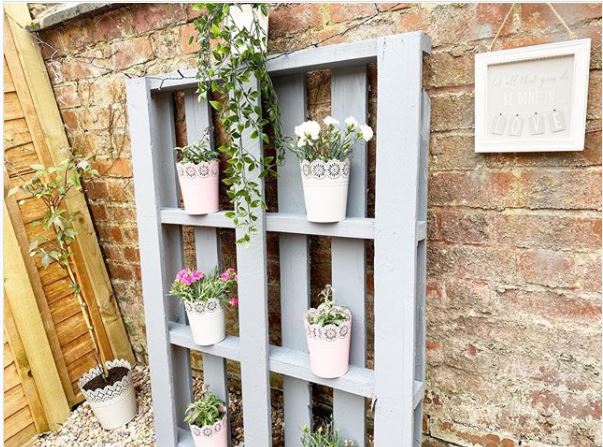
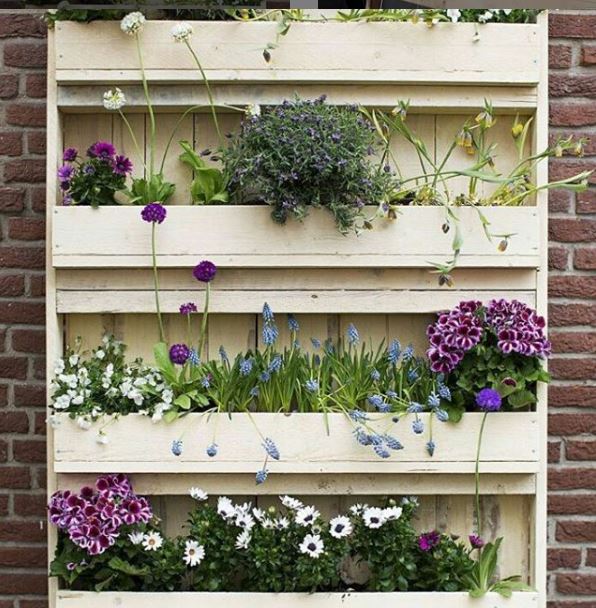
Why use part of a pallet when you could use the whole thing? On this rustic wall with exposed brick, pallets have been painted white and fixed to the wall as a support for flower boxes. I like how hanging baskets have been added to the bottom, giving the whole display extra dimension.

7. Wall mounted pot holder

Okay, I can’t even pretend that this isn’t just another version of the same thing – a whole pallet, on a wall, filled with flowers. I’m just obsessed with how pretty this one is! One thing to think about is that herbs grow particularly well in small spaces, so if you like growing things you can use in the kitchen, a pallet garden like this is a good choice for that.

DIY Pallet Garden Furniture

Building seats and benches from recycled pallets is a fantastic project for DIY beginners. As you’ll see in this section, lots of designs don’t actually need to you to disassemble the pallets at all, and you can focus on securing them together, giving them a lick of paint and adding accessories.

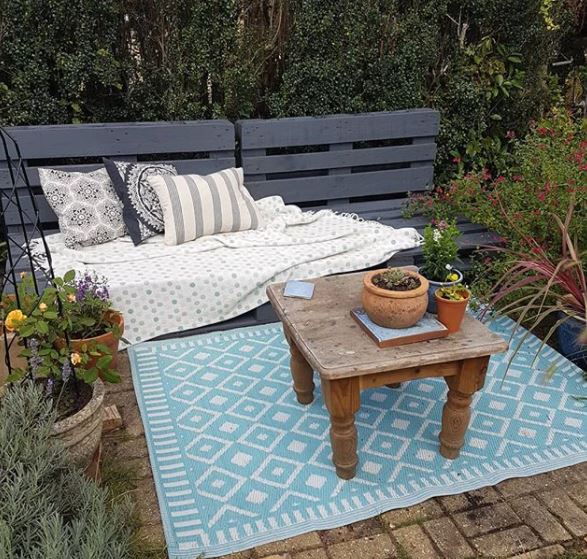
8. Pallet Bench

A set like this is incredibly simple to make, with each section needing two pallets for the base, and one for the back. By painting the bench grey, it blends in with the background and gives the spotlight to the pretty blanket and outdoor rug.

9. Balcony seating

If you’re dealing with pallets in slightly different colours, painting everything a uniform shade – like this modern grey – will tie your furniture set together. Add seat cushions in the same shade, and stick to a pared-back colour scheme for your other decorative elements. This balcony/roof terrace area looks cosy and chic with its monochrome palette.

Need some extra outdoor storage? You could use the gaps between the slats to hold drawers, like the bench on this balcony. They’re not exactly going to replace your shed, but if you only need to store some small gardening tools and seedling trays, they’ll do nicely.

10. Outdoor furniture set

As you can see, this furniture set is made completely from pallets. I particularly like the practical features here – casters on the coffee table so you can move it around, and hinges on the stool cushions so they can be used as storage. The deep blue cushions look luxurious and inviting, too!

11. Garden Swing

I always think a hanging chair or swinging bench adds so much personality to a garden. I love egg-shaped hanging seats, but I’m even more impressed by this DIY swing bench! It looks like it still needs a coating and some cushions though – we’ve got a whole post with ideas about styling hanging garden chairs, if you’re interested.

12. Sofa Set

I am very inspired by this set of pallet sofas with matching coffee table. The stain makes the set look really sophisticated and professional, and I love the way the table has room for a plant, lantern or other pieces of garden decor in the middle.

It actually looks like the table and stools are made from reclaimed crates – perfect if you can’t find enough pallets to build everything you need.

13. Bench planter

These multi-purpose pallet benches are ideal for a mixed-use garden. It looks like they’re being used as both plant displays and seats – although a quick shuffle around could quickly transform them into a serving surface for that garden BBQ area.

If you use your garden for different activities across the seasons, it’s often best to keep your furniture simple.

14. Pallet daybed

Turn a couple of pallets into a breezy cabana by adding a couple of branches or poles, a wide piece of fabric and a squashy pillow. It’s an easy way to upgrade your pallet furniture for summer, and can easily be removed again for winter.

DIY Pallet Garden Accessories

There are almost too many DIY garden pallet projects to choose from, but if you want something more unusual than planters or seating, here are a few pallet ideas that will definitely wow your garden guests.

15. Coffee table

Need a table to go with your garden chairs made from pallets? Well, this one might not be the one, because you’d never guess it was a pallet in its former life! The paint work really adds a punch of personality too, proving the pallets don’t have to always look rustic and rugged. Get the guide to making this from manomano.co.uk.

16. Bin storage

Fed up of your wheelie bins spoiling the beauty of your garden? Building some bin storage is the way to get your aesthetic back. If there’s a particular nook in your garden that you want to transfer into bin storage, a DIY build will enable you to get the measurements exactly right.

This bin storage and log store actually looks incredibly cute!

17. Mini greenhouse

This mini greenhouse made from pallets is a rewarding project for anyone with a green thumb. The hinged front makes it easy to reach in and access your seedlings, while the small footprint means it’s ideal for snatching sliver of sun in even the smallest of gardens.

18. Garden caddy

DIY garden pallet projects for making a garden caddy for carrying plants and tools

Maybe you’ve already got a full-sized greenhouse, but feel like you’re forever taking stuff in and out. Save yourself some effort with this big garden caddy, made from – you guessed it – pallets. This two-level monster will help you cart plants, compost and gardening tools to wherever they need to go. Of course, you could make yours smaller if you need!

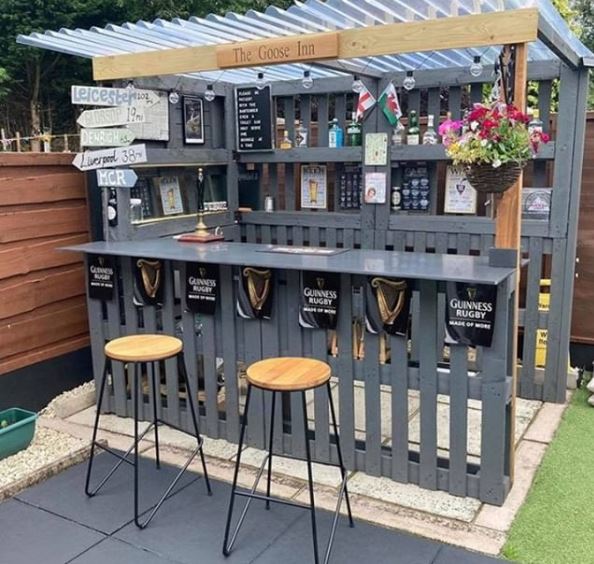
19. Garden bar

The summer of 2020 saw a huge surge in garden bars and home pubs. Building your own bar out of pallets is a fun DIY project and a low-cost commitment, but can look fantastic. Just a few homey touches transform this garden corner into a sophisticated space for summer drinks – check out our page of garden bar ideas to see heaps more ways you can build a bar from pallets.

20. Stand out garden bar

If you like the idea of a garden bar, but don’t want to scare your neighbours with a whole stand dedicated to drinking, how about something on a smaller scale… Like this fold-out bar with a door that doubles as a table? All you need is a couple of bar stools and to keep it stocked!

21. Shed shelf

Pallets are also useful shelves for man-caves and she-sheds. They’re perfect for holding just a few things without encouraging clutter. If you’re trying to make a garden room cosy, just add a few candles, a vase filled with battery-powered fairy lights, and a bottle with some glasses for the occasional nightcap.

22. Fencing

a vegetable patch and flower beds fenced in with pallets painted white

Is one area of your garden particularly precious? Pallet fencing looks friendly and pretty, but will keep boisterous pets or curious kids out of a tender vegetable patch or away from toxic blooms. I really like how this fence has used the depth of the pallets and flower boxes, too!

23. Fence planter

Here’s another example of DIY garden pallet projects that can be used as both planters and fencing. This style would give you a bit more privacy, and would work well as a divider in a long garden, or as one side of a pergola.

24. Bug hotel

A small stack of pallets is perfect for building a large-scale bug hotel, if you have the room. Fill the gaps with various organic materials, like tiles, hay, pinecones and pebbles to create a home for nesting insects. Take a look at more garden bug hotels for ideas.

25. Compost bin dividers

Interested in DIY garden pallet projects that are about sustainability? You can use pallets to create dividers for a garden compost heap and keep your compost pile contained. It’s cheaper than buying a standalone compost container, although you will have to turn your compost manually. Not sure what that means? Our guide to composting has all the tips you need.

26. Garden walkway

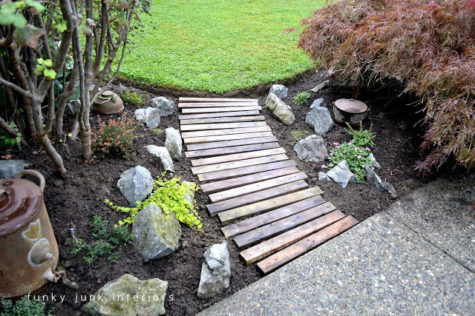
You don’t necessarily need to build anything to make the most of pallets in your garden – sometimes, taking the pallet apart is enough! I think this wooden walkway looks fantastic, and would be right at home in an enchanted garden, or even a minimalist, Japanese-style garden. What do you think?

26 DIY PALLET GARDEN IDEAS OF THINGS TO MAKE WITH PALLETS-min

Save this pin for later
19 Robot Lawn Mower Garage Ideas to House Your Grass Pet

If you’ve decided to buy an all-singing, all-cutting robotic mower for your garden, you’re not alone. These handy garden gadgets have skyrocketed in popularity, putting the chore of the weekly mow firmly on the back burner.

Robotic mowers aren’t cheap, but they are practical. They work by cutting the grass little and often, keeping to the area within the preset boundary. Robot mowers work at low speeds and have collision sensors so they’re safe for use with children and pets and, as they cut frequently, the short grass clippings act as a convenient fertiliser for the lawn.

Robotic mowers come with a charging station which they are programmed to return to when the battery runs low. It’s usually a flat piece of plastic which is permanently connected to mains power and located in a shady spot on the grass.

Although robotic mowers are tough, they aren’t completely immune to the effects of the elements and extreme weather conditions could be damaging. Keep reading to see why it’s a good idea to cover your robotic mower and discover 19 innovative robot lawn mower garage ideas.

Do you really need an automower garage?

We all know that the Great British weather can be changeable, from super hot summer days to pelting winter rain, your robotic mower will endure heat, regular soakings and freezing temperatures.

While robotic mowers are designed to be sturdy, it’s a good idea to protect your mower from weather extremes when it’s docked in the charging station.

Providing a garage for your robotic lawn mower is a great way to:

If you don’t fancy buying a garage for your mower, you can easily build your own! From robot mower garages that match your home to creatively hidden caverns, there are many options for protecting your precious robot mower.

Best robotic lawn mower garage ideas

Robotic mowers will stay in their charging station when they aren’t mowing. The docking station needs to be placed on a flat, grassy surface that’s level with the lawn and it needs to be fairly central.

This means that your robotic mower garage will be quite visible, so it’s worth building (or buying) a mower garage that fits in with your garden and your style. Here’s a list of 19 robot garage ideas to inspire you:

1. Garden Lawnmower Shed

Garden Lawnmower Shed

Source: amazon

Match your mower garage to your garden shed with this miniature robot mower house. It’s made from galvanised steel so will be well-equipped to deal with just about everything the weather throws at it.

2. Sleek Mower Shelter

Sleek Mower Shelter

Source: amazon

This curved steel robot mower shelter is perfect for contemporary gardens. Robotic mowers and their charging stations are fairly sizeable, so if you’re going to purchase a cover for your mower, the more stylish, the better!

3. Minimalist Robot Mower Shelter

Minimalist Robot Mower Shelter

Source: amazon

If you’re keen to protect your new robotic mower but don’t want a large shed-like shelter, this simple metal and PVC cover is perfect for protecting your mower from the rain, hail and snow in a subtler way. We think it looks pretty slick too!

4. Plastic Robotic Mower House

Plastic Robotic Mower House

Source: amazon

Robotic mower houses can be expensive, so a plastic mower house is a good option if you’re on a budget. Plastic garages are perfect for all weather conditions, they provide valuable shade and most have roofs that tilt so you can easily access the docking station as needed.

5. Gabion Lawn Mower Garage with Raised Bed

Gabion Lawn Mower Garage with Raised Bed

Source: suavehome

This is one of the most aesthetically pleasing mower sheds we’ve come across. Fill the wire cage with rocks, stones or beach pebbles and plant the top with pretty flowers or herbs for an environmentally friendly addition to your garden.

6. Wooden Planter Lawnmower Garage

Wooden Lawnmower Garage

Credit: Wayfair

Perfect for hiding your lawnmower when not in use and blending seamlessly in with your garden, this clever wooden planter garage is a must-have for budding gardeners. Add plenty of trailing plants for extra camouflage.

7. Simple Wooden Lawnmower Garage

Simple Wooden Lawnmower Garage

Credit: Wayfair

Whether you’re on a budget after splurging on a robotic lawnmower or just fancy a simple style of robot garage, this slatted wooden garage is a great buy. You can easily paint or stain the wood to prolong the life of the garage, and it’s easy to move it and access the docking station if needed.

8. Canopy-style Robot Mower Shelter

Canopy-style Robot Mower Shelter

Source: amazon

Simple and stylish, canopy robot mower shelters are cheaper than full-sided options but they still offer a good degree of shelter and shade. 

9. Robotic Mower Garage with Automatic Door

Robotic Mower Garage with Automatic Door

Source: amazon

For the ultimate in luxurious robot mower housing, this beautifully designed mower garage includes an automatic door and increased airflow to prevent a robotic mower from overheating. Your mower may just have a fancier garage than your car!

10. Green Roofed Robot Mower Home

Green-Roofed-Robot-Mower-Home

Image credit: Pinterest

Help your robotic mower to blend in with its surroundings using a clever shelter with a green roof. As handy as they are, the colour and sleek style of robot mowers can mean they jar with the softer garden landscape and not everyone wants a mower garage to be the focal point of their garden.

Plant the roof with mosses, succulents like houseleeks and sedum, grasses, sweet-smelling herbs and wildflowers.

11. Dual-Purpose Robot Mower Garage

Dual-Purpose Robot Mower Garage

Image credit: @peikhellyhansen

Taking the DIY robot mower garage to new levels, this ingenious and great-looking firewood store has been built to include a miniature mower garage. It’s an excellent use of space and a great solution for effectively hiding the mower when not in use.

12. Robotic Mower Garage with Curtains

Robotic Mower Garage with Curtains

Image credit: @lawncarewithmike

If you’d like to add an extra layer of protection to a wooden robot garage, whether it’s a purchased or homemade version, fixing plastic curtains to the entrance is a low-cost and effective solution that won’t interfere with the mower’s return to its charging station.

13. Personalised Robot Mower Shed

Personalised Robot Mower Shed

Image credit: Pinterest

If you see your robotic mower as more of a pet than a garden machine, why not personalise its garage? You could have a sign engraved or paint your own for the perfect finishing touch. 

14. Gazebo-Style Robot Lawn Mower Garage

Gazebo-Style Robot Lawn Mower Garage

Image credit: Pinterest

An excellent idea if you don’t want a robot lawn mower garage to dominate the garden is to create a shelter that’s partially enclosed. Take inspiration from garden gazebos and create a miniature version for your robot mower. It’s perfect for creating shade and shelter and you could even decorate it with some twinkling fairy lights!

15. Brick Robot Mower Garage

Brick Robot Mower Garage

Image credit: Pinterest

Create a sturdy, permanent garage structure for your robotic lawn mower with a brick-built garage and metal roof. You won’t need to worry about rotting, warping or maintaining this shed and it will shrug off the worst of the weather with ease.

16. Reclaimed Pallet Robot Mower Garage

Reclaimed Pallet Robot Mower Garage

Image credit: Pinterest

Pallets are one of the best sources of free or inexpensive hardwood. You can repurpose wooden pallets to create decking, planters, gazebos, garden furniture and, of course, robotic lawnmower garages.

17. Slate Roofed Lawnmower Garage

Slate Roofed Lawnmower Garage

Image credit: Pinterest

If you’re feeling creative or want to hone your roofing skills, adding a rustic slate roof to your robotic lawnmower garage is a great option. Slate is a beautiful natural stone and it’s extremely durable, you’ll often see it on the roofs of houses in Cornwall and Wales and it’s a good solution if you want to create a garage for your lawnmower that will blend in with its surroundings.

18. Bespoke Robot Lawnmower Garage

Bespoke Robot Lawnmower Garage

Image credit: @burgers44

Create a unique lawnmower garage by designing your own. You can build a grand design or find a talented craftsman to bring your vision to life. 

19. Custom-Made Lawnmower Garage

Custom-Made Lawnmower Garage

Image credit: @mowergarage

If the other designs in our list just don’t cut it, how about having a bespoke, miniature garage built for you? Crafted with meticulous attention to detail, including scaled down gutters and elaborate windows, this is one robot mower garage that you won’t want to fade into the surroundings.

FAQs

Do robot mowers need a garage?

It’s not a necessity, but to prolong the life of your robot mower and protect it from the elements, a robot garage is recommended. The garage can be fully enclosed with an automatic door, or be a simple, gazebo-style unit to protect the mower from the sun and the worst of the rain.

Can I make my own robot mower garage?

Yes, you can! You can opt for a simple DIY garage or get really creative and build a robot garage to match your home or shed. It’s an excellent project for a novice DIY-er and you can get plenty of inspiration from this article.

26 Privacy Fence Ideas to Keep Unwanted Eyes Away From Your Space

There’s nothing like sitting back and relaxing in your garden, that is until… the head of your friendly neighbour pops over the fence. No one wants to be overlooked in their outdoor space and fortunately, there are many ways to create privacy.

Whether you’re looking for fence cover-up ideas, ways to add height to an existing fence or clever ways to use plants for privacy, we’ve put together a list of creative ideas to ensure you can sit back and unwind in private.

privacy fence ideas

Image credit: @flipcontractorsinc

Types of privacy fences

There are several different types of privacy fences to choose from. Traditional-style, tall wooden privacy fence panels are one of the most popular options. Constructed without any gaps, wooden fence panels are durable, attractive and perfect for privacy.

It’s worth bearing in mind that solid boundary fences shouldn’t be more than 2 metres high, for higher fences you’ll need planning permission. Natural privacy fences can be higher, so if you’re wanting to block out a neighbouring garden that’s on a higher level, this might be the way to go.

Although traditional fence panels are attractive, there are other ways to stop the neighbours from peering into your garden. In this article, we’re going to take a look at some more imaginative ways to create a secret garden hideaway.

Privacy Fence Ideas

If you’re overlooked in your garden or peered over on your patio, keep reading to discover how to create the perfect, secluded haven with imaginative privacy fencing.

Add height to an existing fence

If you’ve already got a fence in your garden but it’s a little on the low side. You can easily create some extra height. Here are some handy fence extension ideas:

1. Add trellis panels 

Trellis panels are an inexpensive, really effective and attractive way to make a fence higher. They’ll make a good screen as they are, but for extra privacy, you can grow climbing plants over them. Try sweetly-scented honeysuckle or vigorous clematis for pretty coverage, you can also buy evergreen varieties of these plants.

trellis pannels

Image credit: @stevebeamhandyman

2. Use fence post extenders

If your fence has support posts, you can extend them with purpose-built post extenders or attach taller wooden posts to which you can affix trellis, wire or small fence panels.

3. Fit trellis wire

An inexpensive and easy way to add height to a fence is to insert tall bamboo canes or small stakes into the ground directly in front of the fence and string trellis wire across them. You can then grow plants up the fence and along the wire. Jasmine, honeysuckle, wisteria and grapevines are all good, fast-growing options that are perfect for adding privacy to a fence.

4. Attach composite or metal fence screening panels

An attractive alternative to wooden trellis or fence panels is composite screen panels. You can purchase these in a range of different designs and sizes. The main advantage is that, unlike wood, they’ll resist damage from sun, rain and frost.

metal fence screening panels

Image credit: @ladylandscape

5. Affix reed screens

Reed or bamboo cane screens are made from natural materials and usually come on a roll. You can easily attach them to an existing fence by screwing or stapling them into place. 

bamboo cane screens

Image credit: @space_librarian2

6. Fix wooden privacy fence toppers

As the name suggests, fence toppers are specifically designed to sit on top of existing fences. You can choose from various wooden designs or opt for long-lasting metal railing toppers.

wooden privacy fence toppers

Image credit: Jacksons Fencing

Add height to a wall

If you have a low wall in your garden, you can easily extend its height to prevent prying eyes. 

7. Add fence panels

Probably the easiest way to add height to an existing wall is by fitting fence panels. Fence panels can be securely attached to the top of an existing wall for added privacy. You don’t have to stick to plain fence panels, attractive fence on top-of-wall ideas include slatted fence panels and durable composite panels.

fence panels

Image credit: @perfectionfence

8. Fit trellis or slatted panels

Just as you can add trellis panels to an existing fence, you can create extra height on a wall by fitting trellis or slatted panels. Trellis panels don’t have to be the traditional square lattice design, you can also buy attractive diamond pattern trellis, slatted trellis and stylish decking panels in a range of designs.

Privacy fence ideas with plants

One of the best and most beautiful ways to make a privacy screen in your garden is with foliage. Many climbing plants are vigorous growers and will ramble their way up a fence or trellis in a matter of weeks. Some types of clematis can climb over 20 feet in just one year!

There are so many benefits to adding plants to your garden. From helping to keep it cool on hot days, to providing shelter for living creatures, plants are an important part of every garden.

9. Create a green wall fence

Fence panels are easy to install, super practical and hard to beat in terms of privacy. However, if you live in an entirely fenced garden, it can feel a little stark. Green walls, also known as vertical gardens, consist of a series of planters fixed to a fence or wall that includes a mixture of plants. 

You can incorporate trailing plants like ivy and strawberries, introduce bright colours with lush green ferns and flowering plants like lobelia, fuchsias and busy Lizzies, and add fragrance with deliciously scented herbs.

green wall fence

Image credit: @atelie_raizes

10. Place plants on top of an existing fence

Another easy and effective way to create privacy with plants is to fix planter boxes along the top of your fence and grow plants like grasses, evergreen buxus or whatever you fancy.

You don’t have to buy expensive planter boxes, check out our handy article on building a plywood planter box.

plants on top of an existing fence

Image credit: @chlos_plants

11. Grow a living fence

Also known as hedgerows and fedges, living fences have been around for centuries. Usually constructed from plants like beech and willow, they won’t provide an instant privacy solution, but in a year or two, you’ll have a beautiful, natural fence that will easily outlast traditional fence panels. 

You can buy ready-woven fedges and starter kits or weave your own design. Living fences are also a great option for gardens that have irregular boundaries or aren’t level.

12. Plant pleached trees

Pleached trees are grown into a specific shape using a frame. These trees provide an excellent alternative to fence panels and can be planted in front of existing fences to add height. Photinia, laurel, magnolia, ash, beech and chestnut can all be pleached. You can pleach young trees yourself for a cheaper option, or buy ready-pleached specimens.

tall bamboo plants on fence

Image credit: @house_proud_dads

13. Use tall bamboo plants

One of the fastest-growing plants on earth, bamboo is a savvy choice for a speedy privacy solution. You can grow pots of bamboo in front of an existing fence to create an attractive screen. Please note that bamboo is an invasive plant so you’ll need to take care to restrict its roots. Plant bamboo in a sturdy container rather than straight into the ground.

bamboo plants privacy screen

Image credit: @inouttiling

14. Grow climbing plants up a fence

Most fences look better with a plant or two climbing up them. You can easily secure a climbing plant to a fence using wire or trellis panels.

Attractive climbers include wisteria (be warned, this beautiful vine is a super-fast grower!), jasmine, roses, honeysuckle, grapevine and clematis. You can also espalier fruit trees like apples and pears against a fence.

climbing plants up a fence

Image credit: @stefano.bonalume

Creative fence cover-up ideas

If your fence is a little shabby, or you just want to add interest and a little more privacy at the same time, here are some imaginative ways to cover up an existing fence:

15. Hang planters along your fence

A cheap and cheerful way to cover up a less-than-perfect fence is to cover it with beautiful flowering plants. You can use hanging baskets and flowerboxes to liven up a dull fence. Have a look at our What can I plant in a flowerbox article for some inspiration.

You can also make your own pallet planter boxes.

Hang planters along your fence

Image credit: @prettydomesticated

16. Use natural willow screening

Willow screens come on rolls for easy fitting and are perfect for covering up an ugly fence. You can also use them to create instant privacy if you’ve got open fencing, railings or a chicken wire fence dividing your garden from your neighbours.

natural willow screening

Image credit: @acottageforkeeps

17. Experiment with different coloured fencing

Bored with your fencing? Give it a lick of paint for an instant makeover. You can choose from a wide range of wood finishes to give your fencing a facelift. Dark colours look incredible next to foliage or go for light, bright shades if you want to create a sunny, Mediterranean-inspired garden.

different coloured fencing

Image credit: @molecule.designs

18. Hang fabric along a fence

Another way to quickly cover a fence that needs some TLC is to use fabric. Canvas shade sails or panels are sturdy and ideal for creating privacy.

DIY Privacy fence ideas

If you need to create some seclusion on a budget or just want a more original privacy screen, have a look at our creative DIY fence ideas:

19. Pallet fence

Wooden pallets are perfect for upcycling into fences. They’re usually made from good-quality wood and you should be able to get hold of them relatively easily. Left untreated, a pallet will last for around 5 years but you can easily extend this by using a suitable wood preservative.

pallet fence

Image credit: @the.plant.savers

There are many projects you can do with pallets, check the rest of our pallet garden ideas.

20. Multi-level privacy fence 

Fences don’t have to be straight and often, fencing on multi-levels can create a wonderful focal point. Consider using a combination of fence panels, raised beds with tall plants and trellis panels for maximum impact. 

Multi-level privacy fence

Image credit: @riverbendplanters

21. Willow hurdle fence

Natural willow hurdles are one of the most attractive fencing options but willow fence panels can also come with a hefty price tag. Consider weaving your own willow fence panels for a rewarding DIY project.

22. DIY trellis 

If you’re feeling creative, you can make your own trellis panels. This is a great idea if you want to create custom-sized pieces and you can also make trellis screens which you can move around as needed

Close up of peas growing up on a trellis

Simple string trellis

23. Privacy screen planter

If extending the height of your fence isn’t an option, you can use garden planters to create privacy. Free-standing planters can have a tall fence panel or trellis attached to the back of them, providing an instant privacy screen. 

Find out how to build a privacy screen planter here.

Privacy screen planter

Image credit: @thedavishome

24. Vertical planter wall

If you’ve got some wood and chicken wire to hand, you can build a custom-sized frame and attach the chicken wire to it, onto which you can hang planters, or grow climbing plants.

Vertical planter wall

Image credit: @balconygardenweb

 25. Pergola next to a fence

If it’s tricky to add height to an existing fence, you can build a freestanding pergola next to the fence, up which you can grow climbing plants. A pergola or a gazebo is a perfect privacy solution if you’re overlooked by neighbouring houses.

Pergola next to a fence

Image credit: @beaufordonthelane

26. Sleeper fencing

Versatile, tough and rustic there’s so much to love about railway sleepers. You can use them for many garden projects, but they make especially attractive fences.

Sleeper fencing

Image credit: @the.collected.home

FAQs

How to cover the fence for privacy?

There are many ways to cover a fence for more privacy. One of the most effective ways is to attach trellis panels and grow climbing plants up it.

You can also attach planter boxes to a fence or use willow or bamboo screens which are easy to fix.

How to make a fence taller for privacy?

You can extend the height of an existing fence by using fence toppers, extension posts and trellis panels.

How to get privacy in an overlooked garden?

If your garden is overlooked, one of the best ways to get privacy is by adding structures that you can grow climbing plants up and over. Pergolas and arches are excellent options. You can also use foliage to screen out any windows that might overlook your property which can be a common problem in newbuild developments.

Adding trellis or fence panels to existing fences and walls will give you adequate privacy and is a relatively inexpensive solution. 

32 Garden Decking Ideas to Transform Your Outdoors

If you don’t have an area of decking in your garden, chances are that you know someone who has. Decking is relatively inexpensive, super practical and easy to install yourself.

Whether used to level an uneven garden or extend your outdoor living space, laying decking is an effective way to transform your garden and make it more accessible.

If the idea of maintaining wooden decking has put you off, there are several different styles of composite decking to choose from. Often made from recycled plastics and natural wood fibres, composite decking is resistant to cracking, splitting, mildew and stains and best of all, it just needs a quick wash and brush up to keep it looking like new.

Garden Decking Ideas

We’ve put together a list of imaginative garden decking ideas to inspire you to take your garden to the next level.

Budget/low-cost decking ideas

If you’re keen to deck out your garden but worried about the cost, there are several ways to fit decking on a budget:

decked area has been built from pallets

This beautiful decked area has been built from pallets. Image credit: @honeysucklecottage26

Curved Decking Ideas

Decking doesn’t need to have straight edges and depending on how and where you are using it, giving your decking a curved edge can transform it from ordinary to outstanding.

Add curved decking around a pond

If you’ve got the space in your garden, creating a decked area that sweeps around a pond or pool will be a beautiful addition to your garden.

curved decking around a pond

Image credit: @applewhitegardendesign

Create a curved porch decking area

This super stylish porch incorporates a curved decking area that sets it apart from the rest.

Fit decking to the curve of a wall

If your garden is an unconventional shape, decking is a great solution. Follow the curve of a wall and fit decking right up to the edge for a professional finish.

decking to the curve of a wall

Image credit: @manche5tardecking

Make a curved sundeck

We love how this composite decking area has been built to incorporate a pergola and chairs and also fit around an existing paved area. Adding a curved edge to decking creates a stylish finish, add decking lights for extra impact.

curved sundeck

Image credit: @the_cabinologist

Create a winding decking path

Use decking to create an enchanting curved path in your garden. Whether it’s through a wild meadow or just on the grass, it will be a fantastic feature in your outdoor space.

winding decking path

Image credit: @cycling_photograph

Small garden decking ideas

All gardens will benefit from an area of decking or paving. A flat area provides a space to sit and relax, somewhere to fire up the barbecue, a safe place for children to play and, if you’re anything like me, somewhere to house all those plants.

If your garden is on the small side, you can still incorporate a functional decked area. Here are some ideas for more compact outdoor spaces:

Create a corner deck

Add interest to the corner of a garden with a mini deck. You can install a pergola for shelter and somewhere to grow climbing plants up. It’ll create a gorgeous focal point from the house and, if you have shelter, you’ll probably use it for most of the year. Keep reading for more corner decking ideas.

corner deck

Image credit: @ourclivedenhouse

Install courtyard decking

If you’ve got a courtyard garden, installing decking is a quick and easy way to smarten it up. Create a barbecue zone and add folding chairs and tables for the ultimate al-fresco dining experience.

courtyard decking

Image credit: @ovaeda_ltd

Build a decked hot tub area

You don’t need an enormous garden for a hot tub, they can be squeezed into the smallest of spaces. Create a luxurious spot in an awkward area of your garden by installing decking around a hot tub. 

decked hot tub area

Image credit: @hastemurray

Fit side return decking

If you live in an older house and have a long, narrow side return, this area can be completely transformed with decking. Lay decking boards or inexpensive deck tiles for an instant facelift.

side return decking

Image credit: @najmielondres

Designate a decked play area

If space is at a premium in your garden and you have children, consider building a small decked area for them to play on. It will create the perfect base for a playhouse and provide room for a small table or chairs.

decked play area

Image credit: @@stephanie.mifsud

Construct a decking gym

Probably inspired by lockdown home workouts, this ingenious decking gym is a great idea, especially if you don’t have a garage or any space for a gym in the house (and let’s face it, that’s most of us!). Just make sure that the cushioned area has a concrete base, you don’t want to be smashing through brand-new decking boards!

decking gym

Image credit: @hoben_uk

Sloping garden decking ideas

If your garden is a little wonky, you might be wondering whether or not you can install decking. The answer is a definite yes! Decking can be used to create various level areas in sloped gardens. It can also be used to create a balcony area and replace concrete steps at the back of the house. You can join different garden levels with decking steps too.

Put in decking steps

If you have a garden that’s been landscaped so it has one or more different levels, use decking steps to connect the different sections and help the garden flow.

decking steps

Image credit: @growingmyhome

Fit raised decking

A raised deck is the perfect solution for an uneven spot in the garden. Make the most of a neglected corner and install an area for entertaining, relaxing and soaking up the sun. We love the rope balustrades too, a more relaxed but equally stylish alternative to railings.

Introduce multi-level decking

If you don’t mind a bit of wood-staining and hate mowing the grass then this fully-decked garden might be for you. Terracing a sloping garden is an effective way to make the most of the space and it gives you plenty of room for tables, chairs and other garden furniture.

You can break up large areas of decking with outdoor rugs, well-positioned furniture and plenty of potted plants. Incorporate borders into your design if you can, so you can add as much greenery as possible. As well as providing visual interest and being beneficial to wildlife, greenery will help to cool your garden down in the summer and provide valuable shade.

multi-level decking

Image credit: @markthomas_carpentry

Corner decking ideas

Decking is usually installed at the rear or side of the house or at the end of the garden. You don’t need acres of space for a deck, a spare corner of your garden will do just fine. 

Build a simple corner deck

This simple decking stage makes the most of a corner of a garden. Add a bistro furniture set, pretty lights, some shade and a few plants and you’ll use this area of your garden like never before. This is an easy design to try if you’re keen to DIY your decking.

simple corner deck

Image credit: @tomdavi20

Create an alfresco dining corner

Resurrect a dull corner with a stylish corner deck. Painting the decking the same colour as the fence will help to create a coherent feel. Add a comfy corner sofa set and garden rugs for a space you’ll never want to leave!

alfresco dining corner

Image credit: @ifewithlisajane

Install corner seating

Seriously up the style stakes in your garden by fitting a contemporary decked seating area into a corner of the garden. Simple and sleek, this is a really effective way to transform your garden and it’s incredibly practical too. Finish the look with decking lighting strips.

corner seating

Image credit: @millboardflooring

Decking lighting ideas

So you’ve got the deck, now it’s time to make it shine with some well-chosen decking lights. Good garden lighting can make a huge difference to your garden. There are so many different lights to choose from and, unlike many things, the more lights, the better!

Recessed decking lights

These are the most common decking lights and installing them will add a gorgeous glow to your deck. Recessed lights can be added to wood or composite decking and they’re well worth putting in as they look so elegant. You can put lights along the edge of your decking, along the sides or both. Recessed lights look great when used on steps and decking seats too.

recessed decking lights

Image credit: @hospitalroadhouse

Rope lights

Try something different and string rope lights along the decking boards for an incredible glow-up.

rope lights

Image credit: @paulmullett

Colour-changing decking lights

Bring the party vibe to your decked area with fun colour-changing recessed lights. Add colourful fairy lights to surrounding fences and plants for extra sparkle.

colour-changing decking lights

Image credit: @life_at_number17

Grey and white decking garden ideas

Decking doesn’t have to be wood-coloured! If you’ve installed wooden decking, you can give it a coat of wood stain, and if you’ve opted for composite decking, this comes in a range of different colours and wood finishes.

Grey and white colour schemes are still bang on trend in gardens and interiors. Both are chic and fresh and look fantastic against green grass and plants.

Get the wow-factor with white decking

Thinking of going white in your garden? Although light-coloured decking might not be the most practical choice to put around a muddy vegetable garden, it can be a striking addition to your garden. Giving existing decking a fresh lick of paint is a great way to revive it.

white decking

Image credit: @carlyshomeideas

Refresh old decking with light wood stain

Upcycle tired decking with a fresh coat of white decking stain. Perfect for making small spaces seem bigger, going for a lighter colour will completely transform your decked zone.

old decking with light wood stain

Image credit: @my_mindful_home

Go for shades of grey decking

The love of all things grey is here to stay and it looks as fantastic on your decking as it does on your walls. Take your coordination to the next level and match garden sheds, fences and furniture to your decking.

shades of grey decking

Image credit: @kirstieathome

Opt for slate grey decking tiles

One of the most stylish decking options, decking tiles can be made from wood or composite. They’re easy to fit and look incredible. These tiles can easily be fitted over existing decking or other flat surfaces so they’re an extremely practical choice.

slate grey decking tiles

Image credit: @click_deck

Decking around swimming pool ideas

If you’re lucky enough to have a swimming pool, you’ll want to make sure that the area surrounding it is as practical, safe and attractive as it can be. Decking ticks all these boxes and although wood and water aren’t usually a great match, when treated properly, wood provides a smooth, warm and extremely durable surface.

Wooden decking is much nicer underfoot than concrete or stone and you’ll be thankful for it in case of any slips! It’s also a great option if you’re fitting flooring for a larger poolside area with a dining area, seating and space for sun loungers.

Raised pool decking

If your pool is above ground, creating a decked surround is a beautiful solution. Using the same material to surround the whole pool area creates a seamless look. The huge advantage of wooden decking is that it will go with concrete, ceramic, paving and just about everything else.

raised pool decking

Image credit: @custommade_timber

Above-ground pool decking

A chic solution to cladding an above-ground pool, decking fits in with any environment and is much easier on the eye than concrete or plastic.

above ground pool decking

Image credit: @galaxyhomerecreation

Natural decking for a wild pool

Step back from pristine composite deck boards and install wooden decking around a wild swimming pool for a look that blends in seamlessly with the natural environment.

natural decking for a wild pool

Image credit: @waterartisans

Decking can be a worthwhile investment for your garden. Whether you’re creating a compact corner deck or a large poolside area, there’s a decking style and material to suit every budget. Although composite decks are made from plastics, they can last for up to 30 years so it’s worth considering this option if the thought of maintaining real wood decking is too much.

Whatever decking you choose, rest assured that it will transform your garden patch and provide somewhere you can sit, relax and enjoy the great outdoors.

32 GARDEN DECKING IDEAS TO TRANSFORM YOUR OUTDOORS-min

Save this pin for later
12 Festival-themed Garden Party Ideas to Free Your Spirit

After the 2 year hiatus, festivals are well and truly back and they’re bigger and better than ever before. If you were lucky enough to bag a ticket to Glastonbury or one of the other fabulous festivals this year (we’re not jealous at all) you might be inspired to recreate the festival vibe in your garden this summer. If you missed out, consider planning your own fun festivities without the mud, queues and questionable toilets.

festival themed garden party ideas

Image credit: @canvas_and_peg

How to throw a festival party in your garden

Whether you’ve got a large field or a bijoux back garden, it’s possible to host a fabulous DIY festival party at home.

The beauty of planning a festival party is that there are no rules and almost anything goes! You can recreate your own summer festival with a central stage, themed tents and even circus acts. You could hire a local band to come and perform or invite musical friends to jam together. Not enough seats? No problem! Use bales of hay or straw for rustic, aesthetically pleasing seating.

And of course, the best thing about hosting a festival party in your garden is that you’ll have fresh water on tap, clean toilets (!) and the scrummiest food – no long queues for the burger van.

Festival-themed garden party ideas

Glitter and glow sticks at the ready? We’re here to arm you with creative ideas for throwing a festival-style garden party that Macca himself would be proud to attend.

1. Theme it

theme festival party idea

Backyard festivals are the best kind. Image credit: @a_stephens90

All great parties start with a plan and if you have a festival party in mind, it’s great to pick a theme for it. When you imagine a festival, live music and acres of mud probably spring to mind. It doesn’t have to be all about the music though, food festivals, religious festivals, art festivals and seasonal festivals are all fantastic ideas for a party. Factor in delicious food, fun drinks and plenty of party games and you’ve got the recipe for a perfect shindig.

Try celebrating with a summer-solstice festival, create a mini-Coachella, host a health and wellness party and go all out with festival-themed decorations to create a chilled-out feel in your garden.

2. Rustle up a festival feast 

rustle up a festival feast

Have fun with festival-friendly food. Image credit: @goballantyne

No party is complete without food and a festival-themed party is no exception! Take inspiration from food festivals like the Sausage and Cider, Foodies and Vegfest events when planning your food. Simple, easy-to-eat food like pizza, tacos, burgers and salads are always popular choices. 

Don’t fancy cooking? You could invite a pizza van or outside caterer, or ask friends to bring a plate of food each. 

If you don’t have lots of outdoor tables and chairs, you can create a boho-chic eating area from pallets. Stack a few on top of each other, cover with a cloth and place cushions on the floor for festival-style, laid-back dining.

For fun, festival-inspired drinks areas, you could create your own bar area, make a prosecco-pimping station with a variety of tempting mixers, and place cold drinks into ice-filled wheelbarrows or plastic camping wagons.

festival beverages

Be innovative with your beverages! Image credit: Pinterest

3. Get creative with DIY festival decorations

Decorating your garden for a festival-themed party needn’t be expensive, in fact, the boho theme lends itself perfectly to homemade accessories.

diy festival decorations

Get the festival feel with brilliant bunting. Image credit: @cornishtipis

festival photo backdrop

A flower wall makes a perfect festival photo backdrop. Image credit: @funnyflower_dekoracje

3. Glow up your garden

Great lighting is key to creating the right ambience for a party and when it comes to lighting up your garden, you can be really imaginative.

String lengths of festoon lights along fences, over arbours and across gazebos and other garden structures.

Tealights in jam jars or empty tin cans make pretty, inexpensive garden lights, you can line them up along pathways or group them together for maximum impact. Small fairy lights can be added to trees and plants and twisted around garden parasols and if you have a pergola or gazebo, try grouping different lantern lights together for an eclectic look.

Pretty solar lights can be dotted around the garden, added to flower pots and hung from fences. You can also add tiny fairy lights to empty wine bottles and glass lanterns for more gorgeous sparkliness. 

festival lights decoration

Add lights everywhere! Image credit: @home_with_victoria

4. Have fun with party props

Everyone loves a party prop! Grab the oversized glasses, the comedy hats and large empty photo frames and create some fun backdrops to delight your guests. Photo booth props are a great way to encourage people to take photos and let their hair down. 

festival party props

Have festival fun with party props. Image credit: @retrocelebrations

If you don’t want to buy photo props, they are really easy to make. Draw out some glasses, moustaches and hats, mount them on cardboard and attach sticks. Papertrail design offers free printable photo booth props too.

5. Create different zones

If you have the space, creating different zones for your party is a great way to add a festival feel to your garden. Think about making separate zones for eating and relaxing and designating an area for activities (see next idea). 

You can use outdoor rugs to help delineate areas as well as beanbags, chairs and tables. Create a stylish dining space by attaching long lengths of ribbon to a large frame. You can construct a frame from wood offcuts or even large twigs.

coachella inspired party decoration

Image credit: Pinterest

It’s worth drawing out a plan if you have a large space to make sure that the zones work well together. Locate food and drink near areas where people can sit and relax and if there’s a stage, you can make this the central point or place it at the end of the garden, where everyone will be able to get a good view.

6. Organise some festival-themed activities

Aside from music and food, festivals can be great places to try your hand at something new. Why not encourage your guests to have a go at some circus skills? Juggling, stilt walking and hula hooping are all fun activities to try at home.

circus props for festivals

Hone your circus skills. Image credit: @ellavationcircus

Take inspiration from Glastonbury’s healing field and try yoga, meditation, Tai Chi and dance!

If you’re hosting a creative party, your guests can try their hands at painting, pottery making or even sculpture. 

7. Provide shelter

We all know how changeable the Great British weather can be so it’s a good idea to factor in some shelter for your guests.

Don’t worry if you don’t have a gazebo or pergola there are several other options:

festival shelter

Image credit: @backyardfestival.uk

Alternatively, you could just be authentic and ask everyone to bring wellies and umbrellas!

8. Heat it up

Just as it’s important to factor shelter into your garden party plans, it’s worth making provisions for keeping your guests warm when the sun goes down. Unless we get another scorching heatwave, everyone will be grateful for a bit of extra warmth.

Firepits, chimineas and patio heaters are great, safe options for keeping your outdoors party heated. Some firepits come with grills, perfect for toasting a few marshmallows throughout the evening.

More on this: Garden Furniture And Fire Pit Ideas

Provide plenty of blankets and throws and you’ll be ready to party until dawn.

festival party heating ideas

Image credit: @cornerstonekitch

9. Festival-themed kid’s party ideas

If you’re thinking of hosting a children’s festival-themed birthday party, we’ve got some fun ideas to get you started.

Kids will love sitting on low tables so grab some pallets to make rustic eating areas. The corners of pallets can be sharp and splintery so make sure you give them a sand before use. 

Festival food is well-suited to kids. Bite-sized pizza slices, mini hotdogs, sliders and kebabs will all go down well. Top it off with fresh fruit salads, jelly and ice creams. Cocktail fish bowls and large jars with taps are fun ways to serve drinks.

festival garden wonderland

Create your own garden wonderland. Image credit: @sz_luxuryevents

Fun festival-themed activities for kids include:

All these activities are easy to organise, perfect for doing outdoors and you could set up a few different activity stations for children to move between.

10. Festival-themed wedding party ideas

If you’re considering a festival-themed wedding, there are so many ways that you can give your wedding party a gala feel. From onsite camping for guests to making your own decorations, here are our top tips for helping your special day go with a swing:

diy festival signpost

DIY signposts add a personal touch. Image credit: Blue Daisy Photography

11. It’s all in the details

From festival-style invitations and wristbands for guests to well-planned seating and shelter, the secret of a successful party is all in the details. A little planning can go a long way, and it will be well worth the effort. 

festival party bracelets

Image credit: @menopause_2017

So dig out your wellies, source those haybales and get planning a festival party to remember!

FAQs

How to decorate your garden for a party?

If you’re planning to host a party in your garden, it’s worth giving it a quick spruce-up before the big day. Give fences and woodwork a fresh coat of paint, mow the grass, give the hedges a trim and pop some pretty flowering plants in pots

Hanging a variety of pretty outdoor lights is a quick, easy and super effective way to decorate your garden, and for a festival-themed party, don’t forget the bunting, garlands and balloons.

How can I make my garden look like a festival?

When it comes to decorating your garden, festival-style, pretty much anything goes! Provide shelter in the form of tents and teepees, create a rustic pallet bar, fashion sofas from hay bales and add masses of lighting in the way of candles, solar lanterns and festoon lights.

Flags always feature heavily at festivals so hang metres of bunting, construct some pendant banners and make your own festival flags.

how can I make my garden look like a festival

Image credit: @misscopey1

How do you throw a small festival?

Planning is key! Think of a theme, decide how many guests you’ll invite and take it from there. You might choose to invite a local band or have friends who can provide the music, or go for a food or creative festival instead.

You’ll need to make sure you’ve got plenty of room for everyone to enjoy the entertainment and to eat, drink and dance.

12 festival-themed garden party ideas to free your spirit (1)

Save this pin for later

How to Use an Old Chair as a Flower Pot

It’s often difficult to throw out a much-loved chair and usually, it only happens after attempts at upholstering or DIY fixes go badly wrong. When somebody sits on one of your old favourites and causes mirth by going through the seat, maybe it’s time to accept it’s destined for another purpose. Here are some fun and creative ideas for how to use an old chair as a flower pot.

old chair flower pot

Image credit: @ourgardenworld

1. Use the back of a chair as a trellis or a support system

Some plants need a trellis or support to clamber up and an old chair can do just that. Remove the central seat, find a flower pot that fits and get planting.

Annual ideas: try sweet peas, nasturtiums and lavender at the back, and plant herbs in front. All of these will bring pollinators, butterflies and sweet scents. Sweet peas will climb around any structure and you can guide nasturtiums to do the same.

Perennial ideas: clematis will grow well in a pot. After flowering, you can replace it with something else and put the clematis back when it returns after the winter. Prune back the growth and compost the cuttings.

nastartiums over an old chair

Nasturtiums will happily clamber over an old chair. Image credit: @my.junklife

2. Repurpose a chair as a young tree support

Young trees need a lot of support and protection which a chair frame can provide. Remove the chair seat, put a potted tree in the gap and place it in a sheltered area. Make sure you can remove the chair if the tree grows very large but it is such an unusual sight in a garden you may decide to keep it as part of the scenery.

Suitable trees are ones you prune annually like willow or purple hazel. The chair will help to keep the tree to a defined size and allow for easy pruning. Make sure you prune the tree hard in the autumn or the spring.

3. Upcycle a child’s high chair or a play chair

child high chair flower pot

Image credit: @palletcreationsuk

An old play chair makes a great planter and the plant it holds can easily be tended to by children. You can get little ones to help with painting the chair in a bright colour while you fill the seating area with plants.

Choose pretty annuals, tasty herbs or even tomatoes for tea-time picking. The colour will add some character in winter and you can move the chair to catch the sun in shadier gardens. In winter, add brightly coloured cyclamen or pansies.

4. Grow a moss or succulent seat

succulent seat

Image credit: @dont_fence_me_in___

Turn an old chair into an attractive succulent planter in a few simple steps:

5. Make a chair hydroponic support system.

Hydroponics allows the gardener to use water and nutrients to grow plants and you can position this in your chair. So what will bloom in your chair?

In winter, you may need to design a bubble wrap cover to keep frost at bay but there are hardy plants like cabbages or other brassicas, which are frost tolerant. Keep the taller ones at the back and enjoy your produce.

6. Grow a person for your chair!

A topiary shrub will happily grow through the seating area of an old chair and you can train it onto wire supports.

Look at this chair as a planter that can hold annuals or perennials and provide you with greenery through the seasons. Once the flowering stops with one plant, you can cut it back and then move in another pot to fill the gap.

How to use an old chair as a flower pot-min

Save this pin for later
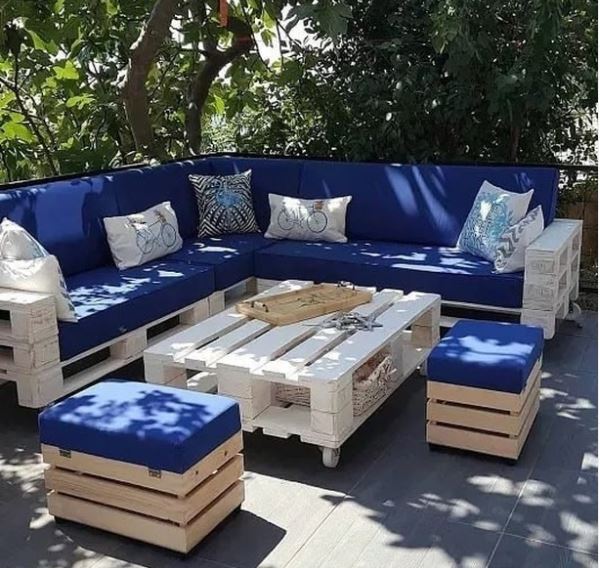
How to Make a DIY Flower Pot Stand (15 Easy Ideas)

All plant pots need a solid surface to stand on whether they’re indoors or outdoors. As well as placing pots on a patio or windowsill, you can make a stand from natural materials, leftover building supplies, unused toys, and even chicken wire. Read on for some innovative DIY flower pot stand ideas.

Ideas for outdoor flower pot stands

1. Pruned tree branch stand

A pruned or fallen tree branch can make a great spot for your plant pots to stand on. It won’t matter if the wood gets damp after watering and the natural look will add interest to any outside space.

  1. Use a saw to remove a branch and then decide how long and wide you want your plant shelf to be.
  2. You’ll need to create a flat edge for the plants to rest on and you can also carve a space to fit the pots into.  If it’s a heavy branch, it can rest on the ground or you can add some legs for stability.
  3. If you enjoy carving, add a seat so you can admire your plants. Plant tall sunflowers and foxgloves behind.
  4. Add your potted plants. Place smaller ones like herbs at the front and pop the branch stand in a location where it catches the sun.

2. Old bathtub flower pot stand

old bathtub flower pot stand

Image credit: @sarahp_art

An old bathtub is perfect for upcycling into a home for plants. You could enlist the help of younger gardeners to paint it or add decorative mosaics and tiles for a unique look.

Add your chosen plant pots, the larger ones can sit on the base and you can add racks to site smaller pots. Large plants like bamboo or grasses can add a fantastic backdrop for a potted rose or wallflower and you can easily change the location of the racks to suit the flowering season.

3. Wooden bench or old decking pot stand

wooden bench or old decking pot stand

Image credit: @twinklecleaningduo

A shabby wooden bench or old decking can be upcycled and adapted as a home for plants. If you’re using decking, stack planks on top of each other to make a long oblong shape as a location for plants.

  1. Sand down the wood and then paint or varnish it.
  2. Add a few cushions or a mattress to make it more comfortable for lounging visitors (or pets).
  3. Tidy the ends by making two end boxes from scrap wood such as pallets or leftover building planks to suit the size of the bench.
  4. Fill these boxes with soil and add climbing beans, a small fruiting tree, strawberries, raspberries or passion fruit.
  5. Add other pots to suit the seasons.

4. Ladder plant stand

ladder plant stand

Image credit: @urbanfarm.deco

An old wooden or metal ladder can be set up on a firm foundation and used to house plants on each step. You may want to secure one edge to a wall or the ground and, if it’s a step ladder, make sure the safety catch is on otherwise it can be a bit unstable.

5. Old toy plant stand

old toy plant stand

Image credit: @thecanberratales

Old children’s toys can make fun plant pot holders, make sure they’re clean and choose a suitable pot to fit. Old toy wheelbarrows look wonderful filled with flowering annual bedding plants.

6. Brick flower pot stand

brick flower pot stand

Image credit: @succulentsinsincity

Bricks make great plant pot stands as they’re heavy and hard to knock over. Try placing bricks in a square or circular shape, add a second layer to make a solid stand and then place your pot directly on the bricks. You can also make a corner stand like the one pictured. This would work well if you have any large bricks or hollow concrete blocks.

7. Tyre plant stand

tyre plant stand

Image credit: @anju_a_plant_lover

Tyres can be used in many ways to hold plant pots, laid flat on a patio, hung on trees with rope, or fixed to a wooden structure. They make picturesque circular holders for plants but don’t plant directly into them unless you add a liner, because the chemicals can leach into the pots or the ground below.

8. Chicken wire flower pot stand

Scrunched-up wire makes an excellent beginning to any DIY plant stand. A roll of chicken wire allows your imagination to run wild!

  1. Make a basic shape and fit small pots through the gaps in the chicken wire or cut the wire to help them to fit. You can also make deep hollows and fill these with moss to help the pot settle.
  2. Then you can mould material around any shape you have made, such as plastic tarpaulins or canvas or any waterproof fabric. Natural materials could be leaf mould, dried straw, bamboo canes, evergreen tree cuttings, pieces of bark or any soft leaves you have available. Some may even start to grow!
  3. These make wild and wonderful DIY stands for succulents and cacti which can live outside in summer.

9. Pallet pot stand

pallet pot stand

Image credit: @bellwayjaponica

Place the pallet upright against a wall and attach it if necessary. You can attach individual plant pot holders to each pallet plank or stand the plants in the pallet. Read more about how to do this here.

You can also cut the pallet into 4 identically sized smaller pieces to make a cube-shaped, wooden planter.

  1. Cut the pallet into individual square pieces.
  2. Stack these one on top of the other.
  3. Nail these together to make a secure shape for plants to rest on.

Ideas for indoor planter stands

1. Corner planter stand

corner planter stand

Image credit: @plantparentcommunity

Corner planter stands fill an empty space and provide you with a view of greenery, particularly in the winter months.

  1. Measure the space and then sketch a design to suit the space available.
  2. This may be triangular to fit just a single plant or L-shaped to provide space for several smaller plants.
  3. Fix the wood shelving to the wall using scaffold board brackets. You can also make a freestanding corner plant stand.
  4. Varnish or stain the wood and allow it to dry before adding the plants.

2. Lampshade pot stand

lampshade pot stand

Upcycle an old lampshade into a stylish plant stand. Image credit: @vilaas_home_decorations

For a quirky indoor plant stand, try repurposing an old lampshade. If you like, you can remove the lampshade material to expose the wire frame which will make an interesting shape for a plant stand.

If the shade is tapered, turn it upside down for stability. You can paint the wire if you want to jazz it up a little.  Add a ceramic plate to the top and place your plant on top.

3. Wood stump stand

wood stump stand

Image credit: @maxhershaft

Wood stumps make fantastic natural plant stands. Their colour and texture varies depending on which tree they are cut from but they are very pleasing in a contemporary setting. Ask any local tree surgeon for one and dig out a tiny grooved section to suit your plant pot shape. You may want to add a waterproof plastic section to stop the wood from rotting or you can varnish it for protection.

If you have two or three stumps, arrange them in a pattern with different heights and place suitable pots on top. Remember to choose a suitable, well-lit location. Some plants grow happily in artificial light like areca palms, ferns, peace lilies, philodendrons, crotons and kalanchoes.

4. A-frame plant stand

a frame plant stand

Image credit: @puravida.seeker

An A-frame plant stand is simple to make with two pieces of wood leaning together in an A shape and shelves between to hold your plants. These can be placed indoors and outdoors. Bookshelf plant stands can work in the same way. Just remove the books and place different plants on each shelf for a tiered effect.

5. Curtain rail plant holder

curtain rail plant holder

Image credit: @handcraftedbymin

Not so much a stand, but more of a hanging holder, you can hang light macramé strings from a curtain rail. This is great for plants that enjoy diffused sunshine, not direct light. Add trailing plants like a string of pearls (Senecio), or a spider plant with hanging spiderettes.

  1. If you like to crochet, knit or knot, then get started by cutting 3 sets of strings. The finished width will need to be about 3 inches (7 cm) in width to support a medium-sized pot.
  2. Work each string separately and when they reach the desired length, tie the strings together securely at the top and secure them to the curtain rail.
  3. Add a light, plastic dripper plate under the pot and watch your plants thrive.
  4. Just be careful when pulling the curtains that you don’t knock the plants off!

6. Scaffold board plant shelf

scaffold board plant shelf

Image credit: @o.g.b_woodwork

Old scaffold boards make fantastic stands for potted plants.  Mount the boards on a solid wall using brackets. You can place pots along the shelf, try combining upright plants with trailing varieties. You can also hang planters from the shelf. Get out your crochet needle or try making some macramé holders.

  1. Use strong cotton or jute to make the plant pot holder. You could also plait coloured wool.
  2. Tie the strings to the supports and start knotting, knitting or crocheting to create your unique design.
  3. When you reach the desired length, make a wider circular piece to accommodate a plant pot. Crochet pot holders can be individually sized to suit the pot and then sewn onto the string holders.
  4. You can then add a plate to hold the pot in shape and then make a potholder to fit outside this. A uniquely individual plant holder, made by you!

Tina’s tips

Think carefully about the light in any area where plants are located. If it is too close to a window, a shade lover will not be happy. If there is not enough direct light for a sun lover, it will droop over time so turn the plant regularly to ensure steady growth on all sides.

You might also like: How to use an old chair as a flower pot

How to make a diy flower pot stand (15 easy ideas)-min

Save this pin for later
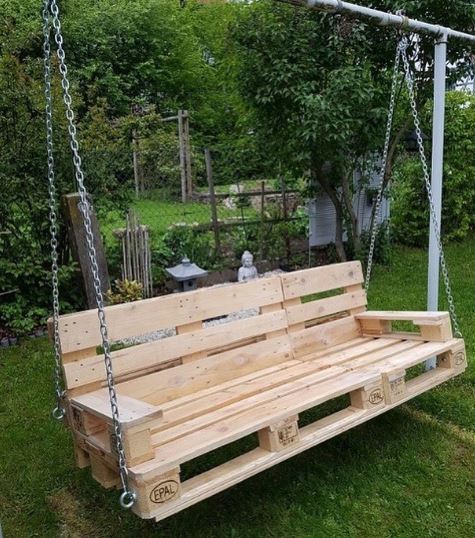
Summer House Ideas

A garden summer house is a fabulous place to read, relax and socialise. It will extend your outdoor living space, bringing you closer to nature whether you’re observing the birds and flowers, working from home or just escaping a summer shower.

Traditional summer houses have sloping roofs and big glass windows but you can design your own to fit into whatever space you have available. The ideas below will allow you to extend the summer season a bit longer by careful planning and decorating ideas.

We’ve put together some summer house ideas to suit all spaces and budgets. There are a few things to consider before you get out the tools and start building:

Shade or sunshine?

If you seek a shady spot, then the roof will help to provide that. If you have a mature tree in your garden, this may provide all the shade you need and you can place your summer house underneath the canopy of foliage.

If you prefer to soak up the sun, then consider where the sun hits your garden at the times you want to enjoy the space. Observe where the sun is at the time you usually relax and position your summer house where it can soak up the warmth.

Materials and your available space will determine the shape and size of your permanent summer house but there are some excellent pop-up alternatives available so you can experiment with the location. I love this Alvantor igloo, which despite its name, provides any garden with a bit of glamorous outdoor space, and it comes in various sizes, which can be folded away easily.

igloo summer house

Credit: Alvantor

Small or unlimited budget?

You don’t have to spend a fortune to create a relaxing spot in your garden. Options include adding a pull-down awning to a simple garden shed which can be adapted by fixing sidewalls made of trellis.

Another idea is to recycle some pallets or wooden logs into walls and then construct a ceiling with branches, bamboo or even slate if you fancy something more waterproof.

More expensive, permanent summer houses can be built from any material you choose. There are exquisite Tiny House plans, with two stories that are fantastic if you have some land and a larger budget.

Wood cabin style summer houses can be purchased for just under £10,000 offering a roomy, wooden interior with three rooms. The cabins are untreated so you can decide on the protective coating and choose your décor. It’s important to make sure the summer house is assembled on a solid, level concrete base.

A summer house shouldn’t require planning permission if its height is under 2.5 m.

firestone-wooden-cabin-summer-house

Credit: B&Q

Unusual summer houses

If you fancy something a bit different, this semi-circular summer house could be used as a playhouse for children or a relaxing space for adults.

semi-circular summer house

Credit: Pinterest

A canvas yurt can be used all year round. Position a log burning stove in the centre and it becomes a perfect spot for summer parties and sleepovers and will provide welcome shelter in the colder months.

yurts made of canvas

Credit: Pinterest

Contemporary summer house ideas

Summer houses don’t have to look traditional. If you have the space and fancy some DIY, Chin.com provide plans for a “tiny house” so that you can build your own modern garden sanctuary.

The below image shows an innovative A-frame structure with a side that can be open or closed, making it perfectly suited to year-round relaxation.

a frame summer house

Credit: Pinterest

A summer house design can combine a wildly different shape with a garage and amazing viewing areas. Obviously, you’ll need some land, an architect and a pocketful of cash and time to make this idea a reality.

Convert a vehicle or container

old shipping containter garden house

Turn an old shipping container into a stylish garden house. Image credit: @usa_containers.co

Instead of the classic sloping roof, think flat. You could convert an old camper van, shipping container, or even fashion old fencing and discarded windows and doors into something new.

The transformation can be breath-taking. Link up the WiFi so you can have music and consider adding solar panels to power enough light for a long night’s work or cosy cuddle.

Plant a green roof

green roof summer house

Plant a green roof on your summer house. Image credit: @finkernagelross

Although you need to consider weight, you may be able to plant a green roof with strawberries, geraniums, summer herbs, and wildflowers for bees and butterflies. A green roof is fabulous for attracting insects and butterflies in summer and it will help to insulate your summer house during the colder months.

Alternative summer houses for small gardens

If you’re short on outdoor space, you may be able to incorporate existing structures to create an alternative to a summer house.

A shed can provide a solid wall to make a lean-to area, which can have an awning attached. You can pull down the awning to waterproof it or to give some privacy in a suburban area, while in winter it can be folded away or dismantled and stored. To enclose it further you can add living walls of planters with a trellis or bamboo canes, making it cosy even if it rains.

A shady patio area can be turned into a shelter by making a roof structure and planting it up with flowering climbers and creepers so that your view becomes colourful and natural. If it keeps the summer rainstorms at bay, you can give some garden furniture a lick of paint to provide sheltered seating.

Give a pond a second use. If you have a pond, the plants there need some light but if you build a bridge over a small section of a large pond, you can use this space as a seating area and then build a roof for rain cover. The benefits are obvious; your view will be of fish swimming, with water lilies blooming and you can enjoy seeing both water and sky.

Summer house decoration ideas

summer house decoration

Hang mirrors, pictures and lights to personalise your summer house. Image credit: @gardenbuildingsdirect

Living walls made of tree trunk cuttings, growing bamboo or wires draped with climbing plants (such as sweet peas, passionflower, clematis and geraniums) will offer a natural atmosphere in your summer house. Add pots of sweet-smelling flowers and edible nasturtiums, strawberries, passion fruit and citrus trees to bring colour, fresh fruit and delightful aromas to your indoor space.

Cork walls. Another idea is to use cork, a natural material from tree bark. If you have plenty of time, secure used corks and create a unique wall to delight your guests. You may decide to build a recycled cork dartboard to amuse your friends! You can also buy beautiful cork tiles which add insulation.

cork walls

Cork makes a beautiful wall and you can easily attach items to it. Image credit: @__ev1__

Increase the feeling of space. If your walls are brick or timber, then using mirrors is a fabulous way to expand your space visually. You can cover a wall in mirror tiles or buy a large vintage mirror to hang in a corner.

Colour is important in a summer house. During the hottest, sunniest part of the day, you will value internal white walls, which reflect the heat. It is advisable to avoid black or dark colours which attract heat. You can create contrast by adding patterned cushions, blankets and bright wall decor.

colour summer house

Image credit: @creatingacosyfarmhouse

Accessorise Later on, when the sunset brings a chill, rugs and throws in colourful shades and textures can bring real warmth to the space. A blanket made from old sweaters cut into squares and sewn onto a quilt backing is fabulous in a summer house. You can also use it as a floor covering when the chill evening air arrives.

Make furniture to suit the space. It’s important to include comfortable seating with plenty of cushions. Sometimes an old sofa can be adapted to summer house use by simply throwing a blanket over it. You can get inventive with pallets and make a lounger for the whole family to relax on.

summer house furniture

Image credit: @billyohcom

Add WiFi connection. If you can connect to the internet, you can create a summer house cinema and enjoy your favourite films during those long summer evenings.

FAQs

Do I need planning permission to build a summer house?

If your summer house is for use by you and your household and the site is on land you own, then it just depends on the height of your planned building and also the ground size.

What pitch does the roof need to be?

How steep a roof will be is what is called the roof pitch or roof slope. A steep pitch will allow water to run off easily, which is obviously an advantage. However, a lower pitch uses less material so if cost is an issue, you should consider this. The minimum needed for a metal roof is half an inch, to ensure that everything stays dry underneath. There are some good links here to help answer your questions about the pitch of the roof.

Summer house ideas-min

Save this pin for later

15 Best Vegetables to Plant in Spring

It may seem a bit chilly for gardening but spring is the perfect time to jumpstart your vegetable garden. Starting early means you’ll be harvesting healthy home-grown vegetables when other gardeners are just rolling up their sleeves to get to work.

You can sow cold-hardy seeds, like lettuce, cucumber, and spinach before the last frost date. Simply start the seeds indoors or in a greenhouse and transplant them outdoors once the weather becomes warmer.

Not sure what to plant? Discover the best vegetables to plant in spring that you can harvest all through summer. We’ll also share some spring gardening tips with you.

What to plant in a spring garden

Spring gardening might sound limiting. But there are plenty of cold-weather vegetables you can grow around this time, from cucumbers to garlic. What’s more, most of these vegetables are easily grown from seeds and they’re generally low-maintenance, requiring only a basic shelter at night to thrive.

1. Cucumber

cucumber spring

Image credit: @katelatimer_country

Cucumbers are a great spring vegetable to start from seeds. You can grow cucumbers in a greenhouse or sow them outdoors directly. Whatever you decide, they’ll need extra warmth to grow properly.

You can start cucumber seeds 2 to 3 weeks after the last frost date. Once the seedlings begin to mature into vines, they’ll need trellises and stakes for support.

2. Beetroot

beetroot spring garden

Image credit: @homegrown_patch

You can sow beetroot seeds from March onwards when the garden is cold but not frozen. Beets don’t grow well if it’s too hot.

Sow the seeds 3 inches apart so the roots have space to grow. If the nights are still cold and wet, you may need to protect them with a frost cover.

Tip: Use frost fleece specially made for vegetable seedlings rather than mature plants. The latter may be too thick.

3. Carrots

carrots spring garden

Image credit: @wyegrowvegandflowers

In springtime, you can grow different types of carrots, from the classic orange type to red, yellow, and even purple varieties.

Carrots love sunlight and well-drained soil. Plant them 2 to 4 weeks before the last frost date, and they should be ready to harvest in 14 to 16 weeks.

4. Cabbage

cabbage spring garden

Image credit: @cottagegardenharvest

Spring cabbage is crunchier and sweeter than other varieties but it needs plenty of sunlight and rich soil to grow well.

You can sow cabbage seeds indoors or in a greenhouse for an early start. Then transplant them to your garden once they’re bigger. Remember to keep them covered until the weather becomes warmer.

5. Lettuce

lettuce spring garden

Image credit: @theurbangardeness

You can grow lettuce all year round, even in the cold months. For that, you need to sow seeds undercover, in a well-lit greenhouse or cold frame.

You can also plant other salad leaves like rocket, mustard, and kale around this time. Since salad leaves can grow surprisingly large, make sure to space them well.

Tip: Loosen up the soil before planting lettuce seeds if it’s too compact. Lettuce grows best in loose soil.

6. Potatoes

potatoes spring garden

Image credit: @anoffgridlife

Potatoes are cold-hardy. They can easily survive frost and can be planted right at the start of spring. What’s more, you can harvest them as soon as 10 weeks after planting.

To grow potatoes, make sure the soil is acidic and loose. Avoid too much sun exposure—it can make potatoes green and bitter.

7. Cauliflower

cauliflower spring garden

Image credit: @marskitchengarden

Cauliflowers are another cool-season crop you can start in spring. They need fertile soil, plenty of water, and consistently cool temperatures.

If they don’t get these, they will form many button-size heads instead of a single, large one. Cauliflowers also take up quite a bit of space. Sow them 6 inches apart to avoid overcrowding.

8. Radishes

radishes spring garden

Image credit: @thehappygardeninglife

Radish seeds germinate and grow very quickly. Sow them in early spring and they’ll be ready to eat in as little as 4 weeks.

Grow radishes in a sunny area of your garden. Too much shade will make the leaves larger and the root smaller. Also, keep the soil well-watered so the roots grow fleshy and don’t split.

Tip: Sow radish seeds at least 9 inches apart so you won’t have to thin them out later.

9. Turnips

turnips spring garden

Image credit: @theseasonalhomestead

Turnips are cold-tolerant and can be sown in early March. Some varieties, like Milan purple top and Atlantic, can be sown as early as February under shelter.

Turnips like cool, moist ground and sunny, open sites. Since they grow very quickly, you can enjoy them in late spring.

Tip: Don’t throw away turnip leaves. You can eat turnip greens raw in salads, sauté or braise them, or add them to soups.

10. Peas

peas spring garden

Image credit: @allotment_time_devon

Home-grown peas are easy to start from seeds. You can sow them in March and harvest them after about 3 months.

Choose a sunny, fertile spot for the seeds. Sow them 2 inches deep and the seedlings will appear in 1 or 2 weeks. Young peas will need stakes for support, so be prepared.

11. Spinach

spinach spring garden

Image credit: @rejuvenatewithplants

Spinach is a cool-weather vegetable you can start indoors even in February. Once the seeds germinate and start growing, transplant them outdoors.

Spring spinach likes growing in a sunny spot and loose, moist soil. You can use cold frames to keep the seedlings sheltered at night.

12. Brussels sprouts

brussels sprouts spring garden

Image credit: @lisaskitchengarden

You can start Brussels sprouts in modular trays in March. Take the young plants outdoors 4 to 6 weeks later when they grow at least seven true leaves.

Brussels sprouts are slow-growing. Plant them in rich, deep soil in full sun. It can take up to 31 weeks for them to mature and harvest.

Tip: To encourage Brussels sprouts to grow faster, thin them out when they are young and apply a nitrogen-rich fertiliser.

13. Aubergines

aubergines spring garden

Image credit: @stevelegend

Aubergines are warmth-loving vegetables. It’s best to grow them indoors or in a polytunnel. For them to grow properly, delay their sowing time to April.

Once the seeds germinate, keep them on a warm and bright windowsill. You can grow them outdoors when it’s closer to summer. Without warmth, you may end up with only an egg-sized aubergine or two.

14. Onions

onions spring garden

Image credit: @vegempireuk

You can grow onions from seeds or immature bulbs both outdoors and indoors. Start them in spring so they’re ready for harvesting in summer.

Onions aren’t too choosy when it comes to light. They adapt well to both sun and partial shade, but they grow best in compost-rich soil.

15. Garlic

garlic spring garden

Image credit: @garden_girl_barossa

Garlic is usually grown from cloves instead of seeds. You can plant garlic cloves in spring, from February to March. They should be ready to harvest in early May.

Sow the cloves 2 inches deep in the soil. Snip off any flower shoots that may sprout in spring, as they will slow the bulb growth.

How to plant a spring garden

Spring gardening may seem like a lot of work with sowing seeds, cleaning debris, and sheltering the plants that need it, but if you plan ahead and have proper supplies, you can enjoy each part of the process.

Here are some tips and tricks to make sure the seeds you sow in spring will bring you a bountiful harvest.

plan spring garden

Image credit: @cornbury_park

Spring vegetable gardening FAQs

Still have questions about growing vegetables in spring? The answers below may help.

How do I prepare my vegetable garden?

First, find the best spots in your garden for growing vegetables. Most spring vegetables love full sun and free-draining soil. Then, till the soil and add organic matter such as well-rotted compost or manure. Finally, start sowing.

For best results, plan your garden beds in advance and give your vegetable seeds plenty of space to grow.

When to sow vegetable seeds outdoors in spring

Sow cold-hardy vegetables outdoors after the fear of frost has passed. Most UK gardeners can start sowing vegetable seeds in April. Alternatively, you can start seeds indoors in February and March and transplant them once the weather warms up.

How do I make a raised bed for my vegetable garden?

spring garden raised bed

Image credit: @shegrowsawildgarden

Raised beds make cold-season gardening so much easier. They help the soil warm up faster, provide good drainage and are easy and inexpensive to make.

To make your own raised bed, nail 4 wooden planks together into a square or rectangle and fill it will good soil. Add some organic matter too. You can also convert old crates and pallets into raised beds for your vegetables.

15 best vegetables to plant in spring-min

Save this pin for later

What to Do in the Garden in February: 12 Gardening Jobs

In February the days are getting longer, bulbs start poking their green shoots out of the ground and even if the weather’s still chilly, we know that spring is on the way.

Wordsworth’s famous ‘host of golden daffodils’ is getting ready to flower. If you’re wondering what to do in the garden in February, here are 12 tasks to get your outdoor patch into shape for spring:

Gardening jobs for February 

1. Prune shrubs

prune shrubs

Image credit: @hedges_and_edges

Prune shrubs like rhododendrons and clematis now.  Prune mahonia, winter jasmine, and forsythia after flowering. You can also prune roses now to encourage a bushier shape. Mulch the roots of all these plants with a good layer of compost too.

2. Cut back any ornamental grasses

This is important because new shoots are emerging and this will be made difficult if old brown stems are still in place. Leave the attractive stems of yellow loosestrife over winter but cut them back now and you will notice new shoots emerging.

3. Prune trees

prune trees

Image credit: @planted.gardens

Fruit trees like apple and pear should be pruned now while still dormant. Pruning any later than February may cause damage to the tree so sharpen the blade and cut branches that are crossed or unwieldy.

Do not cut cherry or apricot until new growth starts because pruning now will allow disease to enter via the cuts. These trees should be cut in summer when they’ve recovered from the colder months.

4. Divide roots

Divide tarragon, mint and lovage roots, which are protected in your greenhouse or indoors. Re-pot them and when all danger of frost is gone, you can place these pots outside.

Mint is frost hardy but the other two won’t survive frost. My indoor tarragon plant is enjoying the spring sunshine and has already started to produce shoots. Dividing now means you have two plants ready by April or May.

5. Plant spring bulbs

planting spring bulbs

Image credit: @mariamurraycreative

Plant spring bulbs if you haven’t done so already. Tulips, daffodils and narcissus will flower this year. Dig holes deep enough for the bulb size and allow some extra depth for roots.

Cover the bulbs with compost and in a few weeks, you’ll be rewarded with an array of bright colours that will return for years to come. Remember where you plant them by placing a row of twigs to remind you because it is easy to forget where they are when summer arrives.

6. Transplant hyacinths

transplant hyacinths

Image credit: @westcoastgardens

Hyacinths that bloomed indoors in winter can be transplanted outside now too. It’s a bit too late to plant snowdrops but you can plant them for next year and you may be lucky and get a late flowering. Grape hyacinths are hardy and can be planted in pots or in the ground now too.

7. Remove leaves

Remove yellow leaves on outdoor vegetables like brassicas and compost them. Purple sprouting broccoli is almost ready and cabbages are still going too. Tidy up and weed around the stems.

8. Get a head start on vegetables and flowers

If you plant seeds in February and ensure warmth using a sunny windowsill or a heated propagator, you can gain extra growth. By the time the frost is a memory, you’ll have young tomato, aubergine and cucumber plants.

9. Other seeds to plant now

Sweet peas, lettuce, salads like rocket and coriander, Brussels sprouts, cabbages and leeks can be sown now. Some herbs like parsley need soil warmth and air temperature to germinate so I usually leave these a little later.

10. Chit potatoes

chit potatoes

Image credit: @gizmosaz2112

This means buying some new tubers to “chit”. Save your egg boxes – these are a perfect size. Place one tuber in each part and place them in a cool place to grow tiny new green shoots. You can also prepare the ground you will plant them in but wait until March before you actually put them in the ground outdoors.

11. Make a plan

While the evenings are long, create a list of plants you want to try growing. It may be flowers, fruit trees or vegetables. You can also plan companion plants like nasturtiums which attract aphids away from other plants.

Draw sketches and take pictures of before so that when your garden is in bloom, you can compare and amaze yourself with the change! With smaller gardeners in the house, you will have plenty of help with tasks like adding food to the compost bin – see more below.

12. Compost

If you don’t have a compost bin, then start one. If you have one New Year’s resolution, make it this one. This is the best way to reduce your carbon footprint with minimal effort. The benefits are rich, useful, free soil to feed your plants which helps your plants and saves you money.

More on this: Is Mulch The Same As Compost?

How do I make compost?

make compost

Image credit: @agardenersheart

Buy a bin or make a space in your garden at least 1x1m but preferably 2x2m if you have space. A corner or a neglected part of the garden is perfect but make sure you have easy access to it, especially in cold and wet weather.

  1. Place some twigs on the ground to mark out the area. Insert wooden stakes in the corners and fix chicken wire to them to make the sides. Wooden pallets work well too.
  2. Next, add a layer of newspaper or cardboard to keep it tidy. Worms love the heat under cardboard and will arrive as soon as it is on the ground.
  3. Add a green layer of fresh waste including outer leaves of cabbages, tomato and potato skins, apple cores and fruit remains.
  4. A brown layer comes next. This is drier and can be composed of waste paper, twigs, lawn cuttings, old leaves etc.
  5. Another green layer goes on top. Keep adding a layer of brown followed by green and if you can, aerate and mix the heap by turning the heap and adding well-rotted material to the top.
  6. DO NOT add meat as this may attract mice and rats.
  7. Leave it for at least 3 months (ideally 6) and you will have a great supply of rich compost, full of worms that every plant will adore.
compost in hand

Image credit: @sheppy105

What is in flower in February?

Heather thrives in acid soils so any that was planted under your conifer hedges should be in full bloom now. Cyclamen enjoy similar conditions. Heather flowers in shades of pink, purple and white and brings warmth to a winter garden.

Mahonia offers yellow flower heads while winter jasmine delights cold gardens with drooping stems decorated with yellow blooms. Yellow forsythia flowers shoot up on new growth and look amazing against the blue sky on sunny days.

mahonia february flower

Image credit: @plantnews

Perennial purple periwinkle has flowered throughout winter in my Kent garden, so perhaps the warmer temperatures are allowing gardeners to be more adventurous. Hebes have been flowering here since November in shades of purple, lilac and pink.

Sarcococca has one of the most enduring, gorgeous scents. Its spikes of powerfully fragranced, delicate white flowers entice pollinators and it works well in a garden where little is in flower, guiding bees to the shrub. It has plump, shiny, black berries, which my gran always told me were edible. They are certainly non-toxic to pets and humans.

Daphne, a shrub native to New Zealand, offers us sprigs of pink blooms right now. There is a new hybrid called Daphne Perfume Prince, which competes with my favourite Sarcococca for scent. Enjoy!

Tina’s Tips

  1. Warm up the soil where you want to plant vegetables and plants now by placing a layer of recycled bubble wrap, cardboard or black gardening landscaping fabric. This doubles up as a weed suppressant so when you remove it, the weeds will have died back or can be dug out easily before you seed new plants. Remove the layer before planting.
  2. Leave hydrangea flower heads for a little longer as according to many gardeners (including me) this provides some protection from frost damage. They are quite decorative and can be cut when the frost has disappeared.
What to do in the garden in february 12 gardening jobs-min

Save this pin for later

How to Find Sustainably Sourced Wood in the UK

If you’re thinking of using wood for a DIY project, do you usually check for any sign that certifies the wood is grown sustainably?

If you burn wood as fuel, can you confidently trace its origin? This article will explain the many certifications of sustainable wood and how you can check its environmental credentials.

I apologise in advance for the acronym usage in this article. FSC and PEFC are defined below! So if you spot either the FSC or PEFC logos on the wood you buy, this is a sure sign that it has been cut from forests that are responsibly managed, socially beneficial, environmentally appropriate, and economically viable.

The Forest Stewardship Council (FSC) and the PEFC are internationally recognised, not-for-profit organisations which promote responsible management of forests all over the world. Their logos are found on sustainably sourced wood.

You may also spot the “Grown in Britain” and Scandinavian Nordic swan logos on sustainably sourced wood, highlighting wood that’s grown closer to home than the Brazilian rainforest.

sustainable wood

Credit: Unsplash

Did you know?

What type of wood can be grown in the UK?

Ash, beech and silver beech, cedar, cherry, cypress, eucalyptus, holly, horse chestnut, (Douglas) fir, larch, lime, magnolia, oak, Scots pine, silver birch, whitebeam, and walnut can all be grown in the UK.

What does sustainable mean in terms of forestry management?

The FSC and PEFC set the international standards for the sustainable management of forests across the globe. In the UK, the Forestry Commission work to protect, expand and promote sustainable management of our woodlands.

Sustainable is one of the main environmental buzzwords right now and for good reason.  Sustainably grown wood comes from forests that are managed responsibly; preventing damage to wildlife, ecosystems and trees.

Let’s look at the main regulatory bodies for the provenance of wood supplies. The labels certify that the wood was grown to acceptable standards, without damaging natural forests.

fsc logo

FSC (Forest Stewardship Council) is an international, non-governmental organisation, dedicated to promoting responsible management of the world’s forests. FSC aims to counteract the destruction of trees illegally and limit the use of harmful chemicals in forests. Their labelling helps consumers to identify wood that has been sourced sustainably.

pefc logo

The PEFC Council (Programme for the Endorsement of Forest Certification) is a worldwide organisation promoting sustainable forest management through forest certification and labelling of forest-based products. Products with PEFC accreditation deliver confidence that raw material originates in a sustainably managed forest.

grown_in_britain_logo

Grown in Britain is a not-for-profit company, established in Bristol in 2013.  See more about this organisation below.

forestry commission logo

The Forestry Commission is a non-ministerial government department responsible for the management of publicly owned forests and the regulation of both public and private forestry in England. It was formerly also responsible for forestry in Wales and Scotland, however on 1 April 2013, Forestry Commission Wales merged with other agencies to become Natural Resources Wales, whilst two new bodies were established in Scotland on 1 April 2019.

plant healthy logo

Plant Healthy is an organisation including tree growers, nurseries, and the Forestry Commission which aims to check the biosecurity of any plant material sold and planted in the UK. This will help to avoid the spread of pests and diseases from abroad.

How do we use wood in the UK?

lumber industry

Credit: Unsplash

Wood is used outdoors for fencing, decking, furniture and playhouses. Indoors, it’s used for furniture, flooring, doors and myriad other items.  In the construction industry wood is used to build frames and beams although steel and metal frames are becoming more common. It can also be used as cladding on buildings.

Wooden pallets are used to protect products in storage and transit and unless they are re-sold, re-used, or upcycled a lot of this wood ends up going to waste.

Wood is used in woodburning stoves and open fires. Biofuel and pellets are made from wood for industrial use.

Wood is present in many products, such as plywood, MDF, and imported paper products like plasterboard, newspaper, and cardboard.

A qualified forester’s viewpoint

I spoke to Dave Preskett, a qualified forester from Bangor. He informed me that the UK is the second-largest importer of timber (after China) and that 80% of that timber is imported.

Europe has about 30% forestry cover and the UK is claimed to have 13%. Dave sees that figure as misleading because, since the early part of this century, the term ‘woodland cover’ now includes all wooded areas, no matter how small.

Satellite technology picks up the green of any tree canopy so think of the trees growing in your garden, in public parks, golf courses, neglected woodlands, and roadside plantings in addition to what we all consider to be true forests.

“In the UK, no more than 5-7% is true forest cover”, according to Dave. This is largely due to the Industrial Revolution, in which timber was used in manufacturing and for fuel, leaving large areas of the countryside deforested. These became grass pasture for sheep and grouse.

He tells me 60% of the coniferous forests in the UK are Sitka spruce, non-native trees, originally sourced from a north west Pacific island (Queen Charlotte’s Island) in the 1800s.

The Forestry Commission statistics only differentiate felled timber volumes as either hardwood or softwood.  Hardwood is a small part of the market. Softwood trees are dominated by Sitka spruce.

Dave comments that the timber quality of the wood from Sitka spruce is very poor compared to Norway spruce. However, they can be densely planted – about 2,750 trees at 1mx1m spacing per hectare is the norm for Sitka spruce. They’re fast-growing and can have a 50-year life cycle, locking in carbon as they grow.

Native UK hardwood trees like oak and chestnut need a lot more space and time to mature. In order to lock carbon up in trees, we need to retain the timber products we make for generations.  The uplands where Sitka spruce is often grown only support one sheep per hectare. Dave’s final comment is “We need a massive tree-planting programme in the UK to lock up carbon.”

A final discussion was had about the transport of wood and how a tree grown in the UK has no extra carbon miles added to it, which takes me nicely onto Grown in Britain.

sustainable wood

Image credit: @growninbritain

Forest management with Grown in Britain 

Rachel Lawrence from Grown in Britain (GiB) emphasises that her organisation is very keen to see more woods brought into long term management and a thriving UK timber sector. GiB certifies the whole chain of custody for timber e.g. sawmills, furniture makers and construction, not just the woods.

We want people to know the Grown in Britain logo because that way the timber they are buying is sustainable, legal and home-grown.” Effectively, good management is rewarded by certification which can result in a range of benefits like carbon sequestration, timber, improved biodiversity and flood management.

Grown in Britain is a not-for-profit company that gets involved in research projects with several partners. They are currently working closely with London Metropolitan University and Birling Estate on the Home Grown House project.

Using domestically grown timber and round-wood thinnings, the project is investigating how local, coppiced wood can be used in low-cost house construction and the locally grown sweet chestnut timber is being tested for its durability and mechanical properties.

Coppicing is a traditional method of chopping some young wood stems periodically while allowing the forest to continue growing.

Rachel explained GiB is also extremely concerned about plant biosecurity in the UK, as pests are most commonly introduced through the movement of live plants.

GiB is a certification body for the Plant Healthy Certification Scheme and she encourages nurseries, garden centres, plant retailers and public bodies to take the online assessment on the Plant Healthy website to sense check their level of risk. The Plant Healthy mark is only awarded to a business or a specific site.

“This is because on products, as soon as that product moves, the risk also changes. Plant Healthy aims to make the movement of all plant material more biosecure”. 16 well-known UK companies have joined the scheme including Barcham Trees, English Woodlands, Wyevale Nursery and many more.

GiB is working in partnership with the Morgan Sindall Group, Blenheim Palace and Nicholsons Nurseries in planting new woods in Oxfordshire, which will incorporate 28 carefully selected varieties of trees.

These include hornbeam, lime, sycamore, wild cherry, oak, Norway maple, alder and beech in the mixed woodlands with an understory of woody shrub species including hazel, hawthorn, viburnums, euonymus and dogwoods to create a diverse and self-sustaining eco-system.

Experimental species will also be included to assess climate resilience and a small percentage of conifers planted to provide winter habitats for wildlife.

How can I make sure the wood I use is from a sustainable source?

sustainable wood source

Image credit: @brittpixx

1. Trace the timber – Where does it come from?

Tracing the timber you buy to a forest with a fully implemented forest management plan in line with the UK Forestry Standard (UKFS) requirements and guidelines is essential.

2. Check with local councils and businesses

Councils are advised by government policy and these days everybody wants to show their green credentials. Councils should have policies for locally grown hardwood for use for seats and benches and also keep the environment in mind for the management of their green spaces.

3. Check your woodfuel meets the Timber Standard for Heat and Electricity (TSHE)

Wood biomass. This is a standard to show how the land criteria will apply to any supplier who generates heat and electricity from woody biomass under the Renewable Heat Incentive, Renewables Obligation, and Contracts for Difference.

How can you help?

  1. Consider if you really need virgin wood. Could you use some second-hand wood or upcycle pallets and old garden furniture?
  2. Keep your wood products for as long as possible. If we use old wood to make furniture and keep that table/wardrobe for our lifetime, then the carbon sequestration works and it can be passed down from generation to generation. If you dump the sofa for a more modern one, all that carbon sequestration is wasted. Put it on freecycle.com and make sure it gets a new home!
  3. Only buy wood with the FSC, PEFC, or similar logos to ensure that it is grown in a managed forest. You are the consumer and your money counts.
  4. Make your own wood fuel. Dry your own wood for 2 years to decrease the moisture content. This is very sustainable and involves no travel miles. Branch prunings or vines make excellent kindling. Use the ash created to fertilise your plants too.
  5. Consider attending some workshops about the management of any forest you are responsible for. See FSC and links below.
  6. Buy some land to re-plant with native trees – speak to the organisations listed in this article for advice. Many local owners are working to create more sustainable wood for fuel and create recreational space to enjoy.

What treatments are used on wood and how sustainable are they?

A range of treatments from chemical-free thermal heat treatment to staining and oiling are available to prolong the life of wood.

If using paint, opt for low VOC (volatile organic compounds) formulas and choose natural resins over harmful varnishes.

Teak oil is fantastic for wood maintenance. However, oil needs to be re-applied annually so make sure you use an oil that is sourced locally if possible.

Some good news stories about timber and forests

timber news

Image credit: @nationaltrustsouthwest

  1. In Finland, experiments are converting Norway spruce to a cotton-like textile. Cotton is a very water-hungry crop and uses a lot of pesticides. By substituting a locally grown tree, this is good news both for the textile industry and well-managed forests.
  2. Pesticide use can be restricted by growing pest-resistant trees. Some cedar trees have a very strong scent, which actually deters pests. Cedar of Lebanon is used as exterior cladding in southern Europe and its ability to repel insects is the main reason.
  3. Partnerships like Grown in Britain along with universities, companies and private landowners are happening all over Britain. You can find one locally.
  4. Small local woodland areas can gain accreditation (using the information above) and funding to manage them but you need committed people with time in the team.
  5. Local councils. You can make your opinions known in their timber procurement policy. Ask your council to specify locally grown hardwoods to make benches in parks and encourage them to join the Plant Healthy movement for sustainable nursery plants for parks and public gardens.

Some websites to help


How to Find Sustainably Sourced Wood in the UK-min

Save this pin for later
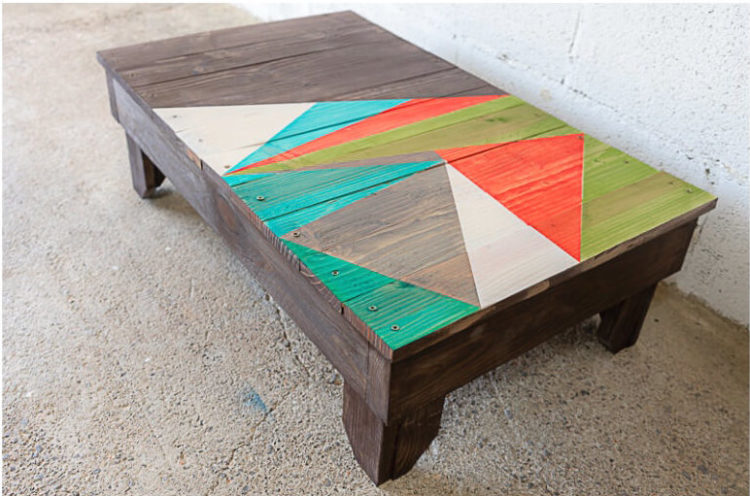
10 Deck Planter Box Ideas to Liven up Your Dull Decking

Are you thinking of decorating your decking with a few planters? There are so many options that you might get a bit overwhelmed. In this article, we’ll look at some deck planter box ideas to spruce up your outdoor space.

Deck Planter Box Ideas

Let’s take a look at what we can find.

1. Permanent deck planter box

permanenet planters

Image credit: Piqsels

Permanent planters are great for large decked areas but remember once they’re built, there’s no moving them.  These structures can be designed to complement your deck and you can plant flowers and other foliage to match the rest of your decor.

In the long run, permanent planters will work best. You won’t need to worry about staining on your deck or about where the water goes when your planters drain. If designed correctly, the water should just drain away into your garden.

2. Recycled can planters

recycled planters

Give your tins a new life. Image credit: Pxfuel

If you love your environment, you’ll like this idea a lot. These planters are made from recycled tin cans. If you have a few of these bad boys lying around your garage or home, why not turn them into great-looking planters?

This is also a fun project to do with kids. They can use the tins as a canvas before you put their creations up on the wall.

3. Planter stands

planter stands

Free up floor space without damaging the walls. Image credit: Pxfuel

Planter stands are great for creating a green wall of plants without damaging the wall. You can simply fill a few planters with the greens of your choice and place them on the stand.

These stands are also great floor space-savers. If you have a lot of plants, finding space for them can become a challenge. Fortunately, a planter stand solves this problem while introducing you to the world of vertical gardening.

4. Wall planter boxes

wall planter boxes

Go bold with wall boxes. Image credit: Pxfuel

If you want to do something a little different, then this idea is definitely for you. You will need to attach a few wooden boxes to the wall, making sure they’re quite secure since plants can be heavy. Choose your plants, pot them and add them to the boxes to create a striking effect.

5. Recycled decking hanging planters

recycled hanging planters

Spice up deck railings with brightly coloured pots. Image credit: Pxfuel

If you have any empty metal buckets lying around, you can easily create these planters. Simply attach a metal hanger that’s strong enough to support the filled bucket.

Paint the buckets any colour you like and hang them on the deck railings. They will add colour and can even complement your decor if painted colours that match.

More on this: 5 Simple Hanging Planter Box Ideas

6. Car tyre planters

car tyre planters

There’s actually a lot you can do in the garden with old tyres. Image credit: Piqsels

Everyone needs to change their car’s tyres every once in a while. Fortunately, there are many ways you can reuse the old tyres to decorate your garden, deck and patio.

You can place the tyres on the wall and place plants inside the rim, simply put them on the ground and fill with soil or create intricate designs like the picture above. For this to work, all you need is some imagination (and of course old tyres).

7. Planters for open decks

planters for open decks

Ceramic or concrete planters are ideal for open decks. Image credit: Piqsels

If you have a deck that’s exposed to the elements, you want planters that can handle the strain. It’s usually best to get large ceramic planters or even those made from concrete. The heavier they are the better.

These planters will need to withstand strong wind and rain. For this reason, you don’t want anything small and light or made from wood. Small planters will easily be tipped over and break while wooden planters will eventually start to rot due to the sun and rain exposure.

Fortunately, ceramic and concrete planters come in many shapes and sizes so you can choose the best planters for your deck.

8. Deck planters made from pallets

planters made from pallets

Pallets are incredibly versatile. Image credit: Pxfuel

Pallets are excellent for a wide range of garden projects, as well as planter holders. They can also become planters if you’re willing to do a little building (check out our pallet planter guide). No matter what you’re up for, you can use pallets against the wall on your deck to grow a variety of plants.

Simply paint the planter the colour of your choice, add a plank or two where required and insert your planters.

9. Railing planters

pine wood over railing planter box

Railing planters provide a simple way to embellish a deck. Image: Pinterest

Railing planters are great for decks with limited space. They also act as excellent decorations. Simply attach one to your railing, add some plants and there you go.  Railing planters come in a wide variety of designs so you can choose one that appeals to you.

10. Decking hanging baskets

hanging baskets filled with flowering annuals

Go for hanging baskets to create that cozy vibe on your deck. Credit: Shutterstock

Last but not least is the hanging basket. These planters are great for decks with little or no space for standing planters. You can hang them at the edge of the roof or even on metal stands inserted in the ground next to your deck. No matter what you decide to do with the basket, they are guaranteed to look great.

There are so many decorative planter box ideas for decks!


Now that you have a few ideas of how to integrate planters with your decking, you can finally go shopping. Hunt down the planter of your choice and bring it home. Just remember to make sure the planter is heavy and durable enough to withstand the weather conditions it will be exposed to.

Happy garden planning!

10 deck planter box ideas to liven up your dull decking-min

Save this pin for later
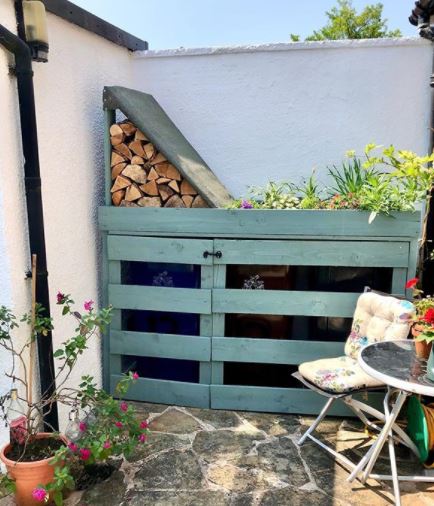
How to Make an Angled Planter Box (Step by Step)

Tired of straight lines and average planter boxes? You could build an angled planter box instead.

Angled planter boxes come in a variety of shapes, styles and sizes, they’re also known as tapered planter boxes.

In this article, we’ll show you how to build a simple angled planter box from readily available materials in just a few hours. We’ll also share angled planter box plans and ideas that offer different takes on this project. Ready when you are!

How to build an angled planter box step by step

Getting the measurements and the cuts right is crucial to completing this project successfully. Once you’ve cut the wood, you can attach the trim to the sides and assemble the front, back, and bottom. Staining and adding landscaping fabric to your angled box will make it look better and last longer.

Find the detailed step-by-step instructions for this project below.

Note: Our instructions are for a single angled planter box that’s about 25 inches long and 8-inches tall, and that tapers from a width of 12 inches at the top to 8 inches at the bottom.

tapered planter box

Add a touch of style to your garden with a tapered planter box. Image credit: @timberandfall

Materials and tools you’ll need

Step 1 – Measure and cut the front and back

Lay two wooden boards or pickets side by side horizontally on your worktable. Mark 12 inches at the top and 8 inches at the bottom.

Next, use the square to find the centre of the top line to guide your cut. To give the planter its angle, draw a line from the top marks to the bottom ones. In other words, connect the first top left 12-inch mark to the bottom 8-inch mark and repeat at the other end.

Tip: Adjust the angle of your mitre saw for the best cut. This could mean deviating slightly from the theoretical 16-degree angle.

Repeat this process to make the other side of the planter.

Step 2 – Cut the sides

After you’ve cut the back of the planter, cut the sides out of the remaining boards or picket.

Using a 90-degree angle on your saw, cut four 23-inch boards.

Step 3 – Make the trim strips

To make your angled planter look nice and level, you’ll have to cut some trim strips. These are strips of wood for levelling the wood pieces you’ve cut during the steps above and make them fit in nicely.

You need to cut eight 8.25-inch trim pieces in total. Cut four pieces with the depth side down and four with the width side down.

Step 4 – Get the bottom ready

You don’t need any special wood for the bottom. You can use leftover boards or anything similar. But the bottom should be at least half an inch thick and preferably more to take the weight of the soil.

Cut the bottom boards at 23 inches by 7 inches.

Step 5 – Add the sides to the angled trim

Now it’s time to put the sides and the trim pieces together.

Drill two pilot holes at the edge of each of the side boards with matching holes in the trim pieces. The trim will be holding the boards together. Use ¾ inch exterior screws to fix the sides.

Important: The trim should overhang the side boards by about half an inch. It should be flush with the top.

Each of the two sides of the planter box will need two trim pieces, one at each end. You’ll be using a total of four trim pieces.

Step 6 – Attach the front and back

Assemble the front and back of the angled planter box using the nail gun. Make sure the top of the planter is flush.

Step 7 – Add the bottom

Install the bottom boards, making sure they’re even. Fix them in place with the nail gun at an angle from both the front and the back.

Step 8 – Add the trim to the front and back boards

Nail the trim to the front and back sides. It should cover the holes you’ve made to fix the bottom boards.

Optional: You can also add four pieces of trim to the top of the angled planter box. Since in practice the exact dimensions for the top trim can vary, it’s best to cut and attach them last.

Step 9 – Stain the wood to make it last longer

Use a safe stain and apply it according to the instructions on the label. If you plan on growing herbs in your new angled planter box, make sure the stain doesn’t contain toxic substances.

More than protecting the wood, a stain will also make your planter box look finished.

staining cedar planter box

Credit: Shutterstock

Step 10 – Add the landscaping fabric

You’re not quite done yet. After the wood stain dries, cut the landscaping fabric, and staple it inside the box. Fold and tuck in the sides, making sure they reach the top of the walls without coming out.

Tip: Depending on how thick the fabric is, you may want to fold it in two.

After the fabric is in place, add in the soil and plant some flowers, scented herbs or both!

Angled planter box plans and ideas to inspire you

It’s good to start with a simple angled planter box like the one we shared above. It will help you get a feel for the process and the minor adjustments needed as you assemble all the pieces, such as the trim at the top.

Once you’ve built your first simple angled planter box, you can try other designs. Here are some inspired angled planter box ideas and plans for you to explore:

Tall angled planters

Need to fill up an empty corner or create more privacy around a seating area? You could create some tall angled planters. Get the plans here.

tall planters

Image: Pinterest

Angled cedar planter

Cedar’s a great wood for planters as it’s naturally resistant to rot. This cedar planter has a nice angle that adds a touch of style to it. It’s a worthy addition to just about any garden. Check out the plans for this angled cedar planter.

angled cedar planter

Image: Pinterest

Minimalist tapered wooden planter on legs

Got some spare wooden boards? Turn them into a minimalist tapered planter. Adding legs can make it look even taller without requiring as much wood. Plus, the legs may also help to improve drainage. Get the plans for the minimalist tapered planter.

minimalist tapered planter on legs

Image: Pinterest

Raised angled pallet planter

If you need a large angled planter box for your garden or vegetable plot, this may be just right for you. You can build it from pallets, so it’s cost-effective. Check out the angled pallet planter box plans.

raised angled pallet planter

Image: Pinterest

Angled pyramid planter boxes

Angled pyramid planter boxes look anything but boring. You can make them from pallets or other wood leftovers. They don’t require too many materials either. Check out the plans for these pyramid angled planters.

angled pyramid planter boxes

Image: Pinterest

The bottom line

Building angled planter boxes requires a few more measurements than your average wood planters and you have to be careful with the angle of the cuts, too. But you don’t need any special skills or tools to build an angled planter box from scratch. So, if it’s time to add a new planter to your green patch, why not make it an angled planter?

How to make an angled planter box (step by step)-min

Save this pin for later
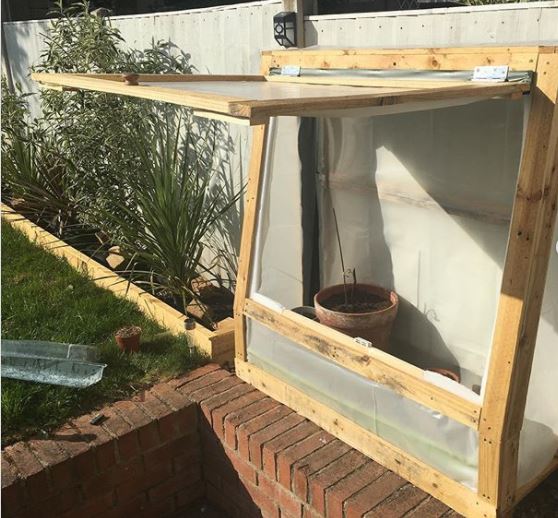
Planter Boxes With Bench Seating Ideas

After a long day in the garden, whether you’ve mowed the lawn, tidied up or deadheaded flowers, it’s very relaxing to flop onto a garden seat with a cuppa and admire your hard work.

Some gardeners incorporate planter boxes into their garden bench seats or design the seating as an integral part of the garden.

You can go for imaginative, rustic seating designs, including old, sawn-off tree branches, choose upcycled wood and plastic planter benches or opt for a sparkling metal design to add elegance to your outdoor space.

Whether you prefer a raised bed with a lounger bench seat or two planter boxes with a bench in between, keep reading for ideas to find one that best suits your space.

raised bed lounger

Image credit: @letsfrolictogether

Before you start, consider:

1. What can you plant in a bench planter?

Obviously, this depends on the size of the planter but think nothing too tall unless you are going to use it to cast some shade intentionally.

Herbs are the perfect additions for a bench planter. Lavender is a good-sized shrub and casts perfume around the area to transform it into a relaxing haven, perfect for a siesta. Sweet-smelling wallflowers, followed by sweet peas will provide glorious scents all summer long.

The bench may be overly popular with adolescents for weekend snoozes but can double up as an area where parents and grandparents can have that afternoon nap (I mean, read the newspaper of course!).  This brings me nicely to the next consideration…

2. Who is going to use the bench?

If the bench has mixed-aged users, it may need to withstand a lot of jumping and juggling, afternoon naps and lounging about playing on iPad moments… The bench needs to be comfortable and strong while the planter needs to be able to withstand sprawling legs, pets or snoozing adults. My advice is that the plants need to be fairly replaceable. Take cuttings!

bench planter kids

A bench planter will be loved by all ages! Image credit: @ourcapefarmcharm

Here Are Some Planter Seating Ideas to Get You Started!

1. British Recycled Plastics matching bench and planter box

No splinters, no splits and no rot mean this range of outdoor recycled plastic benches and seats is low maintenance, weatherproof, safe and designed to deal with the most demanding environment (like the British winter).

These designs have the added value of being recycled, they’re made in Britain and they have planters to match. Placed altogether in your garden, you can be sure that you are bringing true British style to your outdoor space.

Another alternative is two planters fixed to a bench. These can be bought in plastic or metal and you can just add small annuals to the planters for a great place to have your lunch.

2. Sawn-off tree branch seat and matching planter

If any of your larger trees require serious pruning, you may be able to make a very unique planter and seat from the logs. Make sure the branch sits securely on the ground and is large enough to hold people, or at least one person.

sawn-off tree bench

Image credit: @janne_wood_carving

  1. Mark out the measurements of the area you want to sit on.
  2. With a saw, you can remove a section big enough to make a seating area. If the branch is big enough, make some back support by cutting out a further section vertically. This can look amazing when you add comfy cushions.
  3. If there is another branch, this can be fashioned into your planter. Because it is from the same tree, the planter bark will match the seat perfectly. A curling branch offers an extremely natural-looking planter or you can add some wire to place a plant pot in and make a very artistic shape.
sequoia planter

This planter has been made from a sequoia tree branch. Image credit: @tribecagrain

This idea not only depends on the branches available but most importantly,  your imagination. Read on for suggestions for what you can plant in your planter.

You can chop any smaller pieces of leftover wood to use as fuel for a wood-burning stove. Dry them undercover for 2 years before you burn them.

3. Square planter box with seats on each side

Make a striking installation on your lawn with a square planter box that doubles up as a seat.

square planter bench

Image credit: Sitecraft

Choose a sunny spot that plants will love. Think of the soil depth they will need and use the centre of the planter box as a direct soil planter, where you do not need a plastic liner. In this way, you can plant a small tree like an apple or cherry on rooted stock so that it doesn’t grow too tall.

Plan the size depending on available space. A 1-metre square is fine if space is tight but if you can fit a 2-5 metre square planter in, it’ll provide you with a fantastic seating area and a handy place to store tools.

Build your planter at least 3 planks tall and measure the length. Assemble 4 sets of your chosen length to make the 4 sides of the planter box. Use gloves and protective eyewear and have screws or nails handy. You may also want some wood glue to give a more secure binding for the plank seats.

Level off the area underneath the side walls and place guides at the 4 corners. Then assemble the planks ensuring you have a correct 90-degree angle at the corners. Continue to add planks sequentially until your planter is completed.

Make the seats with 2 supports for each plank, and nail these securely to the wall of the planter box. Then attach the seat plank and secure it in place with screws or nails and wood glue (if you decide to use that too). The seats can be sanded down and protected with varnish, oil or whatever method you choose.

If the centrepiece houses a tree, it’s best to add this first, see more below. If there is no tree, then it’s time for planting!

Tina’s Tips:

If you’re planting a tree in the centre, you’ll need to dig a hole deeper than the width and depth of the root ball of your tree and allow extra space for the roots to expand. Please consider adding manure and extra compost mixed with garden soil to nourish it well.

Water the tree in well for its first season and when you see new leaf growth, you know it’s beginning to feel comfortable. You can also mulch the topsoil to keep weeds and pests at bay. This will affect what you plant next.

Advice for plants to accompany a tree:

If you have decided to plant a tree in the centre, then you can use the surrounding soil to add life in different seasons. It’s probably best to have plants that will not fight for space with your tree, so small bulbs and seasonal annuals are fine.

Remember that your planter box has 4 sides so 2 sides will be very sunny for more of the day and the other 2 sides will tend to be shadier. Choose plants accordingly!

Plants for all seasons

Spring

You can plant bulbs for early spring, like grape hyacinths and snowdrops, followed by primroses, pansies and tulips for later in the spring. Make sure taller plants are in the middle.

colorful flowers

Image credit: @frostfarmsgardencenter

Summer

Follow Spring bulbs with:

Autumn:

autumn greens

Image credit: @rom_the_hedge_

Winter

Planters can look bare at this time of year so make sure there are a few:

So the planting is done. Now sit back and enjoy the view of your garden from different sides.

DIY constructions 

1. Upgrade an existing garden bench

Just add 2 vertical gardening planter boxes beside it! If the planters are a little unstable, attach them to your bench. This is worth doing if you have balls being thrown around, boisterous pets or younger gardeners.

2. Trellis the sides of your bench

If you have a couple of large planter boxes and a bench available, why not add some trellis support for climbers at either end so you can enjoy some climbing plants while sitting there?

trellis sides bench

Image credit: @handmadebyellis

3. L-shaped corner bench with planter box

If you have a corner to fill this is a beautiful way to do it. Place two wooden benches in an L shape with a planter between them.

How to build make a planter box seat/bench 

Bricks, concrete, wood, pallets (and cushions) can all be used to make a comfortable outdoor seating area. There are lots of ideas in these links to help:

Bench with planter box designs

Planter boxes with bench seating ideas

Save this pin for later

How to Build a DIY Planter Box With a Privacy Screen Attached

Whether you want to create a new seating area in your garden or simply mask an exposed part of your property, a privacy screen planter is a space-efficient way to do it.

Privacy screen planters can add personality to any garden. They fill space beautifully and increase your privacy without sacrificing style, plus, you can grow several plants in addition to climbers.

Here’s how to build a privacy screen planter, one step at a time.

How to Build a DIY Planter Box With a Privacy Screen Attached 1

Image credit: @woodluck_product

How to make a planter box with privacy screen step by step

For this project, you can adapt the length of the wood pieces to your needs. Start on paper and then cut the wood, assemble the frame, add the cedar boards, install the lattice or pallet board, and add the finishing touches. Having someone to help you with this project will make everything easier.

Let’s take a closer look at the key steps involved:

Materials you’ll need

Step 1 – Cut the wood

You can make the privacy screen as big as you need it to be. Cut the lumber for the frame to the desired length. For a sturdy frame, you’ll need four 2×6 long pieces and six 2×6 shorter pieces for the sides. You’ll also need two 2×6 shorter pieces for extra support at the centre of the longer sides.

Important: Determine the height of the privacy screen. Based on this, you may also have to cut the two 4x4s that will support it.

Step 2 – Assemble the long sides of the frame

Place one of the shorter pieces of 2×6 board vertically at the centre of a long 2×6 board. Drill diagonal pilot holes in it. Drive screws through the diagonal holes and fix the short piece in place.

Turn it over and attach the other long 2×6 board to it. For this, drive holes through the other end of the shorter piece and into the long board. You should end up with a large, horizontal “H”.

Repeat the process for the other part of the frame. Don’t worry about the ends of the frame just yet. You’ll attach them to the 4x4s later.

Step 3 – Assemble the sides of the frame

Now it’s time to build the sides of the frame.

Attach two short 2×6 pieces to a side piece using one diagonal pilot hole and screw for each. This part of the frame should look like a big “C”.

Repeat the process for the other side.

Step 4 – Attach the frame to the privacy screen supports

Attach the two “C” sides to one of the longer, upturned “H” sides to create the front of the frame. Drive two or more screws where the wood meets.

Fix the 4x4s with screws to the ends of the other horizontal “H” to create the back of the frame.

Tip: It’s easier to do this with the 4x4s lying on the ground.

Next, you want to attach the back side of the frame to the front. For this, you’ll have to drive some more screws through the 4x4s so that they reach the ends of the “C” sides.

Step 5 – Add the floorboards

Add the floorboards, screwing each in place with two 2 ½ inch screws at both ends. Work this part with the frame and screen posts standing up.

Note: Depending on the size of the planter, you may have to use more than 10 floorboards.

Step 6 – Add the feet

So that the frame doesn’t sit directly on the ground, you can add 4 feet to the frame. Get someone to help you handle the frame. Fix the feet with screws.

Step 7 – Add the cedar boards

Now it’s time to make your privacy screen planter look nice.

Add the 1×6 cedar boards to the frame you’ve made. Start from the top so that the first board is flush with the top of the frame. Fix each board with two or more screws at both ends.

Work the front and back first and then the sides. Depending on the width you want for the planter, you could make two or three side boards from one long 1×6 cedar board.

Step 8 – Install the privacy screen

Whether you choose to use a wooden lattice, pallet, or wood boards, the process is the same.

Simply nail the privacy screen to the 4×4 posts. You may have to use a jigsaw to cut the lattice or pallet to the right size to fit the boards.

Tip: If you use wood boards to build a custom screen, you can reinforce the boards with a longer vertical board that runs behind the screen. Or you can use long boards that reach from one 4×4 post to the other.

Step 9 – Add the finishing touches

Glue the finials to the top of the 4x4s for a more finished look. If you use a pallet board or nail boards across the posts, finials may not be necessary.

Also optional is to add four horizontal boards to the top of the box. Cut them at a 45-degree angle so that they fit together well.

Step 10 – Stain the wood

You’re almost there, make sure you don’t skip this step.

Staining your new privacy screen planter will make it ready for outside weather. Use a water-repellent wood stain.

staining cedar planter box

Credit: Shutterstock

Tip: Stain all of it, including the inside and the back, to make sure it won’t rot.

Step 11 – Line the planter box

Last but not least, prepare the box for the soil.

Line the inside of the box with landscape fabric. Staple it in place so you can fill the planter with soil without worrying that the fabric may shift under it.

Important: Make sure the fabric you use allows for water to drain from the bottom of the planter. If you’re not sure, make some holes in the fabric.

And with that, you’ve finished building your planter box with privacy screen.

Tip: You can put a climbing plant in the planter alongside other plants so that it will cover the lattice or pallet.

More on this: How to Waterproof A Wooden Planter Box

How to make a planter box privacy screen the easy way

You can save time building a planter box privacy screen by buying a lattice or using a pallet box. You can then simply attach it to the 4×4 posts at the back of the planter or attach it to a custom-sized wooden frame. Then simply fix this to the back of the planter with screws.

Building a privacy screen this way will save you time and money compared to assembling it from boards. The only exception is if you already have some spare wood boards. You can assemble these separately on a wooden frame, fixing them with a vertical board in the middle. Then simply add the screen to the planter.

How to build a screen planter box fast

Our step-by-step guide showed you how to build a stylish planter box with privacy screen. But if you already have some spare lumber and wooden boards, you can simplify the process.

You can build a simple planter box with 8 long boards, 8 shorter side boards, and four 4×4 lumber pieces.

Fix 4 of the long boards and 4 of the side boards to a piece of lumber at each end, screwing it in place with an electric screwdriver.

Repeat for the other side, and you’ll have a simple, bottomless, and legless planter box that you can put directly on the ground.

Line the box with landscape fabric and fix an upright pallet or lattice panel to the back of the box with screws. And with that, you’ve finished with the box and got rid of the boards, too.

DIY planter box with screen ideas

Planter boxes with screens don’t always have to be made of wood. You can play around with other materials, some of which are more resistant. Not all alternative materials look rustic, it’s true. But the end result doesn’t have to look bad.

Here are some interesting takes on the classic planter box with screen:

Brick and PVC pipe privacy screen planter box

If you don’t mind messing around with mortar, you can try building this brick planter box. Get enough bricks for the size you want the planter to be and cement them in place. For the privacy screen, you can use PVC pipes. You’ll need two longer and two shorter PVC pipes for the frame and larger pipe cuttings for the trellis. Glue them with waterproof glue and paint them any colour you want.

Artificial bamboo plants planter box screen

One of the easiest ways to create a privacy screen planter box is to stick tall artificial bamboo plants into an existing planter box. It may not provide as much privacy as a pallet planter, but it works. You’ll need to anchor the artificial shoots well and place the planter box in a sheltered position.

Artificial Bamboo Plants Planter Box Screen

Credit: Pinterest

Wire mesh planter box privacy screen

You can also use wire mesh to create a privacy screen for your planter boxes. You’ll need patience to wait for the climbing plants to cover the mesh, but if you need several screens for multiple planter boxes, it can be a cost-effective solution. You can simply stretch the wire across two 4×4 wooden posts that you fix inside the planter box with clamps and screws.

Wire Mesh Planter Box Privacy Screen

Credit: Pinterest

The wrap up

A planter box with privacy screen can become a standout feature in your garden. More than its functional applications, it can look so good you’ll want to create a seating area near it.

Taking the time to build it well the first time will mean you can enjoy it for years to come. Follow our steps and tips and you can’t go wrong.

How to build a diy planter box with a privacy screen attached-min

Save this pin for later

Make a DIY Self-Watering Planter Box Without Engineering PhD

Do you tend to forget to water your plants or would you just like to go away for a few days? Don’t worry, self-watering planter boxes are there to help you out. Buying a self-watering planter can be expensive, but don’t fret, you can make your own DIY watering system at home.

Self-watering planters are designed to make life easier for all plant lovers, here’s how they work.

What is a self-watering planter?

Self-watering planters contain an inbuilt system that allows your plants access to water over a period of time without drowning them. These types of planters are very handy, whether you have a large operation or are just off for a long weekend away.

Self-watering planters work with a pipe system that is filled up with water. It is quite simple to make your own DIY watering system for planters that don’t have one.

self watering system

Keep your plants looking lush all summer long with a self-watering system. Image credit: @adelaidehillsvegiegardens

How to Build a DIY self-watering planter box

If you don’t have a planter box, you can buy one or make one yourself. There are lots of articles on this website that explain how to build different kinds of planter boxes. Simply find the plans you like and start building.

Once you have a planter box, you can address the self-watering system. Here’s what you’ll need for this project:

Tools:

Supplies:

Building a self watering planter:

Once you have all the supplies and tools ready, take the following steps to set up your self-watering system:

Step 1: Line the planter

To line your planter, get out your carpenter stapler and plastic lining. The liner will protect your planter against excess moisture which in turn prolongs the durability of the planter. This is possible due to the liner slowing down the rotting process since contact with moisture is limited.

Use a measuring tape to measure the inside of the planter and then the plastic liner. This will help you to figure out how big the liner needs to be. Make neat cuts in the liner once you’re happy with the measurements.

Place some glue on the inside of the planter to help secure the liner in place. Once done, place the liner in the box and smooth out all the creases. Staple it in place once you’re happy with it.

You will end up with four flaps in the corners, simply fold them sideways and secure them nicely against the side of the box with some staples. For the last step, fold over the top edges to neaten the liner and staple it in place.

Step 2: Add the drainpipe

It is very important to make sure the drainpipe will sit quite tight inside the planter. To get this right, stretch out and cut the drainpipe to a length equal to the length of the inside of the planter. Make sure to cut enough pieces to cover almost the whole bottom of the planter. You can leave a few tiny spaces between the pipes.

Once you’ve cut the pipes, use a piece of landscape fabric and some duct tape to cover both ends of the drainpipe. Repeat until all the open ends of the drainpipes are covered. Lay the pipes side by side in the planter before moving on to the next step.

Step 3: Add the inlet pipe

The PVC pipes you gathered will serve as the inlet pipe. Take one of the PVC pipes and cut one end so that it forms a sharp point. With the utility knife, cut a small slit in the drainpipe closest to one of the corners.

This cut should be just large enough to allow the PVC pipe to fit in it. The fit will be quite tight and you might need to force the PVC pipe into the drainpipe. If the fit is too loose, secure the PVC pipe and drainpipe together with duct tape

fit self-watering systems into any planter

You can fit self-watering systems into any planter. Image credit: @learngrowedseries

Step 4: Add an overflow drain

In the corner opposite the one with the inlet pipe, drill a hole large enough to fit the flexible ¾ inch hose. You will need to make a small cut in the liner and into the drainpipe to fit the hose through.

You can create a seal around the drainpipe and hose with duct tape. This will prevent any water from leaking out.

Step 5: Add the base potting mix

It is best to create a mixture of vermiculite and peat moss in a ratio of 2:1 to fill the bottom of your planter. Make sure it goes between the drain pipes and covers completely. This mixture will help with drainage while still retaining some water.

Over the base mixture, you can add regular potting soil of your choice. In this soil, you can grow any plants you want.

vermiculite

Vermiculite will absorb water and help to keep the watering system working. Image credit: @dergenialegemuesegarten

How does it work?

Once you’ve finished, you will need to fill up the self-watering system. To do this, simply take a hose pipe and allow water to run into the inlet pipe. It will take around 6 or 7 minutes to fill up the whole system. You know it’s ready once the water starts to run out of the overflow pipe.

Now you might be wondering how exactly this system works since the pipes aren’t connected? It’s really quite simple. You will be filling up the first pipe directly since it’s connected to the inlet. From there the water will drain out of the covered end spilling over into the space filled by the vermiculite mixture.

Once the vermiculite has absorbed as much water as it can hold, the extra water will start to seep into the rest of the pipes filling them up in the process. Once your system reaches capacity and simply can’t hold any more water, the water will start to flow out of the overflow drain. This is how you know the system is saturated.

The time between refilling the system will depend on the type of plants as well as the location of your planter. Some plants are more thirsty and will drain the system faster. Planters placed in the sun will also drain more quickly due to evaporation.

As the water disappears from the vermiculite mixture, water from the pipes will slowly drain out and be reabsorbed by the vermiculite. This is how the system keeps going and keeps your plants moist even without daily watering.

FAQs

Do self-watering raised beds work?

Definitely. Self-watering raised beds deliver water directly to the roots of your plants. This allows them moisture even on the hottest of days when you’re off on a long weekend trip. Self-watering raised beds are very handy if you don’t have the time to water your garden every day or even several times a day depending on the season.

How does a self-watering planter box work?

Self-watering planter boxes deliver water directly to the roots of your plants without drowning them. The water gets stored in the vermiculite and drainpipes at the bottom of your planter. As the water gets absorbed or evaporates, new water will drain out of the pipes to replace the lost moisture. This will sustain your plants for a few days without any watering from you.

Do you need to put rocks at the bottom of a self-watering planter?

No, self-watering planters don’t need the rocks. The drainpipes function as a storage unit keeping excess moisture away from your plants. This will prevent them from drowning and developing root rot while still allowing sufficient moisture for growth.

Make a diy self-watering planter box without engineering phd-min

Save this pin for later

How to Make a DIY Potato Planter Box

Baked, boiled, roasted or mashed, potatoes are one of the most delicious and versatile vegetables and they’re also really easy to grow!

You can sow seed potatoes directly into the ground or plant them into containers. Generally speaking, early and salad potatoes grow well in pots. Let’s take a look at the kinds of containers you can grow potatoes in and how to make your own potato planter box.

What type of containers can I grow potatoes in?

Potatoes really are one of the easiest vegetables to grow and will be happy in almost any container, as long as it’s at least 15 inches deep. A good rule is to plant one potato plant per 10 litres of container space, that’s about the size of an average bucket.

Think dustbins, barrels, large sacks and plastic boxes. As the potatoes grow, you’ll need to heap soil on top of them so the deeper the container, the more potatoes you can grow and harvest! Make sure any pots you choose have drainage holes in the bottom.

How can I make a potato box planter?

You don’t need advanced DIY skills to make a potato planter, just some wood (old pallets are perfect), basic tools and a little time! There are many different online tutorials that show you how to build a potato planter box.

Here are some ideas to get you started:

Wooden pallet potato box

This easy to follow guide from Instructables Living shows you how to make a planter from 2-4 wooden pallets. Because growing potatoes involves adding layers of soil as they grow, you can gradually add planks to the planter box frame as the potato plants grow taller. It’s a great way to maximise your potato crop and gives you chance to source more wooden planks should you run out.

pallet potato box

Image credit: Instructables Living

Plank Potato Box

This box is similar to the pallet planter, in that you continue to add planks as the plant grows. This handy guide to building a potato planter box that grows with your plant from My Outdoor Plans contains a series of illustrated potato planter box plans to help you out.

Hessian bag potato planter

You can create an effective homemade potato planter from inexpensive hessian fabric. Hessian is ideal for planters as it’s tough and drains brilliantly. You can buy hessian from craft shops, online stores or use old sacking. The key to making an effective planter for your potatoes is to make a bottom for the bag so it will stand up.

Tip: You can also use empty grow bags. Start by rolling them down and as the potato plant grows, just roll the bag up and add more compost.

bag potato planter

Make your own hessian potato sacks. Image credit: Pinterest

How do I plant seed potatoes?

Potatoes are one of the most productive crops that you can grow. For every pound of potatoes you plant, you can expect to harvest three to five pounds, that’s a lot of spuds!

There are a few schools of thought when it comes to planting your seed potatoes, but one of the best ways to get the most from them is to cut them into smaller sized pieces, with each piece containing 2 eyes, before planting.

Wait 2-3 days for the cut pieces to callus over before planting, this protects the seed potatoes from disease.

Tip: Plant seed potatoes before they sprout to prevent the tender shoots from being damaged.

plant seed potatoes

Image credit: Plews Garden Design

Sow your seed potatoes into 4-6 inches of good quality potting soil about 2 weeks after the last frost. Make sure you bring them inside should a rogue frost strike after this point. You only need to cover them with an inch or two of soil to begin with.

Position your potato planter in a sunny spot and water well. Water potato plants daily or more in warm, dry weather as the soil needs to be kept moist.

When your potato plant has grown about 6 inches, you need to ‘hill’ the plant. Heap soil around the plant, covering the bottom leaves. It’s the buried stems that produce potatoes. You’ll need to continue this process until you reach the top of the planter or bag. Potatoes grow fast so you’ll need to be vigilant and quick!

When your potato plant flowers, you can begin the fun job of harvesting your spuds! Once the plant yellows and dies back, it’s time to harvest any remaining potatoes.

HOW TO MAKE A POTATO PLANTER BOX-min

Save this pin for later

How to Build a Tomato Planter Box: Ideas for Healthy Plants

Tomatoes are so easy to grow that even a novice gardener can be successful! Growing tomatoes in a planter box will increase your chances of success, as this provides them with enough warmth and nutrition to last a whole growing season.

Whether you’re growing your tomatoes in pots on a window-sill, in a grow bag, a greenhouse, or alongside herbs on a sunny balcony, the basic principles will be the same. Tomato seeds are available for every taste, colour, and size you can imagine.

So what’s the best way to achieve a huge crop in a tomato planter box and how can you build one? Read on!

How to Build a Tomato Planter Box: Ideas for Healthy Plants 2

Image credit: @the_hungrynomad_

What conditions give a good crop of tomatoes?

  1. Good seeds. Buy your tomato seeds from a recognised supplier and try to buy organic seeds if you can. Sow them in pots indoors in spring and transfer them into your planter box as soon as the weather improves and there is no danger of frost.
  2. Good soil. Tomatoes are super-hungry plants and love rich, deep soil where they can spread their roots and grow side branches. Add homemade compost, manure if you can get some, and extras like wood ash, comfrey leaves and well-rotted leaf mould, to provide a balanced soil to feed the tomato plants.
  3. Sunlight. This is an absolute must for tomatoes so make sure your planter box is in a location where it has direct sunlight for as much of the day as possible.
  4. Water. Tomatoes get very thirsty so water them as part of your daily routine or even better, set up a watering system so that even if you forget, your plants still get a drink.
  5. Support. If you’ve never heard of “tying in” plants, you have now! This means tying the stem of a branch onto a support like bamboo stakes or a trellis so that the tomato can climb as high as it likes. This way you can also provide support for a bunch of tomatoes, as sometimes the weight tends to make the whole branch drop.
How to Build a Tomato Planter Box: Ideas for Healthy Plants 3

Tie fruiting tomato plants onto supports. Image credit: @suburbgardenlife

What size planter box will suit tomatoes?

You know by now that tomato plants need rich, deep soil so your planter box must be at least 1 foot deep and preferably deeper. Think of the size of a grow bag and this is for 3 plants. So if you have only 3 tomato plants, then a planter that will fit 3 plants would need to be at least 3 feet wide and 1 foot deep.

If you empty a grow bag into this planter box size, you may need to top up with compost and garden soil and other additions like sand, some manure or ash, and a handful of comfrey leaves.

See also: How To Fill A Wooden Planter Box

What material suits a planter box for tomatoes?

The nice thing about tomato plants is that they aren’t too fussy. I’ve grown tomatoes in plastic pots, ceramic planters, wooden planter boxes and grow bags, in any space I can find in a greenhouse beside cucumbers and herbs.

So if you are really new to this, choose any planter that suits your budget and try it out.  Try growing different varieties of tomatoes to find out which ones you like best. You will never go back to the dull taste of shop-bought tomatoes again!

How to Build a Tomato Planter Box: Ideas for Healthy Plants 4

Get creative with different planters, you can even grow tomatoes upside down! Image credit: @satchellsamantha

Some gardeners swear by the taste of Gardener’s Delight and others like huge plum tomatoes, which originated in Italy or Spain. In my experience, the smaller tomatoes are generally sweeter but if you’re planning on using them for pizza sauce, then the large ones do very well.

Tomatoes can be grown which are resistant to tomato blight and this is very useful in the UK summer weather. See more on diseases and pests below.

Do I need to waterproof a tomato planter box?

Yes, it’s essential to have good drainage but you’ll also want to stop water leaking from your planter box after watering. It’s also important that the planter box material doesn’t rot if it’s made from wood.

See some ideas for how to make your planter box waterproof here.

DIY tomato planter box

Tomatoes aren’t particularly fussy plants and it’s easy to build a tomato planter box that they will thrive in.

Make a planter box from a cardboard box

Make a planter box from pallets

You can make a fantastic pallet box planter for your tomato plant.

How to Build a Tomato Planter Box: Ideas for Healthy Plants 5

You can create a tomato planter from almost anything! Image credit: @lualdridge_

Make a planter box from used plastic containers

We all have old containers lying around that used to hold various paints, chicken pellets, pet food and so on. Make a hole in the base of an old pot using a drill and then line it in the same way as the cardboard box above.

Now your tomato planter box is constructed, waterproof, and full of soil, all you need to do is choose your seeds.

What kinds of tomatoes can I grow in the UK?

There are many excellent seed suppliers in the UK like Fothergills and Thompson and Morgan, and gardening centres offer a wide range of seeds from which to choose. Some tomatoes grow well outside but certain varieties of tomatoes prefer the warmth of a greenhouse so check the packet before you buy.

How to Build a Tomato Planter Box: Ideas for Healthy Plants 6

Image credit: @stillness171

What should I plant with my tomatoes in a planter box?

Tomatoes are very hungry plants but they do grow well with herbs so put some basil, chives, coriander with your tomato and you have a ready-made Italian salad to pick.

Diseases and pests that affect tomatoes

Tomato blight

This is every tomato grower’s nightmare and it spreads like wildfire so remember to use sterilised soil if you can to avoid this. It can spread from potatoes so try not to grow these plants together.

It happens in wet conditions so if it is a really dry summer you probably won’t encounter it. The leaves turn brown and die and when you look at the roots, they are brown instead of creamy white.  The tomatoes will have green spots and look diseased.

How to fix it: Get your gloves on and bag up the whole plant without spreading the fungus to plants close by. Wash your hands thoroughly after touching any diseased plants.

prevent dsease blight

Don’t let this disease blight your precious crops. Image credit @craftygem17

Pests

Pests include mainly slugs and snails, which eat the young plants. Remove them to a new location!

Red spider mites

Red spider mites attack the leaves of tomatoes in a warm dry area like a greenhouse.

How to fix it: Make a solution of washing up liquid and water and spray the plants. Rinse with fresh water and then wait to see if the little red pests have moved on. They hate damp conditions so keep that spray handy for future use.

Caterpillars may munch the leaves and snails may try to eat developing fruit so keep your eyes open and move them to a different part of the garden or compost heap if you have one.

Tomato box planter plans

You’ll need basic carpentry skills for these designs:

https://www.pinterest.co.uk/pin/606649012307248129/

https://www.youtube.com/watch?v=0-d8WcogQ70

HOW TO BUILD A TOMATO PLANTER BOX IDEAS FOR HEALTHY PLANTS-min

Save this pin for later

How to Build a Greenhouse Planter Box (Plans + Ideas)

Greenhouses, traditionally made of glass, provide a warm, safe place for plants that may be too delicate to survive outdoors during winter. Growing tender plants in a greenhouse planter box is the ultimate way to coddle them.

Many gardeners use a greenhouse, not only as protection for plants from winter frost and storms but also as a wonderful starting place for new seedlings.  Sown inside the greenhouse, the young plants remain warm and cosy before moving outside when the worst of the cold weather is over.

A greenhouse provides a stable temperature with direct sunlight, shelter and watering systems. Growing seedlings in a planter box inside the greenhouse offers gardeners an effective way to separate plants and boost yields, while also allowing safe access for children and pets.

greenhouse planter box

Fill your greenhouse with a range of planters and enjoy year-round produce. Image credit: @rebecca_anchorban_house

Why use a planter box in your greenhouse?

1. Keep things tidy

If you have younger visitors to your greenhouse, it is very easy for plants to get damaged. Space is at a premium, most plants are staked and summer climbers like cucumbers can rapidly outgrow their space.

Often there are trailing tubes of an automatic watering system curling around plant stems. So planting a few plants in a contained area like a planter box creates a tidier floor space, making it easier for everybody to walk around.

This is a plus if you have wandering cats and dogs as a physical border keeps the walkway well defined and also makes for easy cleaning and sweeping.

2. Create more space

In spring, when few plants are growing, your greenhouse will seem huge. Each year as I plant seeds and place them in the greenhouse, I forget just how little space there is by the end of the summer growing season!

A cucumber can outstrip its growing space in just 6 weeks if the weather is warm and sunny and I spend half my time in summer tying in the new growth on tomatoes and cucumbers. If the plants are growing in a planter box, they will only grow as tall as the soil conditions allow.

Unless you top up the soil fertility by feeding, a planter box may actually slow down the growth of over-vigorous plants. It is very important to revitalise the soil in planters at least every growing season to make sure it doesn’t become depleted. Use leaf mould, well-rotted manure, homemade compost and plant feed.

tidy greenhouse

Keep your greenhouse tidy and you might find space for a sofa! Image credit @climapod

3. Help prevent disease

It is easier to control plant diseases if plants are in a planter box, particularly one with separate compartments, where plants can grow independently. If plants are in the ground in greenhouse soil, there is a real risk that diseases can cross from one plant to the next.

Tomato blight in one plant will spread like wildfire if your plants are in the same soil. In a planter box, you can whip out the infected plant, cover it with plastic and remove it without letting the spores spread. Dig out the section of soil it was in and discard it. If necessary, replace all the soil in that part of the planter box and don’t plant tomatoes in the same spot for at least 2-3 years. It’s never good to remove a loved plant but you will have saved the other plants by having them in a separate box.

Blight is very difficult to eradicate from the soil so digging out the soil from the planter box is easier than digging out the whole greenhouse. Cucumber leaf rot is another typical greenhouse complaint and you can remove infected leaves, check the stems and top dress the soil around them. Plants in a different planter box will not be affected. Just make sure to keep plants separate when tying in any stems.

prevent dsease blight

Don’t let this disease blight your precious crops. Image credit @craftygem17

4. Improve crop yields

Growing produce in a greenhouse will mean more reliable plants and earlier crops.

If your reason for planting in a planter box is that the crop is delicate, let’s say the fussy aubergine plant, then it’s an excellent choice. You really need to water an aubergine daily in hot weather, it needs constant mulching, feeding and love and care. These plants will not tolerate cold draughts or frosty weather so being snug and warm in a greenhouse planter box suits them really well.

With different boxes, you can tend to each plant as necessary, adding mulch, setting up the watering system and easily adjusting as needed.

5. Grow food all year round 

Don’t let the greenhouse sit empty in winter! The compost you used to grow cucumbers or tomatoes in summer is an excellent base for sowing winter crops. Plant basil, coriander, rocket and parsley with mizuna and winter salads for a winning combination.

autumnal greenhouse

An autumnal greenhouse display. Image credit: @rekha.garden.kitchen>

What materials can I use for my greenhouse planter box?

1. Wood

Raised beds greenhouse gardening

Raised beds are a great option for greenhouse gardening. Image credit: @apple_acres_dk

2. Bricks

Brick is a great material for planters as the clay warms up in the sunlight and retains heat well, perfect for delicate plants. The top surface of the planter can be really useful for holding seed packets, tools, fertilisers and even a cup of tea. Build your planters to fit the length of the greenhouse on both sides, allowing space for a potting table and room for seedlings to grow.

3. Straw bales

This is a really good idea if you live close to a farm or have grassland you mow. Gather the grass to dry, wrap it with string or wire and make a wall of straw to protect the plants. It will gradually decompose so you will need to keep adding new bales but it is a great way to use grass cuttings and completely natural too. Straw provides excellent insulation and you can move them if you decide to relocate a plant.

4. Corrugated iron

If you have any spare corrugated iron sheeting, you can use this to edge a raised bed. Fix some bricks at the base inside and secure the outside with recycled hangers bent into shape or wooden stakes, to keep it steady. Fill it with soil, and your plants have a deep area in which to spread their roots and enjoy the warmth.

Greenhouse planter box plans

Here are some useful greenhouse planter box plans for inspiration.

greenhouse DIY planter box

Transform your greenhouse with a DIY planter box. Image credit: @carlasousamorim>

Are there any problems with planter boxes in greenhouses?

The only obvious one is that if slugs and snails manage to get inside, they will enjoy the regular watering and the delicious greens on offer. So remove them physically and re-locate them to your composting area or take them for a long, one-way walk to your local park.

Little gardeners will love collecting the snails and watching them in a bucket. Beware though, snails have a homing instinct! Studies have shown that snails can travel up to a mile back to their home when released far away.

I have conducted my own experiments with a daughter who banned slug pellets from the garden. We found that our marked snails could find their way home again from anything up to a mile so move them further away for any chance of success!

Can I make my own DIY greenhouse planter box?

Of course! Think about the construction of a greenhouse, then improvise with whatever materials you have. There are some other ways to protect plants in winter too:

1. Wrap trees

Trees can be wrapped in transparent material when heavy snow or frost is predicted.

2. Make a cold frame from recycled windows

A cold frame is a tall box with a sloping lid, much like the bins used to store salt for road spreading in winter. You can make one from old windows, and you will need to have some hinges to attach to the structure underneath.

The base can be made from anything available – straw, wood, metal, any material to keep the wind and cold at bay. Place your delicate plants in the centre, line it with bubble wrap or upcycled plastic and then replace the window lid.

protect tender plants

Rustle up a cold frame and protect tender plants over winter. Image credit: wiltshire_cottagelife

3. Transform a raised bed

If you have a raised bed outdoors, transform it into a mini greenhouse by making some hoops to go from one side to the other. You could use willow or flexible plastic tubes for this. These can be covered over with transparent plastic bags, bubble wrap or any transparent, waterproof material.

I have even seen an allotment owner make a roof from old CDs! It is important that light can penetrate so whatever you use, check your plants regularly and make sure it’s well secured.

Tina’s TIPS

  1. In spring remember to close the greenhouse door at night. Although daytime temperatures are climbing upwards, at night they drop quickly.
  2. Carefully check any homemade compost before adding it to the greenhouse planter box. Strain it through a sieve and remove any little visible pests before they get the chance to spoil new crops.
  3. Leave decoy food for pests such as comfrey leaves or nasturtiums. Usually, the slugs and snails will devour these before they start on the plants you want to protect and even if any leaves remain, the comfrey will slowly decompose adding valuable nutrients.
  4. Bramble deterrents. If you have any blackberries in your garden, prune some thorny stems and place them directly as a barrier against pests. The spikes are so unpleasant that most slugs completely avoid them and snails will move on to other plants.
  5. Silver trail searches. Get out that torch for the first few nights after new plants sprout and look for any tell-tale silvery trails from snails and slugs. Just remove them and relocate them to wilder parts of the garden or even your recycling bin, if it exists.
cosy plant home

Your plants will be grateful for a cosy home. Image credit: @no.7_is_home

The advantages of a greenhouse are protection, warmth and an increased growing season for many plants. Building a planter box will give you the added advantage of protection for your plants where you can keep them safer from disease and enjoy the vegetables and fruit for longer. Whether it’s under glass or recycled materials, your plants will love you for it.

HOW TO BUILD A GREENHOUSE PLANTER BOX (PLANS + IDEAS)-min

Save this pin for later

23 Fence Planter Box Ideas to Decorate Railing & Fences

That tricky space near your fence doesn’t have to go to waste. You can create fence planter boxes and turn it into an eye-catching feature of your garden.

Our selection of fence planter box ideas will help you transform your fence into something you’ll love seeing every day. But first, here’s why fence planter boxes can be such a great idea:

Benefits of fence planter boxes

Convinced? Now let’s get practical with some actual fence planter box ideas…

Fence planter box ideas to inspire you

Looking to cover a small part of your fence or line a whole fence with planter boxes? Either way, we’ve got you covered. Start from our selection of fence planter box ideas and use your creativity to make them your own.

1. Long raised bed fence planters

At their simplest, fence planter boxes are raised beds that sit right under the fence. They enable you to use otherwise dead space to grow flowers or vegetables and you can fill them with just the right type of soil for the plants you want to grow in them. You can build them out of wood and make them as long and as tall as you need them to be.

Long Raised Beds Fence Planters

Image credit: hammersandhighheels

2. Vertical fence picket planter boxes

Fence pickets are readily available and inexpensive. You can use them to integrate planter boxes into your fence in a way that complements it. Arrange them like the image below or adapt their placement to your taste.

Vertical Fence Picket Planter Boxes

Image credit: Pinterest

3. Hanging flower shadow boxes

Flower shadow boxes provide chic support for flowerpots and don’t cost much. You can easily make one from four pieces of wood. Paint them any colour you want and hang them with weatherproof rope along the top of the fence.

Hanging Flower Shadow Boxes

Image credit: thewholecook

4. Iron rail planter boxes

Iron planters are typically made for railings and balconies but nothing stops you from adding them to your fence. You can buy them ready-made and attach them to the fence with the provided screws and clamps. Iron looks great and can last a lifetime but you can also choose plastic rail planters to cut costs.

Iron Rail Planter Boxes

Image credit: Amazon

5. Rain gutter fence planters

Don’t throw old rain gutters away. You can repurpose them into shallow fence planter boxes. Attach them to the fence with metal clamps that you can find in any DIY store. You can install them in long, horizontal lines or cut them and play around with their arrangement. Your call!

Also, check out our guide to building gutter planter boxes with ideas.

Tip: Aluminium rain gutters will last a long time, they’re lightweight too.

Rain Gutters Fence Planters

Image credit: instructables

6. Hanging rain boot planters

Got some old wellies to spare? Maybe your kids have outgrown them, or they leak. Either way, you can repurpose them into DIY fence planter boxes. Drill drainage holes in the soles, fix them to the wall, fill them with soil, and you’re done.

Hanging Rain Boots Planters

Image credit: rosinahuber

7. Colourful hanging flowerpots for fences

If you don’t feel like drilling holes into your fence, don’t worry. You can use colourful hanging flowerpots as fence planter boxes. These offer more limited planting space, it’s true. But they provide you with a fast and effortless way to brighten up your fence. They’re great for flowers and herbs.

Colourful Hanging Flowerpots for Fences

Image credit: etsy

8. Fence shelf planter boxes

Shelves are another simple way to enhance your fence with planter boxes. Fix the shelves to the fence and add small and medium-sized planter boxes. Shelves built from planks of wood can provide enough support for several planter boxes.

9. Pallet fence planters

Got some spare pallets in your garage from other garden pallet projects? Turn them into a multi-tiered fence planter. You can use them as they are or paint them to make them look better and last longer. Pallet planters look great against a brick fence but you can attach them to any type of fence. Depending on the height of your fence, you may have to cut the pallets to size.

Pallet Fence Planters

Image credit: Pinterest

10. Metal drawer DIY hanging fence boxes

Metal drawers, card index boxes, or any similar boxes make great fence planters. Get your hands on a few, clean them up, and give them a fresh coat of paint. Once the paint has dried, attach them to the wall using clamps. They’ll last a long time.

Metal Drawers DIY Hanging Fence Boxes

Image credit: thediyvillage

11. Metal box fence planters

Talking of rusty boxes, you can also use old metal boxes as hanging planters on your fence. Give them a coat of paint or hang them as they are for a weathered look. If you can get hold of an old mail or toolbox, it’s a fun upcycling project.

Mailbox Fence Planters

Image credit: Pinterest

12. Cedar ladder fence planter boxes

If you only need to cover a part of the fence, this tiered cedar ladder planter is an inspired idea. It’s great for growing flowers and herbs and has a pleasant rustic feel to it. But make sure to build it from cedar or another resistant wood so it will last for years to come.

Cedar Ladder Fence Planter Boxes

Image credit: ana-white

13. Recycled can fence planters

Any cans will do for this project provided they’re large enough to accommodate plants and can take a coat of paint. Rather than buying planters to hang on your fence, you can make your own. It’s simple. You only need some empty cans, paint, and a bit of free time. You can make the cans as colourful as you want or play it more neutral with a uniform colour.

Recycled Fence Planters

Image credit: thedeanslistblog

14. Hanging tyre fence planter

Tyres may not be the first thing that springs to mind when it comes to fence planters. But they’re durable and can add some playfulness to your garden. Plus, they’re super easy to install. Apart from the tyre, you’ll need a screw hook and an electric screwdriver and that’s about it.

Tip: A hanging tyre fence planter is good for small flowers and herbs. Don’t put large or tall plants in them.

Hanging Tire Fence Planter

Image credit: hometalk

15. Hanging pocket planters

Hanging pockets are basically small growing bags for plants. You can attach them to any fence and use them for décor as well as for privacy. Make sure to pick one made from a durable material that provides good drainage.

Hanging Pocket Planters

Image credit: Amazon

16. Old window fence planter box

Before throwing away an old wooden window, consider repurposing it. One clever way to do this is to turn it into a support for a fence planter box. You can hang the window to the fence and attach planter boxes from its bottom edge. Before attaching it to the wall, give it a fresh coat of paint that complements or contrasts with the fence colour. It’s not just about looks—it will make it last longer outside.

Old-Window-Fence-Planter-Box

Image credit: Pinterest

17. Recycled crate planter boxes

Want to add wooden planter boxes to your fence with almost no work? Try old crates. Use them as they are for an authentic feel or repaint them to give them a new look. You can attach each crate with L-shaped metal clasps that support them from underneath. Make sure to factor in their weight and how resistant the fence is. You don’t want to find them on the ground after the first storm.

Recycled Crate Planter Boxes

Image credit: Pinterest

18. Hanging bucket fence planters

Metal buckets look great as fence planters. You can hang them with weatherproof rope or metal chains. Depending on the type of wall you have, you may not have to drill any holes. Simply hang the ropes or chains from the tops of the pickets.

Hanging Bucket Fence Planters

Image credit: lilyandfrog

19. Letter-shaped fence planters

Shaping your planter boxes into letters can make your planters stand out. Letter-shaped fence planter boxes are best for light plants like succulents and air plants. Think of them as décor elements rather than vertical growing beds. You can build them from wood or metal sheets.

Letter-Shaped Fence Planters

Image credit: Pinterest

20. PVC pipe tiered planters

PVC pipes look great as planters against a corrugated iron fence. You can cut them to the desired size, paint them, and hang them in tiers with wire. They are perfect for succulents and other small plants and they can last a really long time.

PVC Pipe Tiered Planters

Image credit: Pinterest

21. Plastic bottle fence planters

Unrecycled plastic boxes can take hundreds of years to decay. But worry not—you can turn at least some of them into fence planters. Cut them, drill holes in the caps, fill them with soil, and hang them with rot-resistant rope. As a finishing touch, you can paint the rope in different colours.

Plastic Bottle Fence Planters

Image credit: forgottothink

22. Old metal hanging pipe planters

Great for brick fences, old pipes can make a long, straight wall more interesting. They may require more work than other planters in that you have to drill holes for the plants in them. But the result is worth the effort. The plants will look as if they’ve grown out of the wall.

Hanging Old Metal Pipe Planters

Image credit: Pinterest

23. Rustic fence planter box

There’s something about the look and feel of wood that can make a planter box a timeless addition to your garden. Choose cedar or another long-lasting wood and put together a rectangular box. Fill it with wood and hang it from the fence. It’ll be heavy so use strong wire or sturdy metal clasps to hang it.

Rustic Fence Planter Box

Image credit: Pinterest

You Might Also Like: Bellissimo! Rustic and Romantic Italian Style Garden Ideas

Tips when adding a planter box to your fence

No matter what planter box you choose to add to your fence, you want to install it properly. The soil can weigh it down, especially when it’s wet. If it’s also exposed to strong wind, you want to be extra careful. Here are some tips to help you get the job done right the first time:

The wrap up

Adding planter boxes to a fence can be fun. You can get creative with old boots, plastic bottles, tyres, and many other DIY ideas. All of these can help you create more vertical gardening space for less.

And it’s not like you have to finish all the work in one day. Mix and match planter boxes and play with colours for a unique result. Have fun!

23 FENCE PLANTER BOX IDEAS TO DECORATE RAILING & FENCES-min

Save this pin for later

7 Types of Best Wood for a Planter Box

When choosing the best wood for your planter box, you’ll need to consider a few things. Think about what you intend to plant in it as well as your local weather conditions. You’ll also need to factor in rot resistance, weight and price.

Everybody’s dream wooden planter box looks magnificent and lasts well without too much maintenance, so what’s the best way to achieve this?

wood for planter box

Image credit @planterboxez

What is the best wood for a planter box?

You can’t go wrong with either Cedar or Redwood, which are two of the most popular wood varieties. There are also more affordable choices of timber for wooden planters.

1. Cedar

branch of cedar tree with trunk

Cedar is a perfect choice for garden furniture and planters. Credit: Shutterstock

Cedar is a very popular wood. It’s durable, lightweight, crack and rot-resistant. The weight is important if you are lifting planks so keep this in mind if you are making multiple planter boxes.

Cedar tends to fade with exposure to sunlight, turning an attractive grey colour. If you prefer to keep the original shade, see some of the suggestions for coating and dyeing below. Cedar contains natural oils which help to keep it resistant to bugs and fungi that target wood.  Cedar is grown in the US, so has to be shipped over to the UK.

2. Cypress

Cypress also produces natural oils, making your planter attractive while also being resistant to insects and fungi. Cypress is lightweight, which may be useful if you are planning to construct a raised planter box.

3. Scandinavian redwood

Scandinavian redwood is usually pressure treated and often used for decking. It’s durable, resistant to rot and long-lasting. This will make an attractive planter, however, it is usually more expensive than some of the other wood available and it may need a sealant to prevent the wood cracking over time.

4. Douglas fir

Douglas Fir is native to the US and is really long-lasting, making it a firm favourite with many buyers. Here in the UK, fir on sale generally comes from Scandinavia.

5. Pine

Pine is a readily available and affordable choice. It is frequently pressure treated which stops rot, but also causes shrinkage long-term so be aware of this when planning sizes and buy extra wood so that you can mend and add pieces later if required. It has an attractive grain and it is lightweight which is important if your planter is located on a balcony. Untreated pine is known to resist shrinking and you can treat it yourself with oil – see more below.
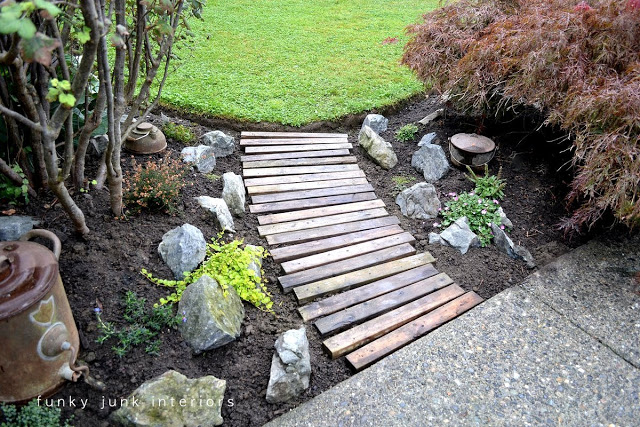
6. Walnut, white oak and black locust

Walnut, white oak and black locust are expensive woods that last a very long time.

7. Mahogany and teak

carving mahagony furniture

Credit: Shutterstock

Mahogany and teak are high quality, long-lasting woods that retain their magnificent colour. If you are prepared to spend a bit more, these are excellent options. As these woods aren’t native to the UK, they can be difficult to source.

What is the best wood for planters in the UK?

The best wood to make a planter box in the UK are native trees such as oak and beech, which have been used for centuries to make furniture and in the construction industry. Scots pine is also native to Britain. Walnut and chestnut used to be very popular but are increasingly difficult to source and walnut is expensive.
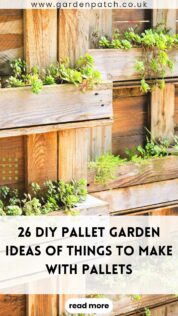
Gardening centres offer pine and a range of more exotic woods depending on your budget. If you would like to source a locally-grown wood for your planter box, contact a local carpenter or tree surgeon. They can usually offer good advice about local wood suppliers.

The Forest Stewardship Council (FSC) logo on wood reassures buyers that the wood has been grown in environmentally friendly ways. When sourcing wood, try to look beyond the cheapest price and the best quality. Sustainability is an important issue to consider so try to ensure any new wood carries FSC certification. Remember that the best wood for sustainability is probably the wood that grows closest to you.

Also, look for the “Grown in Britain” logo. The benefits are obvious; fewer miles travelled and also a guarantee that no pests or diseases from wood grown in other countries will be present.

Other points to consider when choosing best wood for planters:

What materials do I need to make a planter box?

  1. Decide on the size of your planter. Measure the area carefully and then choose your wood.
  2. You need a saw to cut your wood to size and then assemble your planks on a sheet of plastic or any material so you don’t damage the area where you are constructing.
  3. Do you need a waterproof liner? Some wood doesn’t, but if you’re growing edible plants, you may want to check whether the wood treatment used is suitable. If not, use a waterproof membrane or architectural fabric which is more environmentally friendly.
  4. You will also need to ensure good drainage so consider adding sand, pebbles, gravel and other materials.
  5. You’ll need a selection of tools to assemble your planter box – a saw, a drill, nails or screws, decent gloves and eye protection.

Can I make a planter box out of pine?

Pine offers you an attractive grain for your planter box. Pine is usually treated to ensure its durability and stability in construction so it’s a really good option for an outdoor planter box. Just make sure that is pine from a responsible source and if possible, aim to buy local, FSC wood. If you can find the “Grown in Britain” logo, the pine is probably Scottish.

7 Types of Best Wood for a Planter Box 8

Pine is a great choice for a DIY planter box. Image credit: @imaginationcreated

What can you grow in your planter box?

1. Decorative flowers

Decorative flowers can grow in any type of wooden planter box. Deeper ones are suitable for plants that need rich, deep soil such as roses and hungry plants which need fertilising regularly.

More on this: What can I plant in a flower box?

2. Succulents

Succulents grow well in planter boxes and they are great for anybody who doesn’t like to do much watering. Some may need to be moved indoors when the temperature drops in the autumn. Lavender will do well growing with these too as they do not need much watering.

3. Edible herbs and flowers

Edible herbs and flowers such as basil, parsley, coriander and chives grow beautifully in planter boxes, but they will need a liner to avoid eating the preservative from the wood. Place these in a sunny area and add some tomatoes as annual plants so you can make tasty salads.

You Might Also Like: 8 Effortless Herb Planter Box Ideas

4. Vegetables and edible fruit

Vegetables, edible fruits like cucumbers and squash, and beans and peas need deep, nutrient-rich soil so make sure your planter box is big enough for plants like these. Line the box well then add good compost, manure if you can, and water frequently. You can add the planter box to a crop rotation plan so you grow potatoes one year, then beans or peas followed by cabbages and so on. Look for seeds that recommend planter box growing too.

FAQs

How do I keep my planter box from rotting?

Sealants. Untreated wood needs regular maintenance so that it does not leak water, so use a sealant initially and then annually after that.

Lining. Untreated wood planters can be lined as an alternative to treatment in order to prevent leaks. This lining is also useful for keeping the wood preservative outside your soil.

Paint can be applied to wooden planter boxes but most people like to see the grain. Any exterior paint can be applied but check if it needs an undercoat first. You may also need to sand it down well before applying paint.

Pressure-treating pine stops rot, but this also causes shrinkage long-term.

Stain and varnish. Commercially purchased planters are often varnished or you can apply stain and varnish yourself. If your planter box holds decorative shrubs and non-edible plants, you can use a commercial sealant followed by a preservative for long-lasting protection. This will help your planter to remain functional for 5 years or more.

Take great care when applying these products close to a pond as they can be poisonous to aquatic life.

– Cedar and Teak both contain natural oils which repel water naturally. Some gardeners recommend using larch wood; this timber can be used untreated but it is a specialist wood and difficult to obtain so take advice from your wood supplier on this. Cedar, teak and larch are more expensive than pine, so if your budget is tight, this should be a consideration.

More on this: How to Waterproof A Wooden Planter Box

Are there natural ways to keep my planter box from rotting?

If you want to grow herbs, lettuce, edible fruit, vegetables or flowers or indeed, anything that will go into your mouth, be aware that any commercial varnish you use may end up in your stomach. Makes you think again about what to coat your planter with, doesn’t it?

Alternatives include:

  1. Natural oils repel water and are not harmful to humans. Examples of these include linseed and hemp oils. They aren’t completely waterproof but water-resistant. Be aware that these two may slightly darken the colour of your wood. Two coats of oil are more effective than one.
  2. Beeswax is commonly used for wooden household furniture and also on boats for its natural water-resistant qualities. Use liberally by applying with a cloth or sponge. A second coat will improve resistance and repeat annually. It is not heat resistant however and it can still be scratched.
  3. Teak oil can also be used as protection for your wood planter box. Here’s a detailed analysis of teak oil usage for outdoor furniture
  4. Liners. Using any of these oils or wax means that you may need to line the inside of your planter as well. This adds extra protection from leaks and helps to prevent the wood from rotting. You can purchase polythene or plastic as a liner in rolls from your DIY shop store.

For a more environmentally friendly method, use landscaping fabric instead of plastic. Worms prefer this and beneficial insects are happier with fabric too.

Can I use pressure-treated pine for a planter box?

It’s fine to use pressure-treated pine for decorative plants but it’s important to consider what you’ll grow in this box, especially if you want to grow food. Read on for pros and cons:

Advantages:

  1. Pressure-treated pine is very resistant to wood rot and pressure treatment is effective as an insect repellent too.
  2. The chemical treatment keeps it fairly weatherproof, unlike natural pine which will need a sealant.

Disadvantages:

  1. The chemical preservative which helps to keep the wood resistant to rot is not really recommended for direct contact with herbs and vegetables for consumption. You will need to line this planter box.
  2. Another problem with pressure treated wood is that it shrinks over time.
  3. Pine is a very soft wood that can be scratched and dented easily. It may not be suitable for a busy family or if it’s located near anything which may damage the wood.

Tina’s Tips:

How can I source cheap or recycled wood for garden box planters?

Sourcing old wood which you can saw, chop and fashion into a stunning, planter box is a great option.

You can also use pallets to make a planter box, as well as many other DIY projects.

7 TYPES OF BEST WOOD FOR A PLANTER BOX-min

Save this pin for later

How to Build a Vegetable Planter Box: Grow Healthy Foods

There are few things more satisfying than growing and picking your own home-grown vegetables, tasty salads, herbs, tomatoes or cucumbers.

With increasing concerns about the environmental impact of the food we buy in supermarkets and the harmful pesticides used in conventional farming, there’s never been a better time to grow your own food.

Not only will you lower your carbon footprint, but the results are truly tasty! Here in the UK, you’ll need to take the often unpredictable weather into account when growing your own veg. Read on to learn how to build a planter box for vegetables and discover the kinds of food that you can grow throughout the year.

planter box for vegetables

Create your own kitchen garden with vegetable planter boxes. Image courtesy of  @ourclapboardhomebythesea

Types of vegetable box planters to consider

A wooden planter box supported by a south-facing wall will provide sunshine, warmth and shelter for many vegetables suitable for the British summer (or winter). The wall retains the heat, which many of your vegetables will enjoy. If it is close to the water supply, even better, because herbs and most vegetables get thirsty when it’s hot.

Raised planter boxes are great for anybody who has an issue with bending for too long and the extra height makes easy access for wheelchair gardeners. They are a permanent fixture in a garden so check the conditions list below before you finalise the location! The construction of these boxes takes some time and skill so ensure you have a DIY person or carpenter on hand to help if needed.

Patio or balcony planter boxes can be built to suit the size available. Measure your space and allow a reasonable depth for most vegetables – a minimum of 1 foot (30cm) but preferably 2 feet (60cm) for larger vegetables like squash, cucumbers and potatoes.

A window vegetable planter box is fantastic if you don’t have a lot of space. So if you’re new to this gardening thing, why not try a window box first?

raised planter box for vegetables

Consider using a combination of raised planters and pots for different vegetables. Image credit: @victorygardenla

Conservatory planter boxes

In summer, a planter box in a conservatory has everything – the sun, warmth, shelter, regular watering by you, and respite from pests (except pesky red spider mites).

Pots and grow bags are useful for those with very little space. Plants that grow well in pots include tomatoes, cucumbers, aubergines, summer salads, herbs, and carrots. Even beans can grow in pots and grow bags but you will need bamboo canes or trellis for them to climb and to keep them tidy and off the ground.

The soil can be changed annually so that it doesn’t get exhausted and you can even create your own crop rotation plan. (See more on this below.)

How do I build a raised planter box?

To make your planter box, first source your materials. Wood planters can be made from re-used pallets, decking or visit your wood supplier with the measurements of the area where your box will be located.

Vegetables are hungry plants so plan a deep box, say at least 1 foot (30 cm) deep. Make it deeper if possible. If you like growing the first year, you may decide to keep going and the deeper the planter box, the better for vegetables.

Think about adding a liner and drainage for the planter box because the water will need to drain away or the wood may rot.

Plastic is waterproof but you will need to ensure good drainage too. You can also buy architectural matting and coir liners. Coir is made from coconut fibre; it is tough and durable and comes from a natural source, which plants usually prefer to plastic.

Add some pebbles at the end of a deep planter to help drainage and keep the plant roots above this layer. Some gardeners use activated charcoal to help drainage too.

DIY Planter box plans to help you construct your vegetable planters are available to download online. Some of my favourites include:

  1. Construct101 on Pinterest DIY offers raised bed planter plans which are available to download for free. There’s really helpful information to guide you in constructing your new vegetable raised planter bed.
  2. From DIY Montreal, you can download plans to make a slatted raised planter box, with instructions. The planter box is approximately 5 feet x 2 feet wide and 3 feet.
raised wooden planter box vegetables

Enjoy the good life with a steady supply of home grown vegetables. Image credit: @norikoinri

Waterproofing your vegetable planter box

You will need to use something to protect the wood unless it has already been treated.  When you buy your wood, check with the supplier to see if it’s been treated and if not, ask for help with choosing the most suitable protective varnish, paint or oil. Most treatments need to be repeated annually.

If you are lining the planter box there is no need to worry about contamination of the soil with these products. If you are not lining the box, ensure that the coating is thoroughly dried before adding your soil.

staining cedar planter box

Give your planter boxes several coats of protective varnish before filling with soil. Credit: Shutterstock

When your planter box is ready to fill, read our what to grow in a vegetable planter box article for some great ideas and tips.  You’ll be harvesting baskets of delicious vegetables in no time!

HOW TO BUILD A VEGETABLE PLANTER BOX GROW HEALTHY FOODS-min

Save this pin for later

How to Make a Simple DIY Flower Box with Decoration Ideas

Are you the type of gardener who always finds new flowers to cultivate? If planting space is a recurrent problem, flower boxes can save the day.

The best thing about flower boxes is that you can easily make one yourself. And you can put them everywhere—around the garden, along the driveway, on the decking, and around the house too.

Why worry that your treasured plants will perish during the cold winter months when you can shelter them indoors? When spring comes, you can easily move them back outside. Flower boxes make that easy.

Here’s a step-by-step guide to building a flower box, plus practical ideas to build planters without spending a penny.

how to make a flower box

Credit: Shutterstock

How to make a flower box – a step by step guide

Wooden boards are the ideal material for making an attractive wooden flower box.  If you have any leftover boards from other projects, perfect! If not, you can buy boards inexpensively from any DIY store. Make sure to condition the wood if it hasn’t been pressure treated.

Cedar fence slats are a great option as they’re widely available and affordable. Also, cedar wood is an excellent choice for flower boxes because it has antifungal and antimicrobial properties.

Materials & tools you’ll need

Step 1 – Cut the wood boards

Before you start cutting, decide on the size and shape of your flower box. This largely depends on where your box will go and how many plants you’d like to grow.  Make sure your box is at least 8-12 inches deep, you don’t want the roots to be cramped.

If you’re using scraps, the number of wood boards will dictate the size.

Your first task is to identify a board that’s wide enough to use as the bottom of the box. If you don’t have one, you can build a base by screwing two smaller pieces together. Use a bit of glue to make sure that the boards are joined together securely.

Next, figure out whether you want to build a cubic box or a pyramidal one. If you choose a cubic box, cutting the slats that make up the walls is an easy job. All you have to do is measure the length of one side and cut as many slats as you need.

Cubic box

For a small flower box, two slats on each side will be enough. This means you’ll have to prepare 8 wooden slats in all. For a higher flower box, each wall will have 3 slats, so you’ll need to cut 12 wood board pieces.

Pyramidal box

For a pyramid-shaped box, the slats on the upper rows will be longer than the ones on the lower rows. Make them 1-2 inches longer, depending on how wide you want the box to be.

Tip: Keep the electric saw at hand, as each slat will have to be cut at an angle. Check if the slats on adjoining sides fit well together. Trim where necessary.

Step 2 – Build the walls of the flower box

If you build a cubic flower box, building the walls is a simple job. All you have to do is to screw the first row of slats to the bottom, then add as many rows as you want. Place the screws at regular intervals, 2-3 inches apart.

Next, you need to screw the ends of the slats together, using at least 2 screws at each corner.

Tip: To avoid wood splintering, always pre-drill the holes.

For a pyramid-shaped box, you should test how the four slats in the same row fix together before you start screwing them in place, just in case there’s more trimming to be done.

Step 3 – Drill drainage holes

Last but not least, drill a few holes in the bottom board to allow water to drain. If too much water accumulates in the soil, the roots of your plants may start rotting.

Your flower box is now ready!

How to Make a Simple DIY Flower Box with Decoration Ideas 9

Whip up a simple flower box from leftover wood scraps. Image credit: @hexibohome

How to make a flower box look better

There are many ways to make a plain flower box look prettier. If you’re going to make several flower boxes and place them around the garden or inside your house, you could decorate them in a similar style to create a sense of unity.

Here are some ideas to pretty up your flower box:

Use an oil-based stain

With an oil-based stain, you can give the wood slats a distressed look. This can also help to hide any defects. A simple layer of stain is enough to give the wood a low-key, finished look.

Paint the stained wood

You could choose warm colours like red, yellow and orange to match the natural colours in your garden or be bold and choose vibrant or dark colours to make your boxes pop.  You can always re-paint them if you change your mind!

You could paint all the flower boxes in your garden the same colour if you like a coordinated or more formal look or mix-and-match colours for added interest.

How to Make a Simple DIY Flower Box with Decoration Ideas 10

Create a welcome pop of colour by giving your flowerbox a lick of bright paint. Image credit: @alnwick_home_

Decorate your flower box

If you feel like drawing, you can decorate your flower box in any way you like. How about adding beautiful garden insects like bees, butterflies, or ladybirds to your box? If you have kids, you could let them join in the project and express their creativity.

You could also attach wooden decals or personalise your flower box using letter stencils.

How to build a flower box without spending a penny

If you want to make a flower box and you don’t have any scrap wood lying around the house, you can easily repurpose wood pallets. If you don’t have any, visit a couple of large stores in your area and ask them about old pallets. Many stores have a problem with non-reusable pallets and will be glad to get rid of them.

Once you get home with your pallets, start taking them apart. Select the wood pieces that look in good shape, make a pile of them, and see how big a flower box you can make out of them. You could also make smaller boxes that you could use to build a vertical garden.

Here’s what you need to do:

  1. In case the wood is rough and uneven, sand it before use.
  2. Stain it. Repurposed pallet wood is not of the best quality, so it could really use a coat of stain to make it water-resistant.
  3. Cut the wood pieces to measure.
  4. Get enough pieces to build the bottom of the flower box and the walls.
  5. If the wood pieces are not wide enough, you can screw 3 or 4 together to make the bottom of the box.
  6. Build the walls of the box by placing the lower row of slats first, then add another row, depending on how high you want the box to be.

You can also use this method to build large planter boxes for your vegetables. Pallets are usually made of long wood boards, which makes them particularly suitable for rectangular planters.

How to Make a Simple DIY Flower Box with Decoration Ideas 11

Repurpose a humble pallet into a beautiful flower box. Image credit: @bloomingbuddle

How to build a wood flower box fast

The easiest way to build a flower box quickly is to use large wood boards that require little to no cutting. You’ll just need to make sure that the boards you use for the sides of the box are the same length.

Also, there’s less to assemble if you only have to secure the walls to the bottom. Place the screws at 2-3 inch intervals. Pre-drilling the holes is essential as large wood boards are prone to splitting.

How to make flower boxes last

If you built your flower box out of cedar wood, you can look forward to using it for many years to come. Cedar is quite resistant, but it’s still wood, and it’s in constant contact with moisture, not to mention inevitable water spills.

The best method to make wood water-resistant is to stain it. You will have to do this before starting to assemble the box.

For outdoor use, consider using several coats of wood stain. First, use a pre-stain conditioner for wood. The first layer should be an oil-based stain. Allow it to dry for up to 3 hours. Next, apply a coat of acrylic stain, which is specially formulated to resist moisture and mould.

Tip: If you’re using scrap wood, you should sand it before staining to eliminate superficial defects or wood knots. A dark shade of stain can help camouflage minor defects.

How to Make a Simple DIY Flower Box with Decoration Ideas 12

Stain or paint your flower box to help it last longer. Image credit: @casaredesign1

The wrap up

There is no one-size-fits-all when it comes to making a flower box. You can use whatever wood pieces you have at hand and let your imagination run wild.

You can even build a flower box that doesn’t cost anything. But as you’re still investing time and energy, you’ll want it to look good and last for many years. For the best results, use good quality materials and stain or paint the wood to make it look better and last longer.

Read more: What can I plant in a flower box?

HOW TO MAKE A SIMPLE DIY FLOWER BOX WITH DECORATION IDEAS-min

Save this pin for later

5 Simple DIY Hanging Planter Boxes You Can Make

Are you thinking of hanging some planter boxes to liven up your home or garden? When it comes to what you can do with a hanging planter, the possibilities are endless. If you’re very creative, your imagination won’t let you down, if not, here are a few hanging planter box ideas to get you started.

1. Repurposed tyres

repurposed tyre hanging planter box

Have some fun repurposing items that would otherwise be destined for the tip.

If you’ve just changed the tyres on your car, you might be wondering what to do with your old tyres. Instead of throwing them away, you can change them into stunning planters.

Try placing tyres flat on the ground or hanging them against a wall. Drill a few holes and fill the bottom with soil before adding the plants of your choice. You can also paint tyres as you please to fit in with the rest of your decor.

2. Wall covers

hanging wall covers planter box

Create a beautiful living wall and watch it grow.

For this project, you’ll need a few plant pots that look very similar and a net. Hang the net against the wall and attach the pots to it. This way you can cover your wall in plant pots without any effort. Just make sure the net is strong enough to hold up the weight of all the pots combined.  You can also fix wooden pallets to your wall and attach planters to them to create a similar effect.

3. Hanging baskets

hanging basket planter box

Place potted plants in rope or macrame hangers for easy retro-chic!

Indoor hanging baskets are all the rage right now. You can make your own or buy them at a store. Make sure to line your basket with a waterproof liner or use a ceramic pot to keep some moisture in. Outdoor hanging baskets made of coconut coir tend to dry out very quickly. Hang them in a suitable location with the plants of your choice inside.

You Might Also Like: How To Grow Annuals In A Hanging Basket

4. DIY planters

diy hanging planter box

Rustle up a super cute succulent planter from items you probably have lying around.

You can make your own planters from almost anything.

Use any old pieces of wood that you might have lying around, old wooden boxes, plastic containers and the like to make stunning hanging planters. Add some wire or a chain and hang them in the location of your choice. Just make sure that there are some drainage holes to prevent drowning your plants.

5. Stacked hanging baskets

Stacked planters can be made from anything hung in tiers. This means that you can create hanging shelves, baskets or pots. They are quite convenient as wall covers and look great when used on a balcony. It’s also a great way to grow herbs and would make a handy addition to your kitchen.

FAQs

What are the best hanging planters?

The best hanging planter for you will depend on what you want to grow. If it’s purely for decoration, then something simple like a hanging basket might be best. If you want to decorate a wall, then the planters you can hang against a wall will work best. If you’re planning on growing herbs or starting a creativity project, then either a DIY planter or a hanging shelf with tiers are ideal.

Where do you water a hanging plant?

It is best to place your hanging plants in the sink or bath when watering them. If watered where they hang, you might end up with a giant mess on the floor unless they have trays.

Why do my hanging plants keep drying out?

Hanging plants in coconut coir baskets tend to dry out more quickly than other plants. Coconut coir isn’t very good at retaining moisture. For this reason, it is best to line the inside of your baskets with waterproof lining. Just make sure there are drainage holes to prevent drowning your plants.

5 SIMPLE HANGING PLANTER BOX IDEAS-min

Save this pin for later

How to Build a Sturdy DIY Herb Planter Box in 7 Steps

Why buy a planter box for herbs when you can build one yourself? You don’t even need fancy materials for it—your tool shed should have you covered.

Having a handy herbaceous box will help you to spruce up your culinary skills. Think fancy sauces, toppings, and salad dressings. It will also help you to up your landscaping game, to say nothing of the wonderful fragrances wafting through the air year-round.

Tempted already? In this post, we’ll show you how to build a planter box for herbs and give you some easy-breezy DIY herb box ideas that you can take inspiration from.

We’ve also answered some FAQs to make it easier for you to get started. Read on!

how to build a planter box for herbs

Up your gardening game with fragrant, herb-filled planter boxes. Credit: Shutterstock

Build a herb planter box step by step

Start by measuring and cutting your material of choice into any size you think fit. Try to avoid making the planter too large as that will make it heavy and unwieldy.

Next, assemble the pieces using glue and nails. Add the finishing touches to your planter and paint it. Your planter box is now ready to hold some rosemary, basil, and mint!

Let’s take a closer look at each step for building a herb planter box.

Step 1 – Prepare your tools

Bring out all the supplies you’ll need. This way, you won’t have to rummage around the tool shed halfway through for something you missed.

You’ll need:

Step 2 – Measure and cut the material

Next, measure the dimensions of the material. You will have to divide it into five pieces: four sides and one bottom. Mark the sizes with a pen or chalk.

Then begin cutting. Wood, fibreglass, and PVC boards are easy to cut. If you’re working with a metal sheet, use a circular saw to cut it.

Tip: Most herbs grow well in containers that are 4 to 6 inches deep, so make sure your planter box is at least that deep.

Step 3 – Assemble the herb planter

Begin with the bottom piece. Apply strong glue to each side and stick the rest of the pieces to it. When working with metal, use adhesives like epoxy, super glues, or polyurethane.

The glue will take time to dry. You’ll need to clamp the sides so the frame stays in place.

Meanwhile, you can drill nails into the joints. This will give extra strength to your planter box.

Step 4 – Add the finishing touches

Once you have assembled the box, sand the rough edges, and clean any extra glue that’s peeping from the joints. You can also add shelves or sections inside the box if you want.

Step 5 – Drill drainage holes

Don’t forget to drill some holes for drainage. This will ensure your herbs are well hydrated but not overwatered.

Step 6 – Prime, paint, or stain

When you’ve finished, you can prime and paint your planter box. If you’re thinking about skipping this step, keep in mind that a painted herb planter box will be better prepared to face the elements.

Apply a layer of primer and leave it to dry before painting it. You can also polish your wooden box with an outdoor stain for a nice, rustic look.

Tip: Make labels for your herb planter box or carefully paint the names on the box so you know which herbs grow where.

Step 7 – Add soil and herbs

This is the final step. Start by lining your planter with a plastic sheet or landscape fabric. It doesn’t have to be done neatly since you’re going to fill it with potting soil next.

Your planter box is ready, and you can begin planting it with herbs. Make it a basil box or fill it with an assortment of herbs like rosemary, dill, mint, and more. Your choice, really!

More on This: Easy Indoor Herb Garden Ideas and Tips

Herb planter box DIY ideas

Fresh mint, sage, rosemary, dill…nothing brightens up a dish like ready-to-use herbs. While you can always refrigerate store-bought herbs, why not grow some fresh ones in your container? Here are some ideas to get you started:

1. Outdoor herb planter box

a herb garden with catnip and other vegetation

Create a herb garden in a planter box for a constant supply of fresh seasoning.

You don’t need a sweeping kitchen garden to grow herbs. Your outdoor herb planter box is more than enough. Growing herbs is more convenient and takes less work than growing vegetables.

Install the planter outside on a fence or put it in a sheltered position where it gets enough sun. Just make sure that the planter box is primed and painted to brave the elements.

2. Indoor herb planter box

indoor herbs on window sill

Bring fragrant greenery into your home with an indoor herb planter box. Credit: Shutterstock

An indoor herb planter can fit anywhere—on your kitchen worktop, a sunny windowsill, or even a vacant tabletop.

Indoor herb planters will add greenery to your space. More than a functional item, it can become part of the décor. Plus, fresh herbs will make your indoors smell like a meadow.

3. Mixed herb container

mixed herb container

Group different herbs together for maximum impact. Credit: Shutterstock

You can also experiment with different herbs in one planter. Plant some dill, parsley, sage, and thyme. Just make sure the container is big enough to hold them all.

You can also make labels for each of the herbs you grow so when the seeds mature, you know what to expect where.

4. Mini herb box

mini herb box

Plant up mini herb boxes if you’re short on space. Credit: Shutterstock

A mini herb planter box is a cute and effortless addition to any space. Since herbs don’t need a lot of space to grow, mini herb boxes are perfect for small rooms or apartments.

Plant different herbs in each of your mini boxes. Since they’re lightweight, your mini herb boxes will also be super portable.

5. Wall herb garden

wall herb garden

Hang herb planter boxes on a wall in a sunny spot. Credit: Shutterstock

You can also use an empty wall of your house to hold your herb garden. Simply mount your planter box to the wall and start planting.

With a wall herb garden, you’ll have more than freshly picked herbs. You’ll also have a living piece of art growing on your walls.

FAQs

From building a herb planter box the easy way to making it last longer, here are solutions to some frequently asked questions about planter boxes for herbs:

How to build a herb garden planter box cheaply

Looking to build an inexpensive herb garden planter? Follow these tips:

How to make a herb garden planter box the easy way

To make a planter box the easy way, follow these steps:

  1. First, choose a container. Look for a wooden drawer you no longer need, a metal can, or a wine crate.
  2. Next, clean and prepare it for planting. Sand the surface, wipe off rust or tarnish, and remove any peeling paint.
  3. Repaint the surface for a fresh look.
  4. Your herb planter box is ready and you can start planting it. It’s that easy.

How to make a herb planter box last longer

Your herb planter box can look a little worn out after a few years. But don’t worry. Here are a few tips and tricks to make it last longer.

Herbs for health

Herbs in a planter box will add a pop of green to your space. You can also use them in your dishes to add fragrance and seasoning. But there’s more to herbs than that, they also have several health benefits.

Sage can help improve your memory and brain function, whilst eating basil leaves or adding some to your tea can help boost immunity.

If the pollen season is your biggest enemy, rosemary is your friend. It will help suppress allergies and nasal congestion. You can also pluck some mint leaves to improve digestion and treat irritable bowel syndrome.

In other words, your herb planter is a medicine box. So, make sure to care for your herbs. They will care for you in return.

HOW TO BUILD A STURDY DIY HERB PLANTER BOX IN 7 STEPS-min

Save this pin for later

12 Balcony Planter Box Ideas to Inspire You

Do you want to turn your balcony into a planted haven? Even if you don’t have a garden, it doesn’t mean you can’t grow any plants at all. There are many ways to turn a balcony into a garden oasis. Here are a few balcony planter box ideas to get you started.

1. Picket fence planters

hedge planters

Picket fence planters make a smart addition to a balcony.

If you have any old picket fence material lying around, you can use it to build an attractive planter box for your balcony. It’s also possible to buy these boxes from garden centres or online. If you like them, there’s no reason not to get one.

These boxes are usually hung on a balcony railing with a special holder or placed directly on the floor. You can also place the planter on a table if you like. The placement is totally up to you. If it works, it works.

2. Hanging pots

hanging pots

Create your own balcony hanging pots.

Do you have some spare plant pots? These can be used in creative ways to make your balcony look magical. Pots can be placed on the ground, stacked or even hung creatively on the railings. You can either buy the accessories needed to hang them or make them yourself.

Plant the flowers of your choice and watch your balcony transform into a stunning space for relaxation.

3. Repurposed baskets

repurposed baskets

Fill hanging baskets with herbs for a fragrant addition to your outside space.

If you want to create hanging planters, you can buy some baskets and hang them from the ceiling. You can achieve this by linking a few metal hooks together or using a chain. Fill your baskets with a liner and potting soil and pop in the plants of your choice. These rustic planters look great filled with fragrant herbs.

4. Balcony planters

balcony planters

The more planters, the better! Get creative with a range of pots and plants.

If you have enough planters and planter holders, you can fill the whole railing of your balcony with plants. For the best results, use a variety of cascading plants and plants that grow upright. This should create a stunning effect while hiding parts of the planters.

You can also place some of the planters directly on the balcony floor or hang them at a different height to the rest of the planters.

5. Hanging planters

hanging planters

Hanging planters look beautiful and you can even grow your own plants from seeds.

If you don’t have the space for standing planters, and your balcony railing just won’t do, you can always consider hanging planters. They come in a variety of shapes and sizes as well as different materials. You can choose between baskets made from coconut coir or plastic containers in a variety of different colours. Plant some seeds and watch the seedlings grow into fully grown plants.

6. Planter buckets

planter buckets

Upcycle an old bucket into an effective planter.

Bucket planters are simply old metal buckets that have been repurposed into planters. You can attach a piece of metal to the rim that functions as a hook. They can then be hung on the railing of your balcony. Just make sure to drill some drainage holes to stop your plants from drowning if it rains.

7. Repurposed pallets

repurposed pallets

An old pallet makes a quirky display stand for outdoor plants.

If you have access to wooden pallets, you can create a great looking stand for your balcony planters. Just make sure to treat the wood to make sure it can resist water damage. It is definitely one of the cheapest ways to create a stand for your planters. Paint the pallet the colour of your choice, add your planters and it will look great in no time. You can even train some climbing plants to grow on it.

More on This: 26 DIY Garden Pallet Projects: Planters, Furniture and More

8. Wall planters

wall planters

Place heavy planters on top of walls.

If your balcony has a wall instead of a railing, you can still place some planters on it. Simply get large heavy planters that can withstand the wind on your balcony without being blown away. Place them on your balcony wall and fill them with the plants of your choice. If they are big enough, you can even grow some vegetables in them.

9. Plastic planters

plastic planters

Plastic planters can withstand the elements and are a great choice for a balcony.

If you want your planters to last a long time, plastic planters are the way to go. They are durable and can withstand environmental damage for long periods of time, unlike wood and metal that will eventually rot and rust away. Plastic planters also don’t need any special liners since the plastic is durable enough to withstand water damage.

10. Solid wood planters

solid wood planters

Solid wood garden planter box by DeepStream Designs

Solid wood planters are best suited to large balconies since they need to stand on the floor. They look quite elegant and if treated and cared for correctly, will look stunning for a long time. These planter boxes come in many sizes and can be stacked in some cases. If you’re considering one, make sure to look at all the different designs to find the one you like most.

11. Hanging boxes

hanging boxes

Try using crates to display your plants on a wall.

If you have a few wooden boxes lying around, you can place them on the wall to hold plants for you. Wooden crates come in many sizes so you can even choose how many plants they should hold for you. If you no longer want any plants in there, you can use them to hold candles, books or other ornaments. Just make sure the wood is treated to prevent water damage and use a tray for your plant pots if you can.

12. Matching sets

matching sets

Go for a coordinated look with matching pots and plants.

If you’re a lover of matching sets, then this idea is for you. It is possible to set up your balcony decorations and planters in such a way that they all match. This creates a stunning effect that is quite pleasant to look at. All you need to do is find matching pots along with some other designs like hanging basket planters to match the pots you just bought. A good example of this strategy is shown in the picture above.

Read more: What can I plant in a flower box?

FAQs

Do planter boxes need drainage?

Definitely. Proper drainage is essential to keep plants alive in your planter box. Without drainage, the soil will become saturated and drown your plants.

Is it cheaper to build your own balcony planter box?

In some cases. It depends on the cost of the wood you’ll be using. If you choose cheap wood like cedar, it can work out much cheaper just to build your own planters instead of buying them from a garden centre.

What do you line planter boxes with?

Line your planter boxes with plastic sheeting. This will prevent water from coming into direct contact with the wood and stop it from rotting. Lining your wooden planter box will drastically improve its life expectancy, just make sure to poke a few holes in the plastic to allow water to drain freely.

12 BALCONY PLANTER BOX IDEAS TO INSPIRE YOU-min

Save this pin for later

How to Build a Planter Box for Bamboo

Bamboo is one of the fastest-growing evergreen grasses on the planet and it is also regarded as one of the most invasive plants.

However, it also provides us with wood for construction, tasty food to eat, and can be grown successfully in a garden or a planter. Whether you want to build a planter box for bamboo or to build a planter box from bamboo, keep reading!

How to Build a Planter Box for Bamboo 13

Bamboo is best kept confined to large planter boxes. Image credit: Bamboo Sourcery Nursery & Gardens

What materials should I use for a planter box made for bamboo?

A planter for bamboo needs a very firm base to prevent root escapes unless you want a bamboo forest! A stone planter is ideal but you will also need to ensure reasonable drainage or the roots might rot.

A liner could be added to the planter to make double sure! I would then add a slab of stone or some heavy rocks and a layer of smaller pebbles to ensure your plant stays upright and also to allow some drainage at its roots.

Other materials. Any sturdy container will do, for example, a barrel that was used for winemaking or storage would give the roots plenty of space and the firm base would prevent the bamboo from toppling over as it increases in size. Any leftover wood from pallets could work too.

I wouldn’t recommend plastic because I’ve seen bamboo roots break through concrete in Brazil and a plastic container may crack under the sustained pressure from a growing bamboo over time.  So make sure your container is sturdy, won’t unbalance easily and it might help if it has pulley wheels so that you don’t strain your back moving it around your house or garden.

The planter could even be made from bamboo – find out how to do this below.

How do I build a planter box from bamboo?

You will need sharp scissors or secateurs, bamboo canes of your choice, a pencil for markings, a drill to cut holes, a wooden base cut to shape, and string or raffia to secure the whole planter in shape. Varnish is optional. An ability to work like a skilled Brazilian craftsperson will help too!

  1. You need to decide if your planter is round, square, or hexagonal and then cut the bamboo to similar lengths for the upright walls of the containers. In Brazil, other wood besides bamboo is often used to make the base.
  2. Mark holes with a pencil where the canes will sit, then drill the holes to support the canes.
  3. Fit the bamboo canes through the holes in the wood.
  4. Secure the bamboo canes by tying with twine or raffia and then soften one piece to make the top of your planter.
  5. Place the bamboo (to line the edge) in water to soften it up and then attach it (damp) to the top of the box and tie it carefully with string. You can also add a layer of wood glue which will strengthen the bond. Tie as many knots as you can to make an attractive pattern.
  6. Allow the glue to dry and then turn the planter over to check the bottom is level. Sand off the end of the base and varnish it if you really want to make sure it stays dry.
build a planter box made from bamboo

Make an attractive planter from bamboo canes.

How do I build a planter box to grow bamboo in the UK?

Where bamboo grows wild, there are daily, heavy, downpours of tropical rain.  This grass can stand a lot of moisture, which is a relief to British gardeners.

Check the expected height of the bamboo you propose planting. I’ve worked in gardens where the label said 6 feet maximum but I remember standing on ladders with a trimmer to reach the same bamboos at over 9 feet tall. Bamboo is a very opportunistic plant and wherever it can grow, it will. If the sun reaches the higher parts of your garden, more often than not your bamboo plant will grow to reach it.

Tina’s tips for growing bamboo successfully in the UK

Bamboo is an amazingly beautiful material and it’s water-resistant and durable too. There are 2 main types:

This is why I recommend planting your bamboo in a planter box!

Soil: Good drainage is a must. Bamboo takes 5-7 years to reach full maturity, sometimes it flowers (more below) and then you may notice a fungal growth on the exterior, which indicates that its life may be coming to an end.

Watering: Where it grows wild, there are heavy downpours of tropical rain every day so this grass can stand a lot of moisture, which is a relief to British gardeners. Check the soil and if it feels dry, water it generously.

Depth of planter: Should be at least 2 feet (61 cm) but if you can give it some extra depth, do so.

Temperature: Most bamboo is used to warmer climates and some varieties will not tolerate any frost at all. There are hardier bamboo varieties that are reported to survive super-low temperatures down to −29 °C (−20 °F). Hopefully, we don’t test that over here in the UK!

Frost hardy: This depends on the variety. Check the label carefully before buying! Consider moving your planter box indoors for winter or into a more sheltered place. You can drape a cloth cover over a bamboo in time for Christmas to protect it and make it part of your Christmas decorations. However, don’t panic if the whole cane seems to die off outdoors in winter. Usually, the plant sends out new growth each year in spring.

FAQs

Can I prune the bamboo in my planter pot?

Yes, it’s actually essential to contain bamboo growth in the wild and thin out the stems, which ensures good lighting for the rest of the plants. If you grow bamboo indoors, occasional pruning is a good idea. However, gardeners report that it can cause the cut edge to produce leaves at either side of the pruning which adds more greenery. If you want the classic look of one cane bamboo, topped by gorgeous foliage, it may be better to divide the root system when the clump looks unhealthy. Then top-dress the pot with mulch and move the divided part to a new pot.

How fast does bamboo grow?

In the time it takes you to read this article, a bamboo plant will probably have grown 300 mm (12 inches). There are species of bamboo that grow 1mm every 90 seconds!  This should tell you something about how you will need to care for this attractive, exotic plant. Many bamboos are hardy and will grow outside, some can tolerate frost but won’t thank you for it. Bamboos are native to Brazil, Argentina, warm Latin American countries and Asia. Bamboo is grown in China, Japan, Korea, and Malaysia, providing bamboo plants, wood for furniture, construction, and food delicacies such as bamboo shoots.

Do bamboo plants flower?

The flowers of bamboo are really rare and striking, dazzling white against the sharp brown or green bamboo canes. If a forest of bamboo flowers, it usually happens simultaneously, and the whole forest is doomed to die. This is when a population of rats generally overwhelm the area in bamboo forests, feasting on the flowers, giving rise to the idea in India that the flowering of the bamboo signifies famine. If your bamboo plant flowers, then I’m afraid it may have come to the end of its natural life.

How to Build a Planter Box for Bamboo 14

Flowering bamboo is an extremely rare and mysterious event. Image credit: Bamboo Batu

Did you know?

HOW TO BUILD A PLANTER BOX FOR BAMBOO

Save this pin for later

How to Make a DIY Wooden Planter Box the Easy Way

Wooden planter boxes are a great way to incorporate some greenery into your space. You don’t need a sweeping garden for them—an empty balcony or a wistful windowsill is enough. You can use them as a blooming calendar too. Think petunias in spring, bougainvillaeas in summer, dahlias in autumn, and cold-hardy alyssums in winter.

You can use cypress or cedar boards if you plan to make your own. Alternatively, you can turn a wicker basket, an old drawer, or even a scrap pallet into a creative planter box.

Read on for a step-by-step guide to making your own wooden planter box. We’ll also show you how to build a planter box the easy way and give you some tips on how to make your planter box more durable.

How to Make a DIY Wooden Planter Box the Easy Way 15

Build a custom wooden planter box to suit your space. Image credit: @_virtualgreg_

How to make a wooden planter box step by step

To make a planter box out of wood, first, gather all your tools. Then choose the wood you want to work with—teak, cedar, and cypress are some good options.

Next, size and cut the wooden boards and glue the pieces. You may also want to secure the joints with screws.

Once ready, add the finishing touches. Sand any rough edges, prime and paint the outside, or polish it. Finally, fill the planter box with potting soil and plant away.

Let’s take a closer look at each of these steps:

Step 1 – Gather all materials and tools

For your planter box, you’ll need a few basic tools and materials. These include:

Step 2 – Choose the wood

You want your wooden planter box to look classy while also being durable. Choose the wood wisely and make sure it’s resistant to rot and insects.

Cedar and redwood and widely available. They’re also lightweight and crack resistant. Cypress and teak are other options to consider.

Tip: Avoid softwoods like pine and spruce. These are vulnerable to decay.

Step 3 – Size and cut the boards

Once you’ve chosen the right wood for your planter, it’s time to size it. Choose how big (or small) you want it to be. If you’re unsure, think of where you’ll place the planter box.

You can then cut the boards using a saw. When finished, you should have four pieces for the sides and one for the bottom.

Step 4 – Attach the pieces

Time to assemble and glue the pieces. Begin by placing the bottom piece down. Apply strong wood glue around the edges and stick the sides to it.

Once assembled, secure the box with a clamp. While the glue dries, drill screws into all the joints for extra strength. You may also want to drill a drainage hole.

Step 5 – Sand any rough edges

Sanding will give your box a finished look and also save your gardening fingers from potential splinters in the future. Use a sander or sandpaper and run it along the outer surfaces of the box.

Step 6 – Prime, paint, or polish

Priming and painting your box will make it sun and rain-ready. You can choose the colour to match your backyard or home decor.

You can also polish your planter box to bring out the wood’s natural colour but this isn’t ideal if you plan to leave it outdoors.

Step 7 – Plant away

Time to add plants to your box. Before you begin planting, line the box with a plastic sheet to protect the wood. Then add a thin layer of gravel and fill the rest with potting soil.

You can plant seasonal flowers, perennials, seeds, and even vegetables and herbs in your box. Don’t forget to water and occasionally prune them.

Read more: What can I plant in a flower box?

How to build a planter box the easy way

An easy way to make planter boxes is to repurpose old wooden containers. Anything from an old drawer to a wicker basket will do. Let’s see how.

Step 1 – Choose your box

Do you have any vintage drinks crates, useless drawers, wood baskets, or old toolboxes? Instead of throwing them away, you can repurpose them into attractive planter boxes.

Step 2 – Prepare the box

You may need to clean the container before you can use it. Scrape off any peeling paint, sand the surface, and remove any rusty nails.

Step 3 – Paint or stain it

To extend the life of your wooden container, you’ll have to prime and paint it. You can also use a wood stain for a rustic look.

Step 4 – Fill it with plants

Once ready, line the box, fill it with soil, and begin planting. Choose the plants according to the size of your box. You can fill it with flowering annuals, succulents, vines, and even herbs.

How to Make a DIY Wooden Planter Box the Easy Way 16

Turn an old, metal toolbox into an interesting planter. Image credit: @gothabillybaby

How to build a planter box out of wood that will last

Wooden planter boxes aren’t as durable as metal or plastic ones. But they can last for years, even decades, if they are cared for properly.

From selecting the right lumber to painting the surface, here are a few tips to make your wooden planter box last.

How to Make a DIY Wooden Planter Box the Easy Way 17

It’s easy to build your own wooden planter box. Image credit @louvincf

No space? No worries

A wooden planter box makes gardening possible even in small apartments. You can place it anywhere—on your balcony, along the railings or by the window.

You can use planter boxes to spruce up a boring corner of your house. Or make a small kitchen garden with vegetables and herbs.

What’s more, you don’t even have to buy one. You can make your own out of wood or repurpose old wooden containers into the perfect boxes for a plant.

Wooden planter boxes will fit gracefully into any nook of your house and bloom all year round. So, give them a try if you haven’t already.

Get more ideas: 12 balcony planter box ideas to inspire you

HOW TO MAKE A DIY WOODEN PLANTER BOX THE EASY WAY

Save this pin for later

Fun and Interactive Garden Furniture for Kids

Come rain or shine, kids love the great outdoors. Having a safe space of their own fires up their imagination and helps to create lasting memories.  With the increase in screen time, getting out into the fresh air is now more important than ever.

Playing outside improves children’s fine motor skills and overall health, leads to a greater appreciation of the environment and helps them to engage all of their senses.

garden furniture for kids

Credit: Shutterstock

From playhouses to mud kitchens, mini picnic tables and sand-pits, we’ve curated some of the most fun, interactive and space-saving garden furniture for kids, giving them the excuse they need to get out and play!

Playhouses

If you have space, a wooden playhouse is one of the best purchases you can make for your garden.  Available in a range of sizes and styles, you can customise the playhouse to suit your colour scheme or paint it in bright, rainbow hues.  Also available in raised off-the-ground ‘tower’ styles, these playhouses are an ideal option if you don’t have a patio.  With a range of accessories such as window boxes, letterboxes and bells, the sky’s the limit!

This compact playhouse from Keen Gardener is small enough to fit in a snug spot and the elevated design is great for under-house storage.  No patio? No problem!  You can place the legs of the playhouse onto individual patio slabs on grass, making sure it’s level.

shire stork with platform playhouse

Fire up their imagination with a wooden playhouse. Image credit: Keen Gardener

If you don’t have space for a permanent fixture, a wigwam is a great alternative.  There is a wide range available to buy or you can make your own no-sew version using bamboo canes, a sheet and some clothes pegs.

You Might Also Like: 21 Garden Playhouse Ideas for all Kids

Tables and chairs

Kids love to eat al-fresco and with a range of mini tables and chairs, they can dine outside, cafe-style.  Scaled-down dining sets look super cute at any kids garden party.

This sweet picnic table and folding chairs set from Wayfair not only looks the part but is easily storable too, ideal for smaller spaces.  The parasol is a great option for sunny days.

cordova kids 4 piece round picnic bench and chair set

Kids will love eating al-fresco with this cute set.  Image credit: Wayfair

Check the current price on Wayfair.

If you have more space, this sturdy and stylish picnic table from Wayfair is built to last and suitable for children aged from 2-12 years.  Crafted from durable solid wood, it can be left outside all year round.


isoline kids solid wood rectangular picnic bench and chair set and bench

Futuristic Picnic Table, Wayfair

Check the current price on Wayfair.

Play kitchens

Mud pie anyone?  Play kitchens are a fantastic addition to your garden, providing hours of fun and the chance for kids to get super messy!  We love this mud kitchen from Hope Education.

If you fancy some DIY, a mud kitchen is something you may be able to rustle up yourself.  This clever kitchen has been created from an old chest of drawers, a salvaged pallet and lots of imagination.

garden play kitchens for kids

Image credit: Thecarpentersdaughter

Sand and water tables

Young children in particular love to dig and play with sand.  There are so many different options available, from sand and water tables to sandpits that double up as benches.  This wooden pirate ship is one of the best we’ve seen with a small play area, blackboard, sunshade and good-sized sandpit.  Perfect role play for your little swashbucklers.

garden sandpit for kids

TP Toys Wooden Playboat, All Round Fun

Outdoor easel

Creative kids will love this ingenious outdoor easel from All Round Fun.  Extremely sturdy, it has a wipe-clean screen, bamboo wind chimes and a built-in planter in which they can put some of the best plants for kids to grow for a multi-sensory experience.

outdoor easel for kids

Plum Discovery Create and Paint Easel, All Round Fun

Loungers and hanging chairs

What better way to relax after a long day playing in the garden than in a hanging chair?  The comfy looking Donovan hanging chair from Wayfair can be hung from a tree or a treehouse with the sturdy metal eyelet and brought inside in the cooler months.

garden hanging chair for kids

Credit: Wayfair

Check the current price on Wayfair.

The Outsunny mini lounger with parasol from Candide Gardening comes with matching cushions for extra comfort.  Sun safe and snuggly, this will soon become a garden favourite!

Not forgetting the popular beanbag, these outdoor bags from Habitat are super comfy, suitable for use inside and out and best of all, they retain their chair-like shape.  A great, portable solution with a practical, waterproof cover, these are sure to become firm favourites.

With an incredible selection of garden furniture to suit kids of all ages, you can be sure to find the perfect pieces for your space and give them outdoor adventures they will never forget.

Read more: 12 best kid’s patio furniture sets to get them outdoors.

FUN AND INTERACTIVE GARDEN FURNITURE FOR KIDS-min

Save this pin for later

Where To Find Inexpensive Garden Furniture

Decent quality garden furniture that will last more than a few seasons isn’t cheap. Whether we’re talking about wooden, PVC, or even plastic garden furniture, you may end up spending hundreds of pounds if you shop at local gardening stores. Especially since the latest shortage.

But that’s because these sellers know that British gardeners spend an average of £9,150 on garden furniture over their lifetime. Some prices reflect the quality of the products, sure, but not all.  If you’re looking for inexpensive garden furniture, you can turn your attention to online retailers.

Online retailers

Online retailers tend to offer better prices on garden furniture throughout the year. But keep in mind that product size and weight are two important factors when shopping online.  Not all retailers have a fleet of delivery trucks. This may limit the range of furniture they store or in some cases, you may have to pick it yourself.

Large retailers like Amazon and Homebase sell garden furniture throughout the year. eBay also has a large selection of garden furniture.  These e-commerce stores are a good choice for affordable garden furniture, though you can find products across all price categories in their catalogue.

Specialised online furniture retailers cater to more demanding tastes. If you’re looking for something above average, you may want to start with them. Some of them will also have a showroom or local store. More about them in a bit.

Auction sites often handle larger-volume sales, but you can also find in their listings a wide selection of goods including bistro sets.

Best online stores for cheap garden furniture

Got a limited budget? Or simply don’t feel like spending too much on garden furniture? The following online stores provide decent quality for a good price.

More on this: Why Is Garden Furniture So Expensive?

Amazon

Amazon offers a varied selection of garden furniture including plenty of affordable items. Whether you’re after a large rattan seat, a romantic table for two, or some simple loungers, Amazon’s garden furniture & accessories department is a good place to start your search.

Good to know: Most products are not stocked by Amazon so delivery costs can be 20% or more of the item price and possibly more for large and heavy items.

IKEA

IKEA doesn’t sell as much garden furniture as other entries on this list. But you can find some interesting items in their catalogue. If you like Scandinavian design, minimalism, and sustainability, IKEA’s garden furniture catalogue is worth checking out.

Where To Find Inexpensive Garden Furniture 18

IKEA sell a range of garden furniture to suit all budgets.

Homebase

Homebase is one of the best-stocked garden furniture retailers in the UK. It’s a good choice for basics and simple upgrades.  You can get the items delivered to your doorstep or opt to pick them up in one of the 150 stores in the UK. Depending on the item, you may be able to pick it up as little as one hour after you place your order.

Homebase products can be in and out of stock, so often the best time to shop on this site is in the pre-season. But you may find good deals in late summer too.

Argos

Another affordable destination for garden furniture, Argos sells tables and outdoor dining sets, loungers, gazebos, parasols, arbours, benches, hammocks, swing seats, and accessories.  Sell-outs are common, but you can generally find plenty of options in their online catalogue.

Wayfair

Wayfair brings together garden furniture from many manufacturers. You can find thousands of products across essential categories.  Not all products are cheap, but free delivery is available for many items which can help to offset some of the costs.

Wilko

Wilko’s garden and outdoor living selection features some of the most affordable products around. From bistro tables to swing seats, you get lots of choice across styles.  Wilko delivers some products from suppliers for a relatively low delivery fee. The downside is that sometimes you may have to wait a week or longer before getting your items.

The Range

The Range has quite a few affordable products in its catalogue. Many of the products are classic in design with a modern touch of style to them. Products sell out quite fast though, so check the catalogue early in the season.

Garden Trading

Although it isn’t the cheapest garden furniture retailer, Garden Trading offers affordable outdoor furniture deals.  If you want something simple like a bistro table or a pair of chairs, you can find it in their catalogue. Many of the products are available in different colours.

Tip: You can get free delivery for larger orders, but not all products are covered, so make sure to check.

La Redoute

How about some French-style furniture at decent prices?  La Redoute sells furniture for gardens and conservatories. In their catalogue, you’ll find sun loungers, garden armchairs, foldable dining sets, hammock chairs, garden tables, as well as rattan furniture.

Not all products are cheap, but you can find interesting deals that offer a good balance between quality and affordability.

B&Q

B&Q sells a varied range of garden furniture and accessories in their well-stocked online store. You can find options across most styles.  Whether you’re fixing a small green corner for yourself or reimagining a large balcony, you can find interesting deals in their catalogue.

Etsy

A bonanza for handcrafted goods, Etsy constantly features some interesting garden furniture items. Think reclaimed garden tables, pallet sofas, rustic benches, or fold-down garden bars.

Most handcrafted goods on Etsy are not what most people would call cheap. But you can discover among them products that have a great value and a nice artisan feel about them. So you may want to keep an eye on Etsy’s garden furniture section.

Buying and selling communities

For even better prices than online retailers, consider second-hand garden furniture. Good quality garden furniture can stand the passage of time well, especially those made from rot and rust-resistant materials. In other words, it can be a good investment.

You may also want to check out second-hand furniture sellers if you’re after vintage garden furniture. Reconditioning is often necessary, but if you don’t mind putting in a bit of work, you can find something above average at a good price.

Most buying and selling communities have moved online. In addition to eBay, check out Preloved, Gumtree, and Freeads. Depending on your location, there may also be other local sites, so keep an eye out for them.

second hand garden furniture

Second-hand furniture can be a good choice if you’re willing to put in some work. Photo by Pim Chu on Unsplash

Before buying from a seller, make sure to do your research—check their reviews and profile. Make sure also you get a return option. If a deal sounds too good to be true, think twice about it.

Delivery options can vary a lot from seller to seller, so make sure to check them out before you place your order. Bulky or heavy garden furniture will likely require special delivery that can up the cost.

The wrap up

Finding the cheapest garden furniture around may take a bit of time. After all, there are many websites out there and lots of options to compare.  But if you don’t feel like building your own garden furniture—or don’t have the time or the skills for it—it’s your best bet for finding the cheapest deals around.

That’s not to say you can’t pick up bargains at your local gardening centre or outdoor furniture store. Raid those too if you get the chance. To get the absolute best prices, buy your garden furniture off-season.  That’s late summer to mid-autumn. You can also mine the web for rare deals in mid-winter—provided you can wait a few months before using your new buys.

Last but not least, don’t forget about quality—inexpensive doesn’t have to mean bad. You want to enjoy the garden furniture you buy for more than a season or two.

Check out our best buy now pay later garden furniture article for ways to spread garden furniture payments.

WHERE TO FIND INEXPENSIVE GARDEN FURNITURE

Save this pin for later

How to Make Rustic Garden Furniture

Choosing the right furniture for your garden can be tricky, especially if you want something to fit a particular space or something a little out of the ordinary.  It can also be crazily expensive.

Sometimes, the best way is to get creative, roll up your sleeves and design and build your own.  It may seem like a daunting task but we’ve put together some handy tips to help get you started.  From transforming reclaimed scaffold planks and wooden pallets to building benches from bed frames, making rustic garden furniture may be easier than you think..!

make rustic garden furniture

Image courtesy of @antoniadreaming

The best tools for the job

Before you start, you’ll need to gather some basic tools together.  Depending on the material you’re working with, you may need to pick up a few extras.  Here’s a list of essentials that no DIYer should be without:

What materials should I use?

Now you’ve got the tools, you’ll need to choose your raw materials.

If you’re making rustic wooden furniture, you may want to incorporate reclaimed scaffold boards or pallets.  Scaffold boards are usually made from European whitewood, they’ve been created to bear heavy loads, live an outside life and are a solid option for DIY furniture.

Pallets can be made from oak or pine, hard and softwoods. Oak is much harder than pine, it’s a slower growing tree and is usually preferred for long-lasting furniture.

For an environmentally friendly option, choose locally grown hardwood, such as oak, sweet chestnut and fir.  Alternatively, you can salvage a piece of old furniture, from bed frames to chairs, even ladders, it’s possible to make rustic garden furniture from pre-loved items and give them a new lease of life.

Simple wooden bench

This simple, rustic garden bench is constructed from just two wooden planks, glue and a few screws.  Ideal for a first project, it can be built in a couple of hours and is a great way to ease yourself into the world of furniture making.  Find out how to build it here. You can stain or varnish it, or choose colourful wood paint for a statement piece.

DIY fence panel/pallet sofa

You’ve probably seen pictures of incredible seating areas fashioned from humble fence panels or pallets.  You can even buy pallets especially for the job.  How easy are they to make?  Surprisingly so!

With a saw, an electric screwdriver and a little patience, you too can have an enviable, insta-worthy sofa.  Endlessly customisable, you can make it fit any sized space.  Check out this simple tutorial and get sawing! You can make cushions to match using cut to size foam and whip up cushion covers from cotton sheets.

Claire from @life_at_no53 created this stunning sofa and matching coffee table from 2 wooden fence panels and steel legs.

DIY pallet sofa

Image courtesy of @life_at_no53

She explains, “having a jigsaw and a mitre saw was really helpful and made it so much easier.  I had an idea in my head and tried to put it on paper so I could explain what I wanted to achieve, thankfully my partner could understand the very basic drawings and we ended up with a pretty good finished project.”

DIY fence panel sofa

Image courtesy of @life_at_no53

More on this: 26 DIY Garden Pallet Projects: Planters, Furniture and More

Wooden bed frame bench

Spare bed frame?  Lack of garden seating?  Why not convert the bed into a lasting piece of furniture that will give you many years of use.  It’s a great way to turn once cherished furniture into something special and makes a striking focal point for your garden or patio.

This bed frame bench from Mak & Jill looks incredible.  You can find out how they made it here.  Essentially the headboard forms the backrest, the footboard has been halved and used for the arms and the side rails hold everything together, simple and stunningly effective.

wooden bed frame bench

Image copyright Mak & Jill

Crate storage ottoman

Simple to make, comfy to sit on and so useful for storing everything from garden tools to picnicware, old wooden crates are perfect for creating rustic furniture.

You can pick up old wine and fruit crates from places like Etsy and gumtree, or from antique and thrift shops.  Take care to sand back any splinters and remove any residue before you begin.

There’s a great tutorial for making a storage ottoman here, you’ll just need some plywood, foam, material and a staple gun to create the seat.  You can even add wheels!

Cable spool side table

An empty wooden cable spool is basically a side table waiting to happen.  With a little care, you’ll be able to transform one into the perfect rustic accessory for your garden.

You may be lucky enough to find an old cable reel by scouring the local ads, if not, asking local utility companies and electricians may be your best bet. Easy to upcycle, you can just sand and leave as it is, sand and paint or add hairpin legs for a more industrial look.

There are some great ideas at Upcycled Wonders.

Chest of drawers planter

With a little imagination, it’s easy to convert an old chest of drawers into a beautiful rustic garden planter or raised bed.

After a good sand, paint the inside and outside of the drawers with garden paint, it’ll protect the wood and offer a waterproof layer.  If you like bare wood, choose a good quality varnish, yacht varnish would be ideal.  Next, line the drawers with heavy-duty plastic and top with a layer of gravel for drainage.

Fill the drawers with potting compost, I like to use John Innes No3, it doesn’t dry out anywhere near as much as regular compost and your plants will love it.  It’s especially good if the compost will be in place for some time as it’s rich in nutrients.

Now add the plants!  Think about mixing different colours, put taller plants and flowers in the top drawers and fill lower drawers with plants like ivy and trailing rosemary.

planter drawer

Image credit @shulez

Reclaimed plank table

Rustic-looking outdoor tables are hot right now, they also come with a hefty price tag.  You can create your own for a fraction of the price using reclaimed scaffold planks and either pressure treated timber or metal for the legs.

This step-by-step tutorial guides you through the stages of making your very own table.

How to Make Rustic Garden Furniture 19

Image courtesy of @five_at_no.5

The beauty of making your own rustic furniture is that you can create bespoke pieces to perfectly fit your space.  You’ll also feel super proud once you’ve made it (and all your friends will be commissioning you to make theirs).  It’s a great eco-friendly option if you’re upcycling and repurposing furniture that would otherwise be destined for landfill.

We’d love to see your DIY makes, comment below and let us know what you’ve salvaged, upcycled or built from scratch.

HOW TO MAKE RUSTIC GARDEN FURNITURE-min

Save this pin for later

Best Trellis for Cucumbers: 5 Ways to Grow & Train Cucumbers

There are two kinds of cucumbers; one needs a trellis or something to climb. The other does not. Bush cucumbers grow in that shape and these are happy without a trellis. If however, you have a vine cucumber then a trellis or climbing frame of some sort is essential.

Read on to learn which trellis is good for cucumbers, how to train your cucumber on a trellis and what types of trellis might suit your pot or garden.

Do cucumbers need a trellis?

As the cucumber plant grows, its large leaves need support and its little tendrils try to catch on to anything close by, to enable this plant to grow towards the light. Sunshine is the cucumber’s best friend and so it climbs higher and higher to reach it.

Cucumbers are annual plants, which mean you need to grow new plants each year from seed. Gorgeous bright yellow flowers form on the stems of both bush and vine cucumbers, which are then fertilized by bees and pollinators (or you with a paintbrush! see below…) to become cucumbers.

A trellis supports the growing fruit and also allows good ventilation, which helps to avoid some of the common problems that affect cucumbers. Read on to see how your trellis will help you to produce tasty fruit.

Which types of trellis will support my cucumber?

Three types of trellis will support cucumber plants: in a pot, in a greenhouse and in the soil.

1. Growing cucumbers indoors

The cucumber in a pot needs a lot of nourishment so ensure that your trellis is in place before you plant in your cucumber. This is because you might damage the roots if you stick in trellis, canes or supports after planting.

Some of the best trellis for cucumbers include:

tall cucumber vine climbing a pot bamboo trellis

Pot trellis with strings; Credit: Shutterstock

2. Growing cucumbers in a greenhouse

In a greenhouse, your cucumber has found an ideal spot. Providing that you give it enough nutrition through the soil, this plant gets an early start inside so that your plants can be climbing just after the risk of frost has passed.

growing cucumbers in a greenhouse with irrigation

Credit: Shutterstock

Plant your seeds sideways in the soil and water well. I usually add 2 or 3 sticks for them to climb but also to remember where I planted them! They like a sunny location.

Some greenhouses come with tables or supports. If this is the case you can plant your seeds so that they can climb the support available. I like to take out all the tables because cucumbers will fill your entire greenhouse by the end of the summer and just add a bamboo or pruned branch as the first support for my plant.

Watering indoor cucumbers is essential and the best method is to set up an automatic watering system twice a day to do this for you. If you are using a watering can try to avoid getting moisture on the leaves. They don’t like it much. Cucumbers need a lot of water – see more below.

Some greenhouse pests include red spider mites, aphids and mealybugs. Keep reading to learn how to deal with these below.

3. Is your cucumber plant growing outside?

Remember that cucumbers aren’t frost hardy so only plant your cucumber in the ground after all risk of frost has passed. You can speed up the process by sowing your seeds indoors.  Place the pot on a sunny windowsill and transplant them outside after the warm weather arrives.

cucumber plants in seedling peat pot on windowsil

Credit: Shutterstock

Outdoor cucumbers are usually smaller in size than greenhouse cucumbers and they like to sprawl all over the ground, if not supported on a trellis. The benefit of growing cucumbers vertically by trellis is that it allows a lot more air to circulate among the leaves and the developing fruit, so this makes the plant less likely to become diseased or get eaten by slugs and snails.

Choose a sunny location where direct sunlight will nourish the plant for as many hours a day as possible. Cucumbers love the sun!

Prepare the ground well and dig out any perennial weeds such as bindweed or dandelions. Then dig in some well-rotted manure if you have any or add shop-bought or homemade compost. Cucumbers are hungry plants and need a lot of nutrition so give them lots of energy from the beginning.

Next, think about supporting your cucumbers as they grow, Pallets can make great supports for cucumbers but snails and slugs can hide easily inside the planks so inspect these carefully and remove any intruders.

An existing fence is a great alternative to pallets, bamboo or sticks but you may need to add a few nails so that you can tie in the stem, flowers and developing fruit as your plant stretches its way upwards.

How to make cucumbers climb a trellis?

To trellis cucumbers, you need to get some string in place to gently support the stem as soon as the seedling leaves of the plant appear, and when your seedling has at least 6 leaves, then tie them in carefully to the support. Do not tie very tightly because the plant stem will continue to expand and this will feel like a tight belt after a big dinner! Tie it loosely, allowing for growth. Let the stem continue to grow and use the string simply as a guideline for the plant.

If you have several plants in a row, you can tie some string horizontally joining all the plants and then your plants will happily spread sideways, attaching to the closest string they find. This method also uses up any leftover string that comes on parcels or DIY projects.

The string support is really useful when small fruit starts to develop. Now you can add extra string to support the actual cucumber as it grows. Allow the fruit to rest on the string and as it grows, you can tie in another sting if required.

Tina’s TIPS

How do I pollinate a female cucumber flower?

Sometimes the cucumber plant refuses to fruit. If this is the case for your plant, take a good look at the flowers.

Most modern varieties are all-female but the original plants used to have both male and female flowers, and for pollination to occur, the pollen from the male must touch that of the female.

The female flowers seem to have a little rounded fruit already behind the flower whereas the male flower has a longer creamy extension in the centre. You need to paint the male flower with a brush to remove some pollen, and then paint the female with this pollen, and hey presto! A cucumber should result.

Do remember to remove the male flowers after you pollinate or your cucumbers may be bitter and not as tasty as you hoped.

Why do I have so few cucumbers?

As the very first fruits appear, pick them quite small. This will encourage your plants to keep growing. Otherwise, they may try to go to seed really early, putting all their strength in the first 2-3 fruits.

FAQs

Should I fertilize my cucumber plants?

Definitely! Your plants need regular feeding at least once a week when they are fruiting or you will be disappointed by the size of your crop. You can use:

  1. Tomato feed diluted with water
  2. Home-made feed e.g. nettles, dandelions or comfrey leaves soaked in water for 3-5 days, then added to your watering can is excellent for cucumbers.

How should I water my plants?

Cucumbers need a lot of water but remember not to water the leaves or the fruit directly. The water should go around the base of the plant, not on the leaves.

Rot can occur on cucumber fruit and leaves if they are watered frequently, so in a greenhouse, I advise setting up a watering system aimed at the roots if possible.

Why does my cucumber have grey mould?

Cucumber grey mould botrytis

Cucumber Botrytis; credit: Growingproduce

Botrytis occurs in very humid conditions. Has there been a lot of rain or is your greenhouse door always closed?

Why does my cucumber have curled up, discoloured or mottled leaves? 

This is caused by greenfly and is called the cucumber mosaic virus.

Cucumber mosaic virus on cucumber leaves

Cucumber mosaic virus on cucumber leaves; credit: Shutterstock

Why do my cucumbers taste bitter?

Check if your plant is in a draught or has there been a cold spell? If the temperature changes suddenly the result is often a bitter taste to the fruit.

Another possibility is pollination – remember that male flowers should be removed after your pollinate. Some very odd shaped cucumbers which taste bitter can be the result if you forget to do this!

BEST TRELLIS FOR CUCUMBERS 5 WAYS TO GROW & TRAIN CUCUMBERS-min

Save this pin for later

Where to Put a Trellis? 15 Ideas to Use a Trellis in Your Garden

Thinking about installing a trellis in your garden? There are many potential locations for it.

Mounted on a wall, in or at the back of a planter, behind a sitting area as a privacy fence, in your vegetable garden as a support for plants—you can always find room for a trellis in your garden.

That said, you don’t want style and design to be your only considerations when installing a trellis.

How to decide where to put a trellis in the garden

To find the best place for your trellis, consider what plants will grow on it, sun exposure, trellis material and design, air circulation, and local regulations. Let’s take a closer look at each of these factors.

This quick guide applies to both store-bought trellises and those you make yourself.

Plants

Full-sun climbers like clematis like to face the south while peas or green beans need only up to about five hours of sunlight and prefer cooler temperatures.

Always position the trellis with the plant it supports in mind.

Plants that need a trellis include:

Where to Put a Trellis? 15 Ideas to Use a Trellis in Your Garden 20

Photo by Bailey Gullo on Unsplash

Type of garden

Maximize sun exposure by placing your trellis with your garden orientation in mind.

Air circulation

Most plants need good air circulation to develop well, resist pests, and stay healthy. This is something to remember when installing a trellis on a wall or in a corner.

Trellis design

Some trellises are designed for a specific use such as arch trellises for walkways or A-frame trellises for cucumbers. Trying to fit a ready-made trellis to a more problematic location isn’t always the best idea. You may be better off building a simple DIY trellis using readily available materials.

Material

Consider also the material from which your trellis is made. Wooden trellises that haven’t been treated to resist rot won’t last long if exposed to the elements, so give them some cover if possible.

For an exposed location, choose a pressure-treated or painted wooden trellis, or pick an alternative material like stainless steel, copper, or PVC.

Mowing and garden maintenance

The beauty of a trellis may carry you away, but you don’t want to install it where it gets in the way of mowing and other regular garden maintenance activities. Freestanding trellises in particular tend to need some space around them.

Local regulations

Depending on local regulations, some trellises may be considered fences. This means they shouldn’t exceed the maximum height allowed for fences, e.g., 2 meters. Always check local regulations before installing a large trellis.

Inspired trellis location ideas in your garden

The best locations for trellises include garden walls or fences, vertical vegetable gardens, planters, and anywhere you want to create a privacy screen. Let’s explore some of the best locations for a garden trellis.

There are plenty of options across styles and budgets, so it’s quite impossible not to find an option that works for your space.

1. Mounted on a wall or fence with brackets

Create a striking backdrop for your garden by installing a wooden trellis against a back wall or fence. You’ll need brackets and screws to support the frame.

Wall mounted trellis

Wall mounted trellis; credit: BHG

2. In the vegetable garden

A-frame trellises are great for cucumbers and peas. For beans, you can use simple pole trellises. For squash, tomatoes, and melons wire mesh or any grid trellis provides excellent support.

Close up of peas growing up on a trellis

Simple string trellis; credit: Shutterstock

3. In or behind a planter box or container

Stake a trellis in a planter box or container to help tall plants grow straight. Always choose a trellis that’s proportional to the size of the container. Avoid installing tall trellises in small pots. You can also add one behind a box planter for décor.

Planter box trellis

Planter box trellis; credit: HomeTalk

4. As a privacy screen anywhere you need it

Diamond-pattern wooden trellises and wrought iron ones are popular as privacy screens in any area of the garden. They are often more elegant than wall partitions or bamboo fences and provide the air circulation climbing plants need.

Privacy screen trellis

Privacy screen trellis; credit: HomeTalk

5. Right into a flowerbed

Small, corkscrew trellises provide elegant support to plants without shading neighbouring plants. They’re a good choice whether you want to add visual detail to a flower bed or simply protect plants against mischievous winds.

Flowerbed trellis

Flowerbed trellis; credit: Anikasdiylife

6. In any vertical garden

Trying to build a vertical garden? Whether it’s meant to be a new feature of your main garden or a separate garden that reimagines unused space, trellises can add vertical height to your greenery and help plants develop better.

Vertical garden trellis

Vertical garden trellis; credit: Ok.ru

7. As a partition between a garden and yard

A simple trellis can help you create a transitional area between your garden and yard. It can also divide different areas of your garden.

Trellis partition

Trellis as partition; credit: HomeTalk

8. At the entrance to your gazebo

Add some colour and fragrance to your gazebo entrance by hanging a trellis above it. Or frame the entrance with two freestanding trellises. Even a small trellis in a planter can make guests feel more welcome.

Gazebo trellis

Gazebo trellis; credit: Wayfair

9. To create a walkway tunnel

Few garden features are more striking than wisteria growing on an arched trellis tunnel. You can opt for a wrought iron trellis or simply build one using arched cattle wire supported by T-posts.

Trellis as tunnel

Trellis as tunnel; credit: Learningandyearning

10. To frame outbuildings

Garden storage spaces may be necessary, but they don’t have to look drab. With trellises, you can frame them in greenery and colour.

Trellis on a shed

Trellis on a shed; credit: Pinterest

11. Over a downspout

Stuck with a downspout that looks at odds with everything else in your garden? Install a trellis over it and grow a climber to make it look as if it’s raining greenery.

Downspout trellis

Downspout trellis; credit: Gardeningforlife

12. As a fence trellis

Whether it’s between neighbours or different parts of your property, a fence trellis is easier to set up than a regular fence and looks way better. It also improves air circulation and requires less maintenance.

Fence trellis

Fence trellis; credit: Danscollectiblesandmore

13. Leaning against a wall

A simple wooden trellis or a repurposed pallet helps you turn an average wall into a green corner. But make sure that the trellis is fixed in place or heavy enough not to be upset by the wind.

Against a wall trellis

Against a wall trellis; credit: BHG

14. As a patio or deck trellis

Got a patio or deck in your garden? You can choose from a variety of standing, hanging, and attachable trellises that can enhance the outside as well as the inside of your lounging space.

Patio trellis

Patio trellis; credit: BHG

15. Just about anywhere else in your garden

You can add more texture, contrast, and height to your garden with freestanding trellises for décor. You can use them to border paths, provide a backdrop for low-growing plants, cover the shaded space between trees, and in many other creative ways. Just make sure to consider the requirements of the plants.

The Trellis Factor

Few garden features highlight plants as well as trellises. Regardless of your gardening style, you can always find a place for a trellis on your green patch, whether it’s dazzlingly ornamental, minimalist, or classic.

But while trellises themselves can be installed just about anywhere, remember that the climbers and creepers growing on them are a bit more pretentious. Let the sun and shade requirements of the plants guide your choice and you won’t ever place a trellis in the wrong place.

WHERE TO PUT A TRELLIS? 15 IDEAS TO USE A TRELLIS IN YOUR GARDEN

Save this pin for later

Amazing Reclaimed & Upcycled Garden Ideas

A beautiful garden doesn’t have to be a huge financial investment. In fact, we’re here today to show you the complete opposite: how a little bit of creativity and vision can help you curate an incredible, unique garden for next-to-nothing.

Check out these gorgeous upcycled garden ideas made using pre-loved and reclaimed materials, and prepare to be inspired to roll up your sleeves and start scouting for treasures!

Upcycled Garden Ideas: Furniture

Furniture can be one of the biggest costs associated with a garden upgrade, especially if you’re aiming to get a matching set of seating and tables for dining and lounging.

The best way to save money on garden furniture is often to build it yourself with salvaged materials, like wooden pallets, reclaimed crates and/or salvaged masonry like paving stones or breeze blocks.

1. Bright Boho Style

For example, this stunning, spicy patio, that uses painted pallets as a base for seating. The outdoor rug is bang on trend, and the garden mural looks like scorching sun rays. Love it.

Palettes can be used in so many ways, either in their natural, rugged state, or given a lick of paint for a more elegant appearance.

Plus, using pallets is a great way to get custom-sized furniture, like the bench at the end of this pretty balcony seating area. Take a look at more garden furniture using pallets.

2. Get Creative with Crates

Like pallets, crates are an excellent way to get sturdy side tables and surfaces, without forking out for conventional garden furniture.

Paint or stain them to match the rest of your salvaged furniture, or leave the wood exposed for a trendy, industrial look.

Crates are also a quick way to create raised garden beds, making it easier to look after flowers and vegetables. They’re also easy to stack, reposition, and move into the shed in cold weather.

Breeze blocks and concrete can look edgy and urban, particularly in contrast to organic garden shapes.

However, concrete and cement also makes an excellent backdrop for paint, chalk and other kinds of customisation.

Concrete is such an inexpensive material that you can often find planters and blocks at salvage yards for a very low price.

You can even self-pour concrete into moulds to create your own unique garden structures. We’ve got lots more concrete garden ideas to inspire you.

Upcycled Garden Ideas: Pots & Planters

An eclectic collection of pots, planters and flower bed edging is a great way to bring a unique personality into your garden.

It’s easy to find second-hand pots from charity shops, flea markets and car boot sales or, with a little imagination, you can transform all kinds of old homewares into innovative plant holders.

3. Kooky containers

Having literally just returned from the garden centre, I can confirm: garden pots can get expensive! If you’re trying to find upcycled garden ideas, using innovative alternatives to planters is the way to go.

Colanders – or anything that provides healthy water drainage – are fantastic for housing small clusters of plants, and can even be hung u pas makeshift hanging baskets.

With a little bit of vision and eclectic taste, nothing needs to end up at the skip ever again.

The trick with any collection of unusual, vintage garden ideas is to use really wacky pieces sparingly – that way the overall effect is curated, rather than chaotic.

4. Salvaged sleepers

Depending on where you live, your local salvage yards might have an abundance of old railway sleepers (I’m not sure why they seem to be really common in some areas but non-existent in others)!

If you can get hold of some, they are great for garden edging or raised beds, or as sturdy bench or shelving.

a raised planter made from reclaimed railway sleepers filled with edible plants

5. Tired transport

I really love the way old bicycles look when they’re covered in flowers – there’s something very romantic about it!

Using one as focal point a in a flower bed, or leaning one against a wall in your front garden, is the perfect, whimsical way to show off your seasonal blooms.

An old bicycle with baskets of flowers on the front, rear and seat

Upcycled Garden Ideas: Decor

Sometimes a garden design just needs a striking focal point to capture interest and attention. A water feature or sculpture makes for a beautiful garden centrepiece, but these can often be prohibitively expensive.

Why not scout out an unusual piece from a vintage market or salvage yard? Here are some amazing ways to decorate your garden using upcycled or reclaimed items…

6. Reclaimed vases

Old milk cans and similar metal items are very easy to repaint, giving them a new lease of life. If you love showcasing your garden successes by creating arrangements with cut flowers, you can’t go wrong with a beautiful display like this.

Vintage milk cans painted in pink and green with floral details

7. Framing your surroundings

Buying large mirrors or picture frames can be expensive if they’re brand-new but, as long as you’re open-minded about style, you can typically find them for much, much less at second-hand stockists (I’m talking, at least half the original price).

Using mirrors to make your space look bigger is a great trick for smaller gardens, and frames can be used creatively to draw the eye towards specific views within your space.

white patio furniture against a vine-covered wall with a mirror

Here’s another example of how a little creativity can go a long way.

Repainting an old fireplace surround is a fun way to make an outdoor living room feel more welcoming – and shows that, when it comes to upcycled garden ideas – bigger often means better. Of course, you might even want to use it as a backdrop for an actual garden fire pit!

8. Flotsam and Jetsam

Reusing, reclaiming and upcycling comes hand-in-hand with accepting that one person’s trash is another’s treasure.

Old industrial and commercial bric-a-brac isn’t everyone’s cup of tea, but can really bring life and imagination to certain garden themes.

For example, this old fishing paraphernalia for a beach style garden.

a life buoy and reclaimed fishing net used as decor for beach themed garden ideas

The secret to pulling off some truly amazing upcycled garden ideas is to curate carefully, but to also try and have a little bit of vision when it comes to finding unusual items.

Remember, half the joy is taking something old and unloved, and transforming it into something beautiful and amazing for your flower beds. Enjoy!

AMAZING RECLAIMED & UPCYCLED GARDEN IDEAS-min

Save this pin for later

How to Create a Garden Plan

At Garden Patch, we’re all about celebrating all kinds of outdoor spaces, whether that’s a simple, open area for your family to relax and play, or a sophisticated social space, with a hot tub, fire pit and cinema screen. The thing is, knowing how to create that perfect space can be tricky, especially if you’re starting from scratch. Today, we’re going to be looking at how to create a garden plan in stages, so that you can better visualise your ideal garden and begin making it a reality.

Every garden is unique, but the basic principles of managing space, comfort, light and utility are pretty universal. When you have these elements in mind at the planning stage of your garden project, you’ll usually find the rest of your design falls more comfortably into place. The result should be a completely personalised space that is enjoyable for anyone to relax in.

Top considerations for any garden plan:

We’ve already mentioned that the basic elements of garden design are space, comfort, light and utility – although these can sometimes go by different names (like “flow”). Before you start curating any style ideas, it’s important to know how these four elements will interact in your own garden.

  1. Space – the literal area you have available for your garden plans. Is it an unusual shape (very long, or narrow)? Are there natural limitations, like a stream, large tree or slope? Start your process by sketching out the dimensions of your garden and any challenging existing features.
  2. Comfort – how freely can you move around your garden and use all its available space? Comfort can include pathways and steps – perhaps even railings. It will also include privacy: do you want to obscure certain parts of the space from your neighbours? Is there a busy road nearby that you want to muffle?
  3. Light – which direction does your garden face? How much sunlight is available throughout the day, and even across the seasons? Establishing the light patterns will help you identify the best areas for growing flowers or vegetables, and the most comfortable place for a seating area.
  4. Utility – what are the requirements for the activities you’ll mostly be enjoying outside? For example, do you need sturdy pathways for a wheelbarrow, or a large area dedicated to a shed? Container gardens ideally need a nearby spigot, while seating areas should be placed on a supportive deck or patio.

Other important things to consider when you create a garden plan

Confirming your budget might not be the most fun part of a project, but having a firm idea about what you’re willing to spend will take some of the stress out of decision-making. Plus, it’ll be easier to relax in your garden without feeling like you spent “too much” on your renovations.

a narrow side-garden divided into sections of decking and gravel, making each area more practical

via jamesgartsidegardens.co.uk

What’s your ideal timespan for your garden project? Are you hoping to get all of the work done in a few weeks, or are you happy for the transformation to happen gradually, over the course of a year or so? Remember that plants take time to settle in and grow so, to a certain extent, any garden updates are about the journey as much as the immediate results.

Are you going to do a lot of the work yourself? Professional labour can be expensive but, unless you’re experienced, upgrading your garden on your own can be a long and exhausting task. Try categorising your garden projects into those you can easily do yourself, those that might need the help of a friend or partner, and those that might be more effectively carried out by professional installers or landscapers.

Garden features to include in your plan

Are you worried about forgetting to include an essential design feature in your garden redesign? When you’re thinking about what to include, don’t forget to consider:

Garden layout tips

As you create a garden plan, it might become obvious how each feature connects. If you’re struggling to put the pieces together, here are some more tips about positioning and maintenance that should help you decide how to arrange the space.

Most gardens have at least one focal point to draw the eye and give the rest of the garden purpose. Take a look at our guide to creating garden focal points for inspiration.

Give your garden design room to breathe. If you’re wondering whether to squeeze another feature or two into your garden corners, hold back. It’s easy to make a space feel cluttered and overwhelming, and you can always add a few more ornamental features at a later date when you’re sure you have the room. Leaving extra space between furniture, plants, water features and sculptures will create stronger focal points, too.

Choose materials carefully. Colours and textures look great when they echo the architecture of your home, and help tie your property together. Use the woodwork and masonry to inform the bricks, timbers and colours of your deck, patio, path and garden edging for the most harmonious look.

Allow for growth. As we’ve mentioned, your garden is an organic space that won’t fill in for several months – or even years. Resist the temptation to cram plants and structures too closely together, and instead focus on creating an organised layout that gives everything some space to grow in its own time.

HOW TO CREATE A GARDEN PLAN-min

Save this pin for later

How to Transform a Garden on a Budget

Everyone deserves to enjoy their garden, but there are lots of reasons why investing in your outdoor space might not be at the top of your priority list. If you want to transform your garden on a budget, here are our favourite ideas for creating a stylish space without splashing out.

Low-cost landscaping

When you’re looking to transform your garden on a budget, flowers are the best place to start. They’re inexpensive, beautiful and eye-catching, and a brilliant way to bring cheerful colour to a small space.

Container gardening

The most flexible and budget-friendly way to change your garden is to use containers for your flowers. They’re inexpensive to buy – especially if you source them from charity shops or car boot sales. Plus, if you’re feeling creative, you can even customise them yourself.

Container gardening allows you to reposition your plants whenever the mood takes you, and makes it easier to bring your garden with you (sort of), if you move house. You can nestle containers in existing flower beds, stack them on shelves or use them to fill empty corners of patios. We’ve got some container gardening style tips, as well as ideas for the best flowers and best vegetables to grow in containers.

a collection of pots filled with the best plants for container gardening

Green walls

Vertical gardening is another way to create a big impact without breaking the bank. Instead of spreading plants out across the ground, try attaching pots and/or climbing plants to a trellis or wire fence, to create a wall of greenery. Vertical gardens like this are a fantastic way to create privacy, too. Look for fast-growing climbers like clematis or wisteria to get your green curtain flourishing as quickly as possible.

DIY garden pallet ideas using salvaged pallets on the wall as plant racks

Foodscaping

To make your money go further, consider growing edible plants. You can enjoy the spring and summer watching your crops develop, and then supplement your weekly shop come harvest time. Learn how to start your own vegetable garden with plants you can use for salads and roast dinners, as well as crops that can be pickled or preserved for later months.

With a bit of practice, growing an indoor herb garden or outdoor vegetable plot can result in fantastic yields that are much cheaper than supermarket shopping.

Cost-effective creativity

If you’ve exhausted your plant options but still want to give your garden a facelift, there are plenty of low-cost ways to do so.

Crack open the paint

A lick of paint can totally transform your garden on a budget. You can use any half-used tins to paint planters, pots, garden furniture and sheds to give them a fresh, uniform appearance. If you can afford to supplement the colours you already have lying around, look for sample-sizes to paint accents.

A tin of outdoor paint can also have a surprisingly dramatic impact on your outdoor space. For example, painting an incredible monochrome mural on a fence, or painting tiles on a concrete patio.

Budget-friendly decorative items

If you only have a little bit of money to spend on a garden revamp, it’s important to stretch it as far as possible. Look for large areas that could be covered or decorated to make the biggest impact. For example, investing in an outdoor rug and a couple of matching cushions to upgrade your seating area.

Lighting – especially string lights and fairy lights – can be another inexpensive way to make your garden look totally different. Hang solar-powered bulbs from trees and fencing, or buy a couple of statement lanterns to make your patio feel more cosy after dark.

Salvage for success

Sourcing furniture for your garden can be fun and inexpensive if you know where to look. With a bit of patience, second-hand stockists and reclaim/salvage yards are amazing places to find unique furniture at low prices. As long as you don’t mind a bit of upcycling, the furniture from charity shops or flea markets is perfect for stripping, repainting and using to display plants or garden decor.

a raised planter made from reclaimed railway sleepers filled with edible plants

Reclaim yards are particularly good for raw materials that you can DIY into practical structures, like railway sleepers or wooden pallets. The trick is to go with a rough idea of what materials would be useful, but also with an open mind about where you might find them.

Charity shops and car boot sales are ideal for bric-a-brac to use as garden decor, like candle holders, garden ornaments, picture frames and mirrors. Again, the items you find don’t have to be perfect – a lick of paint can modernise them to fit a more current aesthetic if they’re dated.

a row of tea light candles in jam jars

Unusual pieces make ideal garden focal points. A vintage bicycle looks amazing covered with flowers in a front garden, or how about this furniture set made from old barrels? Building furniture out of pre-loved items gives you a totally unique garden at an incredibly affordable cost.

round seats made from barrel parts are sat around a low table, made from an barrel cut in half

Other unusual ways to transform your garden on a budget

Take a look at some of our other posts that offer out-of-the-box inspiration that you might find useful if you want a chic garden without breaking the bank:

HOW TO TRANSFORM A GARDEN ON A BUDGET

Save this pin for later

Raised Bed Gardening Ideas

Raised beds can make messy gardens look neat and orderly, or bring an exciting new dimension to an otherwise bare space. There are many benefits to growing plants above the ground – for example, it’s easier on your back, and containers generally limit the amount of upkeep each bed needs. Plus, raised bed gardening ideas are a fun way to add style and character to your garden aesthetic.

The only drawback to raised bed gardening is that you have to prepare your garden beds before doing anything else – so, without further ado, let’s take a look at how to get started.

a raised planter filled with poppies and wildflowers

What is raised bed gardening?

In case you need a reminder, raised bed gardening is a method that simply moves plant beds above ground, rather than in-ground. Raised beds are conventionally about a metre wide, and can be anywhere from 15cm above the ground to waist-height.

Raised bed gardening helps you control the condition of the soil within the beds, and makes it easier to conserve water (especially if you stagger raised beds down a natural slope in your garden). It’s also possible to implement square foot gardening principles and companion planting, allowing you to grow plants (particularly vegetables) much more intensively than conventional rows of crops.

Because of their size and shape, it’s easier to cover raised beds and protect your crops from cold and pests, extending the growing season. Being closer to eye-level makes it easier to spot pests in the first place, and to watch out for signs of disease. Dense planting also means that, once your crops or flowers get established, it’s much harder for weeds to break though (more tips on keeping flower beds weed-free).

Raised beds also keep plants out of reach of children or pets – useful if you’re growing anything that could be toxic – and, by the same logic, make it easier for adults to reach the beds. If you’re growing a sensory garden for people with physical impairments, raised bed gardening ideas are the way to go.

a raised planter made from reclaimed railway sleepers filled with edible plants

Planning your raised bed garden

A little planning goes a long way when it comes to a raised bed garden. It’s very difficult to change the materials of your beds, or rearrange them, once they’re in place, so take the time to figure out how you want them to look from the start.

Raised bed layouts

The best position for your raised bed will be somewhere that gets full sun throughout the day (at least 6 hours). The majority of crops need full sun to flourish, and if you end up growing vegetables that prefer shade then you can always create more cover at a later point.

You don’t need a lot of space to build your raised bed garden, and you can always start with one or two beds and slowly expand as they become established.

Another thing to consider is water access. Although you can obviously use a hose to take water from one end of your garden to the other, long-term you’ll thank yourself for keeping your raised beds as close to the spigot as possible. You’ll be watering your raised bed at least every few days, so having water within easy reach will be a huge convenience.

Materials for building raised beds

The essential thing to consider when you’re deciding on the materials for building your raised garden beds is that you don’t want chemicals to leach into the soil. This is important for the health of your plants, but even more so when you’re growing anything you intend to eat! Be cautious of pressure-treated timbers (which are often treated with chemicals), and opt for untreated hardwood, concrete, or reclaimed timber sleepers.

The safest option may be to buy prefabricated materials intended for building raised planters. These will typically be rated for food safety and offer the durability needed for outdoor conditions. Look for features like double-skinned walls (which provide insulation against sudden temperature changes and moisture loss), or options that come with plastic lids or covers for extra protection against the elements.

What’s your garden environment like?

Both the position and material of your raised beds will be affected by the weather exposure they get in your garden. As well as direct sunlight, you should take into account where your garden seems to catch the most wind, and where water runoff tends to pool. Consider how to protect your plants before you start growing – could you install a screen, or dig better drainage?

Wildlife management

It’s always wonderful to see more birds and wildlife in our gardens… that is, until we notice them nibbling our crops and trampling our seedlings! If you have the pleasure of living in a rural location where foxes, rabbits and deer are frequent visitors, factor this into your raised bed design. For example, surrounding your beds with a perimeter of fences or nets.

raised bed gardening ideas: a vegetable patch and flower beds fenced in with pallets painted white


When it comes to raised bed gardening ideas, there are no right or wrong answers. Just take the time to assess your outdoor space as well as your own growing goals before you start creating your beds. Happy growing!

RAISED BED GARDENING IDEAS

Save this pin for later

7 Garden Cinema Ideas to Host a Cinema Party at Home

Outdoor cinema screenings were a huge trend in 2019, and it looks like – despite everything that’s happened since – drive-ins and sit-outs are making a careful comeback. Even so, if you’re not ready to face the crowds (or never were), why not host your own outdoor film party at home?

garden cinema ideas with popcorn and blankets

Garden cinema ideas: setting up your silver screen in seven steps

A garden cinema night is a great way to hang out with people while staying socially distanced, and it’s much more convenient than going out. You always get the best seats, and have full control over the guest-list, menu and dress code… bliss! Plus, you’re not just limited to films – once your garden cinema is set up, you can use it for TV, video streaming or gaming.

What better way to spend the summer than having a mini film-fest at home? You don’t even need a conventional garden – if, like me, you’re currently limited to a balcony or roof terrace. Once your outdoor cinema is set up, it’ll become your go-to spot year after year for parties, date-nights and family hang outs.

Here’s our super-easy seven-step guide to creating the best outdoor viewing experience, along with a bunch of gorgeous garden cinema ideas to inspire you.

Scope out your spot

The ideal location for an outdoor cinema set up needs three key things:

These are really the bare essentials, and anything more than that is going to be a plus, comfort-wise. If you’ve already got some nice garden features – like a patio, deck or covered area, you’ll probably want to try and incorporate them.

If you want a home cinema to become part of your routine, what about a more permanent setup? I can’t think of anything better than turning a she shed or garden man cave into a movie-and-gaming den.

Working with a bare-bones garden? No problem! Try setting up a tent or gazebo to make your film screening more cosy (especially later in the year!)

Prepare a projector

I remember when home projectors used to be seen as some kind of specialist equipment (no thanks to insanely high costs). This just isn’t the case any more, and there are ways to create a garden cinema on any budget. Projectors are also quieter and more compact than ever before, and are capable of producing much better images in partial light.

If you’re happy to make a hefty investment, look for projectors with a high lumen count – at least 3000. The lumen measurement indicates how easily you’ll be able to see the on-screen images in brighter lighting, so if you want to start showing films before dusk, the more lumens the merrier. High-end projectors typically start at about £700 for this kind of cinema-level experience.

Right at the other end of the budget are smartphone projectors. Although the picture quality might not be Oscar-worthy, they can usually give you about 8x screen magnification for around £20. Connect your phone to a bluetooth speaker, and you’ve got yourself an entirely wireless little cinema in the palm of your hand. Perfect for a couple of people watching together, or for a solo movie marathon.

Connect your content

It sounds simple, but don’t leave it to the last minute to hook up your video source – it’s a recipe for technical difficulties! Obviously, there are heaps of options available, so whether you’re connecting your Apple TV, Chromecast, laptop or TV, make sure you’ve got all the wires you need to reach your projector.

Think about sound, too – most projectors have a standard 3.5mm jack that you can plug speakers into, or you could look for a model with bluetooth connectivity if you have a soundbar. Sound dissipates much more outside than it does indoors, so you can probably err on the side of speakers with more power.

Don’t forget about your neighbours though! If you live close to any other houses, keep the sound respectful or connect bluetooth headphones – or, I don’t know, invite them over?

Set up your screen

Just like your projection equipment, there are several options when it comes to outdoor cinema screens at home. Your favourite option will depend on whether you’re trying to create a garden cinema on a budget, and how much use you’re expecting to get out of your screen.

Student film budget: Hang a crisp white sheet from a washing line, from two poles or between two hooks fixed to your wall or shed. You might need to fashion something to weigh the bottom down and stop it flapping in the breeze (like pegs).

Indie film budget: If you want something a little more professional, there are several options for mid-range cinema screens at home. It’s possible to sew a DIY projector screen that works pretty well. Just stitch some blackout lining together (when you go shopping, remember it’s white), and attach strips of timber to the top and bottom. Add screw-hooks to the timber at the top, hammer some nails at the right height onto your fence, and you’ll be able to hang your screen whenever you like.

Or, simply buy a projector screen, which will offer great picture quality and cost somewhere between £20-100. If you’re happy to pay a little bit more, you could get a motorised one that unrolls with a remote control.

Blockbuster budget: As the outdoor cinema trend has been growing, so too have the number of places you can buy (or hire) an inflatable screen. Remember you’ll need a power supply for the air pump, and that these can get quite noisy.

Decide on your decor

Not every movie night needs the outdoor party treatment, but a couple of small touches can make the evening more pleasant while you’re watching.

For example, a little bit of light is helpful while everyone gets settled (and possibly to help people find their path to the toilet mid-movie). Fairy lights or lanterns are subtle – we’ve got loads more garden lighting ideas if you need inspiration. Whatever style of lighting you prefer, check that they’ll be easy to turn off when the film starts.

Finally, stock up on citronella candles and diffusers – biting bugs like mosquitoes hate it!

Create some comfort

The joy of bringing the cinema to you is that there’s no limit on how comfortable you can be. Yes, you could simply lay a blanket and some cushions out on the lawn, but why stop there?

If you haven’t already got a decent set of garden furniture, now could be the time. A cosy sofa, reclining armchair or even a luxurious swing-seat would help you enjoy your film nights in style and comfort.

Or, you could go for more casual seating – a set of chilled-out deck chairs, or a hammock, maybe? I’m also a big fan of outdoor bean bags.

Haven’t tried one? You’re missing out, seriously. Whichever kind of seating you choose, always load your guests up with cushions and blankets to stay snug once the sun sets.

For those of you that are really serious about enjoying yourself, I’ve got some suggestions for you. First: fire pit. Second: hot tub. Either of these little babies will keep you warm all night, and are experiences you just can’t get at a regular cinema. Need a bit more convincing? Check out our fire pit ideas and hot tub ideas next.

Secure your snacks

The final touch to any film night: snacks. It could be as simple as banging some popcorn in the microwave, or as elaborate as nibbles that fit into the theme of your movie. Personally, I’m in favour of ordering a takeaway so someone else gets to do all the hard work.

It’s equally important to keep your guests hydrated throughout the film. Bring a cool box outside with you so that everyone has easy access to a chilled beverage whenever they need one (this also saves you having to pause the film while people top their drinks up)!

That’s really all there is to setting up your own outdoor film fest – hopefully some of these garden cinema ideas have inspired you! Unfortunately, we don’t have a guide for helping you choose what to watch… you’re on your own with that!

7 GARDEN CINEMA IDEAS TO HOST A CINEMA PARTY AT HOME

Save this pin for later

18 Container Gardening Ideas: Potted Planting Arrangements

Container gardens are fantastic for anyone that’s getting to grips with gardening, growing plants in a limited space or adding a pop of colour to paved areas. They’re also a fun way to change the way your garden looks each season, or creating focal points within your flower beds. Today I’m going to be sharing some of my favourite container gardening ideas, including seasonal show-stoppers, understated arrangements and container gardens for beginners.

What is container gardening?

Simply put, container gardening is the practice of growing flowers and/or edible plants in pots or planters, instead of straight into the ground. Container gardens are practical if your outdoor space is otherwise hardscaped (for example, a paved courtyard, patio or balcony), and are easy to move around and update as your garden changes through the seasons.

If you’re a beginner gardener, don’t forget to take a look at our lists of the best plants for container gardening and the best vegetables to grow in containers.

The benefits of container gardens

In many ways, container gardening is easier than conventional, in-ground planting. Their restricted size gives you more control over how large your plants get and, if it looks like they’re getting too much sun (or too little), you can simply pick them up and move them to a different part of the garden. The same goes for water and fertiliser – it’s much simpler to adjust an individual pot than an entire flower bed.

Containers also act as a natural defence against many pests, particularly things that crawl on the ground, such as slugs and snails. At the same time, raising your flowers up will make them just that bit more accessible to pollinators, like butterflies and bees.

There’s also the obvious fact that the pots and containers you choose will add a certain style and personality to your garden, so make sure you find some that really suit your aesthetic. We’ve got a whole section of unusual garden containers coming up!

Container gardening tips

There are a few things to be aware of if you’re growing in containers, rather than the ground. These container gardening tips should help you keep your plants a little bit happier:

Container Gardening Ideas

One of the best things about growing plants in pots is that you can start with simple container gardening ideas, and work your way up to more elaborate displays. In this list of my favourite container gardening arrangements, I’ve included a whole range of styles for inspiration.

1. Combine two or three plants

The simplest way to create a beautiful container garden is to combine two or three plants with a variety of shapes and colours. Position the tallest one in the centre, and surround it with shorter flowers or foliage. If there’s space, tuck a trailing plant on each side.

2. Use pots with different textures

As a rule, groups of uneven numbers look more pleasing to the eye than a group made of an even number of things. Keep this in mind when you’re building out your container garden at the beginning. When creating your arrangements, try using pots that are the same colour but have different textures, like these.

3. Use pots of different heights

This set of three containers is really easy to recreate. Find three pots or tubs at different heights, and fill them with a flower of a different colour (or two, in the case of the largest one). These look beautiful next to the raised bed filled with greenery, but would look just as nice against a patio fence or wall.

4. Matching wicker baskets

If you prefer to keep all of your planters looking the same, the more the merrier! These matching wicker baskets are a really attractive way to house larger plants, and would be easy to move around at the same time. 

5. Match the existing colors

Container gardens are a great way to add seasonal interest within a perennial flower bed. This one uses plants that echo the green and purple of the surrounding flowers, but with fun new textures.

6. Contrast pots and flowers

Contrasting the colours of your pots with the colour of your flowers is a great way to make your container garden more noticeable. Plus, when you’re short on space, it adds an extra pop of colour to your patio or balcony.

7. Make clusters

Sometimes, and especially in gardening, more is more. This huge cluster of baskets look absolutely amazing, and the monochrome scheme of white flowers is just stunning. Not everyone has the space to pull off a container garden like this, but it shows that simple abundance is an effective way to decorate a beautiful space.

8. Make a seasonal pot

We’re a little early for the festive season, but this display really shows you how amazing seasonal container garden ideas can look. Pair it with a matching door wreath for a magical winter entryway (and look out for our Christmas garden ideas in a few months for more inspiration)!

9. Add hanging baskets

We usually think of pots and planters when we’re talking about container gardening ideas, but there are lots of playful alternatives! Hanging baskets are a great way to add depth to a container garden – take a look at our hanging basket care tips and the best edible plants to grow in hanging baskets.

10. Fill it up!

Here’s another pretty example of how volume can make a big statement. This relatively small patio is home to heaps of containers of all different shapes and sizes, connected by their lush green foliage.

The monochrome garden furniture is perfect for allowing the beautiful textured plants to take centre stage.

11. Garnish a side return

Container gardens are an easy way to spice up a shady side return – add some gorgeous flowers in spring and summer, and then reclaim the space over winter. These long, narrow planters are the perfect dimensions, and look amazing with all these tall tulips reaching out the top.

12. Make a flower wall

Another amazing wall of colour, proving that container gardening ideas aren’t just for small spaces. To pull off this kind of arrangement, you’ll need lots of medium-sized pots and some sturdy benches, steps or walls to stand them on. Although, if you can get your display dense enough, you could even use reclaimed pallets or breezeblocks to support your pots without them being seen.

13. Decorate front steps

Does your front step need some love? Lining up colour-coordinated containers is a sure-fire way to get noticed, and is easy to keep on top of, one pot at a time. These stunning pinks are right up my street, but play around with colours and pots to suit your home’s style.

14. Upcycle

A common feature in quirky, rustic gardens is reclaiming beautiful worn objects and giving them a new purpose. This old bicycle might not be road-worthy anymore, but it’s a gorgeous and romantic way to display spring and summer blooms. Take a look at more vintage garden ideas.

15. Create a centerpiece

This stone urn makes a brilliant patio centrepiece, and would look right at home in a rustic Italian-style garden. By surrounding the base of the pot with some of the same plants that are growing inside, it creates the impression that the container garden is accidental, and it’s simply being reclaimed by nature. Gorgeous.

16. Bulky containers can work

Container gardens are often delicate and pretty, intended to add plants to a space without being bulky. That doesn’t have to be the case though – just look at these huge stone troughs filled with blooms! Perfect for raised bed gardening in a cottage-garden or countryside setting.

17. Lift off

If you are short on floor space, remember that containers don’t have to be at ground level! These wire baskets are a trendy way to lift pots off the floor, and they give a modern edge to classic terracotta pots. As you can see, this sort of display is perfect for edible plants, as it makes them much easier to harvest!

18. Decorate the windows

Window boxes are another type of container garden that can be overlooked or forgotten about. With some careful pruning, you can squeeze several layers of flowers and foliage into just a couple of feet of soil – and the result is a beautiful makeover for your home! Read our guide on how to make one and what to plant in it


Which of these container gardening ideas is your favourite? If you like these styles, don’t forget to take a look at our garden ideas for small spaces, our front garden ideas and tips for balcony gardens. Happy growing!

18 CONTAINER GARDENING IDEAS POTTED PLANTING ARRANGEMENTS-min

Save this pin for later

How to Improve Your Garden Soil in 6 Steps

High-quality soil is essential for growing healthy, strong plants. Whether you want better yields from crops, more abundant blooms from flowering plants, or to simply give your foliage a better chance against pests and diseases, the condition of your soil is a fundamental factor. Knowing how to improve your garden soil is important; keeping it in a good condition is a continuous process that needs to be worked on every season.

a gardening fork and trowel on a background of dark soil

The basics of great garden soil

The best garden soil to support your plants will be rich in nutrients, minerals, beneficial microorganisms and organic matter. Its consistency should both absorb water and allow for drainage, support your plant while still creating room for root development and provide air circulation. Improving your soil is about understanding deficiencies in the earth that you have, and rebalancing its composition so that it can nourish your plants and support all everything growing in it.

Soil naturally ranges in consistency, from heavy and clay-based to light and sandy. Clay compacts easily, becomes waterlogged and ultimately suffocates plants. Sandy soil, on the other hand, allows moisture to drain faster than plants can absorb it. The ideal consistency is somewhere in the middle, where the soil has a loamy consistency and is rich in organic matter.

How to improve your garden soil in 6 steps

Any type of soil can be transformed into healthy garden soil with a little dedication and hard work. Improving your soil takes time and is an ongoing process. Organic matter needs to be replenished frequently to keep the cycle going. Below are seven ways you can improve garden soil.

close-up of a hand holding earth - how to improve your garden soil

1. Start by testing your soil

You won’t know what’s going on with your soil unless you look. Start by identifying the type of soil you have – whether it’s chalky, clay-based, sandy etc. –  you can usually add some water to it and feel the consistency between your fingers. The Royal Horticultural Society has some great information on understanding soil types.

The next step is to understand the current composition and mineral balance of your soil. You can get a professional survey done, but it will be much cheaper to start with a home testing kit, which you can find at most garden centres or buy online. Soil tests will tell you about the levels of nitrogen, potassium, calcium, magnesium, phosphorus, sulphur, organic matter and lead in your garden, as well as the pH balance. Knowing this will help you understand how to improve your garden soil by boosting elements that are deficient.

It’s good practice to carry out a soil test every few years to check the balance of your soil, and that your routine for conditioning your soil is working properly.

garden compost ideas: a small enclosure made from pallets to keep a compost pile contained

2. Combine it with compost

The simplest thing you can do to improve your garden soil quality is to mix decomposed organic matter – compost – into your flower beds and vegetable patches. It improves the soil structure, feeds the microorganisms living in it and helps your garden earth retain nutrients and moisture, while allowing better drainage and air circulation. Compost can also neutralise your soil’s pH, and generally give your plants the support they need to fend off disease.

Compost is made from natural, carbon-based materials that have broken down – like grass clippings, coffee grounds, dried leaves, vegetable scraps and untreated cardboard. Once it’s decomposed together, the consistency of compost will create vital pockets of air in clay-based soil, and help sandier earth clump together so that plants can thrive. It will also provide organic matter for tiny organisms in the soil to consume and convert into the nutrients your plants need to feed on.

Making your own compost is a great way to sustainably manage some of your household waste. Our complete guide to composting will tell you more.

a wheelbarrow full of well-rotted animal manure to improve garden soil

3. Mix in manure

Aged animal manure from chickens, cows, rabbits, horses and sheep will improve your soil structure, and is high in nutrients that will fertilise your soil. It’s important that you use well-rotted manure that’s at least several months old, as fresh manure can harm both plants and humans.

If you’re buying manure, it’s important that it comes from animals that haven’t been eating hay or grass covered with pesticides. These chemicals can pass through into the manure, and then remain in your soil for a long time.

garden tips for selling your home include putting mulch on your flower beds

4. Add a layer of mulch

Covering the surface of your garden beds with mulch is going to improve your garden soil in several ways. It’s great for helping your soil retain its moisture and keep the ground cool and, more importantly, mulch will also slowly break down to release more nutrients into the soil. Plus, mulch stifles weed growth and makes your garden look more attractive, with uniformly-mulched beds that look neat and tidy.

a row of crops covered in mulch, between two wooden sleepers for walking on

5. Keep your soil loose

Compacted soil is bad news for your garden. Not only does it limit water flow and stifle the microorganisms that create the nutrients for your plants to feed on, it makes it harder for your plants to grow the fine roots they need to search for water and nutrients elsewhere. It’s a vicious circle, and usually results in dehydrated soil that starves the foliage above.

There are several things that contribute to compacted soil, but all of them can be fixed. Clay-based soil is the most likely to become compacted, especially after heavy rain or snow. Regularly mixing in loamy compost will help to rebalance the texture of clay-based soil. Waterlogged soil will also compact easily, which is why it’s important not to over-water your garden, and to allow it a couple of days to drain after wet weather.

The final thing you can do is avoid walking over the soil you intend to grow plants in. It’s much better to have designated flower beds with lawns or paths between them that you can walk on.

6. Rotate your crops

Crop rotation is an essential part of growing vegetables in your garden long-term, as different plants will absorb different elements from the soil. There will also be a build-up of soil-based pests and diseases that target particular crops, so planting something different in the same soil the following year will kill off most of the pests and keep the soil healthy. Failing to rotate your crops will force them to struggle against depleted soil nutrients and greater numbers of pests and pathogens that can cause problems.

Three years is the recommended gap between planting the same crop in the soil. So, the best routine is to divide your vegetable bed into four sections, and rotate the crops into a new section each year (bonus points if you can leave one section fallow for a year). It’s also helpful to know that some plants can replenish certain components in the soil – for example, peas and nasturtiums will deposit nitrogen back into the ground, which is useful after growing a nitrogen-hungry crop, like corn or brassicas.


Learning how to improve your garden soil is the best way to grow happy, healthy plants and crops year after year. Although there’s no quick fix, consistently conditioning your soil will reward you with stronger plants, higher-quality crops and bigger, brighter blooms. Happy growing!

HOW TO IMPROVE YOUR GARDEN SOIL IN 6 STEPS-min

Save this pin for later

How to Grow Strawberries in Your Garden

Strawberries are the perfect summer treat, whether you dip them in cream, drop them into lemonade or reduce them down for jam. Learning how to grow strawberries at home is incredibly rewarding, and will save you heaps of money in comparison to buying them from a supermarket. They’ll probably taste better too!

So, whether you’re cultivating a perfect cottage garden or British-themed backyard – or maybe you just want some fresh fruit for your Pimm’s (in which case, check out our guide for growing cucumbers too) – let’s take a look at how to grow strawberries.

Growing Strawberries: Where to Begin?

There are two types of strawberries; summer-fruiting strawberries (which grow large fruit for 2-3 weeks from early to mid summer), and perpetual strawberries, or ‘everbearers’ that will produce clusters of smaller fruit from the beginning of summer to the beginning of autumn. The best type for you will depend on space, and what you’re planning to do with your strawberries.

Sow in: March, April

Harvest in: June, July, August, September, October

You can also plant strawberries in October for the following year.

Planting strawberries

how to grow strawberries, taking young plants from a box and putting them into the ground

Rather than growing strawberries from seed, it’s much easier to buy young plants in pots, or as runners with bare roots. Runners can look a bit uninspiring (like scraps of roots without many leaves), but I promise, they’ll grow! Buying from a reputable supplier, you can be sure of the variety of strawberry plant you’re getting, and that your plants are disease-free.

Strawberries will flourish if you plant them in the ground, especially if you take the time to prepare the soil. Choose a sunny, sheltered and fertile location, avoiding areas that might be struck by a late frost – and don’t plant strawberries in soil directly after potatoes, tomatoes or chrysanthemums because of the diseases that can remain in the soil. Mix a couple of buckets of garden compost or well-rotted manure into the soil, and add a general purpose fertiliser to get started.

Strawberries are traditionally planted in rows, with about 35cm between each plant, and 75cm of space between rows. Strawberry root balls should be about 10cm across (you can trim them a little if they’re much larger), so dig holes to accommodate them comfortably.

As you refill the soil, take care not to cover the crown of the plant (the section where the stems cluster together before separating – it looks a bit like a crown). The crown should be gently resting on the surface, with the roots completely covered.

How to grow strawberries 

row of strawberry plants becoming established in a garden

Keep your plants well-watered as they become established, although try not to let the crowns get too wet (waterlogged crowns will harbour disease and mould). Keep applying fertiliser every week to two weeks during the growing season to help your strawberry plants form healthy delicious fruits.

Depending on the wildlife in your local area, you might find it useful to cover your strawberry plants with a fine mesh, to keep birds from snatching the berries as they form. If squirrels are a problem, a metal mesh is better than a plastic one.

If you’re growing cold-weather everbearers (early spring or in October), pinch off the first bloom of flowers to help your plants grow stronger before they produce fruit. You don’t need to do this with summer varieties unless the plant is looking a bit feeble.

Most gardeners like to cover the ground with a straw mulch, or soft fibre mat, when they notice the first fruits beginning to ripen – it provides a bit of a gentler landing if your fruits drop early (and will also limit weeds and slugs)!

Growing strawberries in pots

strawberries growing out of a hanging pot in a greenhouse

If you know your garden soil isn’t particularly good quality for growing crops, you can cultivate strawberries in lots of other ways, for example:

Container gardening is great for strawberries, as you can move them into more sheltered spots in bad weather, but return them to full-sun to help them ripen. Raised planting gives you a bit more of a defence against pests, too!

Thanks to staying relatively contained, strawberry plants are convenient for balconies, patios and small gardens. They’re also perfectly happy being grown indoors, as long as they have plenty of sunshine – so they’re an ideal plant if you’re looking for indoor garden ideas.

The only thing to keep in mind is that containers and pots dry out much quicker than flower beds, so remember to keep your strawberry plants well-watered. Mixing in a high potash fertiliser during the growing season is a good idea too.

Harvesting strawberries

Your strawberries are ready when they’re a bright red colour all over. It’s generally recommended that harvesting them at the warmest part of the day results in the best flavour. Remember that strawberries don’t keep well, so, unless you’re going to preserve or process them, pick your strawberries as close as possible to when you intend to eat them!

At the end of the cropping season, remove the fibre mat/mulch/plastic from around your plants, and take off the netting – both things will help to limit pests. You should also trim off old leaves from summer-fruiting plants so new leaves can form.

Strawberry plants typically produce fruit for four years, after which you’ll need to replace them. When you buy new plants, it’s best practice to grow them in a new location with fresh soil to keep nutrients balanced and minimise disease.

Common Problems when Growing Strawberries

Strawberry plants are a tender treat for several kinds of organisms, which means that learning how to grow strawberries will involve some level of pest control practice. Here are the most likely threats to your strawberry plants:

  1. Strawberries don’t take well to frost, and a late cold snap can damage and deform your plants. Keep an eye on the weather at the beginning of the season, and gently cover your strawberry patch with horticultural fleece if a frost is forecast.
  2. Like chilli peppers, strawberries can be susceptible to grey mould – a fuzzy fungus that will develop if your plants are too moist. If you notice any spores, it’s best to cut the affected area off completely, clear up any fallen leaves and try to make more room for airflow around your plants.
  3. Powdery mildew is another fungal challenge you’ll face when tackling how to grow strawberries. It looks just like a dusty pale powder on your plants’ leaves, and can usually be remedied with keeping the soil moist and moving your strawberries to a slightly cooler location for a bit.
  4. Vine weevils are pesky critters that leave tell-tale notches chomped out of your plant leaves. Oh, and the larvae at the bottom of the plant will be feasting on the roots of your plants, in a double-pronged attack. The beetles are small, round and dark coloured, while the larvae are mostly white with brown heads. Employing biological control is the best way to tackle these common garden pests.

Now you know the basics of how to grow strawberries in your garden, don’t forget to check out some of our other guides and ideas for making the most out of your outdoor space this summer. Why not spruce up your BBQ area, or indulge in a cosy swinging chair? Tell us what you think!

HOW TO GROW STRAWBERRIES IN YOUR GARDEN

Save this pin for later

7 Natural Ways To Keep Snails Out Of Your Garden

We’ve spoken about ways to attract “friendly” bugs into your garden, but what about keeping pests at bay? Gardeners find slugs and snails are particularly pesky, as they can really chomp their way through beautiful flowers and delicious crops, destroying flower beds and foodscapes alike. So, let’s take a look at some of the natural ways to keep snails out of your garden.

a brown snail on the edge of a plant pot

Why Choose Natural Pest Control?

There are several reasons why you might prefer to use organic pesticides instead of chemicals. For many, it’s just about looking after the environment and not putting harmful substances into the earth. Maybe you’re also wary of putting pesticides on things you’re ultimately going to be eating. Natural bug control methods are also going to generally be safer to use around children or animals (of course, you should still teach them to stay away).

1. Use rosemary and thyme as companion plants

Companion planting is where you grow certain things near each other for a specific reason. For example, you might use companion planting to encourage cross-pollination, or to maximise the available space in a planter.

In this case, both rosemary and thyme act as natural ways to keep snails out of your garden. For some reason, snails (and slugs, and a number of other garden pests) don’t like the smell of these herbs. Mint will work too, but it’s quite invasive so you should grow in separate containers and sprinkle the leaves around the plants you want to protect.

2. Use a rough, gritty mulch

garden tips for selling your home include putting mulch on your flower beds

I love the way mulch makes a garden look much tidier, with uniform soil peeping out from beneath blooms and bushes. Using certain kinds of mulch is one of the natural ways to keep snails out of your garden and away from your plants.

Look for mulch (or make your own) that contains wood ash, bark, eggshells and crushed nut shells. Any ground-crawlers like snails and slugs will typically avoid slithering over rough soil, and the mixture will help keep the composition of your soil balanced.

3. Encourage more birds

Birds are wonderful pest control, and one of the best ways to keep snails out of your garden without having to deal with them yourself. You might even be surprised by how many varieties of feathered friends start visiting when you show them they’re welcome!

Start by investing in some bird feeders and keep them topped up. A bird bath (or shallow water feature) is also great in summer. You might even want to add some bird-boxes, and hang back on raking and tidying so that there’s plenty of nesting material available. Our posts about bird-friendly garden ideas and wildlife gardens will give you more ideas!

4. Get yourself some chickens

Are the wild birds not showing up quick enough? A short cut is to start rearing your own! Chickens and ducks are actually really fun to keep as pets, and will just devour any bugs they find roaming your garden. They’re the perfect addition to any homestead garden.

So, to clarify, just a handful of hens will lay eggs, provide a free way to keep snails off your plants (and other insects) AND result in endless hours of entertainment. It’s not often I offer you a win-win-win solution, but I think I’ve just done it here.

5. Use diatomaceous earth

a gardener holding a trowel of diatomaceous earth, one of the ways to keep snails out of your garden

Diatomite, or diatomaceous earth, is made from a naturally-occurring rock that is ground to a very fine white powder. It’s safe to ingest (it’s actually used as an abrasive in some toothpastes), but is microscopically sharp.

Sprinkle this flour-like substance around your plants, and any slugs or snails that cross it will get hundreds of tiny cuts that cause them to dehydrate and perish.

6. Get them drunk

ways to keep snails off of your garden include beer traps

Does shredding your garden pests make you feel squeamish? Well, what do you want to do, share a beer with them?! Actually, that’s a good idea too. Sink a shallow container (like a tuna tin) into your flower bed up so the rim is at ground-level. Half-fill it with beer and, voila, you’ve made a beer trap.

Slugs, snails and earwigs are totally tempted by this yeasty treat, and will crawl in, start drinking, and eventually drown. Okay, so that isn’t exactly less gruesome than the last method. If you have excess beer, can I recommend opening a garden pub as an alternative?

7. Container gardening

Container gardening is one of the simpler ways to keep snails out of your garden when you raise it up off the ground. Growing valuable plants in a planter or container makes it less of a target for any ground-crawling pests, both because they’re literally further away, and because it can be tricky for bugs to climb up the sides even if they try.

Plus, it’ll be easier to keep an eye on your plants, and pick off the garden pests that would usually lurk under leaves and sneak behind stems. There are lots of perks with container gardening – take a look at our container gardening tips!

What Are Your Organic Gardening Tips?

This season at Garden Patch, we’ll be looking at all the ways you can keep your garden happy while staying in tune with nature. Let us know how you look after your garden, and check out our posts about kitchen gardening, composting, and natural ways to keep other annoying bugs at bay (mosquitoes, we’re coming for you next!)

7 NATURAL WAYS TO KEEP SNAILS OUT OF YOUR GARDEN

Save this pin for later

17 DIY Kids Garden Play Area Ideas: Bring the Fun Outdoors

In the busy world we live in, gardens have never been a more valuable space for giving your little ones somewhere to safely play outside. Especially in a time where we have to consider social distancing and we’re all spending more time at home, having a garden play area can feel like an absolute luxury.

However, some kids need some encouragement to go outside and play. If your garden could honestly be a bit more exciting, it’s time to roll up your sleeves and start making a play area in the garden with some fun and functional DIY playground ideas for kids.

Ready for the challenge? Read on for tips and inspiration for simple, low-maintenance children’s play area garden ideas that will have your kids running outside as soon as they get home from school.

Kids Garden Play Area Ideas: Sports and Games

If you’re living with a budding athlete, it may take a bit of work to tire them out. Keeping sporty, energetic kids stimulated is going to need a garden play area that combines lots of fun and exercise. Take a look at some of these clever outdoor activity areas for inspiration.

1. Homemade Obstacle Course

An obstacle course is one of the most exciting ideas you can build for little ones who love adventure, especially if you add ways that it can be switched-up once they start getting bored. Depending on the age and agility of your kids, try to include balance beams, slides and tunnels.

You can build obstacle courses using all kinds of leftover items you have lying around – obviously just make sure they’re safe, clean and strong enough for your children to clamber over. Tyres, planks, logs and pallets are the ideal basics for a DIY obstacle course, and you can use paddling pools, ropes, swings and ramps too.

Of course, you can also buy professionally-made obstacles to integrate with your own homemade pieces. Although… once you start building, you’ll probably find that you start analysing everything you see as a potential addition to your course!

2. Mini Climbing Wall

Some kids just like to climb. We’ve got a whole thread of garden treehouse ideas if that’s what you’re after, but you could also add a climbing wall to your garden to encourage your child’s ever-extending reach. Climbing walls are a fun way to get your kids to build strength and improve balance. Plus, climbing walls are a pretty versatile garden fixture, and you could even incorporate them into your design for an obstacle course or treehouse.

Unless you’re a regular climber yourself, building your own climbing wall can be a bit complex, but you can see a guide over at impatientlycrafty.com. Get some tips from online experts, or give yourself some peace of mind by purchasing a pre-made wall. You can get them customised to fit whatever dimensions you want, and usually have them tailored for different difficulty levels, too.

3. Classic Playground Games

You might find that you really don’t need to overthink it when it comes to sporty garden activities for your children. Set up some goalposts, a basketball net or a badminton net if you have the space.

If you fancy a bit of DIY work, there are a couple of family-friendly games you can borrow from the US. Cornhole is a popular choice, where the aim is to toss beanbags towards a target to score points (this video offers a clearer explanation). You can build the target box quite easily with an old pallet and paint.

Alternatively, a tetherball court can be easily put together with just a few materials – an upcycled tire, a pole, and – of course – a tetherball. Adding a bit of personalisation by spray painting the tire is a great way to get your kids involved and invested in the game early.

4. Water Balloon Forts

Although summer may be fleeting in the UK, we seem to be hitting record temperatures every single year. Let’s swiftly sidestep the terrifying conversation about climate change, and emphasise how this means that – for at least one or two days every summer – a water balloon battle arena really is a sensible garden addition.

The simplest setup is to build a defence screen or fort at either end of a garden, with a bucket of water balloons in the middle or – if you’re feeling kind – a bucket of balloons behind each screen. Set up teams and watch the chaos commence. Alternatively, if you’d like something a little less aggressive, you can make a water balloon piñata by hanging them from a clothesline, low branch or climbing frame.

Of course, water pistols are a great alternative.

Children’s Garden Play Area Ideas for Inquisitive Kids

Some children just love exploring and learning about the world around them. Chances are, these types of kids are already interested in being outside, so the best thing you can do is find ways to encourage this.

5. Bug Hunting Games

Combine our garden treasure hunt ideas with a bug-hunting kit for kids, and let your little ones discover the insect world. A set of magnifying glasses and containers is enough to start an expedition, although you might want to come along for the first few bug hunts to help younger children learn the safest ways to interact with nature.

6. Create a Conker-run

Conker runs are the autumn, outdoor equivalent of a marble run, or ball run. This kind of activity run is great for children that are figuring out basic physics, and can be a fairly straightforward DIY build if you have the right materials stored. The essentials are having surfaces at at least two heights, which can be connected with tubes, ramps or troughs.

7. “Soup” Stations

It’s just a fact of life that kids like mixing various materials and liquids together. Some might call it “soup”, while others are more inspired by “magic potions” or “science stuff”. It all comes down to the same thing: grabbing a tray that’s big and deep enough for some wet play, and setting up a station in the garden with “ingredients”, water and containers. Depending on how brave you’re feeling, food colouring and glitter is usually popular too! A word of advice: don’t let your youngsters forage for their own ingredients – that’s how you end up with your prized blooms in shreds!

Kids Garden Play Area Ideas: Creative Spaces

If you have kids who are a little more in tune with their creative side, the garden is the perfect place to let them hone their skills while keeping your home (and wallpaper) relatively “art” free.

8. Rock Painting Station

Have a little bit of nature to spare? Lead your children on a treasure hunt for natural materials they can turn into exciting art pieces. Build a station with fun, age-appropriate materials like wool, paints, chalks, coloured sand and glue so that kids can make and craft mini masterpieces out of their favourite finds. You can use buckets or trays to organise your creative materials (and to ensure they always have a home outside).

9. Leaf Walls & Flower Art

When autumn comes, there are ways to make use of raked-up leaves other than just tossing them in the compost bin. If you’ve got young children, tap into their creativity with a leaf-decorating play area! Like a seasonal rock-painting station, adding simple craft materials like scissors, glue, paper and tape can result in nature boards, collages, wreaths and mobiles.

10. Chalk Canvas Spaces

When it comes to expressions of creativity, chalk is a win-win. Kids love the bright colours and the ability to colour just about anything, and parents are just relieved that it all kind of washes away in the rain (but take a look at our garden mural ideas for something more permanent!)

Take advantage of this fun fact by making a chalk-friendly area of the garden, where chalk drawing is completely permitted, no questions asked. Aim for three or four different surfaces, ideally with some subtle variations in colour and texture to keep in interesting (but remember plain, smooth surfaces are the best)!

Kids Garden Play Area Ideas: Cars, Bikes and Wheels

Do your kids have a need for speed? Whether they’re obsessed with Hot Wheels, constantly attached to ride-on vehicles or treating everything like a baby-BMX obstacle, it may be time to fuel up your child’s excitement with some car-themed play areas.

11. Garden Racetrack Ideas

child playing with wooden toy cars along a track drawn in chalk on concrete

There are lots of ways to create a racetrack in your garden, whether you want a temporary track for racing bikes around over a weekend, or a more permanent circuit for pocket-sized cars to be raced around indefinitely.

Using cones, bamboo canes or pool noodles is an easy, safe way to mark out a larger track in your garden. If you’re working with a solid surface, you could use chalk, too. Mowing out a circuit in the garden gives you the option of laying down plastic or paving for a more long-term track. For toy cars, check out “road tape” – virtually eliminating the effort it takes to draw a track by hand!

Size-appropriate obstacles can be built with breeze blocks, planks of wood and whatever similar materials you might have available.

12. Car Wash for Kids Toys

Perfect for the summertime, a DIY garden “car wash” is a simple and effective mechanism to keep your kids entertained for a good few hours. You can build your car wash with PVC pipes and sprinklers or hang up hoses on a tent frame. It’s a sneaky opportunity to add soaping and drying stations (hidden behind a tunnel system of vinyl tablecloths or bin bags) and get the kids washing dust and cobwebs off of their outdoor toys. Take a look at a step by step guide over at afewshortcuts.com.

When they run out of toy vehicles to clean, it’s time to bring out the water pistols and set them on each other!

13. “Off-Road” Sand Pit

Make truckloads of fun with an off-road track or pit using sand or gravel. Just a little bit of imagination transforms it into a rugged arena for construction play or other-world racing – especially if you add additional toys, ramps and tunnels.

If you don’t already have a sandpit-sized tray, it’s as easy as nailing together a DIY frame and adding a tarpaulin. You could also use bricks, stones, logs or any other kind of block to keep the mess contained. Position it away from the house to minimise grit getting tracked in, and supervise younger kids so they don’t start putting gravel and sand in their mouths!

Kids Garden Play Area Ideas: Playhouse Inspiration

So many kids love “playing house” in one form or another. It’s pretty cute that they have an innate desire to mimic the adults they see around them (if only real adult life was so carefree)! Whether your kid wants to run their own business, live the suburban dream or escape into adventure, we’ve got some inspired playhouse designs to help you get them set up. Check out even more kids playhouse ideas here.

14. Simple Playhouses

Remember playing house as a child? It’s a timeless activity that all kids enjoy – so why not get them to take it outdoors and indulge in a little fresh air? Lay down some turf to separate your child’s play areas from the rest of the yard (plus, it’s a lot less mowing to keep up with).

Fill the space with different stations – a kitchen, cleaning area, lounge, and bedroom. You can leave your child’s “house” up to their interpretation with playful additions like a sandbox, water table, or sports zone. This is a great way to get all your kids’ favourite outdoor toys in a single space that requires minimal maintenance. Let their imagination run wild!

15. Tremendous Treehouses

Anyone that had a treehouse growing up knows it as a place filled with fond childhood memories. If you want to pass those climbing, camping and clubhouse experiences down to your kids, a treehouse really makes a garden feel homely. Even if you’re lacking a tree (or the DIY skills to build a sturdy playhouse in a tree), there are loads of great treehouse-style ideas that are simple to pull off.

16. Snack Stand

Encourage early entrepreneurs by creating a mini storefront where they can “sell” snacks or drinks to obliging family members. Depending on how old your little ones are, they could serve juice, homemade traditional lemonade, or even biscuits or fairy cakes they’ve baked themselves.

Business can be based just about anywhere, so even a picnic blanket with “shop” signs might be enough to keep younger kids amused for an afternoon. You could convert an existing climbing frame or playhouse, or even build a DIY stand out of pallets, if you felt so inclined.

Play money and shop uniforms (aprons or hats) are the perfect finishing touches.

17. Outdoor Reading Nook

Not every child is an outdoor child, so if you’re desperate to get a bookworm in the garden for some fresh air, try setting up their own little reading nook. A covered daybed – like the one in this post – could be fun, or you might prefer to add outdoor cushions or a bean bag to an existing Wendy-house. Even a pop-up tent can do the trick – just fill it with blankets, bunting and whatever other cosy details might tempt your little reader outdoors.


Enhancing your backyard play area can be inexpensive and practical. Doing a little bit of research and smart shopping can turn any yard into a one-stop-shop for endless engaging activities and hours of fun and games. Why not try out some of our favourite garden activities for kids for more inspiration?

17 DIY KIDS GARDEN PLAY AREA IDEAS BRING THE FUN OUTDOORS

Save this pin for later

18 Garden Bar Ideas to DIY Outdoors & Bring The PUB To You!

Covid-19 has consistently interfered with my plans of hanging out in beer gardens and drinking overpriced pints with my friends. Even in the brief windows of pubs being open, social distancing measures (and having to get my wallet out again) mean that it just wasn’t quite the same.

Are nodding your head with me here?

Well, the good news is that there’s a solution – making your own watering hole at home! The summer lockdown of 2020 produced a slew of blog posts and photo feeds from people sharing their garden bar ideas and taking the initiative to make them a reality. Seeing as “normality” still seems to be a way off, it seemed only right that I scour the internet to compile a list of the best-looking outdoor home bars and most interesting garden pub ideas to provide you with inspiration.

From homey lounges and cosy sheds to backyard bars and decked out patios, here’s plenty of stuff you can do to achieve the right kind of pub atmosphere without ever leaving your house.

DIY Garden Pub Ideas

When it comes to low-cost DIY projects for your home and garden, pallets are the gift that keep on giving. Endlessly versatile, it only takes a little bit of creativity and some elbow grease to transform the humble pallet into something beautiful.

There are heaps of ways you can use pallets to build a home bar – see if any of these DIY garden bar ideas take your fancy!

1. Simple shelving and Murphy bars

Even if you’re short on space, you can totally still have a garden bar. Adding just a couple of planks to a pallet can create a cute set of shelves with space for bottles and glasses, with a surface for pouring on top.

Need to go even smaller? Try a Murphy bar – that’s a bar that you can open up when you want a bevvy, but fold away for more space when you need it. It’s simple enough to make from a pallet, you’ll just need a board that’s big enough to cover the front, and chains or ropes hold it upright. The benefit of using a pallet is that you’ll have a shelf that’s deep enough to keep some bottles and glasses waiting inside.

2. Paint your pallet bar

I really like the look of bare pallets and how they can look edgy or rustic depending on how you style them. That being said, giving your DIY pallet bar a lick of paint totally transforms it.

If you like bright and bold, what about a scorching shade of pink? The bold accessories, like the striped rug and kitschy pineapple lights, add some oomph to an otherwise ordinary patio.

Darker, subdued shades are better if you want your garden bar to feel more sophisticated. This deep grey looks gorgeous and very modern against the pale gravel and white stools.

3. Garden bar with a tiki finish

Even if you build your garden bar from pallets, it doesn’t have to look like you have. Covering it with fabric, artificial grass or bamboo matting (like this bar) quickly gives your pallet bar a brand new personality.

4. DIY garden bar with a roof

This little garden setup looks complicated, but really it’s just eight pallets and some planks. I like how they’ve used pallets facing both ways, to create the effect of a panelled bar “front” but also have some in-built shelves to act as a back bar. Of course, the best addition is the clear plastic roof, making this shed-bar an all-weather watering hole.

5. Simple garden shed bar

This cosy blue shed makes for a bright and cheerful home bar, thanks to some recycled pallets and DIY shelving. Simple touches like the artificial grass flooring and festoon garden lights are inexpensive but make the design look thought-out.

Luxury Garden Bar Ideas

I’m sure lots of people are looking for garden bar ideas they can use for a season or two while social distancing measures are at their strictest. However, for others, building a garden bar will be a lifestyle choice they can enjoy for the foreseeable future.

If that’s the case, it’s worth making a bit more of an investment to build an outdoor home bar that you can comfortably use in all seasons. You might even decide to incorporate other leisure activities under the same roof.

Sounding good? We thought so. Take a look at some of these more luxurious garden bar ideas for inspiration…

6. Garden man cave pub

Bringing your garden pub inside gives you so much more scope to make it comfortable. These sleek bar stools wouldn’t be practical outside, and you probably wouldn’t want to keep so many bottles and decorative items exposed to bad weather (or nosy neighbours). We have a whole post on garden man cave ideas, and this one could definitely make the cut!

7. She shed bar

Of course, “she sheds” make excellent bars too. This passionate proprietor has fully committed to the retro diner theme, complete with popcorn-maker and rotary payphone! If you’re looking for ways to bring some character and purpose to your garden retreat, check out our list of she shed ideas.

the interior of a shed made to look like a 1950's diner with red vinyl seats, a checkered floor and a corner bar

Anne and Ian Bate’s American Diner via the National Design Academy

8. Home tiki bar

We looked at how you can give a DIY pallet bar a tiki finish, but if you love this tropical kind of style, you might want to go all-out. This incredible home tiki bar really sets the standard, with bamboo walls, an in-built bench and grass roof. It’s amazing! Learn more about tiki style garden ideas in this post.

a tiki style garden bar made from bamboo with a grass roof

home tiki bar by Grey Rhodes via idealhome.co.uk

9. Garden bar with fire pit

A fire pit is a beautiful way to bring light and warmth to your garden bar all night long. Fire pits make beautiful focal points, and are a natural spot for people to gather around while they socialise. The comfy garden furniture is another great idea if you’re planning to hang out at your outdoor pub all night. Take a look at more garden fire pit inspiration here.

a stylish garden bar with corner sofa and fire pit coffee table

image by Allan Murdough via idealhome.co.uk

10. Posh pavilion bar

A luxury garden cabin is the perfect grown-up retreat for a cocktail or two. This beautiful pavilion would be ideal, with the unusual-yet-elegant design lending itself to many different styles.

11. Outdoor kitchen and bar

If you love hosting and you love being outside, this has got to be the framework of the ultimate party setting. Outdoor kitchens are such a great way to enjoy your garden, and the bar area encourages your guests to hang out and have a drink while you cook.

12. Garden bar and hot tub area

Why should you and your guests have to choose between hanging in the hot tub or enjoying a beverage at the bar? This cabin is the perfect social space for enjoying the outdoors to the fullest. Non-bathers can be sipping away on the stools, while those in the tub can grab a cool soft drink to keep themselves hydrated. Take a look at more garden hot tub ideas if you’re thinking about getting one of these lavish additions to your garden.

garden bar ideas from crown pavilions

hot tub bar enclosure from Crown Pavilions via flexfence.com

13. Covered garden bar areas

With a sturdy roof and sides, you’ll be able to enjoy your garden bar year-round. These thick wooden beams and stone counter tops really give this garden bar a luxurious feel, and the pizza oven (hidden a bit behind the tree) turns it into a multi-functional, family-friendly space.

Accessories and Decor for Your Garden Pub

Anyone can serve drinks from their shed, but it’s the finishing touches that make it feel more like a bar or pub. Depending on the style of garden bar ideas you’re aiming for, try adding some of these fun accessories before you start pouring.

14. Potted plants

Adding plants and flowers to your bar area is the best way to make it blend in with the rest of your garden. By staining the wood the same colour as the fence and adding just three small pots, this garden bar is in perfect harmony with its surroundings.

15. Neon lighting

Real neon light is crazy expensive, but you can now get LED versions that are much more budget-friendly. As you can see, they still have the same effect! This home-bar proprietor has the right idea with the patio heater, too – gotta stay toasty!

16. Fairy lights

These pretty string lights are the perfect way to make your humble garden bar feel a little more magical once the sun sets. Wrapping the fairy lights around the bar structure makes it a proper focal point in the garden – exactly what you want when you’re trying to recreate the ambience of a night out!

17. Brass ornaments

Prefer more of a classic English pub style? Then traditional brass medallions are a must-have. These little ones are perfect for a pint-sized home pub. Look out for second-hand ones in charity shops, or on eBay. While you’re there, look for drinks mats and spill trays to complete the look!

18. A welcome sign (and a name to put on it)

If you’re building your own garden bar, it’s only right that you give it a proper name and slap that name on a sign. Modern English pub names often use a playful pun or innuendo (“The Tipsy Cow”), but you might want to name your bar after your family (“The Smith Arms”), mention its small size (“The Pint-Sized Patio Pub”) or even with a reference to the unusual circumstances that inspired its creation!

Ultimately, building your own mini pub or garden bar is about creating a fun space that reflects your personality, where you can relax and socialise. Even if you’re limited by size or budget, when it comes to styling your bar, it’s your opportunity to be as creative and unique as you like. Even better: it’s your garden, which means you choose which idiots you want drinking there, and always have final say on the playlist.

Hopefully these suggestions have given you plenty of design inspiration. Which of these are your favourite garden bar ideas? Let us know!

18 GARDEN BAR IDEAS TO DIY OUTDOORS & BRING THE PUB TO YOU!

Save this pin for later

Best Traffic Noise Reduction Fences to Soundproof a Garden

The most wonderful thing about having a garden is that you have your own little slice of nature to escape into whenever the mood (or, let’s face it, the weather) takes you. Being able to remove yourself from the sights, smells and sounds of the rest of the world makes it much easier to de-stress and unwind.

However, as nice as this idea is, unless you live somewhere nice and rural, it can be tricky to close yourself off properly.

Most of us are overlooked by one – if not several – neighbouring homes, and are surrounded by other gardens, public paths and roads. You can close your eyes to avoid the view, but it’s tricky to close your ears and drown out the sounds.

Living in a city (albeit a small one), this issue is pretty close to my heart.

So, today, we’ll be looking at ways to block out some of that ambient noise – specifically, how to reduce traffic noise in your garden.

These tips should also muffle other background noise, like pedestrians, trains or people a few gardens over. Unfortunately, I don’t have a solution for drowning out next door’s Karen and Richard bickering over the BBQ (yet).

How Does Noise Reduction Work?

There are two ways to reduce noise in any environment, and getting your head around the principles will make it easier to make sound-blocking decisions in your landscaping.

Sound deflection (blocking sound)

The first is sound deflection. Sound deflection uses a hard barrier (like a solid wall) to bounce soundwaves back in the direction they came from. If you place a sound-deflecting barrier between you and the source of the noise, less of those soundwaves will reach you.

Sound deflection improves as the barrier gets taller and denser. For example, a chain-link fence or low wooden panels won’t block that much noise. However, a tall wall made from brick or stone will deflect much more sound (again, providing that it’s between you and the source of the noise).

Sound-deflection is a really good way to bring some tranquility to your space… but, as you can imagine, building a thick, tall wall around your garden will have other drawbacks. It’s expensive, for one, and it’ll reduce your light and view even better than it will cut the ambient noise.

Sound attenuation (absorbing sound)

The other method that will reduce traffic noise in your garden is sound attenuation. Instead of trying to bounce soundwaves away from your garden, sound attenuation is about absorbing sound energy to reduce noise before it reaches you.

Like sound deflection, this technique relies on barriers between your ears and whatever is making the noise you want to avoid. However, sound-absorbing barriers are usually looser and softer – like hedges, or structured foam (I’ll explain better in a moment).

Trying to attenuate, or absorb, the sound isn’t quite as effective as sound deflection. However, this method is generally cheaper and much more attractive in terms of your garden aesthetic.

Choosing Fences, Walls and Screens to Reduce Traffic Noise

Okay, so the best way to reduce traffic noise in your garden is going to be fencing – including walls and screens. If you’ve already seen our post on garden fence ideas, you might already be picturing the type of fence that will look best with your garden. However, if your priority is to make your garden quieter, you’ll need to factor in more than just its visual appeal.

Tall fencing

The majority of annoying noises (cars, dogs, children, lawnmowers etc.) will be coming from somewhere between the ground and knee-height. So, a little extra height goes a long way when it comes to minimising noise coming into your garden – both in terms of deflecting and absorbing the sound.

A two-metre fence is ideal. Technically, any taller requires planning permission… but you could add a trellis to the top for additional height, and grow flowers across it for better sound absorption.

Thick fencing

Like I’ve mentioned, a dense barrier does a better job of deflecting sound. Even a wooden fence is too thin and flexible to really act as a barrier to noise. You want something solid and thick – like a brick wall or stone wall – to really keep the sound out.

Solid fencing

By now it’s probably obvious that a fence with gaps in it is going to do a poor job of cutting down ambient noise. The sound will carry right through the cracks or gaps, almost as if there’s no fence at all. Picket fences and decorative panels look pretty, but won’t do much to reduce traffic noise, dog yaps or your neighbour’s banging tunes.

Fencing locations

The closer your fence is to the source of the noise, the better job it can do at dampening that noise as soon as possible. That’s why putting a tall, solid barrier around the edge of your garden is really the most effective way to start.

If there’s an area of your garden that you would appreciate being particularly quiet – like a spot for reading, exercising or sunbathing – then you might want to add an additional barrier. Something like a privacy screen, trellis or pergola (especially with plants growing over it) will give you extra cushioning from noise.

Outdoor workspaces like garden offices should definitely have more than one layer of noise defense. For example, I would suggest adding insulation to the walls of the workspace, as well as surrounding it with tall plants, inside a high-fenced garden.

What Fence Materials Will Reduce Traffic Noise the Most?

So you’re back at square one of choosing your fence. What materials should you be considering if you’re really sick of hearing vehicles when you’re outdoors?

Masonry

a wall-mounted stone fountain in the shape of a lion

A wall built from brick or stone is going to do an excellent job of keeping the outside, well, out. The solid structure of masonry means it’s great for sound deflection, and the thickness of a wall (rather than a fence) means that it’s going to attenuate some of the noise too.

Stone or brick walls aren’t exactly cheap though. Look for reclaimed materials to keep your costs down. The patina of weathered rock or old bricks can add a lot of valuable character and charm to a garden, whether you like a vintage look or want some contrast to a modern, minimalist space.

Don’t forget to check your local planning rules before you start building, too. Even if you’re finding the noise pollution unbearable, having to tear down a wall that you’ve only just built will be a headache you absolutely don’t need.

Acoustic fences

Acoustic fencing is actually designed to block noise coming into your garden. An acoustic fence is usually made from a combination of sound deflective and sound attenuating materials, like acoustic wool encased in closely-panelled wood. 

These solutions are usually pretty attractive, and somewhat cheaper than building a wall. However, they’re still going to be a bit of an investment compared to other options.

Plant walls

the front of a home with a medium-height hedge

Vegetation is actually really good at blocking out noise (and pollution) from nearby traffic. Dense shrubbery and hedges look really attractive as garden fences, plus your local wildlife will be grateful!

Look for fast-growing plants, like conifer trees, leylandii or laurel hedges, or even closely-packed bamboo. These can be grown in dense clumps to provide a beautiful green wall that keeps your garden quiet, private and tranquil.

Plus, as the wind brushes through their leaves and branches, the gentle rustle will act as white noise over the sound of distant (or maybe not-so distant) roads.

You should also check out green walls, which can be cultivated to add a bit of extra sound absorption in your garden. There are different kinds of green wall setups, so you should be able to find one with the plants and structure to suit your home, fence or garden shed.

Wooden fencing

a simple rectangular garden with a deck and lawn with narrow floral borders and a sturdy looking fence

Wooden fences are easy and less expensive to install, and depending on the thickness can provide some level of noise reduction.

However, they’re not as effective as other methods and are prone to rot.

Metallic panels

Metallic panel barriers are the least effective, as the panels can actually vibrate and magnify sound waves.

They are easy and inexpensive to install, though, and can provide a very minimal level of sound deflection.

Water features

Although not a physical barrier, running water features such as fountains, streams, or a pond with a waterfall can create their own gentle sound that can help to drown out unpleasant noise.


Reducing road noise in the garden can be stylish

There are plenty of options for reducing noise pollution in your backyard, so you’ll have to carefully decide which one will work best with your garden layout and overall budget.

While tall and dense structures make the best barriers, there are less expensive and intrusive options you can consider as well to help restore the serenity of your backyard.

BEST TRAFFIC NOISE REDUCTION FENCES TO SOUNDPROOF A GARDEN

Save this pin for later

13 Tiki Garden Ideas for a Tropical Themed Backyard Design

Okay, I have a passion that seldom comes up on this blog, but which I finally need to talk about: I ADORE mid-century design. That includes everything from Atomic Age and Googie architecture, through Mid-Century Modern furniture, and all the way to quirky and kitsch decor pieces. So, when I say that I’m going to bring you Tiki garden ideas, know that it’s coming from a place of pure admiration for this weird, retro style phase.

What is Tiki culture?

That is an excellent question – I’m so glad you asked! It’s important to acknowledge that what we might call “Tiki culture” is totally made-up, and doesn’t relate to a real place. The style actually originated in California in the 1930s, at a time when travel to the South Pacfic was exclusive, exotic and highly-romanticised.

For starters, the word comes from Māori mythology – Tiki is the name of the first human, and is also used to describe wooden sculptures of him. So, using it to describe the tropical style of Polynesian islands would be totally alien to the people living there.

Initially, the style appeared in the form of Tiki bars, which featured jungle-themed decor, imitation carvings and strangely-named cocktails made with exotic fruits and lots of rum. Eventually, this expanded to include elements (real and imagined) from locations like Southeast Asia, and Tiki style started to become adopted in residential homes.

Eventually, the appeal faded (partly due to increased travel accessibility but also the impact of World War II). For a long time Tiki was considered a dated trend – or at least limited to niche cocktail bars – but there’s been a bit of a revival of retroistic styles in recent years. The phrase “Tiki culture” has only really been used since the 1990s, revival – originally the terms were used more specifically, like “Tiki rooms”, “Tiki torches” and “Tiki punch”.

Anyway, all this is to say that, when we’re looking at Tiki garden ideas, we’re really looking at features that might be inspired by authentic Polynesian culture… but which have all been painted with some delicious, retro, California wanderlust.

Essential Tiki Garden Ideas

Although Tiki style is based on a fantasy, there are lots of real ways you can bring it into your garden design. Let’s look at the key things you need to transform your space, and the various ways they can be used in a garden in the UK.

1. Fires and torches

Flickering flames are a staple of Tiki-style spaces, providing both heat and light. There are two really simple ways to incorporate fire into your Tiki garden ideas: fire pits and Tiki torches.

If you choose a fire pit, it doesn’t matter too much whether you choose a solid fuel fire pit or a gas-powered fire pit. Tiki style often celebrates ways of living that are at one with nature – so a rugged, earthy-looking wood fire can look amazing. At the same time, the trend embraces kitschy, inauthentic features in man-made materials that are obviously “fake”. So if unlikely flames are leaping out from a stone table, that’s fine too.

tiki garden ideas with an oil and bamboo tiki torch

Tiki torches are ideal for a tropical island aesthetic. Although you can get them made from metal, traditional torches are constructed from bamboo, with a container of oil and a wick to light at the top. You can actually get gas and electric ones too, as well as solar-powered ones.

2. Palm trees and exotic plants

Obviously, the next step in creating a tropical paradise is lots of lush green foliage. Palm trees, banana plants and ferns are iconic Tiki garden ideas, both in your actual plant collection and in the patterns and designs around you space.

But… let’s get real. You’re not going to be able to grow a slice of remote rainforest in the UK. So, like all good Tiki-style establishments… you’re going to have to get comfortable faking it. After all, an artificial lawn stays gorgeous year-round.

That’s not to say your whole garden needs to be planted with plastic. Instead, invest in a few completely artificial plants, and then use a few silk flowers and fronds to spruce up living native plants. Ultimately, happy green foliage is best (wherever it’s from). The trick to making your British garden look exotic with real plants is choosing varieties with big, majestic leaves – as if they’re been growing untouched for decades.

3. Natural materials

Although the concept of Tiki is about as artificial as it comes, the style does embrace a lot of natural, organic materials. Flooring is typically wood, sand or stone (lava stone would be most authentic). Walls are panelled with bamboo, abaca fibres, woven palm fronds or bac-bac matting (made from banana plant bark).

Of course… it’s completely fine to be a bit creative when you’re trying to achieve the look. Reed fencing can be bought pretty cheaply and looks like dried grass, and even the original Tiki bars would create “panelling” by buying cheap bamboo blinds and turning them sideways. Concrete – for which I have a newfound appreciation thanks to some of these concrete landscaping ideas – can be stamped and painted to look like just about any other wood, stone or masonry texture. One last trick – throw a woven fishing net over a surface for a quick and dirty “tropical” cover-up.

a close up of wooden poles being held together with twine to create furniture

4. Exotic fruit motifs

According to the Tiki trend, pacific island life is surrounded by vibrant, fresh fruits – usually the kind that you’re not entirely certain you could accurately identify in a line-up. There’s pineapple, of course, and coconut, and banana… but also papaya, passionfruit, mango, and guava. When it comes to Tiki garden ideas, be inspired by these delicious natural treats, using their shapes and colours in the materials you choose.

5. Bright colours

Talking of colour – you really can’t go too far in a garden that’s inspired by Tiki style. On top of your natural materials like golden bamboo, rock and deep emerald leaves, you should have a riot of flamingo pink, lime green, ocean blue and, um, orange… orange.

6. Hula motifs

Okay, another quick history lesson (and a reminder that “Tiki” generalises many unique cultures through a Western lens). Hula dancing is a complex traditional art form that originates in Hawaii – however there are many similar but different dances from across Polynesia. Even in Hula, there are styles based in ancient practices and styles that have been influenced by Western tastes, music and culture.

Anyway, hula dancing and related costume pieces like hibiscus flower wreaths (leis) and grass skirts are recurring themes in the Californian Tiki style. You might want to nod to this with your own hibiscus arrangements, grass fringing… or even with one of the most polarising of kitsch tchotchkes, a dancing hula girl lamp.

7. Relaxed, informal seating

When you’re adding furniture into your Tiki garden ideas, think carefully about the materials as well as the style. Natural wood, bamboo, wicker and rattan will create the “earthy” island vibes, although your chairs and tables can be ornately carved or covered with hand-printed fabrics.

In these low-key materials, you can afford to go big with shape and form. Garden swing chairs and hammocks will help you literally put your feet up, and big, peacock armchairs will make a statement focal point. Think casual-regal.

8. Dramatic water features

All Tiki garden ideas are really about escapism and creating the illusion of being somewhere much more exotic and fun than you really are. So, tropical rainstorms, cascading waterfalls and tranquil lagoons are all part of building the scene!

For example, the layout of the Tonga Room & Hurricane Bar in San Francisco has a huge turquoise pool in the middle, and heavy “rain” falling from pipes hidden in the ceiling. Tables are positioned around the edge of the pool, protected from the weather by grass umbrellas and roofing. Every twenty minutes or so, the water comes down even heavier, and flashing lights and sound effects make it feel like a thunderstorm!

How you achieve anything to this effect in your garden is up to you. But a vertical water feature (or a water curtain), could be a good start. I’ve also seen beautiful resin tables that resemble clear bodies of water, and even installing rills in the floor of your patio could create the bubbling ambience you’re looking for.

9. Take cover

You’ll need somewhere to stay sheltered from the epic rainstorms (and the sizzling sunshine) of your tropical island. A pergola or gazebo is perfect – a parasol or cabana will work in smaller spaces. Stick to natural materials, like wood, canvas and grass thatch, if you can.

10. An elaborate layout

Tiki-themed venues are rarely simple spaces. They’re often designed to look like huge caverns, with open-air sections, large bodies of water, and different side-rooms for drinking, dancing and conversation. Back in the day, some venues even had maps so guests could navigate between floors, across bridges and between waterfalls.

a garden path, made from stepping stones in gravel, weaves between tropical flower beds

When it comes to Tiki garden ideas and landscaping, there should be no half-measures. Commit to creating the effect of a totally new location, using water features, bamboo screens and murals to hide any evidence of regular UK surroundings. Try dividing your garden into separate sections, connected by winding stone paths or bamboo platforms.

11. Tiki carvings

The carvings associated with tropical gardens and Tiki rooms are inspired by actual sculptures found in Polynesian cultures. Made from wood or stone, these carvings usually depict human figures or faces, and tend to represent significant ancestors and deities. If you choose to incorporate these striking carvings, each statue should be unique.

12. Kitsch memorabilia

If, like me, you appreciate retro paraphernalia, then a fun, Tiki garden is the perfect place to showcase some of it. The era produced all kinds of kooky merchandise, like collectible ceramic cocktail mugs, postcard-esque art prints, and novelty ornaments with tropical themes. Mix in any exotic souvenirs you might have from your travels elsewhere, and enjoy giving your collection a fitting home.

three novelty ceramic tiki mugs shaped like wood carvings are filled with exotic fruit drinks

13. Your own Tiki bar

No tropical, Tiki-style garden is complete without a cocktail bar of some kind – whether it’s as simple as a bamboo-covered bar cart or as extensive as a completely converted shed. If you want some inspiration from the OG Tiki bars, check out pictures of Don the Beachcomber, one of the original Tiki bars, which opened in Hollywood in 1933. The owner later moved to Hawaii and opened another famous bar, Waikiki Beach.

Although tiki bars traditionally keep their unique cocktail recipes secret, there are a few classics you can start serving: Blue Hawaii, Corpse Reviver, Mai Tai, Navy Grog, Sumatra Kula, Zombie. There’s a great YouTube channel that I love, called How to Drink – you can check out this video on making a Pearl Diver, another Tiki bar staple.

However, if you like the idea of having your own signature beverage then get shaking! Choose any variety of rum, orange liqueur, tropical fruit juice and a dash of bitters. Mix up a brightly-coloured blend, serve it in something unusual (hurricane glasses, decorative ceramic cups, hollowed out fruit etc.) and add a flourish – umbrellas, fresh flowers, dry ice or even actual flames.

a tiki style garden bar made from bamboo with a grass roof

Grey Rhodes via idealhome.co.uk

Make no mistake, transforming an ordinary UK garden into an exotic, tropical paradise is an ambitious project. These Tiki garden ideas should give you a sense of how much (or little) you’re prepared to take on, and what Tiki-style features could work in the space you have.

If you’re looking for more garden-overhaul ideas, check out these gorgeous Greek garden ideas, mystical Moroccan-themed features and formal French-garden inspired tips.

13 TIKI GARDEN IDEAS FOR A TROPICAL THEMED BACKYARD DESIGN (1)

Save this pin for later

14 Garden Fence Ideas for Pretty and Practical Fencing

a row of tulips growing in front of a simple wooden fence

The biggest mistake you can make when it comes to garden fencing is believing that it’s only there to separate your garden from other gardens. Try being just a little bit more creative with your garden fence ideas, and you’ll find that your boundary can be so much more than a line around the edge of your property.

Your fence has an important part to play in the style and atmosphere of your garden, and controls both who can see in and what you can see out. Fencing also plays a massive support role – literally. Climbing plants, hanging baskets, pergolas and sun shades might all rely on your fence to provide a stable piece of garden scenery.

The wrong fence will be something you notice every time you step into your garden. In contrast, the right fence will be so harmonious you could forget it’s there at all. If you’re looking for ways to give your garden a facelift, find the perfect style among these garden fence ideas.

Garden Fence Ideas to Create Character

Your fence is the first thing visitors will see when they approach your front garden, and it will set the tone for the rest of your property. In your back garden, your fence is the subtle canvas that lets your plants and decor express the personality and mood of your space. If you’re wondering how a fence can have character, take a look at these next few ideas.

1. Classic picket fencing

The white picket fence is a symbol of an idyllic life. In America, it’s typically found surrounding comfortable suburban houses, and in the UK we tend to associate it with picturesque cottages and quiet villages. If you want your home to feel traditional and welcoming, a picket fence will do the trick.

Picket fences are conventionally white, but really any shade looks nice, especially if it matches your front door or contrasts against the flowers in your garden borders. They’re perfect for a rustic aesthetic, like a cottage garden, or British-themed garden.

You can make a picket fence even more charming by adding lanterns, flower boxes or playing with height.

14 Garden Fence Ideas for Pretty and Practical Fencing 21

2. Iron railings

Iron railings are mostly associated with traditional townhouses of the Georgian, Victorian and Edwardian eras. You’ll find them in the historically wealthier areas of cities like London, Edinburgh, Bristol, Bath, Cambridge and Brighton. They’re elegant, secure and a little bit intimidating!

Iron railings can be made in two ways: using wrought iron or cast iron. The main difference is that wrought iron is manually hammered into unique shapes, while cast iron is shaped using moulds. Wrought iron is stronger, but cast iron is more uniform (and generally cheaper).

If you would like your home to look sophisticated and traditional (and, yes, a bit imposing), a set of iron railings might be up your street. I actually found some nice information about the differences in iron railings through different periods, if you want to find some to match the dates of your home.

a black, iron fence with a silver Fleur-de-lis at the top of each bar

3. Rope fences

Certain garden aesthetics look better without fences at all, but you might still need something to show the edge of your garden or flower beds. Lashing a length of rope across a series of posts is a simple but effective way of marking out an area. This low-key style of fencing is particularly effective in breezy, beach-style gardens or decorative Japanese-inspired landscaping.

a garden water feature behind a decorative rope fence

4. Modern, slatted fences

Contemporary homes tend to look their best with minimalist fences. Crisp, fuss-free panels made from uniform shapes and colours create a sleek, fresh backdrop for all kinds of pared-back garden styles.

The direction of your fence material can create an illusion in your garden, so choose wisely. For example, the continuous horizontal slats of this fence encourage the eye all the way down to the bottom of the garden, making a weeny space appear longer.

In this garden, the effect is supported by the lines in the table and seating, and also by leaving the middle of the garden unobstructed. The slender table legs, low gravel bed and minimalist trees all help the space feel open, but not empty.

Ideas to Cover up an Ugly Fence

Feeling “meh” about a bland fence that would be too expensive to replace? Here are a few garden fencing ideas that will save you some time and money.

5. Train climbing plants

You can literally add some life to a dull fence by training climbing plants to grow across it. Bonus points for flowering varieties and a gold star for blooms with fragrance. Jasmine and honeysuckle are my favourites.

This patio is a stunning example of obscuring a fence with foliage. Climbers can easily attach to a fence that’s slatted or made from mesh, while raised planters with tall flowers cover the lower half.

6. Add hanging baskets

Hanging baskets are one of my favourite ways to spruce up a space you don’t want to permanently alter too much (like a rental garden). Check out our hanging basket tips to get started, as well as our edible hanging baskets post. If you’re nervous about your fence supporting the weight of a hanging basket, try using those plant pots with holders instead, or make a hanging planter box.

You Might Also Like: How To Grow Annuals In A Hanging Basket

7. Cover it with a green wall

Green walls, also known as living garden walls or vertical gardens, are much more interesting to look at than a plain old fence. Use natural climbers, specially-planted succulents or even just artificial coverings to achieve the effect you like best.

8. Give it a coat of colour

It’s incredible how much difference colour can make. Crisp white will make everything seem cleaner and brighter; moody greys and black are super trendy and edgy. Pastel shades are fresh with a hint of fun, while bright jewel tones will make a big statement that livens up an otherwise ordinary space.

9. Whip out a paintbrush for a mural

Do you prefer a more eclectic, artsy or bohemian vibe? Garden murals aren’t for everyone, but they’ll certainly make your space more vibrant and interesting in a unique way. We did say your fence is a canvas, after all!

A quick search of the phrase “fence mural” brings up some incredible floral artwork (which makes sense in a garden, of course), but look up geometric and minimalist ideas too. An alternative is to paint your fence with chalkboard paint or pale matte colour and let your kids go to town with chalk paints that can wash away.

10. Light it up

Lighting is an essential part of garden design, and can make an otherwise boring fence seem more exciting. Try using directional lights, or strings of patterned or coloured fairy lights to cast more interesting shadows across a plain surface. Check out our full list of garden lighting ideas.

Practical Garden Fencing Ideas

Do you need a practical fence to keep your home secure? Are you looking for a fence that can provide a bit of privacy from your neighbours, or shelter from the elements? These examples of practical garden fencing ideas should help you out.

11. Garden fences for security

The best garden fences for security will be tall, difficult to climb and, ideally, solid. Look for vertically-directional styles that make it difficult to get a foothold, and designs that would be uncomfortable for someone to pull themselves over the top.

Solid fences not only stop opportunists from seeing your possessions from the street, but make it harder for them to assess how they could get in and out of your home. Of course, make sure your gate is equally secure.

12. Privacy fences

One of my favourite things to do in summer is to grab a book and head outside for some escapism. Nothing brings me crashing back to reality faster than a noisy neighbour suddenly appearing or – even worse – someone emerging from my own home having spotted me from a window.

The perfect solution to this is installing a couple of decorative fencing panels that you can simply hide behind. I like the pallet fencing on this decked area – the two heights mean it’s not completely anti-social, and the flowers are both decorative and noise-insulating.

You can create a similar effect by adding an extension to the top of your existing wall or fence. This can be a great way to keep the character of an older brick or stone wall, but give it a modern facelift that still lets some light through.

I also like green curtains for balconies. That’s where you use a trellis or twine to encourage plants to grow floor to ceiling, creating a delicate floral partition between you and whatever is on the other side.

13. Wind-break fencing

A bracing breeze is a wonderful thing. Trying to have a conversation, hang washing or tend to delicate plants in a garden that’s overly exposed to the wind or rain? Less so. Screens and windbreaks can create a more sheltered area to enjoy the things you love.

It might seem counter-intuitive, but a solid wall or fence isn’t the answer to reducing wind. At best, they’ll simply angle the gusts towards something else in your garden. At worst, they’ll be blown over in high winds and potentially cause serious damage (my mum’s garden wall came down in the winter storms last year… and the bricks hit her car).

Instead, choose a slightly open-weave fence that will shield you from the worst of the weather and greatly reduce the amount of air blowing through.

14. All-natural hedge borders

Hedges offer an environmentally-friendly way to get more greenery AND more privacy in your outdoor space. You get some gorgeous green walls, and your local wildlife will appreciate a new place to forage and shelter. Popular hedge plants include: blackthorn, bramble, hawthorn, holly, honeysuckle, ivy, rose. Take a look at these fast-growing hedges for more ideas.

the front of a house with a neat hedge along the boundary

Birds can nest among the branches, hedgehogs can tunnel through the stems and all kinds of beneficial bugs will make a home in the undergrowth. Plus, flowering hedges and shrubs encourage essential pollinators like bees and butterflies.

And, before you balk at the thought of constant hedge maintenance, it’s worth remembering that most creatures will thank you for letting your plants get a little bit overgrown. Put away the secateurs until the end of winter and you’ll find that lots of varieties actually produce more flowers, and will offer better coverage for birds and bugs to take cover.

a bench painted in a bright shade of fuschia sits on a patio in front of a hedge


In most cases, your garden fence isn’t going to be the centre of attention in your garden, but don’t underestimate the size of the supporting role it plays. Try any of these garden fence ideas and you’ll see just how much of an impact it can have. If you’re planning a complete garden overhaul, why not take a look at these patio ideas too, or think about adding a fire pit or garden swing chair?

14 GARDEN FENCE IDEAS FOR PRETTY AND PRACTICAL FENCING

Save this pin for later

Garden Style Ideas

garden styled with a wooden gazebo
Upgrade your garden with these simple tips

A well-maintained garden is not only visually appealing but also creates a tranquil and relaxing atmosphere for you and your family. If you’re looking to upgrade your garden, there are several simple tips you can follow to enhance its beauty and functionality. In this article, we will explore some practical ideas and resources to help […]

best trailing plants for winter hanging baskets
9 Best Trailing Plants for Evergreen Winter Hanging Baskets

If you’re keen to add some evergreen interest to a dull winter garden, discover our pick of the best trailing plants for a winter hanging basket.

close up of woman potting geranium flowers
12 Best Bedding Plants for a Colourful Garden

Most bedding plants are a breeze to grow and care for. You can grow blocks of similar-hued bedding plants in clusters or mix and match different plants for colour, texture, and pattern.

why do people use flower pot heaters
Are Terracotta Flower Pot Heaters Safe or Dangerous?

There are many online videos and tutorials detailing ways to heat your space in an emergency using tealight candles and a flower pot.
This article will explain the dangers of flower pot heaters and why you should think twice before using them.

Garden Accessory Ideas

Garden Activities & Events Ideas

what to do in the garden in september
What to Do in the Garden in September: 18 Gardening Jobs to Do Now

September is a time for harvesting, tidying, and preparing the garden and greenhouse for the cooler, more tumultuous months ahead.

what to do in the garden in july
What to Do in the Garden in July: 10 Gardening Jobs to Do Now

Gardening in July is a busy time; jobs include deadheading plants that can bloom again, mowing and fertilising your lawn, harvesting vegetables and fruit trees, and keeping an eye out for pests.

june garden jobs
What to do in the Garden in June – 22 Gardening Jobs to do Now

From sowing salad crops and pruning fruit trees to planting delicious vegetables and harvesting the first of your strawberries, June is a productive month in the gardening calendar.

march lawn care
Lawn Care in March: Can You Mow, Feed or Scarify? (Where to Start)

March is the perfect month to kickstart your lawn care routine. The earth is waking up a little, the days are getting noticeably longer and you can start prepping your winter-stressed lawn.