Common Garden Insects in the UK: Good and Bad Bugs

Maintaining a healthy garden is all about finding balance between human control and nature. A huge part of this is knowing which organisms (particularly insects) are beneficial to your plants, and which are harmful – basically, which are good and bad bugs for your garden.

Your crops, flowers, hedges and trees – even your lawn, if you have one – all play a part in your garden ecosystem. They interconnect with the insects you attract which, in turn, affect the larger critters you might find (like birds and hedgehogs). Trying to keep your garden too tidy, or using harsh chemicals to keep it in check can have a long-term negative impact on your plant health and overall enjoyment.

Let’s take a look at some common garden insects here in the UK and how your garden maintenance can interact with them. And also, how to balance the good and bad bugs in your little slice of nature.

Which insects are good for your garden?

Okay, so it’s obviously not quite as simple as labelling insects as being good or bad bugs. Depending on what you’re growing and who is enjoying your garden (children, pets etc), you’ll want to weigh up these generalisations a little more carefully. However, the minibeasts in this section are generally considered to be a positive influence on your garden balance.

1. Bumblebees

a bumblebee enjoying lavender flowers

Of course, these fuzzy little guys are going to be at the top of the list. Pollinators are great  for boosting plant production – whether that’s for flowers or crops – and pollinating is what bees do best!

There are over 250 bee species in the UK, and 24 of them are types of bumblebees. You can usually pick these out of a line up thanks to their aforementioned fluff, and also because they seem to be endearingly bad at flying in a straight line.

Bumblebees are typically ‘social’ bees, meaning they live together in colonies. However, the majority of bees in the UK are solitary bees, and appreciate an insect hotel to stay in. You can also welcome bees by planting lots of high-pollen flowers in summer.

2. Ladybirds

A ladybird insect on white cow parsley

Ladybirds are another insect that deserves its good reputation. Not only are the wonderful characters in storybooks and spectacularly dressed, ladybirds prey on aphids and other irritating bugs.

Although they look unique, there are actually over 40 species of this bug, which are actually just a type of beetle. You can, of course, identify them thanks to their bright wing cases (ranging from yellow to orange to red in colour) with dark, round spots. Although, about 20 varieties of ladybird don’t have this distinctive shell.

Why are ladybirds so great? They love to munch on aphids (my personal arch nemesis) and scale insects, limiting their populations. Some varieties of ladybird feed on the mildew fungus, helping you out in other ways. The UK Ladybird Survey has more info on these delightful critters.

3. Hoverflies

a tiny hoverfly on a large flower with a yellow centre and white petals

Next up: Hoverflies. These guys wear the same black and yellow stripes that we associate with bees or wasps, so they can seem like bad news to the untrained eye. However, hoverflies are much smaller than the typical wasp, don’t make that distinctive “buzz”, and fly in a totally pattern – so double-check before swatting! When you know what you’re looking at, hoverflies are actually pretty fun to watch as they dart around.

Adult hoverflies live off of nectar, and are great pollinators. The reason hoverflies are on this list of good and bad bugs? Their larvae have an absolutely unstoppable appetite for aphids, thrips and caterpillars – all incredibly common garden pests. So the more the merrier!

Invite hoverflies into your garden by growing large, open flowers, like calendulas, Michaelmas daisies and dahlias. As hoverflies don’t have long tongues (like bees or butterflies), they look for nectar in flatter flowers, rather than deeper ones.

4. Dragonflies

close up of a bright blue dragonfly perched on some grass

Dragonflies are beautiful, but they’re good for more than just scenery. They’re predatory insects, and feed on lots of the flying pests that might plague your garden, like mosquitos and gnats. You can use plants that repel mosquitoes, or set up a small, shallow pond to attract dragonflies.

If you see dragonflies in your garden, it’s a good sign. The presence of dragonflies is usually an indicator of a healthy natural environment, and clean, unpolluted water nearby. Read our tips to attract more dragonflies to your garden.

5. Earwigs

earwigs are both good and bad bugs for your garden

Earwigs are far from my favourite creature, but it turns out they’re pretty good for your garden. They typically live in dark, damp places, like compost heaps, which is probably why they give me the heebie jeebies!

The GOOD thing about earwigs is that their diet includes smaller insects that can destroy your plants, like aphids (among other things). So, if your earwig numbers are relatively low, leave them to hoover up other garden annoyances.

6. Butterflies

a tortoiseshell butterfly with open wings resting on a buddleja flower

Butterflies are excellent pollinators, and a delight to watch fluttering around your flowers. Plus, they’re an important part of the food chain, attracting predators like birds and even bats.

It’s worth remembering that caterpillars can be a pest in high numbers, chomping through the leaves of just about anything. However, one or two won’t pose much of a threat to your shrubs and veggies.

There are all kinds of plants you can grow to attract butterflies, like buddleja, lavender and jasmine. Basically, any varieties that are rich in nectar.

Which bugs are the biggest garden pests?

Again, categorically deciding what are good and bad bugs doesn’t really work. The most irritating pests will depend on where you live and what plants you’re trying to grow. Of course, there are some common offenders – here are my top five.

1. Earwigs

a stumpery made from decaying tree logs

Yes, I know these guys appeared on the “good bugs” list too. While they’re great for controlling an aphid population, earwigs can be a bit of a nightmare if you’re growing clematis, chrysanthemum or dahlia. As I mentioned before, you’ll find earwigs clustered in dark, damp crevices – which is why you’re looking at a picture of a stumpery, instead of another picture of one of my least-favourite critters!

Anyway, earwigs are a prime example of how to keep balance in your garden; in the grand scheme of things, it might be worth keeping some around. If they’re becoming a problem, use earwig traps.

2. Aphids

a cluster of aphids eating a leaf

For me, aphids are hands-down the most annoying pest. I’ll never forget the year I babysat a friend’s tomato plant that I eventually discovered was carrying aphids. I realised because they migrated to all three of my beloved chilli plants, which just couldn’t handle the attack. No matter how many times I washed the aphids away, they always came back – and in greater numbers.

What’s wrong with aphids? They slurp up the sap from your plants, stealing the precious fluids and nutrients that help them grow. As a result, you’ll see limp leaves, shrivelled stems and stunted growth.

As they’re only a couple of millimetres long, you might not spot a lone aphid. However, they tend to appear in groups, and will cluster around the yummiest parts of your plants – new stems or buds. There are a few varieties of aphid, so they could be green, white, brown, red or black.

What is the best way to get rid of aphids? As soon as you notice them, the best thing to do is spray your plant with water or – even better – water with a little bit of dish soap mixed in. You can also use diatomaceous earth to dry them out without harming your plants. Repeat this process a few times to catch newly-hatched aphids.

3. Vine weevils

a little black vine weevil sitting on a leaf with the edges chewed

Vine weevils are a kind of beetle that are down to chomp on just about anything. Adult vine weevils will go for plant leaves, while their grubs at the base of the plant make short work of roots. Container plants are particularly vulnerable, especially on 

Weevils are roughly 9mm long and are black, sometimes with dusty yellow markings. Look for notches chomped out the edges of plant leaves. The grubs are about a centimetre long and are completely white except for a brown spot at the tip, and will hang around among the plant roots.

Keep vine weevils under control by encouraging birds. Check your plants with a torch at night to find and pick-off adult bugs.

4. Slugs and snails
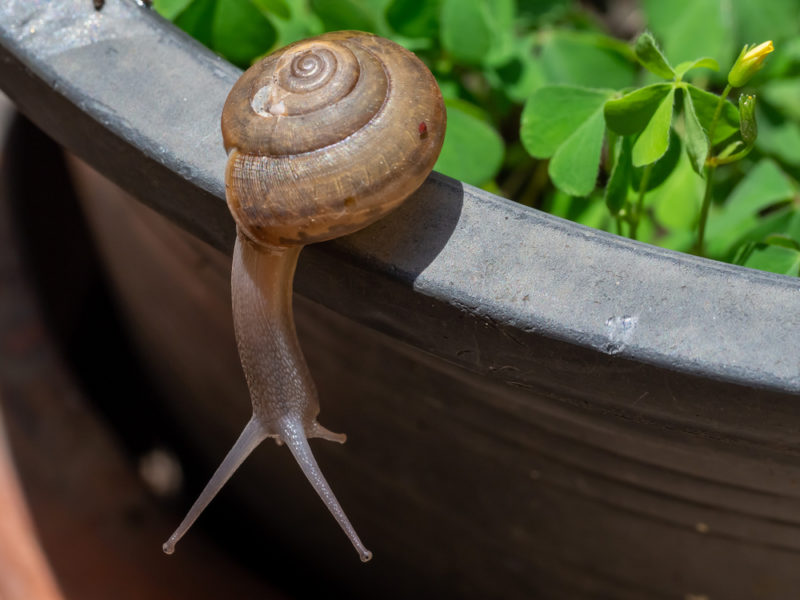
a brown snail on the edge of a plant pot

As a kid I used to love snails – they’re so weird! Even now, if I see one crawling across a path on a rainy day, I will occasionally pick it up and move it to the side (but I’m a lover, not a fighter, what can I say). However, it took me exactly one visit to my step-mum’s glorious allotment to completely understand why veggie growers might abhor these slimy so-and-sos.

What’s the problem with snails? They will devour the leaves, stems and flowers of anything they find delicious – mostly seedlings and veggies, but also some ornamental flowers too. Snails and slugs usually come out at night, leaving silvery trails of slime wherever they’ve been… but chances are, you’ll notice the massive holes in your plants first.

Slugs and snails are simply too widespread to ever hope you can get rid of them. Instead, work on redirecting them and, at the same time, protecting your most prized plants. Use beer traps or fruit traps to tempt them, and surround anything vulnerable with a gritty mulch. Finally, encourage predators like hedgehogs, frogs and toads into your garden. More tips to keep snails out of your garden.

5. Caterpillars

several caterpillars on the underside of a cabbage leaf, eating holes

Caterpillars are another grub that I find amazing. As garden pests go, they’re actually kind of… cute? Or, at least, they’re cute when you have one or two – caterpillar colonies can quickly strip the leaves off the bushiest plant, leaving it totally destroyed. Plus, they’re not picky eaters, so nothing is safe.

Butterflies are great, so the best way to deal with caterpillars is to pick them off manually and relocate them.


So, the key thing to remember is that all creatures contribute to the balance of your garden in their own way. A diverse garden is a healthy garden!

COMMON GARDEN INSECTS IN THE UK GOOD AND BAD BUGS

Save this pin for later

19 DIY Bug Hotel Ideas for a Healthy Garden Eco-System

There are so many wonderful ways you can bring sustainability and eco-friendliness into your garden; we’ve already talked about growing your own kitchen garden, and planting living walls and green roofs. Another fun project to help the eco-system is to build an insect house! We’ve got a whole bunch of cute, practical and artistic bug hotel ideas to suit gardens of every size and style.

Did you know that the average garden can accommodate more than 2,000 different insect species? Although there are a fair few pests, having the right bugs in your garden is such a benefit. Encouraging friendly species like bees, ladybirds, and beetles not only helps to pollinate your flowers, but can actually help you control the numbers of pesky plant-eaters.

So, if you fancy an easy and creative garden project this weekend, try building some insect accommodation. Here are the best insect mansion and bug hotel ideas that I’ve found!

a large insect hotel with various compartments and a green roof

Image by Sabine Fenner

A huge bug habitat with a living garden roof: could this be any more sustainable?

5 Simple reasons to build a bug hotel

If you’re reading this article, I’m guessing you’re already interested in building an insect lodge and have a good idea of all the benefits they can bring… but in case you need convincing, here’s a recap:

  1. You can support garden biodiversity and the balance of your local environment.
  2. Your guests will act as a completely organic form of pest control for your plants.
  3. You’ll be saving the bees, specifically – they’re an incredibly precious part of our ecosystem.
  4. It’s a great opportunity for your children to learn about DIY, insects and environmental awareness.
  5. You can finally use up all of those awkward leftover garden materials!
a tall, rustic insect hotel made from branches and garden debris

Image by Kevinsphotos

Could you make an entire bug hotel out of salvaged materials?

Bug hotel ideas: The basics

First off, choose a site for your bug hotel. The best real estate will be close to the plants you want to pollinate and protect. Bugs can be pesky neighbours, so build your bugtropolis away from the house to prevent creepy-crawlies from trying to move in with you.

Different bugs are attracted to different types of accommodation. If you’re angling for a particular type of insect, check whether they prefer cool shady spots, or a little bit of sunshine. Nestling your bug hotel against a hedge or between shrubs is a good way to get a mixture of conditions and encourage a variety of insects to move in.

Finally, remember that large bug hotels can get pretty heavy, so lay down a solid surface (like paving slabs) to support their weight and stop them from sinking into mud!

a small wooden bug hotel attached to a tree

Build your bug box out of untreated materials to keep your insect visitors safe and happy.

What are the best materials for building a bug hotel?

The main thing when picking your insect mansion construction materials is to keep it natural, so you don’t harm your guests. Choose untreated and unbleached wood, stone or bricks – reusing old bits of furniture and scrap materials is fine, as long as it’s not painted or varnished. Man-made coatings are often toxic to bugs and can cause all sorts of damage.

When it’s time to start building, you’ll want two sets of materials: base materials, to build the main structure, and filler materials, to “furnish” the rooms. You can be as creative as you like – it’s a great way to use leftover material scraps from other garden projects!

Base materials for bug hotels

a close up of hollowed out sticks and bamboo canes arranged together for a bug hotel

Lots of insects look for little tunnels to build a nest and hibernate from the cold, including bees.

Filler materials for bug hotels

a huge garden insect habitat made from old pallets and garden materials

Image by Josef Pichler

This incredible insect resort uses just about every material imaginable – incorporate whatever bits and pieces you find in your garden!

Building your bug hotel

Decide where you want to position your bug hotel, and how big you want it to be. Will it be freestanding on the ground, attached to a post, or fixed to a wall? You might want to build several insect houses to accommodate bugs in various parts of your garden.

Start by screwing together the frame – you can buy wood from almost any decent hardware store if you don’t have spare materials in your garden. Next, add internal segments, thinking about what materials you have to fill them with as you go. You could try building different “floors” for different types of insects. 

When it comes to adding filler materials, they should be fairly tightly packed, but with enough room for insects to burrow. You might want to add chicken wire or mesh to the front of certain sections to stop loose bits falling out.

Finally, add a roof. Tiles or planks will be fine – you want to stop your insect habitat from getting completely soaked, but it doesn’t have to be completely watertight.

simple garden bug hotel ideas

Bug boxes don’t have to be very big! This little insect hotel would be more than enough if you nestled it deeper in a hedge or tall flower bed.

How to attract the right insects to your bug hotel

Beneficial biodiversity in your garden starts with your plants. By choosing the right plants and flowers to surround your bug hotel, you’ll be more likely to attract the most helpful insects.

The longer your blooming season, the more likely you are to attract pollinators like hoverflies and lacewings. Look for plants the flower early in the year, with an assortment of heights so both flying and non-flying critters can reach.

Here are some bug hotel ideas for trying to attract specific kinds of insects!

Befriending the bees

Did you know that most garden bees are actually ground-dwellers? Most will burrow under the soil to hibernate, so you’ll want to leave some space at ground-level for them during the winter.

There are also solitary bee species, which prefer to nest in tunnels and hollow stems. Small groups of loner bees will sometimes hole up together, so incorporate lots of bamboo stems and a little water dish.

a small, narrow bee house made usgin short canes of bamboo

Image by PollyDot

Save the bees! Even the smallest bee hotel can help the environment by housing essential little pollinators.

Luring in ladybirds

You’ll definitely want to make some room for ladybirds – they love munching on aphids, one of the most common plant pests. Ladybirds tend to hibernate in larger groups, and often cluster in-between twigs and dry leaves. Put the bug box near whichever plants are suffering with aphids or – if your aphid population is under control – plant things that will attract more aphids (like nasturtiums).

Boarding for beetles

Sticks, dead plant stems and compost clumps are a paradise to most beetle species. If you’ve got a compost heap, grab some of the soil and include it in a bug hotel room (and if you haven’t got a compost heap, take a look at our compost ideas to get started).

Lots of beetles prefer flowers with flat blooms, so try planting fennel, yarrow and species of daisy nearby.

a large garden insect house, with objects arranged to resemble a smiley face

Image by Sue Rickhuss

Look how many things are tucked into this insect mansion design! If you’ve got the space, you won’t have to worry about leftover garden debris ever again. The smiley face at the top is a nice touch, too.

More bug hotel ideas and inspiration

For the most part, you’ll want to leave your bug box undisturbed, but there’s no harm is adding a little latch so you can clean it out every couple of years – and have a nose inside! The red door on this little insect hotel is very cute, but make sure you’re using organic dyes if you decide to colour your own bug house.

a small wooden bee box with the middle section stained red

Image by Thomas B.

Um, can the person that designed this build a human version for me? I love the aesthetic of this, and the variety of insect “rooms” will attract a diverse range of critters throughout the seasons. Feel free to add cute little details like the “hotel” sign to your own bug box – the insects won’t mind!

This rustic style of DIY bug hotel is an absolute winner if you’ve got the space. Making the most of dry materials that you could find in the garden, the chunky objects are pleasing for human eyes and super cost for bug buddies. Chicken wire keeps everything secure, and a covered roof offers just enough protection.

Short on space? You can turn any awkward nooks in your garden into wildlife accommodation. This picture shows how, with just a little bit of resourcefulness, you can build a bug hotel for free without using any tools.

If you thought all insect hotels look more or less the same, think again. This amazing bug house was custom-built as an eco-friendly art installation. Reckon you’re up to the task of creating your own? 

What if you don’t have much outside space? There are plenty of bug hotel ideas for small gardens, like this wall-mounted critter cottage. You could mount a similar style to any wall that’s close to plants, and still find lots of insects checking in.

Is it just me, or is this chunky insect mansion really satisfying to look at? I reckon you could pack a few more materials into the various crevices, but I love the variety of rooms. Plus, this would be a great way to reuse leftover building materials in your garden.

This has got to take the trophy for the most extravagant design! Less of an insect hotel and more of a bug universe, this eco-sculpture by @damholgard demonstrates how sustainability can intersect with art, if you want it to! Building one of these yourself might be a little ambitious, but you can definitely be inspired by the sheer variety of materials that have gone into this masterpiece.

Tips for looking after your bug hotel

On the whole, insect hotels are best left alone – nature will usually take care of everything it needs. However, it’s always worth keeping an eye on your hotel and its guests and taking care of the following:

Avoid pesticides

Bug boxes are an excellent way to manage pest insects, but the process takes time. While you’re waiting to welcome your visitors, hold off on using pesticides or you’ll risk fumigating their home before they’re even moved in. Look for botanical pesticides as an alternative, but use them sparingly.

an unusual, keyhole shaped insect hotel

Image by planet_fox

I love the unusual shape of this little bug hotel!

Nurture the right plants

Research the feeding habits of your preferred beasties, and plant accordingly. Ladybugs, for example, enjoy coriander, dill, dandelion, and fennel, while hoverflies enjoy yarrow and bergamot. Other plant families that attract a good number of beneficial insects are the carrot, aster, legume, mustard, and verbena families.

Another thing to note is where your insect tenants like to hide. Thyme and oregano are an excellent hiding spot for most beetles, who prefer to tunnel underground, whereas flying insects such as wasps are more attracted to taller flowers like daisies.

DIY bug hotel ideas made from reusing old pallets

Image by Mika Baumeister

Eco-friendly and attractive: Recycle old pallets into a gorgeous DIY insect house

Provide a water source

Though you’ll want to keep your insect hotel dry, it’s good to have a water source ready for your visiting guests. You could install a drip irrigation system, or simply include a natural watering hole or simple water dish.

Build ground-level hiding places

Nocturnal insects prefer to stay away from heat and sunlight, so try and offer them more than just foliage to stay cool. Mulching a section of your garden floor can keep the soil hydrated, and give beneficial bugs an opportunity to munch on underground pests.

For even more shade, build stepping stones out of any flat surface. Push them into loose, shallow soil so insects can burrow without getting crushed or suffocated. You might also use hollow coconut shells or cave-like hides that you can build or purchase at a garden centre.

a shed-sized insect hotel in the middle of long grass in a field

Image by Manfred Antranias Zimmer

Bug hotels can be mostly left to their own devices, just check in every now and then.

19 DIY BUG HOTEL IDEAS FOR A HEALTHY GARDEN ECO-SYSTEM-min

Save this pin for later

Sloped Garden Ideas: 15 Ways to Work With a Gradient in Your Garden

Whether you have a sprawling half-acre plot or a modest backyard, the chances are that your outdoor space isn’t completely level.

Sloping gardens can be tricky areas to landscape, but that doesn’t mean that it can’t be done. However you plan to use your garden and whatever size it is, there are many ways to work with what you have.

Sloped gardens aren’t necessarily a problem, the larger your garden is, the more likely that you’ll have some degree of sloping to tackle. It could be as simple to remedy as adding a few steps or it could require some more hardcore landscaping intervention. However hilly your garden, we’ve got plenty of ideas to help you achieve a more useable space.

sloped garden ideas

Image credit: @cuthbertsbrae_garden

How to manage a sloping garden

If your garden is on an incline, there are a few ways that you can make the space more workable.

Think of how you’re planning to use your garden, do you want to create flat areas for seating and relaxing? Are you happy to place steps through a section of the garden, leaving the sloped areas as they are? Or maybe you’d like to terrace part of the garden to grow plants or vegetables. You could even include an impressive water feature, making the most of the sloping aspect.

Terrace it

One of the simplest ways to level a sloping garden is to terrace it, creating one or more flat areas depending on how sloped your garden is. You’ll need to create retaining walls from sleepers, bricks or gabions. 

Terraced gardens have existed for centuries and in terms of crop growing in mountainous areas, terraces are essential to prevent water from just flowing downhill.

Terracing a garden is relatively easy to do, you will need to factor in existing trees and shrubs and if trees are established, you might need to build a raised area around them to prevent root damage. You can create a series of steps, reinforcing the steep edge of the steps with bricks, wood or stone.

You will be shifting a lot of earth around when digging terraces so don’t forget to add a layer of topsoil if you’re planning to grow grass or other plants afterwards.

Build steps

Another solution to a sloping garden is to build steps up through a section of it. It will give you easier access to the garden and is less labour intensive than terracing the whole garden. 

step slopped garden

Image credit: @bretthardylandscapes

Create zones

If you have a large sloping garden, it’s a perfect opportunity to create different areas. Use a combination of steps and terraces to create zones for planting, relaxing, playing, dining and wildlife. 

zoned sloped garden

Image credit: @graduategardeners

How to work with a sloping garden on a budget

As we’re all facing the cost of living price hike, landscaping the garden probably isn’t high on your list of priorities. However, it is possible to level your garden, or at least make it more accessible without breaking the bank, or your back.

Do it yourself

Creating a terraced garden may sound like a huge challenge but, aside from the heavy digging and soil moving involved, it’s definitely a job that you can tackle yourself. You might want to sketch out some plans before you start. Creating straight-edged terraces will be simpler than cutting out curved terraces.

Get creative with retaining materials

If you’re creating terraced sections in your garden, you’ll need to retain the soil to prevent it from just falling away. Sleepers are often used, but you can use sandbags for a quirkier and much cheaper option.

sandbag sloped garden

Image credit: @coshamcottage

Go for reclaimed sleepers

Wooden sleepers are often used for retaining walls. Their rustic good looks and durability make them a popular option. Although sleepers aren’t hugely expensive, you might find that reclaimed sleepers are cheaper, they’re often made of harder wood than new ones too.

sleepers sloped garden

Image credit: @gardening_etc

Opt for gabion walls

If you love the idea of a retaining stone wall but it’s out of your budget, a gabion stone wall is a much cheaper option. They can look fantastic too. Metal gabion baskets are typically filled with rocks but to save money you can use rocks on the outside and cheaper stones inside, or fill them with bricks, old paving slabs or even bottles.

gabion wall sloped garden

Image credit: @bowleswyer

Small sloped garden ideas

Many small gardens are sloped but even modest plots can be levelled to provide more functional spaces. If your garden is moderately sloped, you might be able to level your garden with just one terrace, if it’s steeper, you can still add flatter areas to your garden.

Fill a sloped bed with flowers

If you have a small sloping garden, consider planting it up with beautiful blooms. It will be a paradise for insects and the plant roots will help to prevent soil erosion too. Plant carefully so that you have brightly coloured flowers throughout spring and summer and evergreen colour in winter.

sloped flower bed

Image credit: @gardendesignmag

Install steps

Steps are an attractive way to link different garden levels together. You can put terraced planters alongside them or plant the adjoining slope with attractive plants.

steps for small sloped garden

Image credit: @claytoncorner

Build a raised deck

Installing a raised decking platform in your garden is an excellent way to create a flat space in an awkwardly angled garden. Check out our garden decking ideas article for more inspiration.

sloped garden raised deck

Image credit: @ourmiddletonhome

Create a beautiful water feature

Small sloped gardens can be the perfect place for a custom water feature, make the most of the natural drop and create something completely unique.

sloped garden water feature

Image credit: @clivenichols

Steep/hilly garden ideas

There’s no doubt that steep gardens make landscaping tricky, but there are several creative ways to make the most out of a less-than-perfect garden.

Put a home office at the bottom of the garden

Steep gardens don’t have to forego garden buildings. This garden has managed to squeeze a home office at the bottom of a very steep incline. The planted roof helps the building to blend into the surroundings.

steep garden home office

Image credit: @hertsgardenrooms

Create multiple levels

Split a hilly garden into a Minecraft-style, multi-levelled area. This garden design cleverly incorporates existing trees, steps and a variety of different levels to create an attractive, functional space.

multiple levels steep garden

Image credit: @loveitlandscaping

Build a stepped garden

Very steep gardens can be tricky to plant up, but you can overcome this by creating a stepped slope, providing flat areas for plants to grow.

stepped garden

Image credit: @spectrascape_gardens

Retaining wall planters

If you’re terracing a very steep garden, the height difference between the different tiers will be much greater than it would be in a more gently sloping garden. Add interest to high retaining walls by building tiered planters.

retaining wall planters

Image credit: @pollyanna_wilkinson

FAQs

How do I make my sloped garden look nice?

Making a sloping garden look good might be a bit more of a challenge than a flatter plot but you can add tiers, steps and areas of decking to make the space more useable and attractive. See a sloped garden as an advantage, you can build zones for seating and planting on different levels, creating a multi-functional and interesting space. You can even take advantage of the gradient by installing a water feature.

How do you landscape a hilly garden?

One of the best ways to landscape a hilly garden is to terrace it. This involves creating multiple levels that are joined with steps. The amount and height of the terraced sections will all depend on the size of your garden and how hilly it is.

landscape a hilly garden

Image credit: @woodblocx

What to do with a garden that slopes?

Sloping gardens can look incredible when managed well. You can keep it simple by creating a few tiers, one might be enough depending on how sloped your garden is. You can vary the surface of the tiers by adding grass, paving stones or decking and using materials such as sleepers or gabions for the retaining walls.

You can also put steps up through the garden, leaving the rest of the sloped areas as they are and adding attractive plants to them, or you can opt for more formal terraced planters.

How do you tier a sloped garden?

To tier a sloped garden, you’ll first need to work out how much soil you need to remove to create a level area. It might be that you can get away with just one tier but steeper gardens will require quite a few tiers, depending on whether you want to tier the whole thing or just part of it.

Next, you’ll need to dig out a trench for your retaining walls, you’ll need to build these first so that the soil you remove from higher up the garden can be piled behind them. It’s a good idea to either save the top layer of soil or add a new layer of topsoil on top of the freshly laid soil, particularly if you’re laying turf or planting grass seed afterwards.

It’s likely that some fencing will be exposed as you remove soil from the edges and top of the garden so make sure you factor in edging. This is a great opportunity to build raised planters.

For more details, read this handy guide to tiering a garden.

6 Wheelchair-Accessible Garden Design Elements for Easier Gardening

In June of this year, my gardening life was rudely interrupted by 2 broken heels, a wheelchair, 2 Star Trek-style orthopaedic boots and a walker, all of which prevented me from getting anywhere near my precious plants.

As I continue my recovery, I have become painfully aware of how my own garden, my allotment and facilities do not make life very easy.

In this article, I will explain the possible difficulties that less able-bodied visitors may have in accessing gardens, not only wheelchair users but also anyone pushing buggies and those using crutches and walkers.

This may help in future-proofing your garden and also allow both younger and older gardeners the chance to get closer to the plants!

6 ways to make garden access easier; what do you need to consider?

Read on for my experiences and discover some innovative ideas to improve garden design for wheelchair users.

1. Can a wheelchair user move easily on the paths provided?

Designing wheelchair-accessible garden paths can be quite complicated. When thinking about your path, consider a wheelchair not only going forwards or backwards but also needing to turn around or swivel in order to gain access to a flower bed. The preferable width for a wheelchair-accessible path is 1.8m. Obviously, many gardens won’t have that much space, but if you make the path as wide as possible, it will aid a wheelchair user to comfortably move around in the space. 

stone path

Uneven surfaces are bad news for wheelchairs

The uneven surface of the path pictured above proved impossible for me to navigate in a wheelchair and the extra bump in the centre meant I had to ask for help to get along it.

I have to add here that all the gardens I love and use include small curved paths and interesting planting layouts, like shade-loving fruit bushes (eg blackcurrant) with glorious sun-loving salvia flowers in front of them. However, I can’t access these paths at all now. All I can do is use a hosepipe from afar and wistfully hope it reaches the roots of the plants. By this time next year, let’s see if my recent experience changes my approach to garden design…

2. Is there adequate support and places to rest?

Newbies like me are unused to using my arms to lift myself from one spot to another. More experienced wheelchair users may be able to do this due to being accustomed to this regular exercise. I find it fairly exhausting to go a few steps, wobbling as I do and need to sit every 10 steps or so. But if walkers or crutches are used, can a visitor use handrails or seats when in need of a rest? 

My answer? I found sawn-off logs to be a fabulous resting place in my own garden because they are in plentiful supply and I like the natural surface. The only safety issue is whether I could balance so that I could lower myself on (and off) them. I am now considering handrails for future use and placing more seats along the way where possible. 

3. Is the path surface suitable?

This is not something I have ever really considered but in several places I visited, the paths were in a shocking state. Nature does not necessarily design wheelchair-friendly access, so human designers can offer some help in this area. 

4. Consider variety in the height of planting

The viewpoint of a seated adult is like the viewpoint of a child – waist height! When seated in front of a tall flowerbed, I was unable to view much beyond waist height. 

To accommodate everybody, try to add some low-flowering plants close to the front of the bed in each season. Taller border plants can be admired by pedestrian visitors. However, if they overhang a narrow path, it can seem a bit jungle-like going through high flowers and grasses and feel quite claustrophobic. It has certainly given me some ideas about how to plant a border with this in mind.

5. What about any obstacles?

This is a general suggestion. In a wheelchair, I want to see a clear path ahead of me, and the quirky designs I have always used in my own garden spaces are simply a nuisance. Things to watch out for are: 

kent-garden-centre-obstacle

This picture was taken in a garden centre in Kent. The place was really excellent overall, but there were a few improvements that could be made. This space was originally designed to allow access but somebody had placed this water feature on the right, in the way. I placed my wheels in the space and you can see the problem.

My only option here was to go back the way I came, reversing out of the space, and then doing a full circle around the plants to get back to where I wanted to go. My arms ache after a few minutes so if you work in a garden centre, please try to leave room for us to get through! My future designs will certainly re-think some of my ideas to date. 

6. Think about access to and height of flower beds, tables and facilities

In your own garden, you may not need to worry about disabled access now. However, if you are thinking about future-proofing, it is a good idea to have a friend in a wheelchair visit so you can assess access. 

Sitting next to a raised bed is another experience. I normally sit on a plank of wood, which holds my tea and my tools and plant pots but from a wheelchair, you can only sit sideways, and reach in with one hand, so your whole upper body is twisted. Now I know gardeners often complain about aches and pains after a hard day’s work in the garden but imagine if one side of your body has been twisted at an awkward angle all day, not to mention the other pain that has you in a wheelchair in the first place.

Tina’s tips

  1. Check the height. When you design a table or a raised bed, think about the height. If possible, try to make sure there is an overhanging piece on a raised bed that allows a wheelchair user to slide in underneath so they can do their gardening with two hands like everybody else. 
  2. Viewpoint. Check what the user or disabled gardener can see before you decide on the plan. You may need to suggest smaller edging plants for those in wheelchairs while those with a longer arm stretch can plant the higher (and usually heavier) plants in the middle. At times, moving through paths with shrubs overgrowing the bed edges can feel quite claustrophobic so allow large walkways through these (if space permits) or keep the overhanging foliage contained. To accommodate everybody, try to have some low-flowering plants in each season as well as taller border plants.
  3. Touch and smell sensory gardens. If you want disabled users to be able to touch plants, make sure they can actually reach them comfortably without having to edge in sideways with an arm extended! Scented flowers add extra joy to wheeling alongside a bed so lavender, aromatic herbs, sweet peas and scented flowering shrubs will improve everybody’s experience. 
  4. Get in a wheelchair and experience it yourself. This is the best advice I can give. See what your user can see, touch, smell and how far you can get into that raised bed. Try to carry tools, plants and your own water bottle as well as a watering can. Remember that your user may have difficulty out-stretching arms (or muscle wastage) and most people are in pain. Make it easy for us! 

Tina’s recommendations: The best wheelchair-friendly garden centre I visited

Holme for Gardens garden centre in Wareham is perfect for a disabled user and I cannot recommend it enough.

Disabled parking was close to the entrance and it was easy to move from there to get around the plants. 

tina in wheelchair

The paths that I could access were wide and well-surfaced. There was only one area that was impossible to access. 

The plants were at the perfect height for me to read the labels.

plant height
This was my wheelchair eye view of a redcurrant bush! Hardy herbs such as rosemary, thyme and sage provided gorgeous scents as I passed by. Lavender was in bloom, and I was literally sniffing in heavenly relaxation as I wheeled myself underneath it. 

The Orchard Café was friendly and helpful and there was full access to tables, both inside and outside with a fabulous fishpond to keep me amused. 

fishpond

The shop selling local food, seeds, garden supplies and some wonderful gift ideas had wide aisles and easy access. Somebody even offered to help me carry my purchases to the car! 

Even the toilet deserves an award. Not strictly a gardening issue but disabled users need to be sure the facilities exist in advance. Clean, functional and spacious, this was the only toilet I have visited in 6 weeks that had a drier close enough for me to dry my hands while seated, and a mirror at my height. Small details but they make a huge difference to a wheelchair user.

Useful websites

Gardens guide A comprehensive guide to public gardens throughout the UK, including details of disabled access, locations and events. 

The UK’s most accessible gardens to visit this summer.  8 of the best wheelchair-friendly gardens to visit.


6 wheelchair-accessible garden design elements for easier gardening-min

Save this pin for later

6 DIY Treatments to Get Rid of Leatherjacket Larvae in Lawns

If you’ve ever encountered those strange, squishy, little brown grubs in your lawn, you may be wondering what they are, and what harm they could possibly cause.

Harmless as they may look, these peculiar pests can cause damage to lawns, seedlings and small plants by eating the roots.

If you discover yellowing patches of grass in your lawn, it’s possible that leatherjackets (crane fly larvae) are the culprits. Fortunately, there are many ways to deal with these wriggly pests. From encouraging predatory birds to spraying garlic solution and applying parasitic nematodes, all will reduce, or eliminate them from your garden.

In this article, we’ll take a detailed look at leatherjacket bugs and how you can successfully remove the larvae from your lawn.

What are leatherjackets?

Leatherjackets are the larvae of crane flies, also known as daddy longlegs. These large, clumsy flying insects, that love to fly right into you, may seem pointless, but the flies and their larvae are an important food source for many birds including starlings, rooks and golden plovers.

There are over 300 species of crane fly (Tipulidae) in the UK. Completely harmless, crane flies are part of the family of true flies including mosquitos. 

Most of the crane fly life is spent in the larval stage. The larvae of most crane fly species don’t feed on living roots, but for those that do, the damage can be extensive, particularly for lawns. The most common types of crane flies are the European and marsh crane flies, both are considered agricultural pests in some parts of the world due to the damage that they can inflict on grass and cereal crops.

What do leatherjackets look like?

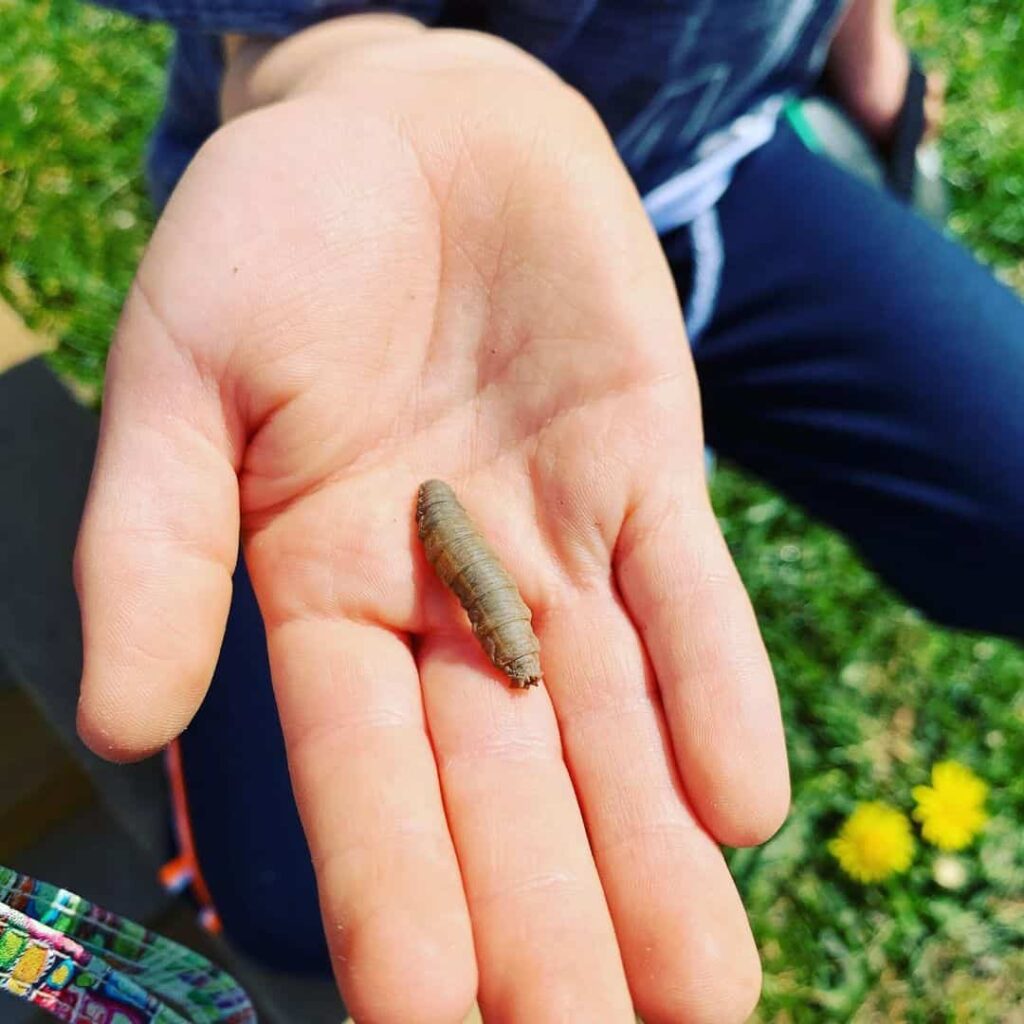
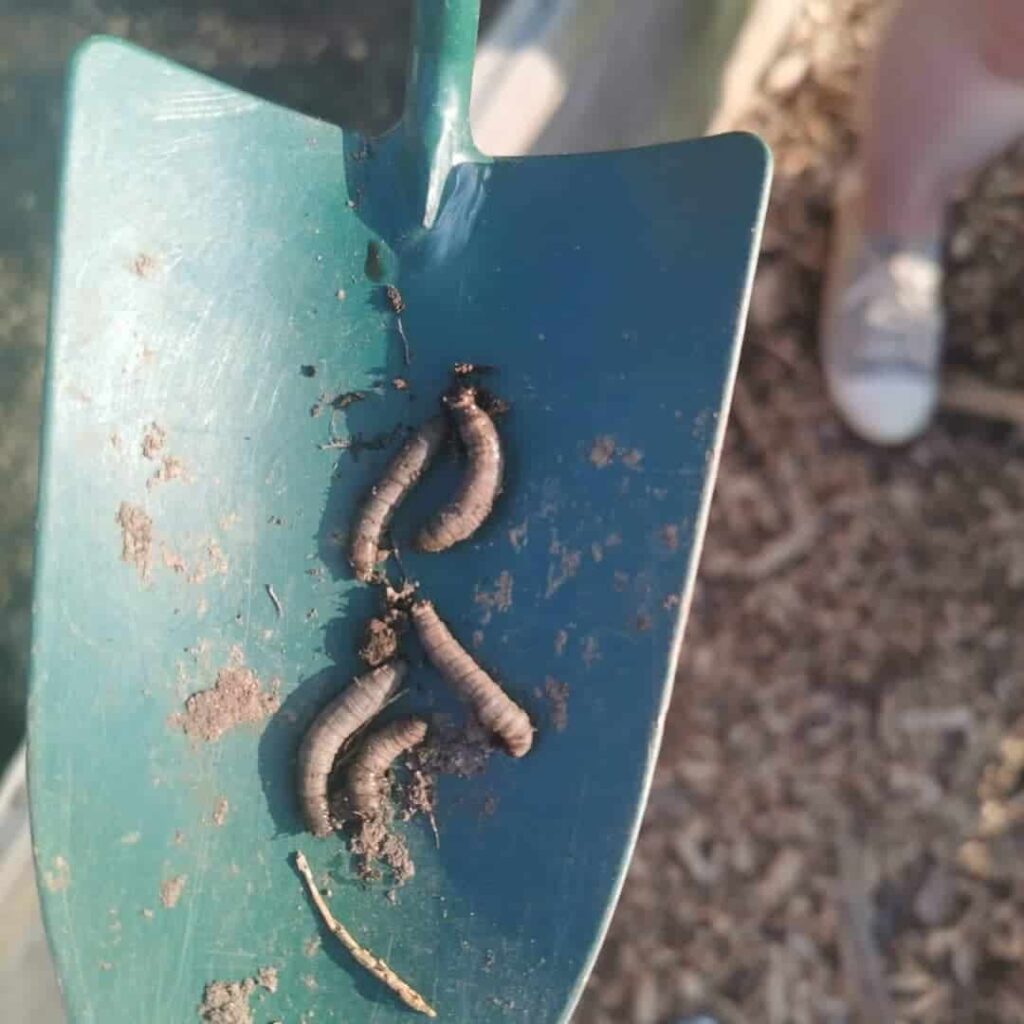
Small, brown and wriggly, I’m sure many a sci-fi movie monster has been inspired by these otherworldly creatures. Leatherjackets are about 3cm long and dull brown in colour.

Looking a bit like a legless caterpillar, leatherjackets are often confused with chafer grubs which are larger with shiny white bodies and black heads. Unlike many ground-dwelling larvae, leatherjackets don’t have an especially noticeable head and their uniform colour can make them tricky to spot in the ground.

what do leatherjackets look like

A crane fly larva or leatherjacket. Image credit: @mrs.mom.me

Also known as leatherjacket worms, you’ll find these critters residing just below the soil surface and if you’re doing any lawn edging or planting, you’re particularly likely to encounter them. You might also find leatherjackets under plant pots and in areas of shallow gravel.

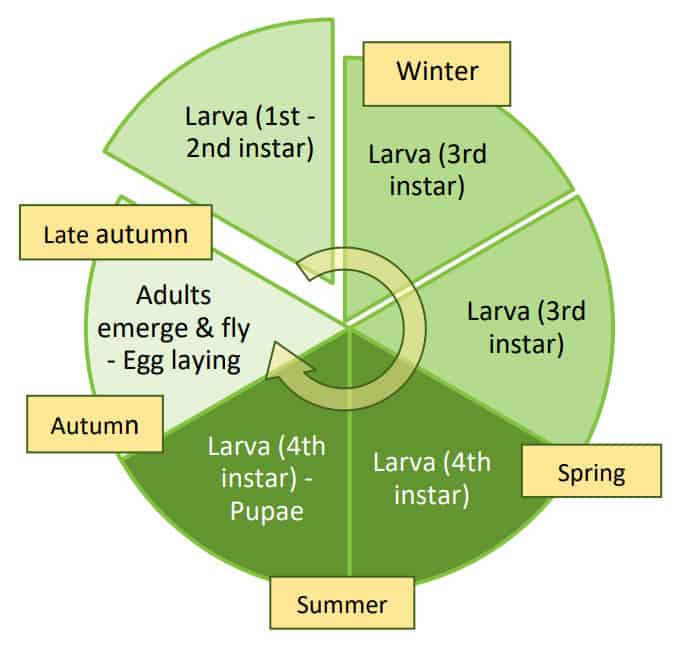
Leatherjacket lifecycle

The crane fly life cycle begins with the emergence of the adult fly in August/September. This can vary a little from region to region. 

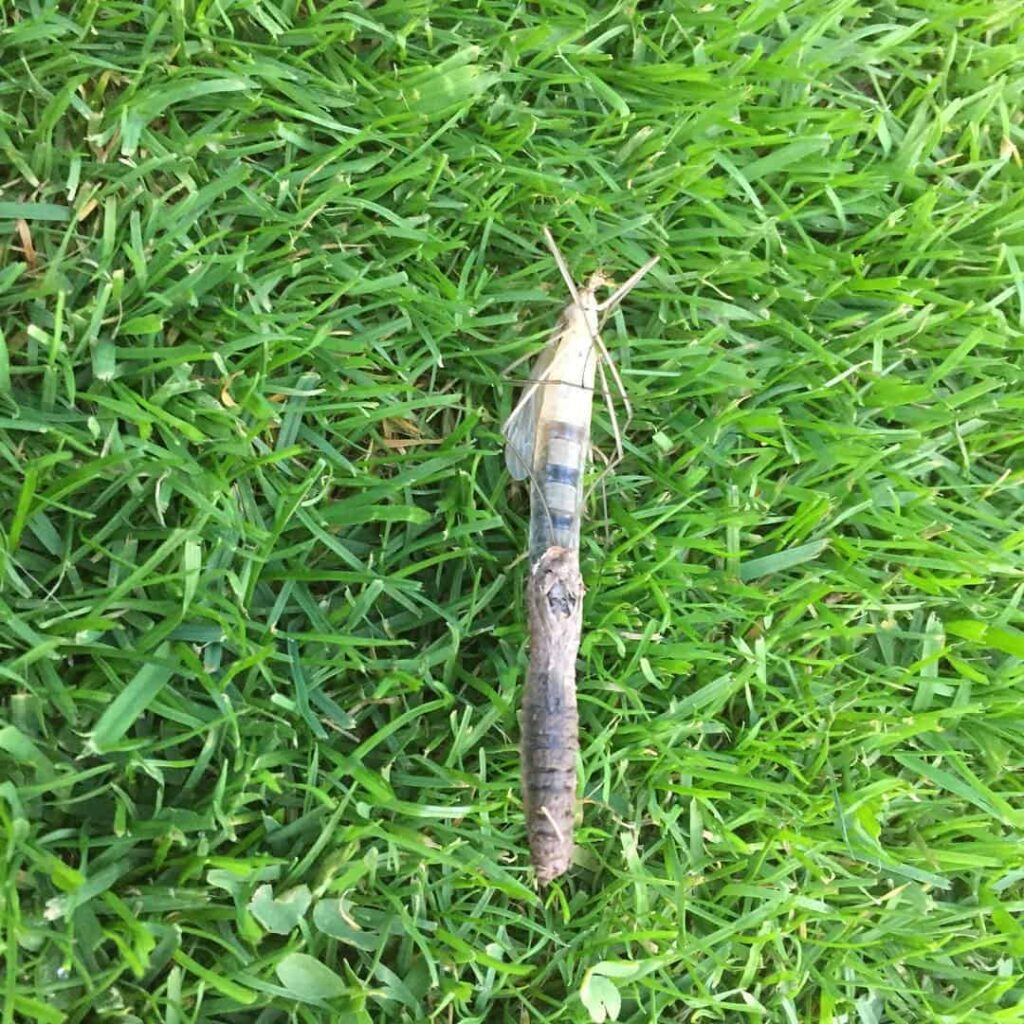
adult crane fly emerging from a pupa

An adult crane fly emerging from a pupa. Image credit: @nobbycctfc

The adult stage of the crane fly is a romantic but short one. Living for just 10-15 days, their sole purpose is to mate and lay eggs. They don’t have mouths so are unable to eat during this stage. Female crane flies will hatch out with a supply of mature eggs and will find a mate soon after emerging.

Daddy longlegs eggs are usually laid in the grass (around 300 at a time) and the larvae hatch out after a few weeks. Their growth is measured in ‘instars’ and they will take around 8 months to grow and pupate. The leatherjacket larvae will dig more deeply into the soil as the temperatures drop, rising up again in spring. Crane flies spend the vast majority of their life in the leatherjacket stage.

The crane fly larvae will pupate around the month of June, emerging as adult crane flies from August onwards, ready for the new cycle to begin.

leatherjacket life cycle

Leatherjacket life cycle, Source: Soilassociation.org

Are leatherjackets good for the garden?

Although the larvae of some crane fly species are completely harmless, those that live under our lawns have voracious appetites and feast on the roots of the grass.

Soil-dwelling leatherjacket larvae do have some benefits, they help to promote a healthy soil ecosystem, more than a few of these grubs can cause damage to your grass.

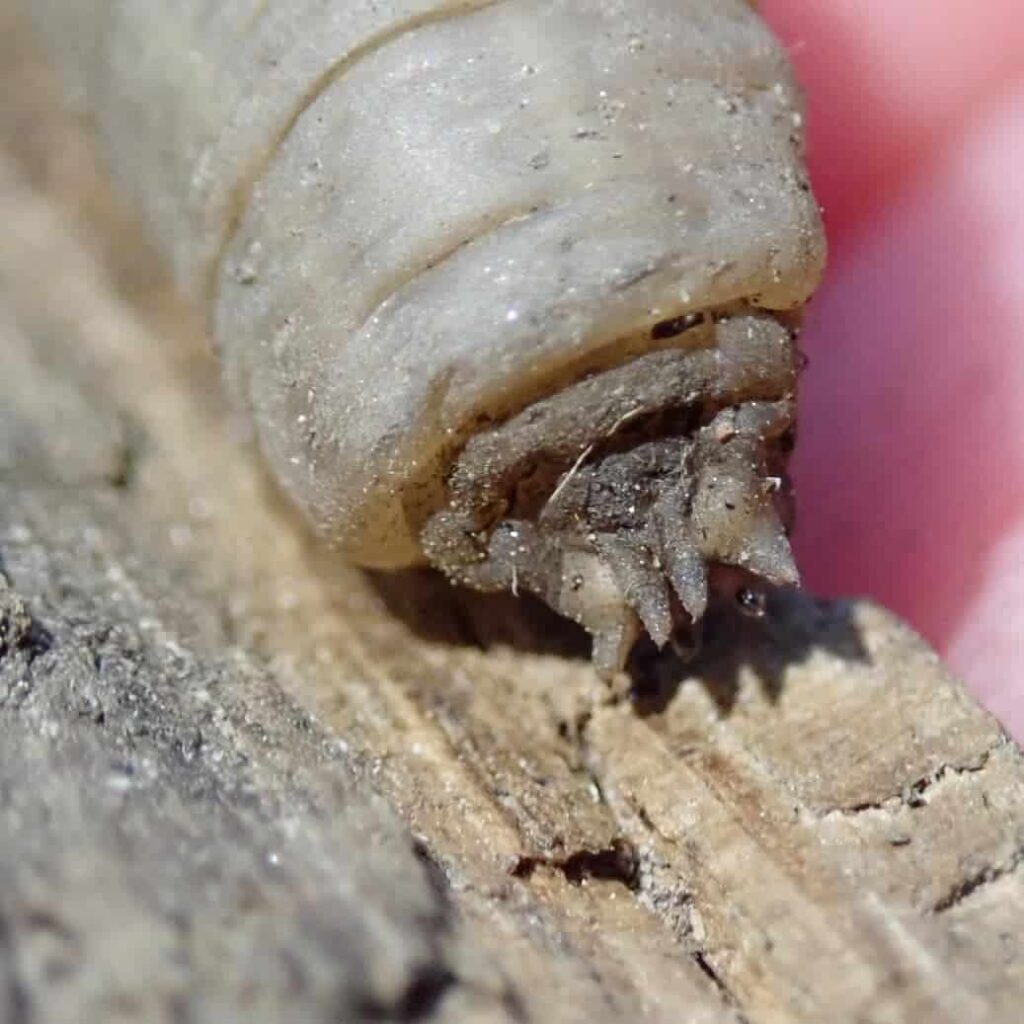
leatherjacket larvae

Looking like something straight out of a sci-fi movie. Image credit: @young_entomologist_2018

Leatherjackets damage lawns by eating the roots of the grass. If you’ve seen how quickly caterpillars can lace the leaves of your vegetables, leatherjackets and grass roots are no different.

A small, balanced number of leatherjackets won’t cause a problem but if they are eating the roots more quickly than the grass can recover, sections of the lawn will begin to die. A healthy lawn can sustain around 40 leatherjackets per square foot, any more than this and you will start to see the signs of infestation.

Larger birds and animals that feed on leatherjackets can also cause damage to the grass, particularly during the summer when the grass is drier. 

What causes leatherjackets in the garden?

Crane flies tend to lay their eggs in areas of grass. There will often be more crane flies after a wet autumn because the larvae and pupae prefer damp conditions.

adult crane fly

An adult crane fly will only live for around 10 days. Image credit: david_chatterton

Crane flies are attracted to the light from our houses and short grass provides the perfect spot for egg-laying. A leatherjacket infestation is often just down to bad luck, people may have one infestation and no more problems, or could experience repeat infestations. The number of adult crane flies will vary and where they deposit their eggs is quite random, some even lay eggs whilst flying. 

What are the signs of leatherjackets in my lawn?

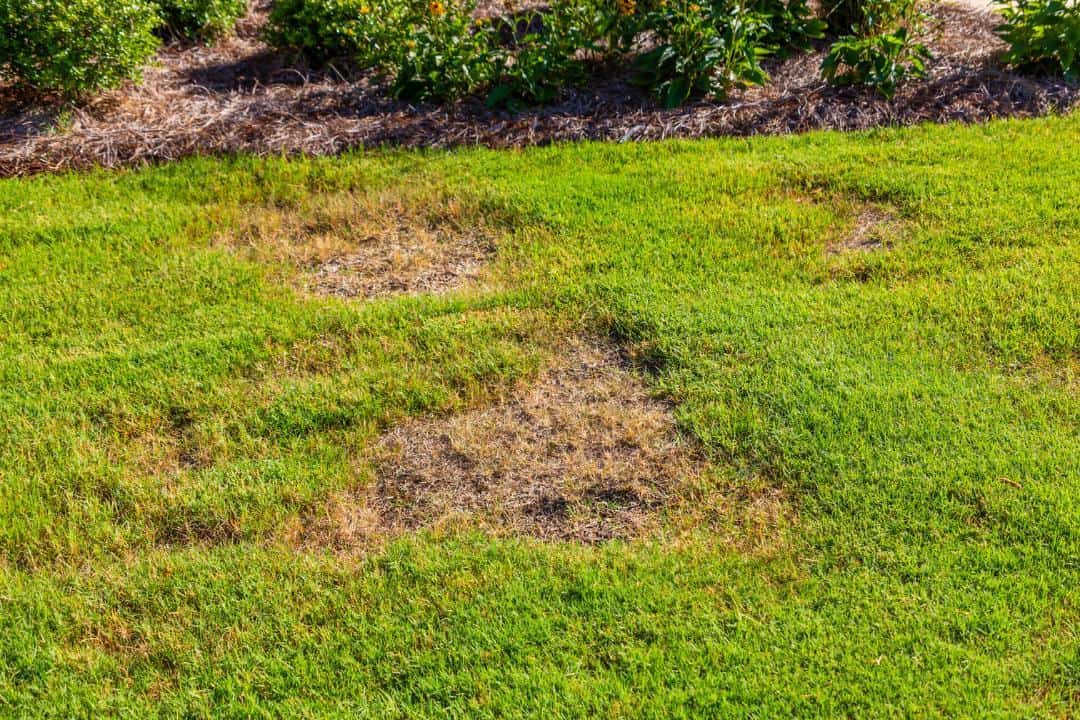
Discoloured patches of yellow-brown, weak grass in your garden are often a sign of leatherjackets insects in the lawn. If you have a leatherjacket infestation, you may be able to easily pull up large sections of turf where the roots have been damaged. Damage to lawns will be at its worst in spring, when the larvae are at their largest and if winter has been damp and mild, it may be particularly bad.

leatherjacket lawn damage

Typical leatherjacket damage. Image credit: @basf_nemasys_uk

If you dig into the soil, you’ll likely find a few of the brown larvae, particularly around border and path edges.

How to get rid of leatherjackets in your lawn

If you’re unlucky enough to have a leather jacket infestation in your lawn, there are several ways that you can tackle the problem.

Because of environmental legislation withdrawing all insecticide and pesticide treatments in 2015, no chemical treatments for leatherjackets are available. This is great news for the environment and there are many other effective ways to remove these pests from your garden.

1. Ensure the grass is strong

Healthy grass means healthy roots and, unless you have an extensive infestation, a few daddy longlegs larvae won’t do any noticeable damage to your lawn.

Keep your lawn healthy by regularly mowing it, once a week should be adequate during the summer months. Keep your grass well aerated and well fed, and it’ll produce long, strong roots that will be able to withstand most leatherjacket feeding frenzies.

2. Attract leatherjacket feasting birds

leatherjacket feasting birds

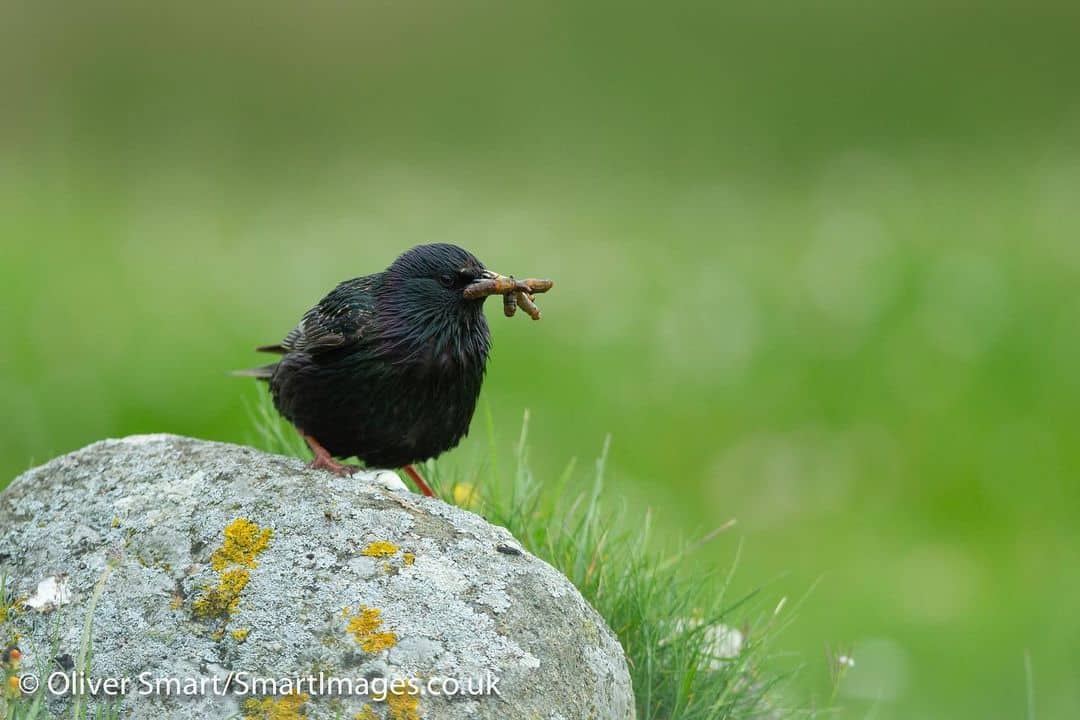
Starlings are especially partial to leatherjackets. Image credit: @oliversmartimages

Leatherjackets are a juicy delicacy for birds so attracting them to your garden is a good move. Crows, starlings, rooks, magpies and golden plovers are particularly partial to a leatherjacket or 5. 

You can attract birds to your garden by providing suitable food and water. Starlings will enjoy mealworms and suet balls. 

3. Set a trap

leatherjackets come to the surface of the soil

Lure them out and provide a feast for the birds. Image credit: @newark_golf_club

Another good tip is to encourage leatherjackets to come to the surface of the soil. You can do this by wetting an area of the lawn and placing a black plastic sheet or large bin bag over it. Anchor it to the ground using heavy stones or tent pegs and leave it overnight or for a day or two. Any leatherjackets should rise to the surface of the lawn and will provide a feast for the birds. Simply repeat with another section of your lawn until you’ve covered the whole area.

4. Apply nematodes

nematodes to kill leatherjackets

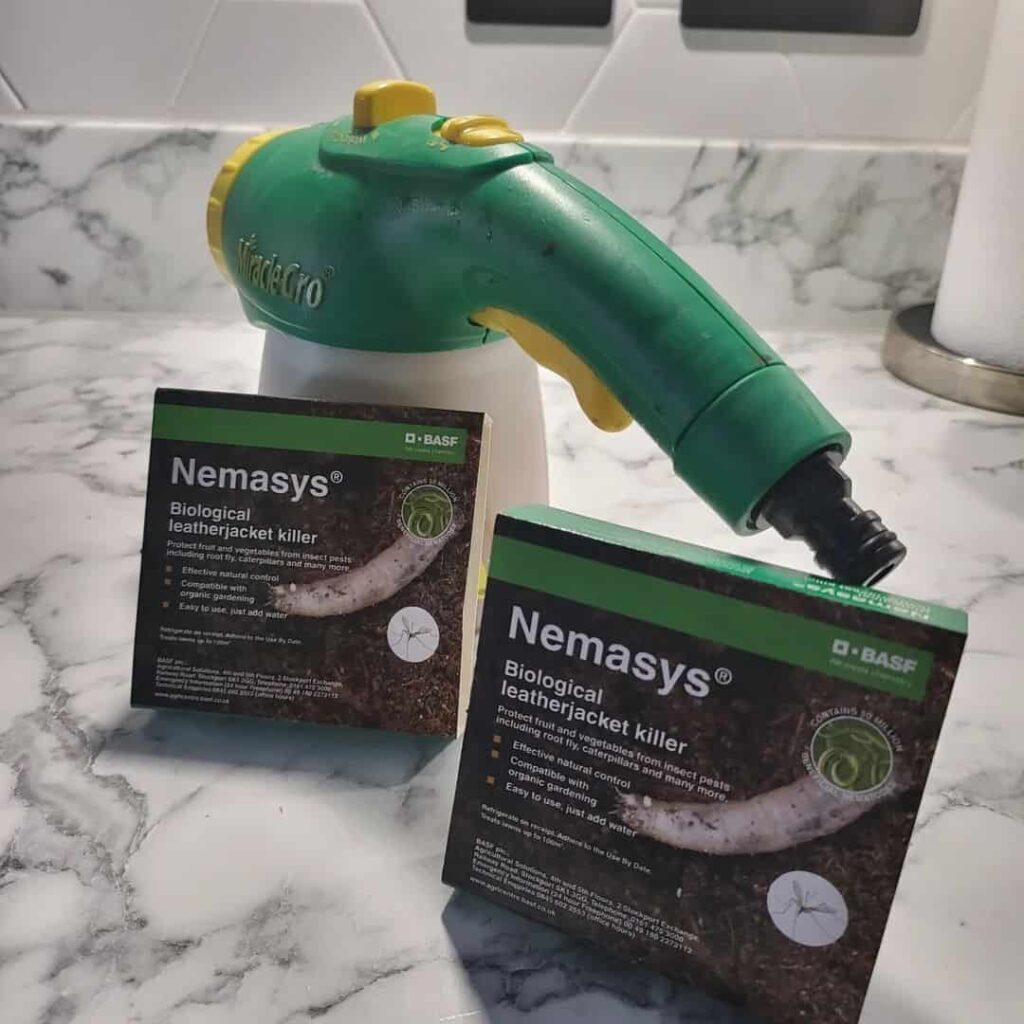
Nematodes are of the most effective ways to remove leatherjackets. Image credit: @jwn.lwn

Leatherjackets can be successfully controlled using insect pathogens like fungi and bacteria, specifically Bacillus thuringiensis. These bacteria and fungi are introduced into the soil by nematodes, pathogenic, worm-like, multi-cellular insects with smooth bodies.

Nematodes that will specifically target and kill leatherjackets can be purchased online, or from garden centres. They work by releasing a fungus or bacteria into the larvae which then destroys them. 

When to apply nematodes for leatherjackets

To apply nematodes, you’ll first need to cut your grass short. Mix the treatment with water and apply it to the lawn with a watering can. Although nematodes sound a little scary, they are a completely natural treatment and harmless to humans, pets, wildlife (except leatherjackets) and the lawn.

The best time to apply nematodes is when the larvae are at their most active. So from mid-April to mid-May or from September to October. Be sure to read the instructions on the packet as the dosage may be different depending on the time of year that you apply the nematodes.

5. Spritz on the garlic 

leatherjacket garlic spray

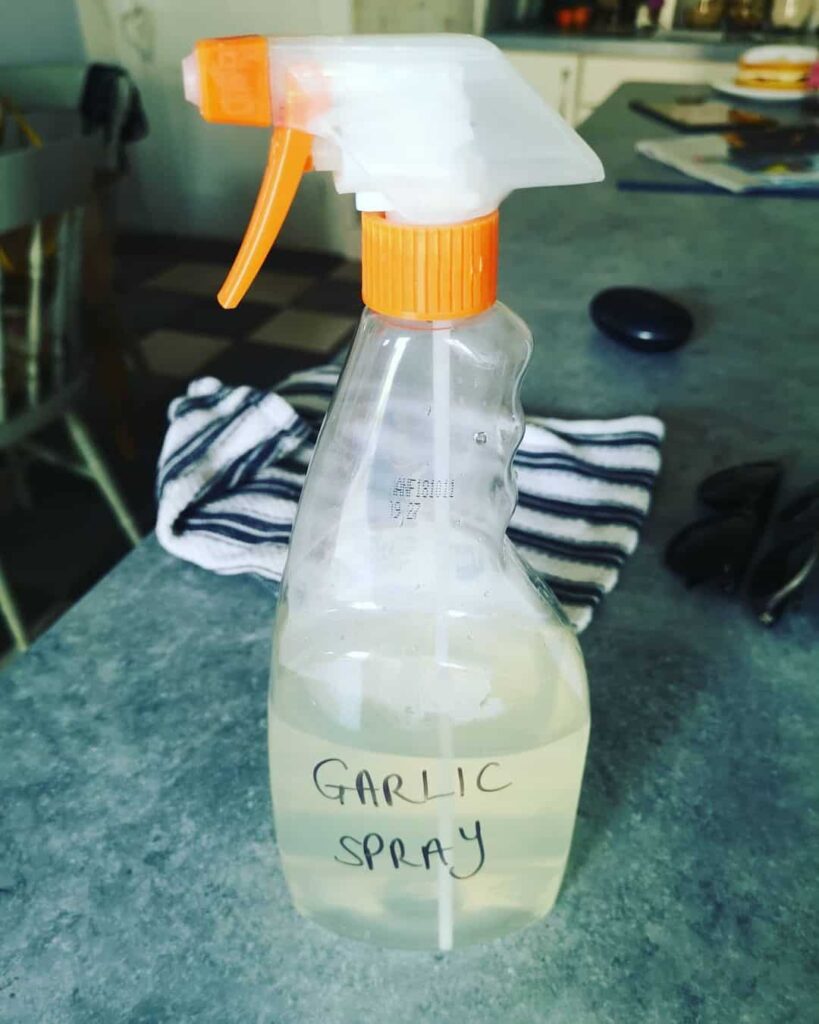
Leatherjackets will not appreciate garlicky-tasting grass. Image credit: @thelodge_essex

If you prefer to try a DIY leatherjacket repellant, garlic is proving to be an exceptionally effective treatment. 

Incredibly simple to make, crush several garlic cloves into a bowl, add boiling water and leave overnight, then strain it to remove the larger pieces which may clog up your sprayer. Mix with water then liberally apply the solution to the grass. 

The bitter taste of the garlic will prevent the larvae from feasting on the grass and they’ll wriggle away to find sweeter-tasting grass elsewhere. 

6. Get digging

dig out leatherjackets

See how many leatherjackets you can dig out. Image credit: @lifeonplot27

For a completely free treatment, you can simply dig down and remove the larvae yourself. This won’t be suitable for a large area of grass, but if you’ve got a small lawn, you can effectively remove leatherjackets from any affected areas using a small trowel.

You shouldn’t need to dig too deep to uncover the larvae because they tend to live around 3 inches below the soil. It may take a few goes to remove the larvae but if leatherjackets are causing noticeable damage to your lawn, it’ll be time well spent.

You can pop the leatherjackets you’ve removed onto a bird table or tray, they won’t be around for long!

How to repair leatherjacket lawn damage

Fortunately, extensive lawn damage due to leatherjackets isn’t common, but what do you do if they have savaged your lawn? 

Once you’ve treated the soil for leatherjackets (see above), you’ll need to remove any yellowing or dead grass from the lawn. This is easy enough to do, just take a sharp knife or edging tool to cut around the damaged section and carefully lift it out.

Once you’ve removed all the damaged patches, apply good-quality topsoil to the bare soil, making sure it’s level with the rest of the lawn and re-seed. Choose grass seed that’s suitable for the soil and aspect of the garden.

Take care to keep the patches well-watered as the new grass establishes. You can read more about lawn reseeding here.

How do I control leatherjackets in my lawn?

Although there’s nothing you can do about crane flies laying their eggs in your garden. There are steps that you can take to control leatherjackets in grass. The most effective method is an application of specific leatherjacket-targeting nematodes which can be done twice a year. 

Unless you dig up your lawn, it’s almost impossible to know whether you have a leatherjacket issue until it’s too late. Using nematodes will kill any larvae that are in the lawn, preventing any damage. Also, take care to keep your lawn healthy, it’ll help to ensure that any damage caused by leatherjackets is minimal.

Conclusion

Now you know what those strange little brown grubs are, you can rest assured that they’re very unlikely to cause much damage to your garden. If you do notice sections of your lawn are yellowing, dig down and see if leatherjackets are the cause of the problem, you’ll easily find plenty if it’s the case.

Arm yourself with black plastic, a garlic spray, befriend the birds or introduce nematodes to your garden and your lawn will quickly bounce back to life.

If you’ve had success with any of the methods we’ve listed, please let us know in the comments below.

Get rid of leatherjacket larvae

Save this pin for later

9 Easy Breezy Garden Windbreak Ideas for Stylish Shelter

When we’re lucky enough to see the sun, there’s nothing better than sitting back and relaxing in the garden with a good book or a cool drink in hand.

Creating an area of your garden where you can relax and unwind is really important for your well-being. It’s easy enough to put a lounger on the grass or deck when the weather’s fine, but for the ultimate relaxing space, it’s a good idea to factor in some shelter from the wind. A gentle breeze is perfect but no one wants their book or drink taking flight in a sudden gust of wind.

How to create shelter in a windy garden

There are many ways that you can create a sheltered spot away from the wind in your garden.  From installing screens and pergolas to planting dense shrubs, you can create a functional windbreak that blends in perfectly with your surroundings.

Garden windbreak ideas

Whether you prefer a living structure or a stylish screen to provide shelter from the wind, we’ve put together some functional and attractive garden windbreak ideas so that you can relax and enjoy your garden, wind chill free.

1. Willow fence panels

One of the most beautiful and natural ways to create shelter in your garden is by installing or making your own willow screens.

Environmentally friendly willow fencing can last for up to 10 years, it’ll blend in with any setting and the best thing is, it’s completely biodegradable so it won’t be clogging up landfills when it reaches the end of its life.

2. Arbour seating

rowlinson winchester arbour

Rowlinson Winchester Arbour, Original Organics

Arbours offer the perfect blend of comfort and shelter and take up minimal space in a garden. You can choose from solid side panels, like this Winchester arbour from Original Organics, or choose one with more open, trellised sides which you can grow climbing plants up. 

3. Extending Fence Panel

northway fence panel

Northway Fence Panel, Wayfair

Now it may not be the most beautiful panel out there, but this ingenious extending fence screen is perfect for creating shelter in your garden at a moment’s notice. Simply pull the screen out, fix the post into the anchor and your screen is good to go. At 3 metres wide, it’s a good size and will provide plenty of shelter from the wind whether you’re planning an outdoor party or just a relaxing afternoon in the garden.

4. DIY Wooden log windbreak

DIY wooden log windbreak

Image credit: @grangefarmtimberltd

If you’re partial to a bit of DIY and fancy creating your own shelter from the wind, take inspiration from this rustic, wooden log windbreak. The beauty of making your own windbreak is that you can make it whatever size you like.

This attractive garden wall will look great for years to come, you can dress it up with strings of outdoor lights and use it to anchor a sail shade in place on hot days. It’ll also provide valuable shelter for insects in the cooler months, giant-bug-hotel style!

5. Decorative screen panels

harrod laser cut screen

Harrod Laser Cut Screen, Harrod Horticultural

One of the easiest and most attractive ways to provide shelter from the wind is to install screen panels and posts. You can use screens to create secluded sections in your garden and they’ll look great edging the lawn, placed along the side of decking or affixed to the sides of a garden gazebo or pergola.

These beautiful screens from Harrod Horticultural are made from powder-coated aluminium and you can choose from 3 laser cut designs. The screens come with matching posts so fixing them together is a breeze.

6. Pergola with panels

pergola with panels

Image credit: @charnwoodtowers

Adding panels to an existing garden structure is an effective way to create shelter from the wind. You can easily attach slatted fence panels to the posts of a wooden pergola or gazebo, creating a protected retreat to enjoy on those breezier days.

7. Slatted wooden screen

slatted wooden screen

Rowlinson Corner Screen Set, You Garden

Minimal and stylish, tall, slatted fence panels will provide an effective windbreak and they look fantastic too. 

This corner screen set from You Garden can be fixed to the side of a house or shed to create a great-looking, sheltered sun trap, perfect for eating al-fresco or relaxing in a lounger chair.

You can easily add your own twist by painting or staining the panels. The set includes 3 wooden planters so you can add climbing roses, honeysuckle, a passionflower or clematis to grow up the screens.

8. Hedge windbreak

hedge windbreak

Image credit: @northmeadhedges

If your garden is particularly open to the elements but you don’t want to build a large structure or install any screens, you can consider strategically planting a row of shrubs to act as a natural windbreak.

You’ll want to choose dense shrubs for the best hedging effect. Buxus, beech, hawthorn, holly and yew are all excellent choices. 

9. Living willow ‘fedge’

living willow ‘fedge’

Image credit: @sarahmorpeth

A cross between a fence and a hedge, bare willow stems can be inserted into the ground in a criss-cross pattern and woven together for stability. The amazing thing about willow is that it will grow just about anywhere and soon your twiggy fedge will be a mass of glorious green leaves. You can also create a beautiful living fedge with dogwood.

You might need to stabilise your young fedge whilst it grows. Hay bales, tyres and anything heavy that you can get your hands on will help with support until the new plants are established.

And finally…

When you’ve got your windbreak in place, don’t forget to accessorise with some comfortable sun loungers or chairs, outdoor lights and pretty potted plants.

FAQ

What are the best trees for windy areas?

If you’re choosing plants with the idea of creating a barrier from the wind, the RHS recommend alternating evergreen and deciduous plants. This helps to prevent any issues with wind turbulence that could occur with a solid line of trees. Pine and fir trees are great choices, along with Norway spruce and cedar.

If you’re looking for trees that will tolerate windy areas, picking shorter plants, or those that will bend easily in the wind are good options. Consider planting hazel, oak and cedar.

What are some plants and shrubs for windy gardens?

Roses, ornamental grasses, magnolias, holly, hardy geraniums, sea holly and palms are all great choices in exposed gardens. 

How to build a windbreak fence

You can build a natural windbreak fence using willow or dogwood sticks. Insert the twigs into the ground in a criss-cross pattern and weave them together for strength. You may need to support the twigs while they become established.

You can also create woven willow fence panels, there’s a great tutorial that shows you how to do this here.

You can also get creative with found objects, try using logs, old roofing batons or corrugated iron sheets, the only limit is your imagination! 

9 easy breezy garden windbreak ideas for stylish shelter

Save this pin for later

8 Developmental Benefits of Gardening for Kids

If you were lucky enough to have access to a garden as a child, you might have fond memories of playing on swings, helping to grow vegetables and running off all that energy. If you’ve got children of your own, having a safe, outdoor space for them to play in is probably one of the key things you looked for when choosing your home.

With children spending more and more time on devices, being outside in the fresh air has never been so important. Ofcom estimates that, on average, children as young as 3 are spending 3 hours a day in front of the screen, rising to 6.5 hours for teenagers. Screens definitely have their advantages, but it’s really important for children to get outdoors, breathe in the fresh air and ignite their senses too. 

In this article, we’ll look at the benefits of gardens and how they can help to aid children’s development.

How do gardens benefit children’s development?

From being outside in the fresh air and soaking up vitamin D, to improving their fitness and reducing stress, gardens boast a huge wealth of benefits for children. Here are 8 ways that spending time in the garden can help to aid children’s development:

1. Helps to develop social skills

Anyone who’s ever gardened will know that it takes patience, responsibility and plenty of care to get the best results. From planting a small seed to watching it grow and develop, each stage needs to be carefully managed.

Gardening for kids has several benefits. Spending time in the garden and helping to plant vegetables and care for flowers is a great way to aid and improve children’s self-confidence. They can feel really proud about their achievements and a real sense of responsibility in having to keep a living thing alive!

Studies have shown that spending time in green spaces, including gardens, helps to increase prosocial behaviour among children and adolescents, helping to promote harmonious relationships with others. 

2. Boosts sensory development

gardening for kids sensory development

Image credit: @sustainabetty

From squelchy mud and brilliant birdsong to fragrant flowers and slimy snails, every journey into the garden is a full-on sensory adventure. 

Spending time in the garden is one of the easiest ways for children to explore nature and experience the sensory stimulation that it offers. Walking on soft grass, touching flowers, smelling the huge variety of scents and hearing the buzzing of bees are all important actions that will aid their sensory development. It’s a great way to help all children make sense of the world they live in.

Gardening also helps to boost proprioceptive sensory input, pushing a wheelbarrow, pulling up weeds, carrying plant pots and digging holes all help to improve coordination and posture.

Zoned sensory gardens provide an effective way to help children with special educational needs and sensory processing disorders, helping them to engage with the setting and utilise their sensory stimulation as well as their physical and social skills.

3. Encourages healthy eating

gardening for kids encourages healthy eating

Image credit: @ltpreschool

Few things are better than growing and eating your own food and knowing exactly where our favourite fruit and vegetables come from. For children, discovering how plants germinate and seeing how long they take to grow and bear fruit is an important part of life.

It’ll also help them to develop a taste for healthy, fresh food and encourage them to eat those green veggies. Peas taste infinitely better when they’re freshly popped out of a pod! 

Having easy access to fresh raspberries, strawberries, delicious peas and crunchy carrots will also help to increase their daily fruit and vegetable intake. Even if you don’t have access to a large garden or allotment, you can grow successfully grow vegetables in containers.

4. Offers educational advantages

gardening for kids educational advantages

Image credit: @littlegreengem_

A garden provides a perfect learning environment for children. They can learn about the seasons, see how the weather affects the plants, watch birds build their nests and spot caterpillars and butterflies.

Whether they’re writing labels for newly planted seeds or watching tadpoles metamorphose into frogs, a garden offers endless learning opportunities.

Learning about different plants and being able to identify different insects are skills they’ll use throughout their lives and it’s a wonderful way to teach them about respecting nature and the environment that we share with so many other living creatures.

5. Improves fitness and enhances sporting ability

Even if your garden is small, there are so many ways that gardens can help to improve children’s fitness and sporting abilities. From practising football to throwing and catching, and honing their skipping skills, you don’t need a huge space for kids to get active outdoors.

Try chalking an old-fashioned hop-scotch grid onto the patio (I bet you can’t resist having a go too), setting up a ‘how many balls can you get into a bucket?’ challenge or making fun obstacle courses.

You can also get them gardening! Weeding, raking and watering plants use different muscle groups and are a great way to get their bodies moving and some handy gardening chores done too!

More on this: Garden activities for kids: 24 fun things to do with kids in the garden

6. Reduces stress

Studies have shown that gardening and spending time in green spaces has numerous mental health benefits for children, including stress reduction and improved cognitive development. 

Just being outdoors in the open is enough to make a difference and if children want to be more active, the gentle exercise that gardening provides is enough to boost cortisol levels and improve their mood. 

7. Nurtures creativity

gardening for kids nurtures creativity

Image credit: @gardenat31

There are few places where you can let your children run wild and not have to worry about it but the garden is definitely one of them! Let them experiment by concocting magical garden potions, building sandcastles and mud pies and creating wild dens.

It’s such a brilliant way for children to learn about nature and have fun and it doesn’t need to cost a penny.

Some no-cost creative ideas include making a wild picture or themed flat lay with whatever garden objects they can find, making handmade windchimes, building bug hotels and turning outgrown footwear into planters. 

8. Fosters a lifelong love of nature

gardening for kids fosters a lifelong love of nature

Image credit: @fylstanorrgarden

We all know about the impact of climate change and the devastating consequences it’s having on our natural world. Helping children to understand how we can all play a small part to help, from planting trees and bee-friendly plants and learning all about how important insects are will help them to develop a lifelong love of and respect for nature.

Conclusion

There’s no doubt that spending time in a garden is hugely beneficial to children’s development and will help them to develop strong, lifelong skills. If you don’t have access to a garden, children will gain the same benefits from playing in a park or green space.

You might also like: 17 DIY kid’s garden play areas

developmental benefits of gardening for kids-min

Save this pin for later

Polka Dot Plant Care: How To Grow Hypoestes Phyllostachya

The polka dot plant, also known as freckleface, is a short-stemmed houseplant that’s super cute and easily maintained. It gets its name from the spotty appearance of its leaves. If that isn’t enough to grab your attention, it also comes in several colour varieties.

In this article, we’ll discuss the different varieties of Hypoestes Phyllostachya, how to care for them and how to identify problems.

Ready to start caring for your own Polka Dot plant? Let’s get you armed with the facts.

Polka dot plant care – Hypoestes Phyllostachya

polka dot plant

By Karl Thomas Moore – Own work, CC BY-SA 4.0, via Wiki

Polka dot plant overview

Scientific name Hypoestes Phyllostachya
Common names Polka Dot plant, freckleface, pink dot, flamingo plant, measles plant
Family Acanthaceae
Plant type Herbaceous, perennial, annual
Sun exposure Partial shade
Soil type Moist, well-drained
Soil pH Slightly acidic to neutral (6.1 to 7.3)
Hardiness zones H2 to H1c RHS
Best time to plant Spring
Mature size 0.3-0.6 m (1-2 ft) tall, 0.3-0.6 m (1-2 ft) wide
Colour varieties Different patterns of green with white, pink or red spots
Flower colour Lilac, pink or white
Bloom time Summer or early autumn
Native to Madagascar
Toxicity Non toxic


Varieties of polka dot plant (Hypoestes Phyllostachya)

There are many varieties of polka dot plants all bred for their striking leaf colour and patterns.

They all come from the same species, Hypoestes Phyllostachya, even though they may look quite different. Here are four of the most popular varieties:

The ‘Pink Brocade’ shows off its green leaves with mottled pink spots.

This variety can be seen sporting dark green and red-spotted leaves.

‘Splash’, as the name states is a mix of colours featuring mixes of greens with red, white or pink splotched across leaf surfaces. The different colours are often referred to as ‘red splash’, ‘pink splash’ and ‘white splash’.

This variety boasts green leaves with spots of pink, white, red, rose or burgundy across their surfaces.

hypoestes phyllostachya

By James St. John – Hypoestes phyllostachya (polka dot plant) 2, CC BY 2.0, via Wiki

Appearance

Hypoestes Phyllostachya is an evergreen shrub that can grow around 0.3 metres (1ft) tall and wide. The leaves are heavily spotted with pink, white or red as if splashed with paint. Sometimes these spots can bleed into each other causing a mottled pattern.

You can expect your plant to form bushy compact tufts if properly cared for. You can identify polka dot plants by their pointed, oval leaves that are splashed with colour. The most common colour variety of Hypoestes Phyllostachya has green leaves with pink spots.

Your polka dot plant may produce small, solitary pink, purple or white flowers at the nodes. They resemble honeysuckle flowers quite closely. If allowed to fruit, you’ll notice a many-seeded dehiscent capsule.

Polka dot plant natural habitat

The polka dot plant is native to Madagascar, but other species in the family Acanthaceae originate from South Africa and South-East Asia as well. This plant can usually be found in humid, forest environments. The plants grow in a bushy manner in partial shade and prefer tropical climates.

Growing polka dot plants

Hypoestes Phyllostachya plants are fairly easy to grow and care for. Warm temperatures and humidity are the keys to success when it comes to growing one of these beauties. You can expect to be quite involved in the care of polka dot plants. Here’s what you need to know:

Does a polka dot plant require special care?

These stunning plants need warm temperatures and high humidity to grow properly. If you live in a cold or very dry climate, you will need to pay extra attention to watering, temperature and humidity to keep your plant healthy.

Polka dot plants also need a lot of TLC. You’ll need to pinch back stems weekly, cut any flowers and fertilise regularly for the best results.

polka dot in plant pot

Brighten up your home with a beautiful polka dot plant. Image credit: @jasonrmcintosh>

Polka dot plant care: Watering

Watering your Hypoestes Phyllostachya properly is one of the most important requirements for growing a healthy plant. They like their environment to be quite moist so don’t be scared to keep the soil slightly damp, just make sure it drains well.

How often do I water a polka dot plant?

Watering correctly is very important to keep your plant alive. Despite loving moisture, your polka dot plant will succumb to root rot if the soil is too wet or doesn’t drain properly.

When watering, make sure to water evenly. You want all the soil around the roots to get wet. Ideally, there should be some moisture in the soil at all times.

If the soil dries out completely, you can expect your plant to wilt and you might struggle to bring it back to life. If the soil doesn’t drain well and stays soggy for long periods after watering, you will see signs of root rot pretty quickly.

To make sure this doesn’t happen to you, make sure the top 1.5cm (½ in) of soil is dry before you water it. You can check this by simply using your finger to dig in the soil and feel for moisture. There’s also some specialised equipment available if you want an accurate reading of soil moisture levels, but this isn’t essential.

Do polka dot plants need humidity?

As well as adequate water and light, humidity is one of the most important elements for a polka dot plant. These plants grow naturally in areas with high humidity and will thrive when exposed to a bit of extra moisture in the air. A minimum humidity level of 50% is required.

If you’re worried about humidity, you can create a humidity tray for your plant, or simply place it in a well-lit area with naturally high humidity, like a kitchen or bathroom.

Humidity trays work best for container plants. Simply place the plants on a tray filled with rocks and water. Make sure the rocks stick out above the water’s surface so your plant pot isn’t sitting in the water. As the water from the tray evaporates, it will raise the humidity level around your plant.

If you want to place polka pot plants outside, choose a sunny, sheltered spot. You can put them near water to raise the humidity level or stand them on humidity trays. If you aren’t growing your plants as annuals, you’ll need to bring your plants inside when the temperature falls below 12℃.

polka dot plant japan

By TANAKA Juuyoh (田中十洋), via Flickr

Soil conditions that suit polka dot plants

Hypoestes Phyllostachya prefers evenly moist soil that drains well. The soil also needs to be humus-rich since these plants need plenty of nutrients to stay healthy. Planting a polka dot in rich soil will reduce the amount of fertiliser you need to use monthly.

Well draining soil is also a must since polka dot plants are very sensitive to developing root rot.

The best soil for polka dot plants

Polka dot plants prefer humus-rich soil with a pH of around 6.1 to 7.3. Choose an organic potting soil mix and add some extra pumice or perlite to further improve drainage.

Polka dot plant fertiliser

If you have container plants, make sure to feed them with organic fertiliser meant for potted plants. For garden plants, you’ll need to mix in a good amount of compost. Polka dot plants are heavy feeders so make sure you give them enough organic nutrients.

How do I fertilise polka dot plants?

Potted polka dot plants need to be fed once a month with an organic fertiliser. If you’re using a liquid fertiliser, increase feedings to twice a week. Make sure to water your plant after feeding to make sure the roots don’t get burned. Watering will also help the fertiliser to soak into the soil.

For garden plants, you’ll need to mix a good amount of compost into the soil every spring. If you think your plants need more nutrients, add a layer of compost on top of the soil or lightly mix it in without disturbing the plant.

Only fertilise polka dot plants during the active growing season from spring to autumn.

polka dot plant flower

By Andreas Kay, via Flickr

Lighting for polka dot plants

Polka dot plants grow best in areas with partial shade. If you give them too much or too little light, the colours of the leaves will fade. Your plant might also become leggy.

What lighting conditions are best for Hypoestes Phyllostachya?

The best lighting conditions for polka dot plants are medium-light. They prefer to grow in an area that gets morning sun but afternoon shade. Too much light will cause leaf burn and fade colours. You might also notice your plant dropping its leaves prematurely.

How do I stop my Hypoestes Phyllostachya plant from getting leggy?

If your plant is planted in an area with very low light, you will notice it growing longer stems with larger distances between the nodes. To stop this from happening, move your plant to an area with partial sun. Morning sun with afternoon shade is best. Bright indirect light also works for potted plants.

You can also counter leggy growth by regularly pruning your polka dot plant. Simply cut off the first two nodes with leaves on the tips of the stems. By doing this, you’re forcing your plant to grow from nodes lower down on the stems. In time, this will cause bushy growth.

If your goal is to grow a short but dense plant, trim the tips of stems weekly. If your plant is a leggy mess, cut it down to just above the last node. This will force the plant to sprout new growth from the base.

Temperatures for polka dot plants

Polka dot plants are only hardy in RSH zones H2 and H1c. In any other areas, your polka dot plant will need to be a houseplant or annual.

If you live in an area where temperatures regularly drop below 15.5°C (60°F) then this plant might not be for you unless you’re willing to grow it as a houseplant.

Polka dot plant care – propagation and repotting

These stunning plants can be grown from seeds and cuttings. A great way to preserve your plants in a non-tropical climate is by taking stem cuttings before the first frost hits. Frost will kill off your outside plants, but your cuttings will live on if protected in a heated greenhouse or indoors.

Polka_Dot_Plant_II

By Karl Thomas Moore – Own work, CC BY-SA 4.0, via Wiki

How do I propagate polka dot plants?

Polka dot plant propagation is really simple. If you’re growing plants from seed, the best time to sow them is in spring. Simply sow the seeds on top of warm, moist soil inside a seed tray. Place the tray where it will get morning sun.

Your seeds should sprout in a couple of days. Allow the seedlings to grow for a couple of weeks to become strong enough for a transplant. A good indication that they are ready is when they grow their first set of true leaves.

If you’ll be planting outdoors, make sure the threat of frost has passed, this is usually at the end of May.

If you’ll be propagating from cuttings, you will need to take a 10cm (4in) piece of stem from anywhere on the plant. Make sure to use sharp, sterilised scissors to prevent any contamination.

Dip the end of the cutting in hormone rooting powder and then place it in a glass jar of water or into moist soil. If you’re planting in soil make sure to cover the plant in clear plastic wrap to increase humidity. You can remove the clear wrap when you notice new leaves or obvious growth.

To test for roots, gently tug on the cutting. If it doesn’t come out of the soil, it’s established itself. Once you’re sure that the plant has a nice root system and is actively growing, you can repot or transplant it outside.

Diseases and pests that affect polka dot plants

Healthy polka dot plants usually don’t have any problems with pests and diseases. If your plant is under stress, however, it’ll be more susceptible. The most common pests are aphids, mealybugs and whiteflies.

Diseases you should look out for include root rot, leaf spot diseases and powdery mildew. You can tell your plant needs some extra care when foliage becomes discoloured, leaves have holes in them, the plant appears sickly and struggles to grow and you can see small insects moving on your plants.

Hypoestes_phyllostachya_-_Polka_Dot_Plant

By Vinayaraj – Own work, CC BY-SA 4.0, via Wiki

Are polka dot plants toxic?

Polka dot plants are safe to grow around pets and small children. If large amounts of foliage are consumed it might cause vomiting and diarrhoea.

Buying polka dot plants

You can buy polka dot plants at your local garden centre or online. They should be available from around spring into summer.

FAQs

polka dot plant hanging basket

Polka dot plants are great for hanging baskets. Image credit: @infinite_green42

Can I grow a polka dot plant outside?

Yes, but only as annuals as they will die over winter. They will grow as perennials in tropical climates.

Can I place my polka dot plant outside in warmer weather?

Definitely. Polka dot plants can be grown completely outdoors during the warm months of summer. Just make sure to bring them inside when autumn hits. Frost will kill your plants pretty quickly.

Should I avoid positioning my polka dot plant in direct sunlight?

These plants prefer bright indirect light. They don’t do so well when exposed to direct sunlight all day long or when grown in very low light conditions.

What’s the ideal temperature for polka dot plants?

Polka dot plants like it warm. They don’t do well when temperatures drop below 15.5°C (60°F).

Polka dot plant care: how to grow hypoestes phyllostachya

Save this pin for later

January Flowers: 10 Plants That Bloom in January

Gardening in the winter sounds counter-intuitive; however, plenty of flowering plants bloom in January. If you want to add some colour to your home this Winter, let me introduce you to some stunning January flowers. A graphic design containing lots of flowers that bloom in January

Flowers that bloom in January

In this list, we’ve written about 10 of the most popular January bloomers and some vital information to help you choose and look after them.

But that’s not all. I’ve included two links at the end of the article that include even more winter flowering plant ideas, so make sure you continue reading till the end.

Let’s take a look at our January flowers:

1. Anthurium andraeanum

Anthurium, also known as the Flamingo flower, is a popular ornamental house plant that flowers all year round. This plant is particularly sought after for its colourful, wax-like spathes and bright yellow or red tail-like flower spikes.

Flamingo flowers are popular at Christmas time due to their festive red or white flowers and dark green foliage. Keep in mind that these plants are climbers and need warmth and humidity to thrive.

They also need bright indirect sunlight, but should never be placed in direct sun. Make sure your plant is kept in well-draining soil and given just enough water to stay moist but not wet.

Care Instructions: 

2. Lonicera × purpusii ‘Winter Beauty’

Honeysuckle is a popular plant due to its incredible scent. These beauties have a tendency to be bushy, but you can train them to climb up a trellis or something similar. This plant is easy to care for so ideal if you’re an absolute beginner.

The cream coloured flowers will be the highlight of the season. They usually appear on the bare branches somewhere in winter and will last into spring. Make sure you plant this specimen in well-draining soil to keep it healthy.

Care Instructions:

You might also like: 7 Vivid Winter Flowering Climbing Plants

3. Narcissus tazetta subsp. Papyraceus

narcissus tazetta subsp. Papyraceus

By Dominicus Johannes Bergsma – Own work, CC BY-SA 3.0, via Wiki

Paperwhite daffodils grow from bulbs that like to grow in well-draining soil. It’s best to keep the soil constantly moist, but not wet during the growing season and dry in the dormant season. The flowers have an extraordinary scent and are often favoured as cut flowers in the home.

If you leave the flowers on the plant, it’s best to deadhead them once they fade. The leaves of the plant should be left to die back naturally.

Care Instructions:

4. Lachenalia pendula

Lachenalia pendula - Bulb-bearing leopard lily

By KENPEI – Own work, CC BY 3.0, via Wiki

Lachenalia, otherwise known as the bulb bearing leopard lily, is a low growing plant with stunning red, green and purple flowers. If given enough sunlight, the leaves usually have spots on them, hence the name leopard lily.

When walking past this beauty, you can’t miss it. The flowers are extremely eye-catching and it makes for an excellent container plant. Make sure to plant leopard lilies in soil that retains moisture, but still drains well. The best place to grow them is in an area with full sun.

Care Instructions: 

More on this: 12 Winter Flowering Plants for Pots: Lively Winter Colours

5. Strelitzia reginae ‘Kirstenbosch Gold’

Strelitzia reginae 'Kirstenbosch Gold'

By Axxter99 – Own work, CC BY-SA 4.0, via Wiki

The stunning, evergreen bird of paradise plant is more commonly associated with warmer climates; however, under the right conditions, it will bloom in Winter and Spring. To encourage this, provide an environment as close to its native environment as possible. Strelitzia reginae requires bright light to bloom. In its natural habitat, it enjoys full sun. However, you’ll need to keep it in a bright covered location during January and other winter months. The Plant is not frost tolerant and needs warm temperatures, ideally between 65°F to 70°F (18°C to 21°C) during the day and slightly cooler at night, but not below 50°F (10°C).

Strelitzia reginae likes moist but well-drained soil. This plant grows quite large, so locate it somewhere where it won’t interfere with other plants.

Once these plants flower, you won’t be able to walk past them without admiring the strangely shaped flowers. The flowers appear to have a beak and are often used in arrangements. Bird of paradise is very easy to care for and requires no pruning.

Care Instructions: 

6. Tulipa biflora

Tulipa biflora

credit: Wiki

The two flowered tulip is a grey-green perennial bulb with fragrant white and yellow flowers. This stunning plant needs well-drained soil to stay healthy. Two flowered tulips usually form clumps when growing.

The flowers appear first in winter and are then joined by the foliage in spring. They will naturally die back and disappear in summer and autumn just to reappear again sometime during winter.

Care Instructions: 

7. Crocus sieberi ‘Bowles’s White’

Crocus sieberi 'Bowles's White'

By Meneerke bloem – Own work, CC BY-SA 3.0, via Wiki

Corcus sieberi is a perennial bulb that produces its leaves and flowers at the same time in winter. The foliage will stay around after the flowers die back, but will eventually disappear at the end of summer.

When planting this bulb, keep in mind that it needs full sun and well-drained soil. This plant is extremely easy to care for. After the initial planting, leave it to do its thing. No pruning is required.

Care Instructions: 

8. Galanthus ‘Trumps’

Galanthus 'Trumps'

Credit: Piqsels

Snowdrops are bulbous perennials that start to flower in mid-winter. The foliage of this plant is green-grey and appears at about the same time as the flowers. Once summer arrives it will die back completely, just to resprout once it’s winter again.

Make sure you don’t accidentally dig snowdrops up. They won’t be visible during summer and autumn. It’s best to keep the soil in the area moist, but make sure it drains well to prevent the bulbs from rotting. Watering isn’t necessary in summer while the bulbs are dormant.

Care Instructions: 

9. Erica carnea f. alba ‘Winter Snow’

Erica carnea f. alba 'Winter Snow'

credit: Wiki, via CC BY-SA 3.0

Erica carnea heather is a dense clump-forming plant that produces beautiful white flowers in late winter. This plant prefers to grow in full or partial sun and should be grown in very well-drained soil. Make sure that the soil retains some water since this heather doesn’t like to dry out completely.

Even when Erica carnea isn’t flowering, its bright, evergreen foliage will add interest to your garden all year round.

Care Instructions: 

10. Eranthis hyemalis

Eranthis hyemalis

By Kora27 – Own work, via Wiki, CC BY-SA 4.0

Winter aconite is a perennial plant with yellow, cup-shaped flowers that appear in winter. The foliage of this plant usually appears and dies back at the same time as the flowers. Make sure not to dig up the tubers since they will reappear next winter.

Plant winter aconites in well-drained, moist soil in an area with full sun or partial shade. These stunning little flowers will brighten up your winter garden, even when there’s still snow on the ground.

Care Instructions: 

Conclusion

Now that you have an idea of which flowers to expect in January, you can start planning your winter garden. Also, check out our list of indoor plants which flower during winter and tasty vegetables to grow in winter.

You can find more suggestions for winter flowering plants by clicking the links below. I suggest researching the plants before buying as not all the plants on the linked lists will flower in January.

Happy gardening!

JANUARY FLOWERS 10 PLANTS THAT BLOOM IN JANUARY-min

Save this pin for later

How to Stop Ants Nesting in Plant Pots (& Get Rid of It Safely)

With the exception of Antarctica, ants have colonised every landmass on earth. There are more than 30 species of ant in the UK alone.

Ants are eusocial insects, related to bees and wasps. This means that they live in a highly organised society, cooperatively taking care of their young, overlapping generations within a colony of adults and dividing labour into reproductive and non-reproductive groups.

Ants are resourceful little insects and they’re partial to a flowerpot home. Ants’ nests can contain hundreds, sometimes thousands of ants, mainly consisting of worker females and one or two queen ants. You can often spot the nests from the small piles of excavated earth that the ants leave on the ground.

Do ants harm plants in pots?

ant on a flower

Image credit: @_.mothernature

Ants can be beneficial to gardens and are an important part of the garden ecosystem. Tunnelling ants turn over as much soil as earthworms, helping to aerate the ground. They also help to control pests by feeding on their eggs and young and can unintentionally improve pollination by scurrying from flower to flower in search of nectar.

Although ants aren’t directly destructive insects, if they nest in plant pots, they can disturb the plant’s roots, leading to plant damage. They also like to ‘farm’ aphids to feed on the honeydew that aphids excrete and will protect them from predators to do so.

There’s no doubt that ants are impressive, and extremely tough, having been around since the mid-cretaceous period. Considering that they survived where the T-rex didn’t, eradicating them from your garden may not be the simplest task!

Why are ants nesting in my plant pot?

ant nest in plant pot

Image credit: @zippety_do_dah

There are several reasons for ants setting up home in a plant pot. A pot provides warmth and shelter, but it can also be a great source of food if the plant is the victim of an aphid invasion.

Ants don’t like moist soil, so if your plant is in a sunny spot and infrequently watered, it will make a perfect base for a colony of ants. Old compost can also become so dry that it doesn’t retain any water, it simply flows through the pot and out of the bottom.

How to stop ants nesting in plant pots

Plant pots are attractive potential homes for ants and luckily, there are a number of ways that you can stop them from setting up a forever home in one of yours.

The most effective way to stop ants in their tracks is to use traps or bait.

If you prefer a more natural deterrent, try sprinkling coffee grounds, spices like cinnamon and pepper, or citrus rind on the soil around your plants. If ants have already invaded your pots, read on to discover how to effectively remove them.

6 Ways to remove an ants’ nest from a flower pot

There are a few tricks to removing ants from your plants, let’s look at the most effective:

1. Apply a soap solution

soap solution for ants

Image credit: @the_wholesome_mumma

Spraying on a soap solution is a great way to evict your tiny tenants without the use of harmful pesticides. Add a teaspoon of washing up liquid to a pint of warm water and spray liberally on and around the plant in the evening. You can add peppermint oil for extra effectiveness as it’s a natural insect repellant. In the morning you can spray the plant with fresh water to remove any soap residue. You may need to apply the solution a few times.

You can also pour an insecticidal solution onto the plant, letting it soak right through.

2. Remove aphids

ants and aphids

Ants and aphids have a symbiotic relationship. Image credit: @
daff_o_dils__

As ants are attracted to plants with aphid infestations, it makes sense to get rid of aphids first. Try spraying affected plants with an insecticidal soap solution.

You can also try attracting aphid-eating bugs like ladybirds, hoverflies and lacewings to your garden by planting irresistible borage, dill, marigolds, mint, rosemary and thyme.

3. Add diatomaceous earth

diatomaceous earth for ants

Image credit: @louisespetconnection

Diatomaceous earth is a natural substance that’s non-toxic to people, pets and birds but toxic to ants, earwigs, slugs and beetles. It consists of tiny algae skeletons that have fossilized over millions of years and it’s rich in silica.

You can sprinkle the powder on the surface of affected pots or mix one cup of diatomaceous earth with 4 pints of water and spray it over the plants. It will coat the plant’s leaves and soil with a powdery residue that sticks to the ant’s feet.

4. Replace the soil

replacing ants' nest soil

Image credit: @urbangardenerto

Another effective and easy way to remove an ants’ nest from your plant pot is to remove the plant and replace the soil. Carefully remove the plant from the pot and remove as much soil as you can, using water to remove the final traces. It’s a good idea to move the plant away from its intended location while you do this as there will be ants everywhere!

Remove all remaining soil from the pot and give it a wash before adding fresh soil. You can also mix potting soil with diatomaceous earth at a ratio of 20:80 earth to soil to prevent further infestation. Replace the plant and water with an insecticidal soap solution.

5. Battle them with baking soda 

Did you know that bicarbonate of soda, also known as baking soda, can be an effective ant killer?  Baking soda reacts with the acid in the ants’ tiny stomachs and this chemical reaction will prove fatal. It is, however, a fairly slow-acting treatment and you won’t’ see noticeable results for days, possibly even weeks.  Ants will actively avoid baking soda and it can be used as an effective deterrent.

You may have heard that some ants don’t like sugar, preferring protein instead. So-called grease ants or protein ants aren’t found in the UK and, in fact, most ants aren’t especially fussy eaters and will be attracted to the sugar in traps.

To make a baking soda trap, you’ll need to disguise the bicarb by mixing it with something sweet.

To make a solution: mix 3 teaspoons of sugar to 3 teaspoons of bicarbonate of soda.  Add the bicarb-sugar mix to small lids or containers which you can place in the affected plant pots. The ants will feed on the powder and take pieces down to feed the colony. It might take a few days to work on all the ants in the colony and it’s not the most effective method for removing ants but, if you have an ant problem, and a tub of baking soda handy, it’s worth a try!

6. Use natural repellants

natural ant repellants

Image credit: @bradley_oils

Ants love honeydew but they can’t stand citrus, peppermint, coffee or cinnamon. Try applying any of these around the base of the plant to keep ants at bay. You can also mix your own anti-ant solution.

Concoct an orange solution by boiling the rinds of 6 oranges in water for 15 minutes, When cooled, blend the water and rinds and pour the solution over the plant.

Pouring boiling water into the plant will kill any ants you can see but it’s unlikely to reach all the ants and most will just scurry out of the way, it can also damage your plant so isn’t an advisable solution.

Conclusion

It may be tempting to blast ants with a pesticide spray but these are so harmful to the environment, we don’t advocate their use. They’re also often unsuitable for use on or near plants and aren’t especially effective.

Introducing natural enemies, using pesticide-free solutions and re-potting your plant if the ants’ nest is an issue should be the first line of defence.

Don’t forget, these tiny insects have survived extreme climate change, can carry 3 times their body weight and can communicate with each other through clever chemical release. Maybe it’s time to see these brilli-ant creatures in a new light.

How to get rid of an ants’ nest in a flower pot-min

Save this pin for later

What to Do in the Garden in January: 8 Gardening Jobs

The festive season is behind us and we’ve enjoyed the warmest New Year’s day on record. Although the days are slowly getting longer, they can still seem gloomy and dark. If your garden looks a bit neglected, grab your hat and gloves, it’s time to head outside and beat the January blues!

Here’s a list of what to do in the garden in January:

1. Tidy up

tidy up january garden job

January is the perfect time to head outside and tidy up the garden. Image credit: @susanshomeandgarden

Clear leaves from paths and decking. Leaves can be added to your compost bin or bagged up to create leaf mould. Make a few holes to allow some air to circulate and leave Mother Nature to do the work for you. When you pot up new plants early in the summer, add some of this organic leaf mould to the soil. It should be crumbly in texture and well-rotted.

Decking can be scrubbed to get rid of moss and algae and check pots for moss and weeds to get them spring-ready too.

Prune back any leggy plants and branches overhanging paths. Prune roses, remove old brown stems and leaves and compost them. Annuals can be completely removed to make space for this year’s plants. One word of caution; do not cut back hydrangea heads as the flowers offer some protection against frost. Prune these later in the spring when the frost risk is over.

Protect delicate plants if the weather forecast is really harsh. Use fleece, bubble wrap or even old tablecloths if snow is predicted. These will provide enough warmth to protect plants temporarily. Remove protection after the snow has melted or the frost has retreated.

protect plants with horticultural fleece

Plants like to be warm too. Image credit: @gardenskill.uk

Wash plant pots. Plant pots can be rinsed thoroughly in preparation for your spring seedlings. Allow them to dry and then stack them up tidily in time for planting.

Paint garden furniture and sheds. On a dry day, you can paint furniture and varnish (or treat) wooden tables, benches and sheds to prevent rot and cracking.

Clean and oil tools. Shears, pruners, saws, secateurs, trowels, forks and spades will all benefit from a thorough cleaning. Oil tools with moving parts to keep them in good condition. Sharpen any cutting surfaces, give them a few drops of oil and make sure to check the hosepipe and automatic watering system for any leaks.

Give your lawn some TLC. Don’t cut the grass until it starts growing again is the first golden rule. Rake up fallen leaves to allow the grass to have full access to light, and then pack them into leaf mould bags. Dig out any moss as soon as you spot it. You can also tidy up the edges using a sharp edging tool.

2. Re-design, move plants and order seeds

gardening diary

Keep a gardening diary for reflection and new ideas. Image credit: @inkpotandpen

Now it all looks neat and tidy, think about what worked well last year and which areas could do with a re-think. If you keep a gardening diary, have a look at the photos from last year and then choose seeds for summer. If you don’t keep a diary of the garden, I thoroughly recommend this as a new year’s resolution.

You can write notes about areas that worked well and add pictures. On a wet January day, this provides me with a visual memory of last year and brings back the warmth of summer. It’s well worth recording ideas about companion plants, which plants the butterflies liked or effective planting combinations.

3. Fertilise fruit trees and flower beds

fertilize fruit trees and flower beds

Image credit: @hozelock

Get composting. After a long, wet December, my compost bin is full! It contains fallen leaves, vegetable peelings and leftovers; a treasure trove of goodness ready to spread on the garden. Fruit trees will really benefit from a layer of compost now, helping them grow well through the next fruiting season. Apple, pear, plum, cherry and apricot trees all need a layer of compost about 2 inches thick spread around their roots. They will reward you later in the year with luscious fruit.

Frost protection. A top layer of compost will also protect your delicate plants from really cold weather. Dahlias will survive in the ground provided there is a thick layer of mulch over the top.  As well as providing insulation in cold weather, compost will enrich your soil year on year, adding nutrients (and worms) and building fertility and natural balance.

Strawberry beds can be weeded, then spread a layer of compost over these too. It’s a great time to pot up strawberry runners as well. These are the tiny seedlings that develop on long stems away from the mother plant. Just place a small pot of compost next to the main plant and pot the runner into it. It helps if you weigh down the stem with a stone to keep the roots in the pot. When roots develop, you can cut this plant away from its mother and re-plant into its permanent position in spring.

4. Get the greenhouse ready!

clean the greenhouse

Image credit: @squires_gc

There’s nothing like a good clean of the greenhouse to make you feel that spring is just around the corner. Remove old tomatoes and cucumbers and any other plant remains from last year. Ensure any moss is removed too and clean the windows.

As well as making you feel good, cleaning helps to remove disease, not forgetting any lurking slugs and snails who like the warmer temperature indoors. Remove the lot to your compost heap.

More on this: 13 Ideas for Growing Greenhouse Winter Vegetables

5. Protect your trees

Wrap your fruit trees with sticky bands to trap any climbing bugs and generally protect them from pests. Prune any overhanging branches so that storm damage is limited.

If it snows, remove snow from branches that look likely to break. Keep delicate trees (like citrus and olive) indoors until there is no danger of frost damage.

6. Plant salads in the greenhouse and hardy seeds outside

aromatto basil seedlings indoors

Image credit: @willowcreekblooms

Indoors: We still have a fair bit of winter to get through before we can plant outside but many salads planted now will germinate, provided the temperature is high enough. I planted mustard seeds in my greenhouse before Christmas and they are already growing. Lettuce and coriander will usually grow well this time of year, provided they are not planted outdoors in cold, wet soil.

Outdoors: You can plant onions, broad beans, peas and garlic now. All of these like rich, nutritious soil so weed well before planting and dig in some manure and compost to give them a good start.

7. Switch on your heated propagator

heated propagator with lights

Turn up the heat! Image credit: @wyegrow

If you have a greenhouse, then start a heated propagator in there and get planting tomatoes, cucumbers and even aubergines towards the end of the month. Provided the frost is kept outside seeds will respond to heat.

A sunny windowsill will also give seeds a head start. Herbs like parsley and basil prefer warm weather to germinate, so extra heat may persuade them to germinate early. That way, these early herbs can be planted in your greenhouse by March and by April, you can have a good selection of spring greens.

8. Weed and plant spring bulbs

weed and plant spring bulbs

Image credit: @stephanie___hope

If you’ve already got spring bulbs planted, then weed the topsoil around them carefully. Hardy bulbs can be planted, provided the ground isn’t frozen so choose some bulbs in your local garden store and start planting snowdrops, daffodils and tulips. The first to appear will be snowdrops, then multi-coloured crocuses, followed by grape hyacinths. Before you know it, daffodils will poke their cautious shoots above ground and we can look forward to a dash of yellow.

FAQs

What will grow in my fruit and vegetable garden in January?

garlic through the snow

Garlic will grow happily in the snow. Image credit: @allotmentcafe

Broad beans and peas are hardy and providing the soil is friable enough to plant seeds, they won’t mind a bit of cold weather.

Garlic needs cold weather! When I lived in Hungary, the first thing people asked me on my return to work after the festive season was “have you planted your garlic?”.  They told me that frost and snow actually improve the flavour so get planting now. Just separate a garlic bulb into individual cloves and plant each one. By June, your cloves will have made a whole new bulb. Great for younger gardeners!

Brassicas and leeks: If you planted these last year, then now’s the time to weed any overwintering cabbages, cauliflower or winter sprouting broccoli and firm up the ground around them as brassicas like to be sturdy. Removing any weeds gives vegetables like leeks a better chance to produce thick stems. Sprouts and cabbages will continue to grow in this period.

How can gardeners help our natural world in January?

We all know the disastrous statistics about climate change but there are many ways gardeners can give Mother Nature a helping hand.

save the bees

Image credit: @myrosebuddha

Plant a tree

Who hasn’t heard the advice about planting trees? Do your bit by planting one. Even if you only have containers, many trees will grow well. Bay trees are fabulous in pots as it restricts their size and you can pick bay leaves regularly. Hang them to dry before using them.

Fruit trees grafted onto rooting stock mean their height will be limited so a large pot will allow you to pick cherries or apples providing that you keep adding a top layer of compost each spring and autumn, to nourish the growth.

If you have garden space, then choose a tree that looks good in all seasons. Hazelnuts produce delightful catkins in spring, then abundant foliage followed by a colourful leaf show in autumn with a harvest of tasty nuts to pick.

meadow border at sunrise

Let part of your garden grow wild. Image credit: @tinaworboys

unusal can planters

Have fun creating unusual planters. Image credit: @cangrowchallenge


What to do in the garden in january 8 gardening jobs-min

Save this pin for later

15 Raspberry Pests and Diseases You Should Know About

Although raspberries are generally easy-to-grow and care for plants, there are quite a few pests and diseases that may affect your raspberry plants. Here are the most common ones to be aware of.

Raspberry pests

1. Raspberry sawfly

raspberry sawfly

Image credit: @d.graeme

Sawfly damage can be identified by the look of the plant or by finding the culprit. The leaves will appear like skeletons, sparsely covered in small veins that look like lace. The large veins of the leaf are usually left intact.  

The small, green larvae can be picked off by hand or sprayed regularly with a horticultural soap, this won’t harm the plant or the environment.

sawfly leaf damage

Image credit: rosemulvey

2. Raspberry beetles

raspberry beetles

Image credit: @jonathan.willow

Raspberry beetles are harmless to the plant. They do however produce grubs that will devour any fruits before you can get to them. Raspberry beetles are tiny brown, hairy beetles that usually live in the soil.

You can buy water traps that are effective at controlling raspberry beetles or try an organic insecticide.  You can also try encouraging natural predators; birds and ground beetles.

3. Cane midges

Cane midges are tiny flies that usually live in the soil. The female fly will lay eggs on emerging canes. The grubs then damage the cane. You might notice brown spots on your raspberry canes when cane midge is present.

Cane midges alone don’t do much damage but they do create wounds that can get infected by fungus. Cane midge is usually grouped together with spur blight and cane blight for this very reason.

There is no control for the cane-midge but you can take steps to remove infected canes from your raspberry plants (see below).

4. Weevils

raspberry weevil

Image credit: Tom Murray

Weevils are tiny insects that feed on the leaves and roots of your raspberry plant. Damage to the plant is usually noted first and can be identified by large notches chewed into the leaves. Damaged roots will cause plant growth to slow and it will look sickly.

To control weevils, try introducing entomopathogenic nematodes. These are tiny roundworms that occur naturally in soil and will reduce the number of weevil larvae.

Raspberry diseases

Bacterial infections:

5. Fire blight

fire blight

Image credit: @thehobbyhomestead

Fire blight is a bacterial infection that affects the tips of canes. The tips will usually turn black and fold over like a hook. You might notice the affected cane oozing a cream coloured liquid if conditions are very humid.

There is no cure for fire blight, remove any affected canes and destroy them, taking care to disinfect garden tools after use.

Viral infections:

6. Raspberry bushy dwarf virus

This viral infection causes the raspberry plant to become dwarfed. The cane height will be reduced, leaves will have a yellowish appearance and fruits become quite brittle.

The only way to control this virus is to plant resistant cultivars.

7. Leaf curl virus

leaf curl virus

Image credit: @laissezfairefarm

Leaf curl causes the leaves to remain small and curl inwards. If a cane is affected by this disease, the new shoots will grow back shorter the next year and appear stiff and yellow in colour. They are also quite brittle.

To treat this virus, remove and double bag any affected plants, helping to prevent spread to nearby plants.

8. Raspberry ringspot virus

Raspberry ringspot is characterised by delayed leaf development. Once the leaves do develop, they have yellow veins and yellow rings on them. The fruit will also be poorly formed and the canes may have a yellow colouration.

This virus is transmitted by nematodes and by seed. It can be treated by adding nematicides to the soil.  Try to keep your raspberry patch as weed-free as possible as weeds can act as hosts for many viruses.

9. Raspberry mosaic disease

Raspberry mosaic disease causes the canes to grow back shorter and more brittle. The leaves will also be affected, curling upwards. Green blisters can be seen on the leaves along with yellow mottling.

Unfortunately, there is no cure for this disease, affected plants need to be removed and destroyed.

Fungal infections:

10. Cane blight

Cane blight can be identified by looking for brown cane midge wounds that have developed purple cankerous growths. These cankers enlarge and circle the cane which causes wilting and death of lateral shoots.

Cut and dispose of any affected canes, disinfecting tools after use.

11. Spur blight

Spur blight can be identified by looking for purple-brown lesions under leaves or buds. These lesions are usually found near the ground since cane midges can’t fly. This fungus usually takes advantage of wounds caused by cane midges.

Remove and dispose of any affected canes, taking care to disinfect tools after use.

12. Grey mould

Grey mould is caused by the fungus Botrytis cinera. It causes browning and drying of blossoms. It also affects the fruit leaving light brown spots that grow rapidly until the fruit is covered by a grey powdery substance.

Try to plant resistant cultivars to reduce the likelihood of grey mould developing.  If it does, remove damaged fruit and harvest ripe fruits as quickly as possible.

13. Yellow rust

yellow rust

Image credit: @librarylottie

This fungus forms yellow-orange pustules on the underside of leaves. It also weakens the plant which leads to premature leaf loss and increased cold-weather damage.

If just a few leaves are affected, they can be picked off and disposed of to help slow the spread of the disease. Try to make sure canes aren’t overcrowded to keep air circulating freely.

14. Raspberry leaf spot

Raspberry leaf spots usually appear as dark green spots on new leaves. As the disease progresses, the spots will turn lighter until they eventually fall out, leaving a hole in the leaf. These leaves might also fall off prematurely.

Improving air circulation is one of the best ways to help prevent this disease. Thin out and prune crowded canes to help.

Oomycete infection:

15. Root rot

Root rot is easily recognised by looking at the leaves of your plant as well as inspecting the soil. Leaves will usually have scorched edges, take on a yellowish-orange colour and begin to fall off. The soil will be smelly and very moist. The whole plant will appear sickly and the roots will have a brick-red colouration when the outer surface is scraped away.

You can try treating root rot by lifting the plant, rinsing the roots in water and carefully cutting away the affected roots.  If the plant is severely affected, dispose of the plant. Plant resistant cultivars if you can.

15 raspberry pests and diseases you should know about-min

Save this pin for later

10 Autumn Flowers For Bees (Best UK Bee-Friendly Plants)

Are you passionate about saving bees? Then this article is for you. Bees need a source of food even in the harshest of months. Although honeybees huddle together for warmth in the hive and feed on their own supply of honey during winter, some will venture out on warmer autumn and winter days to find fresh nectar. To help these endangered insects and make your garden more colourful in the process, try planting flowers for every season.

In this article, we’ll look at the perfect bee-friendly flowering plants for an autumn garden.

Autumn Flowering Plants For Bees

Credit: Pixabay

How to help bees survive

Bees are quickly becoming endangered all over the world. If this matters to you, you can create a bee-friendly garden to help these essential insects. Now you might be wondering how exactly to achieve this goal… Here are a few quick tips:

1. Plant fall flowers that bees enjoy

Flowers will be the main attractant for bees. If you don’t have any bee-friendly plants, you might never see these insects around. In the list below, you’ll find a few flowers that will support bees in autumn.

2. Put up a bee box

Bees also need somewhere to live and raise their young. If you’re allowed, put up a bee box in an isolated spot in your garden. In spring when the bees are swarming you can put attractants in the box to encourage them to start living there. This way you’ll permanently have bees in your garden and you might even get a bit of honey out of it.

3. Add plants that flower at different times of the year

It’s best to support the bees during every season. You can plan your garden in such a way that there’s always a flowering plant somewhere. You shouldn’t have a problem finding plants that flower in spring and summer but autumn and winter might be a bit more tricky.

In the list below, you’ll find a few flowers that will help save the bees in autumn. Also, check out our article on winter flowering plants for some ideas for the bees during this harsh season.

4. Put out honey, sugar water or bee food

To further help the bees, you can put out a tiny container with honey, sugar water or bee food in it. You can buy bee food online or from any beekeeping shop. These will help the bees to survive harsh months in autumn and winter when few plants are in flower.

5. Avoid pesticides in your garden

One of the worst things you can do for a bee-friendly garden is spray pesticides. These will not only kill the targeted pests but also the bees you’re trying to save. If you have a problem with pests, try some homemade natural remedies instead.

6. Encourage the neighbours to participate

If you want to bring bees to your garden, encourage your neighbours to accommodate these helpful insects too and create a bee-friendly neighbourhood. Every little bit helps to save these important pollinators.

As an added bonus, you’ll also see other pollinators like butterflies arriving. These in turn will attract more birds to your garden. Overall, it’s a win-win situation for everyone.

Best bee-friendly autumn flowering plants

If you’re not sure which flowers will work in an autumn bee-friendly garden, consider the following options below.

1. Asters

Asters are particularly good for attracting pollinators such as bees and butterflies to your garden.  There are many varieties of asters, however, so make sure to choose one that flowers in autumn.

These flowers will provide bees and other pollinators with a source of pollen and nectar which is vital to their survival. If you want to help these insects, plant some asters to help them out.

Fortunately, asters are very versatile. You can use them as borders between garden beds, plant them in rock gardens or even add them to your wildflower bed. The options are almost limitless as long as you choose the correct variety for your needs and research their care beforehand.

asters Autumn Flowering Plants For Bees

Credit: Pixabay

2. Snowdrops

Snowdrops are an excellent late winter and early spring source of food for pollinators such as bees. There are many varieties of snowdrops, however, so make sure to choose a variety that flowers in autumn. Most snowdrops are known to flower from mid-winter through spring, but by doing some research, you’ll be able to find one that flowers much earlier.

These flowers look stunning in an otherwise red autumn garden. They will lure honeybees to your property and offer them a much-needed source of food. By planting these flowers, you’ll be helping the honey bee survive winter.

snow drops Autumn Flowering Plants For Bees

By Ian Kirk from Broadstone, Dorset, UK – The bees are out! Uploaded by tm, CC BY 2.0

3. Hellebores

Hellebores aren’t normally autumn flowering plants, but there are a few varieties that will bless your garden with some colour in this transitional season. You will have to do some serious research, however, to make sure you choose the correct variety.

Bees love this plant and will be attracted to your garden if you have these beauties around. If your goal is to help the bees, you definitely can’t go wrong here. These plants will also help the bees during other seasons.

hellebores Autumn Flowering Plants For Bees

Credit: Pxhere

4. Anemone

Anemones are a great addition to any garden that favours and supports pollinators like bees and butterflies. They tend to flower from late summer all the way through autumn and will bathe your garden in stunning colours.

Anemones are an excellent source of pollen and nectar and bees just can’t get enough of them.

Anemone Autumn Flowering Plants For Bees

Credit: Pixabay

5. Heleniums

Helenium is great for a bee-friendly garden in late autumn. This perennial look great paired with grasses, but you can plant it alongside just about anything. This plant is also very popular as cut flowers and great at attracting wildlife.

Once the flowers start to die, cut them back. This will extend flowering and help out the bees for longer.

Helenium-Pollination-Bees-autumn

Credit: Maxpixel

6. Sedum

Sedums produce stunning flowers that bees can’t resist. They will flock to this plant as soon as it’s discovered for its pollen and nectar. You can happily add this addition to your garden if you’re going the bee-friendly route. You will definitely help the pollinators to prepare for winter.

Besides being a great source of food for insects, it also looks great. This plant will bring a last bit of life to your dying garden as it prepares for winter.

Sedum Autumn Flowering Plants For Bees

Credit: Pixabay

7. Crocuses

There are several kinds of crocuses, most don’t flower in autumn. If you want one for your autumn garden, you’ll need to do some research. There definitely are crocuses that prefer to flower at this time of year.

Bees will also adore you for putting in the effort to find an autumn crocus. They love this plant and need it to prepare for surviving winter. The crocus that blooms in autumn isn’t their favourite, however, so it would be better to go for the spring variety if you can.

Crocuses Autumn Flowering Plants For Bees

Credit: Pixabay

8. Sunflowers

Sunflowers will always brighten up any garden. There are a few different varieties of different sizes. These flowers are excellent for gardens that encourage bee activity. They have plenty of pollen and nectar for pollinators. The seeds can also be dried and placed out for birds once winter really hits.

You can use these flowers as dividers between beds, to create some shade for shade-loving plants or just as a background plant to cover up a fence or wall.

Sunflowers Autumn Flowering Plants For Bees

Credit: Pixabay

9. Honeysuckle

Most varieties of honeysuckle bloom in spring. Fortunately, there are a few varieties that will flower through summer into autumn. These are the ones you’re looking to add to your bee-friendly autumn garden.

More on this: Which Trellis For Honeysuckle?

This plant has highly fragrant blooms that will attract bees to your garden in no time. You can also place a beehive near this plant for bees to stay in your garden permanently.

Honeysuckle Autumn Flowering Plants For Bees

By Zeynel Cebeci – Own work, via Wiki CC BY-SA 4.0,

10. Echinaceas

Echinaceas, also known as coneflowers, resemble purple daisies. The centre of the cone is made up of multiple florets that contain pollen and nectar. This is the part of the flower that attract bees and other pollinators.

These flowers grow best in an area with well-drained soil and full sun exposure. You can expect them to flower from around mid-summer to early autumn.

Coneflower Autumn Flowering Plants For Bees

Credit: Pxhere

Final thoughts

Now that you know a bit more about which flowers will work in an autumn garden, it’s time to go shopping. Ask the local authorities if you’re allowed to keep a bee box in your garden before you get one.

Thank you for helping the bees! Have fun planting!

FAQs

What flowers do bees like in autumn?

Bees like flowers that offer them something like pollen or nectar. Some flowers you can consider are asters, sunflowers, ecinaceas, honeysuckle, snowdrops and crocuses.

What can I plant in autumn for pollinators?

If you want to help the bees, consider planting flowers with lots of pollen such as sunflowers, honeysuckle, echineceas, asters, sedum and heleniums.

What flowers attract bees in the winter?

Any plants that flower in winter will attract bees. Some of the best plants for bees in winter are snowdrops, alyssum and marigolds.

You Might Also Like: 7 Vivid Winter Flowering Climbing Plants

10 bee-friendly autumn flowering plants for attracting bees-min

Save this pin for later

10 Best Companion Plants For Autumn Joy Sedum

Do you love Autumn Joy sedum? If you want one of these beauties in your garden, this article is for you. As you already know, this sedum looks great on its own, but it’s always good to complement it with a few other plants.

If you’re wondering which plants make the best companions for Autumn Joy, keep reading.

autumn joy sedum

Autumn Joy Sedum by mwms1916

What can I plant with Autumn Joy sedum?

It’s not difficult to find companions for this popular plant. All you have to do is make sure they have the same care requirements and plan the layout. Here are a few plants that go well with Autumn Joy to get you started.

1. Fountain grass

Fountain grass is a perennial ornamental grass that usually grows from one focal point or mount. This plant gets its name from the fountain-like appearance of the leaves. It’s very easy to care for and pairs well with Autumn Joy.

This plant is ideal for placing in garden borders, making it an ideal companion for sedum. It won’t become invasive and comes in a range of different sizes depending on the variety you choose.

To get the most out of this plant, use it as a background to shorter plants and enjoy the showy display when it flowers.

fountain grass

Credit: Max Pixel

2. Russian sage

Russian sage is very popular because of its silver foliage and purple, lavender like flowers. This plant can be used as ground cover around your Autumn Joy. The purple flowers will complement the much bigger sedum plant and its flowers.

This plant is very hardy but prefers a full sun location. Russian sages are fairly drought tolerant so water sparingly. In very dry conditions, you can water it every few days. Its ability to tolerate dry spells also makes it an ideal companion for Autumn Joy since that plant doesn’t like too much water either.

russian sage

Russian Sage by Robert Ashworth

3. Black-eyed Susans

If you want something that stands out, you can’t go wrong with black-eyed Susans. These popular wildflowers belong to the aster family. They tend to take over so make sure to keep them in check. Black-eyed Susans will perfectly complement the Autumn Joy with their yellow leaves and blackish purple centres.

These flowers need to be watered a bit more regularly than the sedum. For this reason, make sure there’s a little gap between the species to avoid overwatering the Autumn Joy.

black-eyed susan

Credit: Pixabay

4. Asters

Asters are daisy-like perennials that come in many varieties and a wide range of colours, perfect for pairing with your Autumn Joy.

Asters flower quite late in summer and into autumn. This makes them very attractive to bees and other pollinators when other blooms have faded. You can plant them in borders or simply let them grow in a wildflower garden bed nearby.

asters

Credit: Pxhere

5. Blue fescue

Blue fescue is another ornamental grass that looks really good alongside Autumn Joy. Its characteristic green-blue leaves will contrast against the pink flowers of the sedum. You can use them together as border plants or separately in different garden beds. You can even plant blue fescue around your sedum to create an attractive border.

These grasses are very easy to grow and care for. Simply make sure you water them enough and give them the proper light conditions to thrive.

6. Dianthus

Dianthus flowers are annuals, biannual or even perennials that are usually used in borders. This makes it an ideal plant to use alongside sedum. The spicy fragrance of these flowers is what makes them most attractive.

Also called pinks, the dianthus plant produces stunning pink flowers that will liven up your garden. They can be used to frame the sedum or help to mark a border between different flower beds.

dianthus

Credit: Pixabay

7. Hostas

Hostas are perfect for framing the shaded edges of your garden and a great partner to the sun-loving sedum. The stunning display of different greens and their ability to fill a shaded spot where other plants just won’t grow is what makes them most attractive.

Hostas produce beautiful flowers during summer. This will also help to complement your sun-loving Autumn Joy.

hostas

Credit: Pixabay

8. Echinacea (coneflower)

Echinaceas are easy to care for perennials that will go beautifully with your Autumn Joy sedum. These flowers are quite drought resistant, making them ideal companion plants.

They’re also excellent at attracting bees and other pollinators to your garden. These flowers need quite a bit of sun to survive. You can plant them in a ring around your sedum or place them in a wildflower garden bed.

coneflower

Credit: Pixabay

9. Goldenrod (Solidago Goldkind)

Goldenrod is a perennial flowering plant that looks great paired with Autumn Joy. They’ll attract beneficial insects to your garden and make the sedum stand out, providing a striking contrast against its yellow flowers.

Use them together in garden borders or create a ring of goldenrod around your sedum. Young goldenrod leaves are edible and often used in herbal teas.

solidago

Credit: Pxhere

10. Boltonias

Boltonias are aster-like perennials that produce a sea of flowers in late summer. They are often used in borders and need to be divided often to keep them under control. They’re often used to neutralise the colours of your garden with their grey-green foliage.

Their flower and foliage colours are what makes this plant a popular companion for Autumn Joy.

boltonias

Boltonia asteroides by Alvin Kho

FAQs

Will Autumn Joy sedum grow in shade?

Yes, but shady conditions will reduce flowering, cause the plant to become leggy and may lead to root rot if not watered properly. These plants prefer to grow in full sun unless grown in a very hot environment.

Learn more: Tips for Growing a Shade Garden

Where does Autumn Joy sedum grow best?

Autumn Joy sedum grows best in an area with very well-draining soil and full sun. Sedums make excellent additions to a drought-tolerant garden. It’s best to keep the soil of your Autumn Joy on the dry side. They also don’t like very fertile soil so don’t add too much compost.

Final thoughts

Now that you know a bit more about the plants that make great companions for Autumn Joy, it’s time to choose what you’d like for your garden. You’ll be able to find most of these plants at your nearest nursery, or you can buy them online.

Happy gardening!

10 BEST COMPANION PLANTS FOR AUTUMN JOY SEDUM-min

Save this pin for later

Winter Pansies Growing Guide: Easy Winter Flowering Plants

Would you like to inject some colour into your dull winter garden? Pansies won’t let you down. These stunning smiling flowers will bring some life back to winter. In this article, we’ll look at everything you need to know to grow and care for pansies.

Winter Pansies Growing Guide

By Colin Smith, CC BY-SA 2.0, via Wiki

What are pansies?

Before you run off to buy your favourite winter pansies, it’s important to know a bit more about this plant. This will help you to figure out when to plant pansies, where the best place is to help them grow and how to care for them.

The first thing you’ll need to know is that pansies are short-lived perennials. In some climates, however, they are annuals. Most of the time gardeners treat pansies as annuals regardless of the climate even though they can technically survive for two to three years if cared for properly.

The reason for keeping them as annuals is mostly due to their growth pattern in summer. Pansies tend to become quite leggy in warm temperatures which can look unattractive to some. The best time to have pansies around is from autumn until the end of spring.

These pretty flowering plants will flower even in snow. The flowers have heart-shaped overlapping petals with patterns that appear to be a smiley face. You do, however, get quite a few varieties of pansies with a range of different colours and patterns.

To complement your winter pansies, plant them alongside violas, primroses, trailing lobelia and sweet alyssum.

Winter Pansies viola

Credit: Pxfuel

A quick guide to growing pansies

In-depth growing guide for winter pansies

Pansies aren’t difficult to grow. As long as you water them properly and feed them every now and then, they should be just fine. If you want to know a bit more about pansies than just the basics, keep reading.

Lighting

If you live in a cool climate, you can plant your pansies in an area with full sun. In warmer climates, it’s best to keep them in an area that gets morning sun and shade throughout the rest of the day. Midday and afternoon sun may be too much for these cold-loving plants.

If kept in containers, you can move them around to the appropriate light conditions. Just keep in mind that these plants are even less tolerant of heat when kept in containers. You’ll need to make sure you pay attention to your pansies to keep them alive and blooming away.

Watering

The biggest problem people tend to have with their pansies is underwatering. If your pansies look a bit sickly, try giving them more water. Generally, it’s a good idea to water your pansies every day.

If you’re scared of overwatering, make sure the top inch of soil is dry before you water. Pansies don’t like to dry out completely so make sure to pay special attention to them on hot days.

This is especially important if your pansies are planted in an area with full sun or when kept in containers. These plants may need to be watered more than once a day if the soil tends to dry out quickly. If your plants aren’t getting enough water, you’ll quickly notice them wilting.

Winter Pansies watering

Credit: Pixabay

Soil

Pansies are best kept in moist, humus-rich, well-drained soil. These plants despise drying out but won’t do well in standing water. It’s best to find a comfortable in-between. To keep the soil moist, you’ll need to make sure that you use something that retains some water. The humus content should help with this.

To make sure the soil still drains well, you’ll need materials such as bark, perlite and vermiculite. These will help water to drain slowly so the plant can absorb what it needs to survive.

The humus content provides the pansies with a slightly moist, acidic environment to grow in. It will also help to retain some moisture for the pansies to absorb.

It’s also best to monitor the soil temperature before planting pansies. Your pansies will grow best in a soil temperature that’s between 7 and 18°C (45-65°F).

Winter Pansies soil

Credit: Pixabay

Temperature

Pansies are frost tolerant plants. They do well in temperatures far into the minuses (or teens if you’re working in Fahrenheit). Pansies prefer cold areas, they can be grown in warmer climates as well but will become annuals instead of perennials.

In the UK pansies will mostly be grown as annuals. If you live in an area that gets severe frost, you will need to protect your pansies by using mulch. If you’re only dealing with snow, there’s no need to worry. Snow insulates and protects pansy plants while they continue flowering throughout.

Winter Pansies frost

Credit: Pixabay

Expected size

Pansies come in different sizes, patterns and colours. What you decide to choose for your garden depends on taste and climate. The variety referred to as winter pansies grow about 15-23cm (6-9″) tall and 23-30.5cm (9-12″) wide.

To make sure your plants aren’t overcrowded, make sure your single plants are surrounded by a minimum space of around 25cm (9″) all around.

Fertilising

To keep your pansies blooming, you will need to feed your plants a balanced all-purpose fertiliser. It’s best to choose a solid slow-release fertiliser. This way you can be sure that your plant gets the nutrients it needs even in winter when snow may make fertilising more difficult.

If your plants will be kept in containers, a weekly liquid fertiliser feed will do the trick. Just make sure to water thoroughly before applying liquid fertiliser to prevent burn damage. The only fertiliser that should be avoided is one with high nitrogen content. This fertiliser isn’t necessarily bad for your plants, but it will reduce the number of blooms quite drastically.

Pruning

The best way to prolong flowering in your pansy plants is to deadhead any faded or dead flowers. This means picking out the flowers in question and snipping them off at the base where it joins the plant.

Once your plant starts to become leggy, most people rip them out and replant it next season. You can, however, continue to care for this short-lived perennial if you like.

Propagating

Pansies aren’t the easiest plants to grow from seeds. They are quite finicky and should be barely covered by soil to succeed. This makes it very difficult to not wash the seeds away in the first few days before the seedling emerges.

Most gardeners opt to skip the seedling stage. They simply buy their plants ready for transplanting from a nursery. This is definitely the easier way to do it unless you don’t mind quite a bit of disappointment until you get the hang of growing pansies from seeds.

Did you know?

Pansies are more than just a pretty flower in your garden. These beauties are edible too. They are said to have a mild minty flavour and are often used as a garnish in salads and desserts.

edible Winter Pansies

Pansies are edible too. Credit: Pxfuel

When to plant pansies

The best time to plant pansies is in autumn. By doing so, you give them a chance to establish before winter hits. You can also plant pansies in spring, but doing so means you’ll need to help them survive summer.

Pansies aren’t the best heat-tolerant plants. If you live in a climate with very hot summers, these aren’t the flowers for you. Pansies get very leggy when exposed to summer heat. For this reason, they are often planted as annuals during autumn.

Pansy problems

pansy problems

Image credit: Pinterest

Pansies aren’t the hardiest of plants. For this reason, you need to be wary of quite a few problems. Here’s what to look out for:

Mosaic viruses

The signs for mosaic viruses are quite variable. Some signs you can look out for are irregular leaf mottling (yellow, light and dark green patches on the leaves), stunted, curled or puckered leaves with lighter veins than normal, dwarfed plants compared to healthy neighbours, fewer flowers than normal, and dwarfed, deformed or stunted flowers.

Downy mildew

This disease thrives in humid conditions. You can expect to see pale green to yellow spots forming on the leaves that later turn brown. You might also see dark purplish fuzz growing on the underside of the leaves. Most fungicides will help to sort out this problem. Also, try to reduce the humidity.

Powdery mildew

The first sign of this disease is pale yellow spots on both the upper and underside of the leaves. These spots slowly merge into larger blotches. You will then notice a powdery substance appearing on the affected areas. Treat your plant with a fungicide to get rid of this problem.

Crown and root rot

Crown and root rot is often caused by overwatering in poorly drained soil. The soil will force the water to stand around for much longer than necessary. This means the plant’s roots won’t be able to breathe and start to die off.

The earliest symptoms of this problem include wilting despite being in wet soil, yellowing of the leaves, a bad smell around the roots and mould appearing around the base of the plant.

To solve this problem, water on a regular schedule and make sure that the first inch of soil is dry before watering again. Also, repot with well-draining soil to avoid standing water.

Rust

Rust appears as pale spots that eventually turn into spore-producing structures called pustules. These structures are usually rust coloured, hence the name. You can use a fungicide to treat this problem.

Grey mould

Grey mould, as the name suggests, usually appears as grey-brown lesions on the leaves of your plant. It can also be seen on the flowers where they will appear as small grey spots. You can treat this problem with a fungicide.

Spot anthracnose

This problem usually appears as tan or brown irregular spots on the leaves. The leaves will also usually appear distorted, cupped or curled. In severe cases, you will experience dropping leaves. Treat your plants by removing any obviously affected leaves. Spray the remaining leaves with a copper-based fungicide.

Slugs, snails, and aphids

Pests are quite common on pansies, we’re not the only ones that think they’re good to eat! To treat pests, spray your pansies with an organic, pest-specific spray and see our guide for naturally keeping slugs and snails away.

Underwatering

Underwatering is a common problem in pansies. Plants that have been underwatered will wilt, develop brown, dry leaf tips and develop fewer flowers than they would normally.

Leggy pansies

Pansies usually become leggy in warm to hot temperatures. To solve this problem, either grow your pansies as annuals and replant every year or trim back the stems by making a cut right above the last leave set closest to the base of the plant. Make sure to fertilise the pansy afterwards to help it recover.

Final thoughts

Now that you know how to care for winter pansies, it’s time to start growing your own. Just remember to use well-draining soil, water regularly and provide your pansies with enough morning light to keep them growing.

growing winter pansies

Image credit: @khatoani

FAQs

When should I buy winter-flowering pansies?

Pansies usually go on sale in early September in the UK. You can buy and plant them at this time. The latest you should buy them is in mid-October as this allows the plants to establish themselves before winter hits. 

Do pansy flowers bloom in winter?

Yes. Pansies prefer the cold and will start to flower when the temperature drops in autumn. In some areas, they can flower throughout the year. 

Are winter-flowering pansies perennial?

Yes, but most people tend to treat them as annuals. Pansies aren’t the easiest to care for during the summer months and can become quite leggy and unattractive in the heat. 

How do pansies survive winter?

Pansies are very hardy plants that prefer the cold. When snowed on, the snow acts as a protective blanket that insulates the pansies. You can also use mulch to protect your plants in areas with frost. 

What do you do with winter pansies after flowering?

Most people replace the pansies with a plant that will flower in summer. If you prefer, you can deadhead the flowers and keep your plant alive throughout summer.

Happy gardening!

Winter pansies growing guide easy winter flowering plants-min

Save this pin for later

15 Point Checklist for a Thorough Autumn Garden Clean Up

When it comes to cleaning up your garden in autumn, it’s easy to lose yourself in the details. But trusting nature with your garden is often the best way to make sure it stays healthy and beautiful.

Focus on the essential autumn garden cleanup tasks, the ones that really matter. Don’t be afraid of a little disorder on your green patch. It’s part of nature’s way and, just like those shredded leaves that can become mulch for your flower beds, continues the cycle of the seasons.

Of course, that still leaves plenty of essential things to do in your garden this autumn.

autumn garden clean up tips

Credit: Pixabay

What needs to be done in the garden in autumn?

You want to rake excess leaves, clear dead and diseased plants and weeds, remove spent crops, mulch and protect vulnerable plants, and give the grass a final cut.

Autumn is also the time to compost leaves and tidy up your flower beds. Depending on the flowers you grow in your garden, you may have to divide perennials and shelter certain plants.

If the weather is on your side, you can also plant winter crops, which may involve preparing for them your vegetable beds and/or greenhouse, polytunnel, and cold frames.

Read on for tips on all the important things you need to do in your garden before the frosty weather comes.

So, how do you clean up an autumn garden?

Cleaning up an autumn garden may seem like a lot of work. But if you break it down into steps, you’ll find the workload more manageable.

1. Rake or blow the leaves

Leaving a thick carpet of leaves over the ground can be smothering for the grass and living plants and harbour pests. You also want to watch out for leaf piles around the trunks of young trees. They make perfect hiding spots for rodents that may gnaw the young trunks.

The best way to rake leaves is by doing it a bit at a time. This is especially true if you have a large deciduous tree in your garden or many plants that shed leaves around this time of year. If you wait for all the leaves to fall, by the time you finally rake them, they may have already damaged the grass and other low-lying plants.

raking leaves

Rake up the leaves in sections. Image credit: @fgm_f20

Raking is also good for the grass since it helps to aerate it. You may want to use a lightweight plastic rake rather than a heavy metal one. It’s less work on your hands and won’t damage thick grass either.

But don’t get carried away by all that raking. You can also leave some small leaf piles out of the way. They may provide shelter to pollinators over winter.

Tip: Rake or blow your leaves into a pile and use your lawnmower to vacuum them. Then dump the mower bag into your compost bin or straight over the places that could do with a layer of mulch.

2. Compost leaves and the remains of withered plants

If you don’t have a compost bin, autumn’s the best time of the year to build or get one. Through the alchemy of nature, a compost bin will transform this year’s fallen leaves and dead plant matter into rich compost for your soil next year.

More on this: Bin Storage Ideas: How to Hide Your Wheelie Bins and Conceal Your Compost

Speed up composting by mixing carbon-rich brown leaves with nitrogen-rich green plant remains, food and vegetable scraps, and grass clippings. Keep the compost pile slightly wet—or trust the rain to do it. You also want to aerate it by turning it with a fork now and then.

Important: Be careful not to compost diseased plants or their remains. The disease may survive in the compost bin and return next year.

3. Remove spent crops and residue from the vegetable garden

Prune, cut, and dig them up if you have to. If you intend to plant winter crops, start with the beds reserved for them to make sure they will be ready in time for autumn planting.

Tip: Leave the roots of peas and beans in the ground since they provide a rich source of nitrogen, fertilising other crops. Simply cut these plants off at ground level.

15 Point Checklist for a Thorough Autumn Garden Clean Up 1

Remove spent crops and plant winter vegetables. Image credit: @growingyourgreens

Consider sowing a winter crop or green manure to improve the quality of the soil.

The rest of the vegetable beds you can cover with mulch, tarp, or landscape fabric to fight off weeds and preserve them for spring.

Don’t forget to remove bamboo canes, temporary trellises, and other supports that are no longer necessary. Wash them and store in a sheltered place.

4. Tidy up the flower beds

Cut back the perennials that bloom first in spring about 4-5 inches. Think irises, lilies, peonies, and bulbs. Using a hedge trimmer rather than garden clippers can save you time on this task.

Don’t forget to clean up any diseased foliage from roses. You also want to cut or deadhead self-seeding plants. Autumn winds may spread their seeds all over your garden.

You can leave the rest of the flower bed clearing to early spring when the flowers put forth new growth. Not only is this convenient, but it can help beneficial insects find shelter over winter. Keep in mind too that stems with attractive seed heads can be a treat for the birds.

tidy up flower beds

Old foliage can provide shelter for many insects. Image credit: @happyhorticulturist

If you have any tender plants that freezing temperatures may damage, now’s the time to move them to a sheltered place or use winter wrapping materials such as straw or fleece to insulate them.

Tip: Leave some leaves in your flower bed, they will break down and feed the soil. It will save you time from raking now and mulching in spring.

5. Divide and reposition crowded perennials

Got lilies, peonies, or hostas in your garden? Like other perennials, they can benefit from being divided every few years if they’ve become crowded.

A perennial clump needs to be divided if the flowers or the plants in the middle look unwell. Dig out the perennials carefully with a spade. Also with the spade, divide the plants into smaller ones and replant them giving them more space around each other.

6. Prepare the roses for winter

Remove diseased leaves from your rosebushes. You also want to stop deadheading your roses around 10 weeks before the first frost of the year.

If your roses have long stems, trim them to make sure they won’t snap during strong winds. You can also trim back branches that may rub against each other and get damaged.

15 Point Checklist for a Thorough Autumn Garden Clean Up 2

Image credit: @garden_tender_

7. Remove weeds

While tidying your garden, you’ll invariably come across some weeds. Weeding now will save you precious time in spring so you can focus then on planting new flowers and veggies.

Tip: To make weeding easier, do it after a rain so that the soil is loose. Your hands will thank you for it.

8. Give the grass a last cut (and make it longer)

Caterpillars and other soil-enriching bugs like burrowing into autumn grass. Mow it too closely, and you’ll upset them big time. Leaving the grass a bit longer than usual in winter will protect both the soil and the grass.

So, after raking the leaves from your grass, set the blades of your lawnmower to a higher setting. After the last cut of the year, clean your lawnmower and remove the grass from it.

Tip: Got a shredding mower? Use it to turn unraked leaves into leaf little that is nourishing for the soil.

If your grass patch joins footpaths, garden beds, ponds, and other garden features, you can use a gardening knife or edging tool to neaten and redefine its edges before the soil hardens.

cutting grass for winter

Give the grass a final cut. Image credit: @vanpeltyarnies

9. Remove broken branches from the trees

Autumn is not the time for any serious pruning—leave that to spring. But cleaning off any dead branches is good for the trees.

Use sharp pruners to make a cut close to the trunk. You may need a ladder for this task, and someone to hold it, alternatively use a pair of long-handled pruners.

Tip: If you have fruit trees in your garden, make sure to remove any fallen fruit from around them as these may attract pests.

10. Remove leaves from the pond

If you have a pond in your garden, remove any leaves that have fallen into the water. If they rot, they will reduce the quality of the water and affect the wildlife.

Remove any pumps or equipment from the water too. Depending on the size of the pond, you may also want to drain it and clean the water features before winter settles in your garden.

removing leaves from the pound

Image credit: @quberesin

11. Neaten the bushes and ornamental borders

Tidy up ornamental bushes and borders if you want to. But hold back any serious cutting until spring. Ornamental borders shelter beneficial insects.

You don’t want to prune berry bushes either unless you know the cultivar you’re growing needs it. Apply a layer of mulch to the bushes that are less winter hardy. If they are in an exposed area, consider creating a windbreaker to protect them from winter storms.

Don’t forget that autumn is a good time to plant more shrubs and trees. If your garden needs them, go ahead and plant them.

12. Add organic matter to the soil

To improve growth conditions next year, consider testing the soil in your garden. If your soil is very alkaline, amend it with sulphur. If it’s too acidic, use lime.

Once the plants in your garden have entered dormancy, you can add shredded leaves or compost to fertilise the parts of your garden that need it the most. Rotten manure is also great.

This takes a bit of work. But if you work the organic matter a few inches into your soil now, planting and growing things in spring will get easier.

13. Make winter a litter easier for the birds

Do birds stop by your winter garden? Check and repair any birdhouses you may have in your garden. Remove leaves from the bird fountains and birdbaths and clean them up if necessary.

Pumps, fountains, and other mechanisms that may freeze will have to go inside the shed. Until freezing temperatures arrive, try to keep the water in the birdbaths fresh.

More on this: Bird Friendly Garden Ideas

Don’t forget to clean any nest boxes and bird feeders. You can fill the latter with seed mixes and other bird-friendly foods.

winter garden birds

Spare a thought for our feathered friends. Image credit: @psanna_wildlife

14. Get your garden tools and accessories ready for winter

Clean and sand garden tools before putting them away for winter. Disinfect any pruners or shears you’ve used to cut diseased plants. If any tool needs mending, now’s the time to do it or make a note and fix it one winter day when you have nothing better to do.

Use diluted bleach to clean any clay or ceramic pots before storing them inside. You don’t want the frost to crack them, do you?

And don’t forget to remove the water hose and turn off the water if it runs the risk of freezing in winter.

garden tools

Don’t forget to give your garden tools some TLC too. Image credit: @gardenandwood

15. Repair all those things you’ve been putting off repairing during summer

Last but not least, repair the compost bins, raised beds, polytunnels, or cold frames that need it. Also, check any outdoor garden furniture to make sure it’s winter-ready.

Paint any wooden furniture, benches, fences, shed doors, or the like with spray paint containing a sealant. That way you’ll prevent rot and make your garden look nicer, too.

Oh, and if your wheelbarrow wheel has gone flat, now’s as good a time as any to see to it.

FAQs

When should I clean my garden in autumn?

The best time to start an autumn garden clean up is after the first few freezing nights come round. By this time, most of the foliage and the last blooms of the year will have fallen. Perennials too will have entered dormancy.

Avoid cutting back plants too early or you may encourage new growth before winter, which may damage them. It’s often easier and more beneficial for your garden to clean it in multiple rounds rather than in one go. It’s also less stressful and enables you to focus on one task at a time.

What plants should be cleaned in autumn?

Clean up blooming perennials, self-seeding plants you don’t want to take over your garden, and any dead or diseased plants, including those in your vegetable patch. Don’t forget about peonies, lilies, roses, or irises. You can also remove dead branches and old fruit from the trees.

Other than that, you don’t want to be pruning plants for the sake of it unless you’re certain they need it. You’ll be doing plenty of pruning in spring once the plants put forth new growth.

what plants should be cleaned in autumn

Image credit: @sarah_rivett_carnac

What autumn cleanup chores can I skip?

You can save time on your autumn garden cleanup by leaving any leaves in your flower beds to rot there at their own pace. You can also leave dead foliage on most plants except those that may harbour pests.

Lastly, you can leave sunflowers and other seed-rich flowers where they are since their seeds can feed wildlife in the colder months. But be careful about self-seeding plants or they may spread.

15 point checklist for a thorough autumn garden clean up-min

Save this pin for later

14 Stunning Autumn Flowering Plants for a Vibrant Garden

When the leaves start to fall and your once bright summer perennials come to the end of their natural lives, it can be tricky to keep your garden looking bright and welcoming.  You may be asking yourself, do any flowers bloom in autumn?

The answer is a resounding yes, there are many flowering plants that will keep your garden in colour well into the colder months.

autumn garden flowers

Here’s our pick of the best flowers for an autumn garden that will flower from September onwards:

Autumn Flowering Plants

There are plenty of plants that will flower throughout the colder months. If you time the planting right, you can have a seamless display of blooms through every season.

Star flowering plants for autumn include pansies, dahlias and crocosmia. The winter-flowering clematis will provide interest at the end of the year along with Christmas roses and delicate snowdrops.

What flowers can you plant in autumn and winter? Here’s our pick of the prettiest flowering plants to grace your autumn and winter garden:

1. Dahlias

Dahlias deserve a place in every garden. With over 40 species and thousands of cultivars of jewel-coloured, intricate blooms to choose from, you can enjoy these resplendent flowers well into autumn.

dahlias autumn

Dahlias have to be of the most spectacular of all flowering plants. Image credit: @choosingcalm

Dahlias need a fair bit of space (allow 40cm between plants) and the tubers can be sown directly into the ground from late April after the last frost has passed. You can also start them in pots inside from February onwards. You’ll need to pinch out the top leaves of the main shoot, leaving the top pair of leaves. As the tuber sprouts more shoots, remove all but 5 from the tuber, it sounds a little extreme but fewer stems mean stronger stems.

Make sure you stake the plants as they grow as a strong gust of wind can easily snap a dahlia stem. Each dahlia tuber can produce hundreds of flowers and as they are the perfect cut flower, you can create endless brilliant bouquets.

2. Pansies

pansies autumn flower

Brighten up your winter garden with bold pansies. Image credit: @rocio_marga

We couldn’t compile a list of autumn-flowering plants without mentioning the humble pansy. These cheery little plants are ideal for filling gaps in borders and adding vibrant colour and interest to pots or hanging baskets.

Pansies can flower throughout winter and even into spring but it’s worth planting them in early autumn as it gives the roots time to toughen up. Pansies planted out from November onwards may not survive the frost.

There are hundreds of varieties of pansies to choose from in a full spectrum of colours. They’re one of the easiest and most reliable plants to care for and sure to brighten even the bleakest winter day.

3. Sedum

sedum autumn flower

Bring in the pink with a flowering sedum. Image credit: @woodbridgenursery

Sedums are a fantastic plant to include in a garden border. Their unusual foliage provides interest from spring and colourful pink flowers appear from August, lasting well into late autumn. Once the flowers die back, you can leave the dried flower heads on the plant until spring.

Sedum is extremely easy to care for and will grow in pots or the ground. There are hundreds of varieties to choose from, including creeping and upright plants.

4. Crocosmia

crocosmia autumn flower

Bold and beautiful, crocosmia will light up an early autumn garden. Image credit: @mike.park.books

With its spiky leaves and stalks of fiery coloured flowers, crocosmia is an elegant addition to an autumn garden. Crocosmia bulbs should be planted in early spring for flowering in mid-summer to autumn. Although crocosmia won’t flower for the first year or so, it’s well worth the wait. They will add glorious colour to your garden when other summer flowers have faded.

Once crocosmia get’s going, it’s a vigorous spreader so it will need to be supported and kept in check by thinning out if necessary. Once the flowers have died back, leave the foliage in place as it provides the energy for next year’s blooms.

5. Asters

asters autumn flower

November asters in bloom. Image credit: @between.gardens

These sweet, brightly coloured star-shaped flowers are perfect for brightening up an autumn garden. You can plant asters in spring for autumn flowering and, if you’re lucky, they may self-seed and return the following year.

Asters come in a range of colours and are ideal in pots or placed in borders.

6. Autumn crocuses

autumn crocuses

Add glorious colour with autumn crocuses. Image credit: @alexander.hoyle

Despite their name, these flowers belong to the lily family. When planted in summer, they’ll flower in September and October. They’re happiest in partial shade and like well-drained soil. Autumn crocuses will flower year after year, providing welcome, reliable colour for your autumn garden.

Note: these plants are toxic so may not be suitable for a family garden.

7. Winter-flowering clematis

winter-flowering clematis

This clematis will happily bloom from November to March. Image credit: @dawns_gardening

Clematis are often thought of as summer plants but several varieties will flower through winter and into spring. Try the evergreen Clematis cirrhosa ‘freckles’ (pictured) and the gorgeous pink-flowered Clematis Markham’s pink for a show of winter flowers.

These climbers reach a height and spread of around 4 x 1 metres so will need the support of a trellis if they don’t have a wall or other plant to ramble over.

8. Cyclamen

cyclamen autumn flower

Cheer up your autumn garden with cyclamen. Image credit: @helenlouise726

One of my favourites, these beautiful little flowers provide a welcome burst of colour throughout the cooler months and they flower for ages! These plants are tuberous and rest during the summer months so resist the temptation to chuck them on the compost heap when they look a little tired.

9. Rudbeckia

rudbeckia autumn flower

Fire up autumnal borders with glowing rudbeckia. Image credit: @ebrahim_1659

Also known as black-eyed Susans, these beautiful flowers will be in bloom from August to October. With their showy golden colour, they’ll add a welcome splash of colour to your autumn borders.

10. Snowdrops

snowdrops autumn flower

True to their name, snowdrops can resist the cold. Image credit: @olbrichgardens

Snowdrops typically flower at the end of winter and into spring but in a mild winter, you may spot a keen bloomer as early as December. A sighting of a snowdrop often signifies the end of winter and they’re a beautiful addition to any garden.

Snowdrop bulbs are best planted with their green leaves intact in the spring, but you can also plant them as bare bulbs in October or November. They aren’t fussy about location and you can pop a few into your lawn for a cheery display. Snowdrops also make pretty cut flowers, simply arrange a few stems in a jam-jar as a simple decoration.

11. Winter honeysuckle

winter honeysuckle autumn flower

Add sweet scent to a winter garden with a honeysuckle. Image credit: @a.zen.gardener

The winter honeysuckle is a striking winter-flowering plant. It flowers from December to March on almost leafless branches, creating a blossom-like effect. Introduced from China, the creamy-white flowers smell divine. Its name, Lonicera fragrantissima, means ‘sweetest honeysuckle’ and the heady scent will be welcome in the depths of winter.

Make sure you choose a trellis for your honeysuckle if you intend to keep this vining plant tamed.

12. Heather

heather autumn flower

Understated and beautiful, heather is a great option for an autumn garden. Image credit: @clivenichols

Heather is often overlooked in favour of showier plants but it provides a welcome blanket of colour throughout winter and offers essential nutrients for bees and other pollinators. This alone makes it worth adding to your winter garden!

There are many varieties to choose from for winter colour, try Erica carnea Corinna for hot pink flowers or Erica darleyensis f. aureifolia ‘Tweety’ which has striking orange foliage with contrasting magenta flowers in winter.

As heathers are evergreen, they provide changing colour all year round. They’re easy to grow and care for and an easy way to bring colour into your autumn and winter garden.

13. Viburnum

viburnum autumn flower

Image credit: @madefound

If you’re looking for an easy-to-grow winter-flowering shrub, a viburnum is a great choice. Viburnum × bodnantense ‘Dawn’ produces clusters of small pink blooms on bare branches throughout winter.

Winter-flowering viburnum will bloom anytime from November to March, sometimes all the way through! These plants won’t flower until they’re 4-6 years old.

Viburnum nudum flowers in the summer but is followed by beautiful pink berries that turn purple, providing an unusual burst of colour.

14. Christmas rose

christmas rose autumn flower

Image credit: @althek3

Helleborus niger, the Christmas rose, is an evergreen plant that produces large white flowers from late winter into spring. It’s not actually related to the rose family, instead, it belongs to the buttercups.

You can plant Christmas roses at any time but they like damp soil and lots of organic matter so add plenty of well-rotted compost when planting and top up each year for best results. I’ll definitely be adding some of these to my garden this winter and look forward to waking up to a garden in bloom on Christmas day.

14 stunning autumn flowering plants for a vibrant garden-min

Save this pin for later


How to Build a Greenhouse Planter Box (Plans + Ideas)

Greenhouses, traditionally made of glass, provide a warm, safe place for plants that may be too delicate to survive outdoors during winter. Growing tender plants in a greenhouse planter box is the ultimate way to coddle them.

Many gardeners use a greenhouse, not only as protection for plants from winter frost and storms but also as a wonderful starting place for new seedlings.  Sown inside the greenhouse, the young plants remain warm and cosy before moving outside when the worst of the cold weather is over.

A greenhouse provides a stable temperature with direct sunlight, shelter and watering systems. Growing seedlings in a planter box inside the greenhouse offers gardeners an effective way to separate plants and boost yields, while also allowing safe access for children and pets.

greenhouse planter box

Fill your greenhouse with a range of planters and enjoy year-round produce. Image credit: @rebecca_anchorban_house

Why use a planter box in your greenhouse?

1. Keep things tidy

If you have younger visitors to your greenhouse, it is very easy for plants to get damaged. Space is at a premium, most plants are staked and summer climbers like cucumbers can rapidly outgrow their space.

Often there are trailing tubes of an automatic watering system curling around plant stems. So planting a few plants in a contained area like a planter box creates a tidier floor space, making it easier for everybody to walk around.

This is a plus if you have wandering cats and dogs as a physical border keeps the walkway well defined and also makes for easy cleaning and sweeping.

2. Create more space

In spring, when few plants are growing, your greenhouse will seem huge. Each year as I plant seeds and place them in the greenhouse, I forget just how little space there is by the end of the summer growing season!

A cucumber can outstrip its growing space in just 6 weeks if the weather is warm and sunny and I spend half my time in summer tying in the new growth on tomatoes and cucumbers. If the plants are growing in a planter box, they will only grow as tall as the soil conditions allow.

Unless you top up the soil fertility by feeding, a planter box may actually slow down the growth of over-vigorous plants. It is very important to revitalise the soil in planters at least every growing season to make sure it doesn’t become depleted. Use leaf mould, well-rotted manure, homemade compost and plant feed.

tidy greenhouse

Keep your greenhouse tidy and you might find space for a sofa! Image credit @climapod

3. Help prevent disease

It is easier to control plant diseases if plants are in a planter box, particularly one with separate compartments, where plants can grow independently. If plants are in the ground in greenhouse soil, there is a real risk that diseases can cross from one plant to the next.

Tomato blight in one plant will spread like wildfire if your plants are in the same soil. In a planter box, you can whip out the infected plant, cover it with plastic and remove it without letting the spores spread. Dig out the section of soil it was in and discard it. If necessary, replace all the soil in that part of the planter box and don’t plant tomatoes in the same spot for at least 2-3 years. It’s never good to remove a loved plant but you will have saved the other plants by having them in a separate box.

Blight is very difficult to eradicate from the soil so digging out the soil from the planter box is easier than digging out the whole greenhouse. Cucumber leaf rot is another typical greenhouse complaint and you can remove infected leaves, check the stems and top dress the soil around them. Plants in a different planter box will not be affected. Just make sure to keep plants separate when tying in any stems.

prevent dsease blight

Don’t let this disease blight your precious crops. Image credit @craftygem17

4. Improve crop yields

Growing produce in a greenhouse will mean more reliable plants and earlier crops.

If your reason for planting in a planter box is that the crop is delicate, let’s say the fussy aubergine plant, then it’s an excellent choice. You really need to water an aubergine daily in hot weather, it needs constant mulching, feeding and love and care. These plants will not tolerate cold draughts or frosty weather so being snug and warm in a greenhouse planter box suits them really well.

With different boxes, you can tend to each plant as necessary, adding mulch, setting up the watering system and easily adjusting as needed.

5. Grow food all year round 

Don’t let the greenhouse sit empty in winter! The compost you used to grow cucumbers or tomatoes in summer is an excellent base for sowing winter crops. Plant basil, coriander, rocket and parsley with mizuna and winter salads for a winning combination.

autumnal greenhouse

An autumnal greenhouse display. Image credit: @rekha.garden.kitchen>

What materials can I use for my greenhouse planter box?

1. Wood

Raised beds greenhouse gardening

Raised beds are a great option for greenhouse gardening. Image credit: @apple_acres_dk

2. Bricks

Brick is a great material for planters as the clay warms up in the sunlight and retains heat well, perfect for delicate plants. The top surface of the planter can be really useful for holding seed packets, tools, fertilisers and even a cup of tea. Build your planters to fit the length of the greenhouse on both sides, allowing space for a potting table and room for seedlings to grow.

3. Straw bales

This is a really good idea if you live close to a farm or have grassland you mow. Gather the grass to dry, wrap it with string or wire and make a wall of straw to protect the plants. It will gradually decompose so you will need to keep adding new bales but it is a great way to use grass cuttings and completely natural too. Straw provides excellent insulation and you can move them if you decide to relocate a plant.

4. Corrugated iron

If you have any spare corrugated iron sheeting, you can use this to edge a raised bed. Fix some bricks at the base inside and secure the outside with recycled hangers bent into shape or wooden stakes, to keep it steady. Fill it with soil, and your plants have a deep area in which to spread their roots and enjoy the warmth.

Greenhouse planter box plans

Here are some useful greenhouse planter box plans for inspiration.

greenhouse DIY planter box

Transform your greenhouse with a DIY planter box. Image credit: @carlasousamorim>

Are there any problems with planter boxes in greenhouses?

The only obvious one is that if slugs and snails manage to get inside, they will enjoy the regular watering and the delicious greens on offer. So remove them physically and re-locate them to your composting area or take them for a long, one-way walk to your local park.

Little gardeners will love collecting the snails and watching them in a bucket. Beware though, snails have a homing instinct! Studies have shown that snails can travel up to a mile back to their home when released far away.

I have conducted my own experiments with a daughter who banned slug pellets from the garden. We found that our marked snails could find their way home again from anything up to a mile so move them further away for any chance of success!

Can I make my own DIY greenhouse planter box?

Of course! Think about the construction of a greenhouse, then improvise with whatever materials you have. There are some other ways to protect plants in winter too:

1. Wrap trees

Trees can be wrapped in transparent material when heavy snow or frost is predicted.

2. Make a cold frame from recycled windows

A cold frame is a tall box with a sloping lid, much like the bins used to store salt for road spreading in winter. You can make one from old windows, and you will need to have some hinges to attach to the structure underneath.

The base can be made from anything available – straw, wood, metal, any material to keep the wind and cold at bay. Place your delicate plants in the centre, line it with bubble wrap or upcycled plastic and then replace the window lid.

protect tender plants

Rustle up a cold frame and protect tender plants over winter. Image credit: wiltshire_cottagelife

3. Transform a raised bed

If you have a raised bed outdoors, transform it into a mini greenhouse by making some hoops to go from one side to the other. You could use willow or flexible plastic tubes for this. These can be covered over with transparent plastic bags, bubble wrap or any transparent, waterproof material.

I have even seen an allotment owner make a roof from old CDs! It is important that light can penetrate so whatever you use, check your plants regularly and make sure it’s well secured.

Tina’s TIPS

  1. In spring remember to close the greenhouse door at night. Although daytime temperatures are climbing upwards, at night they drop quickly.
  2. Carefully check any homemade compost before adding it to the greenhouse planter box. Strain it through a sieve and remove any little visible pests before they get the chance to spoil new crops.
  3. Leave decoy food for pests such as comfrey leaves or nasturtiums. Usually, the slugs and snails will devour these before they start on the plants you want to protect and even if any leaves remain, the comfrey will slowly decompose adding valuable nutrients.
  4. Bramble deterrents. If you have any blackberries in your garden, prune some thorny stems and place them directly as a barrier against pests. The spikes are so unpleasant that most slugs completely avoid them and snails will move on to other plants.
  5. Silver trail searches. Get out that torch for the first few nights after new plants sprout and look for any tell-tale silvery trails from snails and slugs. Just remove them and relocate them to wilder parts of the garden or even your recycling bin, if it exists.
cosy plant home

Your plants will be grateful for a cosy home. Image credit: @no.7_is_home

The advantages of a greenhouse are protection, warmth and an increased growing season for many plants. Building a planter box will give you the added advantage of protection for your plants where you can keep them safer from disease and enjoy the vegetables and fruit for longer. Whether it’s under glass or recycled materials, your plants will love you for it.

HOW TO BUILD A GREENHOUSE PLANTER BOX (PLANS + IDEAS)-min

Save this pin for later

7 Types of Best Wood for a Planter Box

When choosing the best wood for your planter box, you’ll need to consider a few things. Think about what you intend to plant in it as well as your local weather conditions. You’ll also need to factor in rot resistance, weight and price.

Everybody’s dream wooden planter box looks magnificent and lasts well without too much maintenance, so what’s the best way to achieve this?

wood for planter box

Image credit @planterboxez

What is the best wood for a planter box?

You can’t go wrong with either Cedar or Redwood, which are two of the most popular wood varieties. There are also more affordable choices of timber for wooden planters.

1. Cedar

branch of cedar tree with trunk

Cedar is a perfect choice for garden furniture and planters. Credit: Shutterstock

Cedar is a very popular wood. It’s durable, lightweight, crack and rot-resistant. The weight is important if you are lifting planks so keep this in mind if you are making multiple planter boxes.

Cedar tends to fade with exposure to sunlight, turning an attractive grey colour. If you prefer to keep the original shade, see some of the suggestions for coating and dyeing below. Cedar contains natural oils which help to keep it resistant to bugs and fungi that target wood.  Cedar is grown in the US, so has to be shipped over to the UK.

2. Cypress

Cypress also produces natural oils, making your planter attractive while also being resistant to insects and fungi. Cypress is lightweight, which may be useful if you are planning to construct a raised planter box.

3. Scandinavian redwood

Scandinavian redwood is usually pressure treated and often used for decking. It’s durable, resistant to rot and long-lasting. This will make an attractive planter, however, it is usually more expensive than some of the other wood available and it may need a sealant to prevent the wood cracking over time.

4. Douglas fir

Douglas Fir is native to the US and is really long-lasting, making it a firm favourite with many buyers. Here in the UK, fir on sale generally comes from Scandinavia.

5. Pine

Pine is a readily available and affordable choice. It is frequently pressure treated which stops rot, but also causes shrinkage long-term so be aware of this when planning sizes and buy extra wood so that you can mend and add pieces later if required. It has an attractive grain and it is lightweight which is important if your planter is located on a balcony. Untreated pine is known to resist shrinking and you can treat it yourself with oil – see more below.

6. Walnut, white oak and black locust

Walnut, white oak and black locust are expensive woods that last a very long time.

7. Mahogany and teak

carving mahagony furniture

Credit: Shutterstock

Mahogany and teak are high quality, long-lasting woods that retain their magnificent colour. If you are prepared to spend a bit more, these are excellent options. As these woods aren’t native to the UK, they can be difficult to source.

What is the best wood for planters in the UK?

The best wood to make a planter box in the UK are native trees such as oak and beech, which have been used for centuries to make furniture and in the construction industry. Scots pine is also native to Britain. Walnut and chestnut used to be very popular but are increasingly difficult to source and walnut is expensive.

Gardening centres offer pine and a range of more exotic woods depending on your budget. If you would like to source a locally-grown wood for your planter box, contact a local carpenter or tree surgeon. They can usually offer good advice about local wood suppliers.

The Forest Stewardship Council (FSC) logo on wood reassures buyers that the wood has been grown in environmentally friendly ways. When sourcing wood, try to look beyond the cheapest price and the best quality. Sustainability is an important issue to consider so try to ensure any new wood carries FSC certification. Remember that the best wood for sustainability is probably the wood that grows closest to you.

Also, look for the “Grown in Britain” logo. The benefits are obvious; fewer miles travelled and also a guarantee that no pests or diseases from wood grown in other countries will be present.

Other points to consider when choosing best wood for planters:

What materials do I need to make a planter box?

  1. Decide on the size of your planter. Measure the area carefully and then choose your wood.
  2. You need a saw to cut your wood to size and then assemble your planks on a sheet of plastic or any material so you don’t damage the area where you are constructing.
  3. Do you need a waterproof liner? Some wood doesn’t, but if you’re growing edible plants, you may want to check whether the wood treatment used is suitable. If not, use a waterproof membrane or architectural fabric which is more environmentally friendly.
  4. You will also need to ensure good drainage so consider adding sand, pebbles, gravel and other materials.
  5. You’ll need a selection of tools to assemble your planter box – a saw, a drill, nails or screws, decent gloves and eye protection.

Can I make a planter box out of pine?

Pine offers you an attractive grain for your planter box. Pine is usually treated to ensure its durability and stability in construction so it’s a really good option for an outdoor planter box. Just make sure that is pine from a responsible source and if possible, aim to buy local, FSC wood. If you can find the “Grown in Britain” logo, the pine is probably Scottish.

7 Types of Best Wood for a Planter Box 3

Pine is a great choice for a DIY planter box. Image credit: @imaginationcreated

What can you grow in your planter box?

1. Decorative flowers

Decorative flowers can grow in any type of wooden planter box. Deeper ones are suitable for plants that need rich, deep soil such as roses and hungry plants which need fertilising regularly.

More on this: What can I plant in a flower box?

2. Succulents

Succulents grow well in planter boxes and they are great for anybody who doesn’t like to do much watering. Some may need to be moved indoors when the temperature drops in the autumn. Lavender will do well growing with these too as they do not need much watering.

3. Edible herbs and flowers

Edible herbs and flowers such as basil, parsley, coriander and chives grow beautifully in planter boxes, but they will need a liner to avoid eating the preservative from the wood. Place these in a sunny area and add some tomatoes as annual plants so you can make tasty salads.

You Might Also Like: 8 Effortless Herb Planter Box Ideas

4. Vegetables and edible fruit

Vegetables, edible fruits like cucumbers and squash, and beans and peas need deep, nutrient-rich soil so make sure your planter box is big enough for plants like these. Line the box well then add good compost, manure if you can, and water frequently. You can add the planter box to a crop rotation plan so you grow potatoes one year, then beans or peas followed by cabbages and so on. Look for seeds that recommend planter box growing too.

FAQs

How do I keep my planter box from rotting?

Sealants. Untreated wood needs regular maintenance so that it does not leak water, so use a sealant initially and then annually after that.

Lining. Untreated wood planters can be lined as an alternative to treatment in order to prevent leaks. This lining is also useful for keeping the wood preservative outside your soil.

Paint can be applied to wooden planter boxes but most people like to see the grain. Any exterior paint can be applied but check if it needs an undercoat first. You may also need to sand it down well before applying paint.

Pressure-treating pine stops rot, but this also causes shrinkage long-term.

Stain and varnish. Commercially purchased planters are often varnished or you can apply stain and varnish yourself. If your planter box holds decorative shrubs and non-edible plants, you can use a commercial sealant followed by a preservative for long-lasting protection. This will help your planter to remain functional for 5 years or more.

Take great care when applying these products close to a pond as they can be poisonous to aquatic life.

– Cedar and Teak both contain natural oils which repel water naturally. Some gardeners recommend using larch wood; this timber can be used untreated but it is a specialist wood and difficult to obtain so take advice from your wood supplier on this. Cedar, teak and larch are more expensive than pine, so if your budget is tight, this should be a consideration.

More on this: How to Waterproof A Wooden Planter Box

Are there natural ways to keep my planter box from rotting?

If you want to grow herbs, lettuce, edible fruit, vegetables or flowers or indeed, anything that will go into your mouth, be aware that any commercial varnish you use may end up in your stomach. Makes you think again about what to coat your planter with, doesn’t it?

Alternatives include:

  1. Natural oils repel water and are not harmful to humans. Examples of these include linseed and hemp oils. They aren’t completely waterproof but water-resistant. Be aware that these two may slightly darken the colour of your wood. Two coats of oil are more effective than one.
  2. Beeswax is commonly used for wooden household furniture and also on boats for its natural water-resistant qualities. Use liberally by applying with a cloth or sponge. A second coat will improve resistance and repeat annually. It is not heat resistant however and it can still be scratched.
  3. Teak oil can also be used as protection for your wood planter box. Here’s a detailed analysis of teak oil usage for outdoor furniture
  4. Liners. Using any of these oils or wax means that you may need to line the inside of your planter as well. This adds extra protection from leaks and helps to prevent the wood from rotting. You can purchase polythene or plastic as a liner in rolls from your DIY shop store.

For a more environmentally friendly method, use landscaping fabric instead of plastic. Worms prefer this and beneficial insects are happier with fabric too.

Can I use pressure-treated pine for a planter box?

It’s fine to use pressure-treated pine for decorative plants but it’s important to consider what you’ll grow in this box, especially if you want to grow food. Read on for pros and cons:

Advantages:

  1. Pressure-treated pine is very resistant to wood rot and pressure treatment is effective as an insect repellent too.
  2. The chemical treatment keeps it fairly weatherproof, unlike natural pine which will need a sealant.

Disadvantages:

  1. The chemical preservative which helps to keep the wood resistant to rot is not really recommended for direct contact with herbs and vegetables for consumption. You will need to line this planter box.
  2. Another problem with pressure treated wood is that it shrinks over time.
  3. Pine is a very soft wood that can be scratched and dented easily. It may not be suitable for a busy family or if it’s located near anything which may damage the wood.

Tina’s Tips:

How can I source cheap or recycled wood for garden box planters?

Sourcing old wood which you can saw, chop and fashion into a stunning, planter box is a great option.

You can also use pallets to make a planter box, as well as many other DIY projects.

7 TYPES OF BEST WOOD FOR A PLANTER BOX-min

Save this pin for later

How to Clean A Canvas Gazebo Canopy in 4 Steps

Dust, grime, pollen, tree sap, rainwater, mould, and mildew—almost everything can make your canvas gazebo canopy dirty.

But replacing the canvas isn’t your only option. You can clean it once or twice a year to keep it looking almost as good as new.

You don’t need fancy equipment and cleaning supplies. A mild detergent, vinegar, soft brush, and water are often enough. So, pick a warm and sunny day and start cleaning!

How to clean a canvas gazebo canopy the easy way

Gather all your essential supplies—mild detergent, a soft brush, nylon scrubber, and water bucket. Next, follow this easy step-by-step guide.

Step 1 – Prepare a soapy solution

Pour warm water into a bucket and add a mild detergent to it. The dirtier the canvas, the stronger the soap solution should be. Stir the solution till it begins to lather.

Step 2 – Brush the canopy

Dip a soft brush into the solution and use it to clean the canopy. Start by gently scrubbing all dirt and stains.

Be careful around the stitches. Aggressive brushing can damage them and cause leakage.

Step 3 – Scrub stubborn stains

If the stains are stubborn, use a nylon scrub to clean them. Scrub in a circular motion so you don’t damage the canvas.

Let the solution sit for a few minutes before you wash it off. Repeat the scrubbing several times until you get rid of all stains.

Step 4 – Rinse and dry

When you’ve finished cleaning, rinse the soap residue well. You can use a garden hose for this.

Important: Let the canvas canopy dry completely in the sun. This will also keep mould and mildew from growing on the canvas.

How to clean a non-canvas gazebo canopy

Canvas isn’t the only fabric used for gazebo canopies. Other popular materials include polyester, vinyl, and acrylic. All these different materials have different cleaning routines. But don’t worry, none are hard.

Let’s take a closer look at each.

Polyester canopy

Polyester is durable and water-resistant, making it an ideal choice for gazebo canopies. To clean it, you will need a mild laundry soap and a brush for scrubbing.

Begin by scrubbing all surface dirt and debris. You can also use a solution of vinegar and water to clean the stains.

Tip: Brush well but be careful not to damage the fabric.

Vinyl-Coated canopy

Vinyl-coated canopies are made of canvas laminated with vinyl. They can be easily cleaned with warm, soapy water. Simply dip a soft cloth in the soapy water and wipe the fabric.

Tip: For tough stains, use a mix of 10% bleach and 90% water. But test this mix over a smaller area before to make sure it doesn’t discolour the fabric.

Acrylic canopy

Acrylic canopies are made of weather-resistant synthetic fabric. This fabric is one of the easiest materials to clean.

Begin by brushing off any loose dirt. Then use a laundry detergent to treat heavy stains. Allow the canopy to dry before using it again.

How to remove mildew from a gazebo canopy

mildewed canopy

Don’t let unsightly mildew creep up on your gazebo. Credit: Shutterstock

Mould and mildew can creep up on your gazebo canopy, especially if you live in a humid climate. Even lack of sunlight can encourage their growth.  But you don’t have to make peace with these unsightly spores. There are quick and efficient ways to get rid of them.

Step 1 – Scrape the spores

Use a stiff-bristle brush to scrape away loose mould and mildew. Do this in an open area to avoid spreading the spores.

Step 2 – Mix a cleaning solution

Pour some lukewarm water into a bucket. To this, add a cup of chlorine bleach and one-quarter of a cup of laundry detergent.

Step 3 – Scrub off stains

Apply the cleaning solution over the mildewed area with a rag or sponge. Scrub the canopy thoroughly.

Let the solution sit for a few minutes. Then scrub the tough stains with the brush.

Step 4 – Rinse and dry

When you’re happy with the cleaning, rinse the fabric thoroughly to remove all residue. Let the canopy dry in a sunny place.

How to clean gazebo covers

Your gazebo cover, whether canvas or vinyl-coated, can gather dirt and debris over months of use. To keep it looking good season after season, you’ll have to clean it. Not eventually, but regularly!

Step 1 – Prepare your cover for cleaning

Before you get into the actual cleaning, take a good look at your cover. Check for any damage (rips or tears) in the fabric and fix them first.

Next, use a soft brush and remove all build-ups of dirt, grime, or muck. Flip the cover and brush the underside, too.

Step 2 – Scrub the cover

Prepare a cleaning solution using warm water, some vinegar, and bleach-free detergent. With a rag, apply this solution to the cover and begin scrubbing.

Avoid using a stiff-bristled brush. It can scratch the fabric and cause leaks.

Step 3 – Rinse and air-dry the cover

Now, rinse both sides of your cover with water. Make sure no soapy residue remains.

When you’re finished, let the cover air-dry before storing it away.

How to wash gazebo covers

You can also machine wash gazebo covers if that’s easier for you. But don’t just throw them into the washing machine. Follow the steps below.

Step 1 – Inspect your cover

Before you machine wash your gazebo cover, inspect it well. Look for any rips in the fabric and repair them. Clean mould, mildew, and surface grime.

Make sure the fabric is safe for machine washing. Also, check that your washing machine has enough room to spin the cover. You don’t want to throw in any extra clothes.

Step 2 – Wash the cover

Use cold water for machine washing. Pour your regular detergent and a cup of white vinegar for extra cleaning.

Important: Avoid using bleach as it can stain most fabrics.

Step 3 – Air-dry the cover

After washing, it’s best to air-dry the cover. Using the dryer can shrink the fabric, making it difficult to put back on your gazebo.

Make sure the fabric has dried completely to keep mould and mildew from attacking it again.

How to clean a gazebo

While your gazebo canopy and cover are drying in the sun, why not clean your gazebo? You’ll enjoy it all the more after.

Step 1 – Clean the gazebo frame

Begin by cleaning your gazebo frames and stakes. Use a soapy solution and scrub them well with a rag or sponge.

Make sure to rinse and dry all the metal components.

Step 2 – Clean the interior

Look for pollen, dirt, and grime in the gazebo. Scrub the floor with a mild soap. Avoid using any fragrant soap as it may attract bugs.

Remove cobwebs with a long-handled broom. Check for wasps and other insect nests and remove them too.

Step 3 – Fix any damage

Scrape old paint off the poles and posts and repaint them.

Look for signs of cracks and splits in the framework and fill them with metal or wood putty. Yes, it’s going to take a bit of time, but not only will it make your gazebo look better, it’ll last longer too.

Keep your gazebo fresh

A gazebo in your garden is a serene place for you to unwind. But being exposed to the elements all day, it can gather dust, grime, pollen, mildew, and more. In other words, it can start looking old and weary after a while. Inhaling pollen can cause nasal congestion and irritation. Spores can cause fungal infections. Even dust particles can make your eyes feel dry.

Clean your gazebo every six months to keep it clean and fresh. A clean gazebo is also a healthy gazebo.

In the end, by keeping your gazebo fresh and clean, you will keep yourself and your family healthy.

HOW TO CLEAN A CANVAS GAZEBO CANOPY IN 4 STEPS-min

Save this pin for later

What Is a Gazebo and What’s it Used for?

A gazebo is a freestanding garden structure that provides shade, shelter and somewhere to sit and admire a scenic view. It has a roof and open sides—just perfect to create an airy, beautiful shelter outside.

Gazebos tend to be geometric. They come in hexagonal, octagonal, rectangular, and other similar shapes, and they are made of wood or metal. They may also feature built-in seating, classic fencing, and drapes to create a sense of privacy.

A gazebo will add a nostalgic, old-world charm to your garden or yard. You can use a gazebo for relaxation, reading, and also to create an outdoor entertainment space.  Read on to learn more about different types of gazebos, their history, features, and how you can best use them.

A brief history of gazebos

The history of gazebos goes back over 5,000 years. But their use hasn’t changed much in time.  Gazebos were a popular garden feature in Ancient Egypt and Rome. They were a great retreat from which to relax and delight in picturesque views. They were also used for traditional tea ceremonies in Asia.

But back then, they weren’t called “gazebos”. The name itself is an 18th-century invention. It’s a humorous combination of the words “gaze” and the Latin suffix “ebo” meaning “I shall.” Gazebos are a great addition to any French or Italian styled gardens, and of course fitting for a Japan-themed garden. And true to their name, gazebos are often used today to relax and enjoy nature.

Types of gazebos

There are many different types of gazebos, varying in shapes, sizes, materials, and styles.  Some gazebos are octagonal while others are rectangular, oval, or dodecagonal. They come in classic wooden as well as modern vinyl and aluminium styles. The roofing can also vary from a country style to a pinnacle roof.

But don’t be overwhelmed by all the different types of gazebos around. Focusing on their key characteristics makes it easier to choose the right gazebo for your garden.

What Is a Gazebo and What's it Used for? 4

Gazebos come in many shapes and sizes.  Photo by Lisa Yount on Unsplash

Gazebo sizes

Today’s gazebos come in all sizes. Some are great for a family of four while others can comfortably host a small gathering. Before adding a gazebo to your property, consider the space you have.

You don’t want to squeeze a large gazebo into a small yard. Likewise, you don’t want it to look like a dollhouse in your sweeping garden. Going for just the right size of gazebo will complement your outdoor space.

Gazebo shape

Traditional-looking gazebos are generally octagonal or dodecagonal. Since these have many posts, they’re suitable only for large backyards.

Choosing the shape of your gazebo again depends on the space you have. For smaller spaces, hexagonal, square, rectangular, and oval gazebos like in a classic Greek Garden are ideal.

Gazebo material

Gazebos are commonly made of wood, which lends them a rustic, natural beauty that can accent any outdoor space. Plus, there are many design and colour options to experiment with. But wooden gazebos are difficult to maintain. They will need to be repainted or repaired over time.

Vinyl gazebos are also gaining popularity. They are sturdy, modern-looking, and easy to maintain. Vinyl units can also be made to resemble wood and other materials.

Aluminium gazebos are another option to consider. They are lightweight and affordable. You can paint aluminium to match your outdoor furniture or enjoy its natural finish.

And finally, you can opt for a steel gazebo. It’s the most expensive material. But the versatility it offers you in terms of design is worth it. You can design it to look like traditional ironwork or add wood around the frames for a classy look. A well-built and properly maintained steel gazebo can last a lifetime.

What Is a Gazebo and What's it Used for? 5

Aluminium gazebos are weatherproof, modern and can come with shuttered roofs for instant shade. Credit: Suns Lifestyle

Roofing material

Your gazebo roof can have asphalt, rubber, or cedar shingles. These materials are available in varying colours to match your gazebo and other structures around it.

Asphalt shingles are affordable and easy to install. Rubber shingles are durable and less likely to crack in extreme weather. Cedar shingles are wind-resistant and have a nice classic look. Remember these key points while choosing your roofing material. Take a look at our gazebo roof building guide for more information.

Roof style

A gazebo roof is more than just a shade over a frame. It’s a way to make your structure stand out in your landscape.  So, your gazebo roof style is something you cannot overlook. Some popular styles to consider are pinnacle, pagoda, cupola, and country-style roofs.

What Is a Gazebo and What's it Used for? 6

Gazebo roofs come in many different designs. Credit: Summer Garden Buildings

Gazebo must-have features

Your gazebo can have seating, privacy drapes, and lighting. These extra touches will turn your gazebo into a space that will keep you coming outside time after time.  Consider adding comfortable chairs and sofas to your gazebo. You can also go for built-in benches around the framework—or maybe you love hammocks?

Tip: Don’t forget to add cushions and rugs to your gazebo for a cosy feel.

A privacy screen is a must-have for those romantic evenings, especially if you have curious neighbours—or have to put up with lots of mosquitos during summer. There are a lot of gazebo curtain options, you can opt for a mesh screen, latticework, or outdoor drapes. These are also great to keep out bugs and pests.

Another important feature is adding some lighting to your gazebo. Lights will transform your gazebo at night and create an inviting, cosy feel. Take a look at our garden lighting list to get started.

What Is a Gazebo and What's it Used for? 7

Adding strings of lights to your gazebo is a must. Credit: Shutterstock

What are the uses of a gazebo?

A gazebo will be more than a nice feature in your garden. It will offer breezy shade on a warm summer’s day or a snow-free spot to enjoy winter views. You can also relax in your gazebo on a rainy day with a hot cup of tea and a book, or even put a hot tub under it!

On special days, you can use your gazebo to host parties with friends and family. And if your gazebo is spacious, you can hold special ceremonies and outdoor functions in it.  A gazebo will also act as a covered picnic area. Plus, you can use it as a romantic backdrop for photoshoots.

What Is a Gazebo and What's it Used for? 8

Gazebos offer the perfect place to relax and unwind. Credit: Shutterstock

A window into the past

Classic, romantic, and airy, gazebos are a window into the past. Just the presence of one in your garden can make you feel like you’ve travelled back in time to simpler, less stressful days.

To make the most of this experience, break free from all electronics. Leave your computer, laptop, and phone out of the gazebo. And just enjoy the simple pleasures of your garden.

This time-honoured outdoor structure will also add beauty to your space. It will invite you outdoors season after season.  Use this time for quiet contemplation. And who knows, a window into the past can help spark brilliant ideas for the future.

Are you thinking where can I buy a gazebo?! Well, before splashing out find out how much does it cost to build one yourself. And if you like to get your hands involved check out how to build a simple rectangular gazebo.

WHAT IS A GAZEBO AND WHAT’S IT USED FOR

Save this pin for later

7 Ways To Stop Cats From Spraying in Your Garden & Outside

Do your neighbourhood cats think your outdoor furniture makes the perfect toilet?

It can be very frustrating sitting down on your patio with a nice cup of coffee but all you can smell is cat urine. Fortunately, there are ways to stop cats from spraying on garden furniture. Here is what you need to know…

stop cats from spraying on garden furniture

Nobody wants the smell of cat urine accompanying their morning coffee… Credit: Shutterstock

How to stop cats spraying outside your home

There are lots of ways to stop cats marking their territory in your garden. The most simple method is to get your male cat neutered. Spraying is a behaviour that marks the territory of the male cat to keep other males away. Once your cat is fixed, you should see a change in behaviour as the cat no longer sees the need to mark everything.

If it’s not your cat or if sterilisation isn’t an option, There are a few other things you can try to repel cats. Let’s take a look.

How to repel cats

Cats have an excellent sense of smell so you can make use of this to keep neighbours’ cats out of your garden. There are quite a few scents out there that cats despise. Here are a few options:

1. Vinegar

Cats absolutely hate the smell of vinegar which makes it an excellent natural cat repellent. Simply mix one part white vinegar with one part water to make your own cat repellent at home. It is safe to spray this solution on your furniture as well as cushions as long as you don’t make everything constantly wet.

vinegar spray

Vinegar is an effective kitty repellant.  Credit: Shutterstock

Constant wetness creates the perfect environment for mould to grow, especially inside your cushions, nobody wants that. If you don’t like the smell of vinegar either, try one of our other homemade cat repellent options.

Vinegar has another benefit. It can remove the smell of cat urine completely since it breaks down ammonia. This way you can prevent a cat from coming back to mark again due to being attracted by the smell of feline urine.

Golden Swan White Vinegar, 5 l (Pack of 4)


Check Latest Price »
We may earn a commission if you make a purchase, at no additional cost to you.

2. Essential oils

Due to cats being so sensitive to smells, there are quite a few essential oils that are just too much for a cat to handle. Some of the essential oils to stop cats from spraying include:

Fortunately, all of these smell great to us. You will need to mix around 6 to 8 drops of oil for every cup of water. Make sure you shake the solution well and then spray it on and around your furniture. You will need to do this at least once a week but daily has the best results.

citronella oil

Try essential oils to ward cats away.  Credit: Shutterstock

It is best to combine the use of essential oils with vinegar. Wash all marked areas with vinegar, soap and water solution to remove any urine smells. After the area dried, spray your essential oil cat repellent all around and on your furniture to keep the cat from coming back.

3. Potpourri

This might sound like a very strange solution, but there are some plant and fruit scents that cats just can’t stand. As an example, the dried peels of citrus fruits are an excellent choice for a cat repellent potpourri. You can use a combination of lemon, orange, tangerine and lime peels to create a great smelling potpourri with some lemongrass mixed in if you please.

lemon and orange potpourri

Credit: Shutterstock

Simply leave your citrus potpourri out near your outdoor furniture and watch the cats go out of their way to avoid the area. This also works if you want to keep them off your furniture as well. Just keep in mind that wind, rain and the size of the area will play a role in how effective your potpourri is.

You can also create small potpourri satchels to stick into the covers of your outdoor cushions. This way the cats won’t jump on your furniture either.

4. Plants

Another strange way to keep cats away from your outdoor furniture is to create a cat barrier. Now you might be wondering how exactly you’re supposed to create a barrier that such an athletic jumper won’t be getting over. Well, it’s quite simple really.

All you have to do is plant quite a few cat repellent plants. A few options you can consider are pennyroyal (smallest of the mint family), scaredy-cat plant (Coleus canina), lavender, rosemary, curry herb (Helichrysum italicum), lemon balm, thyme, and anything thorny.

a bumblebee enjoying lavender flowers

Lavender is great for attracting pollinators and repelling intruders such as mosquitos and cats.

These plants can be used alone or in a combination. Some of them are even useful to you in the kitchen. They also look great and will benefit your garden by deterring some other garden pests as well.

5. Commercial spray

There are of course also quite a few commercial cat repellent sprays available. Simply go to any pet store or check the pet and garden section of your favourite supermarket. If you can’t find any in your area, you can also order them from an online pet store or platform like Amazon.

These sprays, like everything else on this list, won’t always work. They do however at least allow you to try until you find the option that works best for you.

6. Protect your furniture

If all else fails, you might want to consider bringing your outdoor cushions indoors or get furniture with storage for cushions when you’re not around. This way you can simply hose down the remaining frames to wash away any nasty cat smells.

You can also create covers for your furniture to protect it from getting sprayed in the first place.

furniture covers

Covering your furniture will protect it from cats and the weather. Credit: Sunvilla

This way you can simply hose down the covers while your furniture stays pristine. Covers will also protect your furniture against weather damage so it’s a win-win situation.

Final thoughts

Repelling cats and stopping them from spraying on your outdoor furniture can be quite tricky. Not all methods and repellents will work on all cats.  All you can do is keep trying until you find something that does work. Sometimes this takes a lot of time, however, so be prepared.

FAQs

How do I keep the neighbourhood cats out of my garden?

The best way to keep the neighbour’s cat out of your garden is to create a cat barrier. You can do this by planting cat repellent plants like pennyroyal (Smallest of the mint family), scaredy-cat plant (Coleus canina), lavender, rosemary, curry herb (Helichrysum italicum), lemon balm, thyme, and anything thorny.

cat walking on old wooden fence

Credit: Shutterstock

How do I keep cats off my garden furniture?

To keep cats off your outdoor furniture you can either create a cat repellent solution with vinegar or essential oils or you can use potpourri with dried citrus peels. You can even use a combination of all three options if you like. Just make sure that you don’t leave your furniture constantly wet.

Does cat detergent spray work?

Cat detergent sprays work differently on different cats. Some cats couldn’t care less about the spray and still mark while others will stay far far away. The only way to find something that works for you is to keep trying.  Let us know in the comments below which deterrents work best for you.

7 WAYS TO STOP CATS FROM SPRAYING IN YOUR GARDEN & FURNITURE

Save this pin for later

6 Ways to Keep Spiders Off Garden Furniture and Patios

Do you often find a spider or two relaxing along with you on your garden furniture?  You’re not alone. For most of us, spiders give us the creeps, never mind that most of them are completely harmless and actually good for the environment.

keep spiders off garden furniture

Credit: Shutterstock

If that sounds like you, read on to find out how to make your garden time a more relaxing, spider-free experience.

How to keep spiders off garden furniture

Keeping spiders away from your garden furniture is fairly simple. All you have to do is clean regularly, remove any hiding spots, use repellents or use some other form of spider barrier or prevention technique.

Let’s take a look at exactly how to stop spiders on garden furniture.

1. Furniture choices

The type of furniture you choose will have a direct effect on the number of spiders and the amount of effort you’ll have to put in to remove them.

Wicker furniture is usually the worst choice of garden furniture if you don’t get along with spiders. They have lots of perfectly protected, dark holes and areas where a spider will live very happily despite your fear of them.

rattan coffee table

Wicker furniture is the worst choice for a spider-free garden. Credit: Shutterstock

If you don’t want to put in a lot of effort to prevent a spider infestation, rather avoid wicker furniture and go for something simpler like metal or open design wooden furniture. This way you’re reducing the number of hiding spots while still having great-looking furniture.

2. Remove any hiding spots

Spiders prefer messy areas with lots of holes and dark areas to hide in. If your pot plants or vines are taking over the area around your garden furniture, they will create the perfect hiding spots for spiders.  Any unnecessary garden tools and kid’s toys left lying around will also contribute to the perfect arachnid-friendly environment.

To reduce or even completely remove the number of spiders taking over your garden furniture, start by tidying up the area around them. Pack away any children’s toys, pool noodles or garden equipment. Here are some storage ideas to keep things tidy. 

Trim any large shrubs or vines growing nearby and move any potted plants that can create hiding spots for spiders.

Make sure to give the area a good sweep or even hose it down to remove any dirt that may be attracting the spiders. Once you’re done, move on to cleaning the furniture itself.

3. Cleaning garden furniture

Your garden furniture, just like your indoor furniture, needs to be cleaned regularly. This involves dusting, vacuuming and sweeping underneath to remove any spiderwebs, eggs and debris that might lure in prey for the spiders.

Regularly cleaning your furniture will force spiders to work harder to rebuild their webs and nests every day which in turn will force them to migrate to a more hospitable area away from your furniture.

woman gardener sweeping the garden

Keeping the garden clean makes spiders work harder. Credit: Shutterstock

You can also wash your garden furniture once every other week to flush out any spiders hiding in the crevices.  Spiders are nocturnal so getting them to come out and move can be quite tricky during the day. Water will get the job done quickly flushing them out and forcing them to take shelter elsewhere.

You can also give your garden cushions a wash or beating quite regularly to dislodge any spiders that took up residence in the folds.  Just make sure to do it out in the garden to prevent the spiders from simply running into another dark hole on a different piece of furniture.

4. Use spider repellents

If regular cleaning just doesn’t cut it and you’re still finding loads of spiders on your furniture every day, maybe it’s time to introduce some spider repellents into your daily or weekly spider prevention routine.

Here are a few options to look into:

Essential oils

It is possible to make your own spider repellent spray at home by using essential oils.

Spiders, like a lot of insects, hate the smell of citronella oil.  You can mix it with a bit of water and spray it on, under or even around your furniture or you can use a citronella lamp to scare them away with the sweet-smelling smoke.

citronella oil

Citronella oil will keep spiders away. Credit: Shutterstock

It is also possible to use other oils like peppermint, citrus, or even cinnamon oil. Simply mix a few drops with some water, add it to a spray bottle and spray it all over.

Unfortunately, you will have to do this at least once a week since rain and other weather conditions may dilute the spider repelling properties of your solution.

Vinegar and pepper mix

Vinegar on its own is very effective for repelling spiders, but mixed with pepper it lasts a bit longer. 

Vinegar can possibly damage your furniture over time so it’s best to first test the solution on an out of sight area. If you notice any discolouration, simply further dilute the solution or switch to a different one.

Commercial products

There are quite a few commercial products out there that function as both a repellent and a barrier.

They aren’t guaranteed to work 100% of the time, but if applied regularly you should see fewer spiders around.  Make sure to reapply after rain.

Plants

There are a few plants you can grow either as a barrier or as a repellent for spiders. Peppermint is particularly good at this job. 

All you have to do is plant some in a container and place it between your furniture or plant a whole row of peppermint all around your patio to prevent spiders from entering.

peppermint in container

Plant some peppermint in containers to repel spiders. Credit: Shutterstock

Peppermint isn’t the only plant that works so do some research and you might even find a whole host of useful plants. Another plus, you can use these plants in your cooking most of the time!

5. Create a barrier

There are quite a few things you can create a very effective spider barrier with. As mentioned above, your first choice will most likely be to plant plants with spider repellent properties. If that’s not the way to go for you, you can also try the following:

Diatomaceous earth

Diatomaceous earth (DE) is a kind of powder that is excellent at killing pests.  It works by cutting and dehydrating any insects that dare to crawl over it. DE works great sprinkled around your furniture or even the garden as long as it doesn’t get wet.

diatomaceous earth kieselgur powder spider repellent

Diatomaceous earth is a toxic-free spider repellent. Credit: Shutterstock

There’s no danger to your pets or even babies if ingested making it ideal for pet and child-friendly gardens.

Cedarwood chips

Cedar is known for its pest repellent properties. It is often used in gardens as a mulch making it ideal to use around the area where you keep your furniture.

cedarwood chips

Use cedarwood chips as mulch and to keep spiders away. Credit: Shutterstock

Cedarwood chips look great as a ground cover which also hides the fact that you have a spider problem.

6. Reduce attractants

Another way to reduce the number of spiders on your furniture is to reduce the amount of light on your patio. Bugs like moths and mosquitos are attracted to artificial light which makes your patio a perfect hunting ground for spiders.

To reduce this problem and force them to hunt elsewhere, simply turn off the light when you’re not out there or change it to yellow light. Yellow light tends to attract fewer insects than normal white light does.

FAQs

How do I keep insects off my outdoor furniture?

To keep bugs away, make a natural pest repellent by using peppermint, citronella or eucalyptus essential oils, sprinkle some diatomaceous earth, or plant a few garden plants or herbs with pest repellent properties. It is always best to use a combination for the best effect.

What smells do spiders hate?

Spiders can’t stand the smell of citrus, peppermint, eucalyptus, citronella or tea tree oil. They also despise vinegar and cinnamon so these are also excellent options to repel spiders.

When you kill a spider does it attract other spiders?

No, spiders aren’t attracted by their dead brethren. When you do kill a spider, however, you open up a territory that will soon be filled by another spider if you don’t take the time to find a spider repellent or barrier that works for you.

6 WAYS TO KEEP SPIDERS OFF GARDEN FURNITURE AND PATIOS-min

Save this pin for later

10 Best Annuals For Hanging Baskets to Add Color & Density

Have you ever admired a lush hanging basket at the nursery and wished for one of your own?  Let’s face it, hanging baskets are expensive and the price just seems to rise every year.  Fortunately, growing your own annuals in a hanging basket doesn’t have to break the bank. Here’s what you need to know…

hanging baskets filled with flowering annuals

Credit: Shutterstock

How to grow annuals in hanging baskets

If you want to successfully grow annuals in hanging baskets, you’ll first have to consider what kind of annual will work best for your situation.

Some annuals like impatiens (busy Lizzies) prefer shady areas while others like petunias do well in full sun. Let’s take a look at the best annuals to grow in hanging baskets.

Best annuals for hanging baskets:

1. Violas

Violas are usually grown as annuals in hanging baskets. They are distinguished by their 5 petalled flowers that range in colour from blue and purple to yellow and pink. They have quite a lovely scent which makes them perfect for nose-level hanging baskets.

blue viola blooms in a hanging basket

Place your hanging basket at nose level and enjoy viola’s lovely scent; credit: Shutterstock

Violas prefer nutrient-rich, moist soil that drains well in a sunny to a partially shady location. Keep in mind that the sun exposure necessary may vary depending on the variety.

2. Sweet alyssum

This low growing bushy plant works perfectly in a hanging basket and will even work as a butterfly lure. The flowers are either white, pink or purple and have a strong honey scent that will enrich your patio or garden and lure some stunning insects to look at.

alyssum flowers

Sweet alyssums are a butterfly magnet; credit: Shutterstock

This plant does best in full sun but will tolerate partial shade.

3. Primroses

Primroses are very popular flowers to grow in hanging baskets. They can make any dull garden come alive with their beautiful, multi-coloured flowers.

primrose in hanging baskets

Keep an eye on insects if you go for primrose; credit: Shutterstock

Unfortunately, they are quite vulnerable to pests like aphids and red spider mites so make sure to keep a close eye on them. Primroses do really well in partial shade but will tolerate full sun with some extra care.

4. Petunias

Petunias are a favourite around the world when it comes to hanging baskets. They also make excellent additions to a moon garden since they are most fragrant in the evening.

basket filled with vibrant petunias

Petunia is the lion of the hanging basket annuals; credit: Shutterstock

Unfortunately, those with a very humid climate sometimes struggle with petal blight. If you want a basket that looks full and overflows with flowers, then the petunia is a great choice. They even come in a variety of colours from yellow and black to pink and purple.

5. Million bells

Million bells is a cousin of the petunia that’s a bit hardier when it comes to temperature and pests.

hanging basket of million bells flowers

Million bells flowers provide sunshine in a pot; credit: Shutterstock

They come in a variety of colours that range from yellow to blue to bronze. They will stay in bloom for a long time with just some moist soil and a full day of sun to keep them vibrant.

6. Lobelia

Lobelia usually has blue, purple or white flowers with neat, compacted foliage to add to its overall beauty in a hanging basket.

hanging wicker basket with blue Lobelia flowers

Flower field in a basket? Look no further than lobelia; credit: Shutterstock

Lobelia prefers full sun with moist, well-drained soil and thrives in moderate temperatures. If you want to lure some butterflies to your garden, you can’t go wrong with lobelia.

7. Impatiens

Impatiens or busy Lizzies are well-loved for their array of cheery flowers in all colours. They flourish in shady locations with some protection against wind and rain.

10 Best Annuals For Hanging Baskets to Add Color & Density 9

Busy Lizzies add an impressive pop of colour to hanging baskets. Image credit – Shutterstock

If you live in a humid environment, you’ll need to pay attention to avoid overwatering since impatiens are susceptible to grey mould.

8. Tomatoes

It might seem a bit strange since this is not your typical flowering plant, but you can also grow edible plants in hanging baskets.

tomatoes in hanging basket

Form and function – go tomatoes! credit: Shutterstock

Tomatoes make a great hanging basket plant along with some edible herbs. Make sure to hang the basket in an area with full sun and watch your crop grow and spill over the edge.

9. Clematis

Clematis is a very popular hanging basket plant. There are many different varieties with a range of flower colours.

purple large-flowered Clematis blooms in a hanging basket

Lush foliage and pretty flowers make Clematis a popular choice for hanging baskets; credit: Shutterstock

The best variety for a hanging basket is one of the compact varieties. Clematis generally prefers a sunny spot, but some varieties will tolerate partial shade.

10. Begonias

Begonias are an excellent choice if you’re thinking of hanging your basket in a partly shady area. Begonias have stunning colours ranging from red to bronze that will be displayed throughout summer into autumn.

beautiful begonia flowers in hanging baskets

Begonias are very versatile hanging basket annuals; Credit: Shutterstock

Do take care not to overwater them however since they are quite prone to developing root rot. There are a lot of begonia varieties to choose from, so make sure you get one that suits your climate.

When to plant annuals in hanging baskets

Hanging baskets aren’t that different from planting in-ground when it comes to timing. You will still need to avoid frost and protect your plants against very cold nights. Despite all that, however, it is possible to start your hanging baskets slightly earlier.

Hanging baskets can easily be moved around which makes it very easy to bring them indoors. This allows you to plant your hanging baskets slightly earlier than you would in-ground.

If frost is a possibility, you can simply move them to protect them. The soil in the basket will also warm up faster than ground soil does.

How to plant hanging baskets

Before you can plant, you will need a hanging basket. There are loads of different baskets available at nurseries, some already lined with coco coir ready to be planted.

coir hanging basket

Coco coir is usually used to line hanging baskets; credit: Shutterstock

You will also need to line the bottom of your basket to prevent water from just rushing out of the bottom. Lots of nurseries use liners to increase water retention. You can either buy these special liners or make your own by using a plastic bag with a few holes in it.

The next thing you’ll need is potting soil. You can buy potting soil from a nursery. Never use normal garden soil It’s too heavy for your basket and may carry diseases that will negatively affect your plants. It’s best to choose a lightweight potting soil made especially for hanging baskets.

woman holding potting soil over a hanging basket

Soil for hanging baskets has to weigh less than regular soil; credit: Shutterstock

Now to choose your plants. You can be quite creative and create baskets with a mixture of plants or you can use one species to dominate your basket. If you’re choosing a mixture, make sure to choose a plant that grows tall and upright for the middle focal point. You can place trailing or spreading varieties around it to create a nicely filled basket effect.

As an extra, you can also rip holes into the side of your baskets and add plants to them. A plant that does really well growing like this is sweet alyssum. Also, make sure you know how many plants to plant in your preferred basket size.

Here are the general rules for planting in baskets:

This means that if you have a 30cm (12 inch) basket, you can plant 12 plants in it unless you have a strong grower like fuchsias. In that case, you can only plant 5 plants in the same size hanging basket.

How to care for hanging baskets

Caring for hanging baskets is fairly easy. To keep yours looking great, keep the following in mind:

Do some pruning

One of the best ways to keep your baskets looking great is to regularly prune away leggy and dead plant stems, flowers and leaves. Your plants will grow bushier over time and produce more flowers as you trim away the wilted ones.

Water regularly

Hanging baskets tend to dry out much faster because of how they are structured. The coco coir isn’t great at keeping moisture in after all. You will need to take this into account and water your plants regularly to prevent them from drying out and dying as a result.

If you’re unsure if your plants need to be water simply stick your finger about 2.5 cm (1 inch) into the soil and feel for moisture. If it feels dry, water your plant thoroughly.

Fertilise

Hanging baskets also need to be fertilised more regularly than in-ground plants. The regular waterings will quickly flush out any nutrients in the little bit of potting soil you have inside the basket.

To prevent your plants from starving and to increase the number of blooms, fertilise every week with liquid fertiliser or once a month with a solid fertiliser.

Replace dead plants

Once your plants start to die back, there’s no point struggling to keep these annuals alive. Simply take them out and replace them with other plants to keep your baskets looking great.

FAQs

How many plants can be planted in a hanging basket?

The number of plants will depend on the type of plant as well as the size of your basket. The general rule is one plant for every 2.5 cm (inch) of planting space inside your basket unless you have a vigorous grower. In the case of a vigorous grower like fuchsias, plant 1 plant in every 6 cm of planting space.

planting a hanging basket with young flowers

A good rule of thumb is one plant for every 2.5 cm (inch) of planting space; credit: Shutterstock

Why do my hanging baskets die?

Hanging baskets are a lot more sensitive to lack of water and need more fertilising than when growing the same plants in-ground.

Can you line hanging baskets with plastic?

Hanging baskets can be lined with plastic to reduce the loss of moisture. You will, however, have to make sure to puncture the plastic at the lowest point of the basket to allow drainage. Not doing so may result in your plants drowning and developing root rot.

HOW TO GROW ANNUALS IN A HANGING BASKET-min

Save this pin for later

Why Trellis Tomatoes?

With a range of vivid sunshine colours, intensely sweet flavours and impressive yields, tomatoes are one of the easiest plants to grow and harvest in your garden.

Vine tomatoes are known as indeterminate tomatoes, meaning the vines continue to grow throughout the season.  Bush or determinate tomatoes are much smaller plants, reaching a set height and producing fruit over a shorter time than the climbing varieties.

Benefits of trellising tomatoes

Whether you are growing vine or bush tomatoes, there are several reasons for trellising these cheery fruits as they grow:

Reduce plant damage

Tomato vines produce vast quantities of large, heavy fruit and securing them to a trellis or cage will help to prevent stem breakage.

Most varieties of tomato are indeterminate, reaching an eventual height of 1.8m and have an upright growth habit.  Tomatoes are happier reaching for the stars than creeping along the ground and supporting your tomatoes will also prevent you from walking on, and inevitably squishing, your prized harvest.

Lessen pest destruction and disease

By securing tomatoes off the ground, it’ll be trickier for hungry rodents and snails to nibble their way through crops and reduce damage by insects.  It won’t prevent damage completely but it’ll make it harder for pests to reach fruit that’s higher up.  It also helps to reduce damage from disease due to improved airflow.

Prevent overcrowding

Trellising your tomatoes will help to prevent overcrowding, as well as making it super easy to pick the fruit when ready. It will also allow more sunlight to reach the plants.  Using a trellis is an incredible space-saver and allows you to grow more in your space.

Boost yield

Tomatoes love a helping hand to grow and will benefit from being able to spread out as much as possible.  Using a support system will mean less spoiled fruit due to rotting, more exposure to sunlight and improved access for weeding and maintenance.

Different types of tomato trellis

Whether leaning against a fence or secured in the vegetable patch, trellis is one of the simplest ways to support tomato plants.  It’s really easy to tie the vines on and the structure allows you to attach the stems vertically and horizontally.  Being light and easy to install means trellis can be positioned virtually anywhere.

There are a wide range of trellis options available, you can simply buy your own or for a more rewarding and inexpensive option, choose from a range of materials, and DIY!

DIY trellis

The cheapest and most environmentally friendly way to trellis your tomatoes is to get creative and build your own!  Make sure the height of your trellis is at least 5 feet if you’re growing indeterminate varieties.  You can use bamboo canes and twine for a simple yet effective support system.

Vertical garden trellis

Vertical garden trellis; credit: Ok.ru

Salvaged branches can be weaved together to create a rustic but beautiful structure.  You can also weave twine through the branches for additional support.  The beauty of using wood and string is that you can simply snip the string after harvesting, and store the wood or canes until the following year.

Metal and wood trellis

Another simple way to support your tomatoes is by placing wooden stakes into the ground and attaching chicken wire, metal trellis or wire fencing to the stakes.

A more permanent solution to stake and twine, you could choose to grow a different plant up the trellis the next growing season.

net trellis tomatoes

Credit: Shutterstock

Tomato cage

You can buy inexpensive tomato cages from garden centres.  These are easy to place around the plant and are often used for smaller, container-grown determinate varieties such as Red Alert, Tumbling Tom and Cherry Cascade. 

Although bush varieties can be very compact, the fruits are heavy and will benefit from support.

tomato cage

Credit: Shutterstock

Florida weave trellis

Basically ‘sandwiching’ your tomatoes between lengths of garden twine that are tied to stakes, this method of trellising tomatoes is ultra-cheap and very easy to set up.

The Florida weave works best on tomatoes that are planted in rows and is popular with farmers.

florida weave tomato trellis

Credit: Gardenbetty

Salvaged trellis

If you’re feeling extra creative, you can up-cycle old ladders, bits of fencing, even plastic netting to create effective, imaginative trellis to support your tomatoes and other climbing plants.


As long as they are bathed in sunshine, rich compost and regularly watered, tomatoes will grow happily in a large patio pot, gro-bag or raised bed.

They can even be trained over a pergola, with the fruits hanging down like bunches of grapes. There are so many different ways to trellis tomato vines and given a little TLC, they’ll reward you with a plentiful and delicious harvest.

WHY TRELLIS TOMATOES-min

Save this pin for later

Do Nasturtiums Climb Trellis? How to Train Climbing Nasturtium

Nasturtiums love to climb up a trellis or any natural stem, these plants reach for the sun!

The cheerful blooms of nasturtiums thrive in the poorest of soils, winding themselves in intricate shapes around anything that will allow them to climb.

Nasturtiums are wonderful climbers which will delight your eyes for months. Let’s look at 4 of the best ways to trellis them:

4 ideas for trellising nasturtiums

1. Wooden trellis is ideal for pot nasturtiums

Place it on a wall behind the pot and the plant will curl itself around the trellis with ease.

nasturtiums climbing trellis on the wall

Credit: Islandashley

You can help the plant by curling it onto the trellis if it doesn’t find it to start with. This provides the nasturtium with support and you with brightly coloured flowers to enjoy all summer long.

2. Bamboo poles can work well too

If you plant nasturtiums with French beans, runner beans or any climbing beans, many pests are attracted to the gorgeous flowers. Aphids in particular will flock to nasturtiums by choice, which means they leave your bean flowers and leaves alone. A fantastic combination!

Nasturtiums are often chosen as companion plants because white fly, aphids and other pests adore them. Experienced vegetable gardeners know that the yellow and orange flowers are also really attractive to pollinators so you can help the bees as well.  The trellis for the runner beans transforms into a nasturtium climber. So the aphids devour the nasturtium, leaving the beans to grow well without too many worries.

3. Climb a vine and add colour 

If you have a vine in your garden or under cover, at times the trunks can seem brown and bare in summer so plant nasturtiums! Seeded in soil at the base of a vine, they will climb as vigorously as the grape vines, adding a fantastic dash of colour to any garden, as they grow.

They climb vines and twine around it beautifully adding a decorative look to the vine as it grows. Colours can vary from yellow to lemon yellow to bright orange and their cheerful tubular shapes can be enjoyed until the first frosts.

Nasturtiums climbing vines

Credit: Siena Scarff

Like the vine pictured, they do not need really nutritious soil. In fact, if the soil is too full of nutrients, the nasturtium plant tends to grow expansive foliage rather than blooms. The heart shaped leaves are edible in salads with a spicy tang to taste as are the flowers. Decide if you want to encourage flowers or foliage though and bear this in mind when choosing the soil.

4. Cover up areas with nasturtiums

Use a support system like the edges of your composting area as a trellis, and you can disguise the area beautifully by the climbing stems of nasturtiums. They last the whole summer even until the misty days of November, providing bright colour, pollen and salad leaves in the autumn at a time when very little else is in bloom.

Nasturtiums can cover a compost heap, fence or a garden shed to transform an area into a colourful place to enjoy.

Do Nasturtiums Climb Trellis? How to Train Climbing Nasturtium 10

Nasturtium flowers and leaves are edible and can be added to salads. Credit: Shutterstock

Best conditions for growing nasturtiums

Now read on for advice about the best conditions, soil and how to care for nasturtiums.

Soil: Strangely enough, nasturtiums love poor soil. If the soil is very rich the nasturtium will produce lots of foliage. So if you want colourful flowers, then ensure that the seeds are placed in soil that has not been fertilised or had beans or peas the previous season. This is because these legumes add nitrogen as they grow, which encourages plants to grow. Traditionally cabbages follow beans as they need extra nutrition right through the growing season and even before.

Temperature: These colourful blooms are good from June through to the first frosts.

Fertiliser: There is no need to add extra fertiliser for nasturtiums. In fact, if you do, you will gain a lot of leaves but very few flowers.

Water: These plants can survive a drought. If they are outdoors they hardly need to be watered all summer provided that there has been occasional rain. If you notice the plant drooping, water well or use your leftover grey water like washing up water or what’s left after washing some earthy newly picked potatoes.

DO NASTURTIUMS CLIMB TRELLIS? HOW TO TRAIN CLIMBING NASTURTIUM

Save this pin for later

Best Trellis for Cucumbers: 5 Ways to Grow & Train Cucumbers

There are two kinds of cucumbers; one needs a trellis or something to climb. The other does not. Bush cucumbers grow in that shape and these are happy without a trellis. If however, you have a vine cucumber then a trellis or climbing frame of some sort is essential.

Read on to learn which trellis is good for cucumbers, how to train your cucumber on a trellis and what types of trellis might suit your pot or garden.

Do cucumbers need a trellis?

As the cucumber plant grows, its large leaves need support and its little tendrils try to catch on to anything close by, to enable this plant to grow towards the light. Sunshine is the cucumber’s best friend and so it climbs higher and higher to reach it.

Cucumbers are annual plants, which mean you need to grow new plants each year from seed. Gorgeous bright yellow flowers form on the stems of both bush and vine cucumbers, which are then fertilized by bees and pollinators (or you with a paintbrush! see below…) to become cucumbers.

A trellis supports the growing fruit and also allows good ventilation, which helps to avoid some of the common problems that affect cucumbers. Read on to see how your trellis will help you to produce tasty fruit.

Which types of trellis will support my cucumber?

Three types of trellis will support cucumber plants: in a pot, in a greenhouse and in the soil.

1. Growing cucumbers indoors

The cucumber in a pot needs a lot of nourishment so ensure that your trellis is in place before you plant in your cucumber. This is because you might damage the roots if you stick in trellis, canes or supports after planting.

Some of the best trellis for cucumbers include:

tall cucumber vine climbing a pot bamboo trellis

Pot trellis with strings; Credit: Shutterstock

2. Growing cucumbers in a greenhouse

In a greenhouse, your cucumber has found an ideal spot. Providing that you give it enough nutrition through the soil, this plant gets an early start inside so that your plants can be climbing just after the risk of frost has passed.

growing cucumbers in a greenhouse with irrigation

Credit: Shutterstock

Plant your seeds sideways in the soil and water well. I usually add 2 or 3 sticks for them to climb but also to remember where I planted them! They like a sunny location.

Some greenhouses come with tables or supports. If this is the case you can plant your seeds so that they can climb the support available. I like to take out all the tables because cucumbers will fill your entire greenhouse by the end of the summer and just add a bamboo or pruned branch as the first support for my plant.

Watering indoor cucumbers is essential and the best method is to set up an automatic watering system twice a day to do this for you. If you are using a watering can try to avoid getting moisture on the leaves. They don’t like it much. Cucumbers need a lot of water – see more below.

Some greenhouse pests include red spider mites, aphids and mealybugs. Keep reading to learn how to deal with these below.

3. Is your cucumber plant growing outside?

Remember that cucumbers aren’t frost hardy so only plant your cucumber in the ground after all risk of frost has passed. You can speed up the process by sowing your seeds indoors.  Place the pot on a sunny windowsill and transplant them outside after the warm weather arrives.

cucumber plants in seedling peat pot on windowsil

Credit: Shutterstock

Outdoor cucumbers are usually smaller in size than greenhouse cucumbers and they like to sprawl all over the ground, if not supported on a trellis. The benefit of growing cucumbers vertically by trellis is that it allows a lot more air to circulate among the leaves and the developing fruit, so this makes the plant less likely to become diseased or get eaten by slugs and snails.

Choose a sunny location where direct sunlight will nourish the plant for as many hours a day as possible. Cucumbers love the sun!

Prepare the ground well and dig out any perennial weeds such as bindweed or dandelions. Then dig in some well-rotted manure if you have any or add shop-bought or homemade compost. Cucumbers are hungry plants and need a lot of nutrition so give them lots of energy from the beginning.

Next, think about supporting your cucumbers as they grow, Pallets can make great supports for cucumbers but snails and slugs can hide easily inside the planks so inspect these carefully and remove any intruders.

An existing fence is a great alternative to pallets, bamboo or sticks but you may need to add a few nails so that you can tie in the stem, flowers and developing fruit as your plant stretches its way upwards.

How to make cucumbers climb a trellis?

To trellis cucumbers, you need to get some string in place to gently support the stem as soon as the seedling leaves of the plant appear, and when your seedling has at least 6 leaves, then tie them in carefully to the support. Do not tie very tightly because the plant stem will continue to expand and this will feel like a tight belt after a big dinner! Tie it loosely, allowing for growth. Let the stem continue to grow and use the string simply as a guideline for the plant.

If you have several plants in a row, you can tie some string horizontally joining all the plants and then your plants will happily spread sideways, attaching to the closest string they find. This method also uses up any leftover string that comes on parcels or DIY projects.

The string support is really useful when small fruit starts to develop. Now you can add extra string to support the actual cucumber as it grows. Allow the fruit to rest on the string and as it grows, you can tie in another sting if required.

Tina’s TIPS

How do I pollinate a female cucumber flower?

Sometimes the cucumber plant refuses to fruit. If this is the case for your plant, take a good look at the flowers.

Most modern varieties are all-female but the original plants used to have both male and female flowers, and for pollination to occur, the pollen from the male must touch that of the female.

The female flowers seem to have a little rounded fruit already behind the flower whereas the male flower has a longer creamy extension in the centre. You need to paint the male flower with a brush to remove some pollen, and then paint the female with this pollen, and hey presto! A cucumber should result.

Do remember to remove the male flowers after you pollinate or your cucumbers may be bitter and not as tasty as you hoped.

Why do I have so few cucumbers?

As the very first fruits appear, pick them quite small. This will encourage your plants to keep growing. Otherwise, they may try to go to seed really early, putting all their strength in the first 2-3 fruits.

FAQs

Should I fertilize my cucumber plants?

Definitely! Your plants need regular feeding at least once a week when they are fruiting or you will be disappointed by the size of your crop. You can use:

  1. Tomato feed diluted with water
  2. Home-made feed e.g. nettles, dandelions or comfrey leaves soaked in water for 3-5 days, then added to your watering can is excellent for cucumbers.

How should I water my plants?

Cucumbers need a lot of water but remember not to water the leaves or the fruit directly. The water should go around the base of the plant, not on the leaves.

Rot can occur on cucumber fruit and leaves if they are watered frequently, so in a greenhouse, I advise setting up a watering system aimed at the roots if possible.

Why does my cucumber have grey mould?

Cucumber grey mould botrytis

Cucumber Botrytis; credit: Growingproduce

Botrytis occurs in very humid conditions. Has there been a lot of rain or is your greenhouse door always closed?

Why does my cucumber have curled up, discoloured or mottled leaves? 

This is caused by greenfly and is called the cucumber mosaic virus.

Cucumber mosaic virus on cucumber leaves

Cucumber mosaic virus on cucumber leaves; credit: Shutterstock

Why do my cucumbers taste bitter?

Check if your plant is in a draught or has there been a cold spell? If the temperature changes suddenly the result is often a bitter taste to the fruit.

Another possibility is pollination – remember that male flowers should be removed after your pollinate. Some very odd shaped cucumbers which taste bitter can be the result if you forget to do this!

BEST TRELLIS FOR CUCUMBERS 5 WAYS TO GROW & TRAIN CUCUMBERS-min

Save this pin for later

Where to Put a Trellis? 15 Ideas to Use a Trellis in Your Garden

Thinking about installing a trellis in your garden? There are many potential locations for it.

Mounted on a wall, in or at the back of a planter, behind a sitting area as a privacy fence, in your vegetable garden as a support for plants—you can always find room for a trellis in your garden.

That said, you don’t want style and design to be your only considerations when installing a trellis.

How to decide where to put a trellis in the garden

To find the best place for your trellis, consider what plants will grow on it, sun exposure, trellis material and design, air circulation, and local regulations. Let’s take a closer look at each of these factors.

This quick guide applies to both store-bought trellises and those you make yourself.

Plants

Full-sun climbers like clematis like to face the south while peas or green beans need only up to about five hours of sunlight and prefer cooler temperatures.

Always position the trellis with the plant it supports in mind.

Plants that need a trellis include:

Where to Put a Trellis? 15 Ideas to Use a Trellis in Your Garden 11

Photo by Bailey Gullo on Unsplash

Type of garden

Maximize sun exposure by placing your trellis with your garden orientation in mind.

Air circulation

Most plants need good air circulation to develop well, resist pests, and stay healthy. This is something to remember when installing a trellis on a wall or in a corner.

Trellis design

Some trellises are designed for a specific use such as arch trellises for walkways or A-frame trellises for cucumbers. Trying to fit a ready-made trellis to a more problematic location isn’t always the best idea. You may be better off building a simple DIY trellis using readily available materials.

Material

Consider also the material from which your trellis is made. Wooden trellises that haven’t been treated to resist rot won’t last long if exposed to the elements, so give them some cover if possible.

For an exposed location, choose a pressure-treated or painted wooden trellis, or pick an alternative material like stainless steel, copper, or PVC.

Mowing and garden maintenance

The beauty of a trellis may carry you away, but you don’t want to install it where it gets in the way of mowing and other regular garden maintenance activities. Freestanding trellises in particular tend to need some space around them.

Local regulations

Depending on local regulations, some trellises may be considered fences. This means they shouldn’t exceed the maximum height allowed for fences, e.g., 2 meters. Always check local regulations before installing a large trellis.

Inspired trellis location ideas in your garden

The best locations for trellises include garden walls or fences, vertical vegetable gardens, planters, and anywhere you want to create a privacy screen. Let’s explore some of the best locations for a garden trellis.

There are plenty of options across styles and budgets, so it’s quite impossible not to find an option that works for your space.

1. Mounted on a wall or fence with brackets

Create a striking backdrop for your garden by installing a wooden trellis against a back wall or fence. You’ll need brackets and screws to support the frame.

Wall mounted trellis

Wall mounted trellis; credit: BHG

2. In the vegetable garden

A-frame trellises are great for cucumbers and peas. For beans, you can use simple pole trellises. For squash, tomatoes, and melons wire mesh or any grid trellis provides excellent support.

Close up of peas growing up on a trellis

Simple string trellis; credit: Shutterstock

3. In or behind a planter box or container

Stake a trellis in a planter box or container to help tall plants grow straight. Always choose a trellis that’s proportional to the size of the container. Avoid installing tall trellises in small pots. You can also add one behind a box planter for décor.

Planter box trellis

Planter box trellis; credit: HomeTalk

4. As a privacy screen anywhere you need it

Diamond-pattern wooden trellises and wrought iron ones are popular as privacy screens in any area of the garden. They are often more elegant than wall partitions or bamboo fences and provide the air circulation climbing plants need.

Privacy screen trellis

Privacy screen trellis; credit: HomeTalk

5. Right into a flowerbed

Small, corkscrew trellises provide elegant support to plants without shading neighbouring plants. They’re a good choice whether you want to add visual detail to a flower bed or simply protect plants against mischievous winds.

Flowerbed trellis

Flowerbed trellis; credit: Anikasdiylife

6. In any vertical garden

Trying to build a vertical garden? Whether it’s meant to be a new feature of your main garden or a separate garden that reimagines unused space, trellises can add vertical height to your greenery and help plants develop better.

Vertical garden trellis

Vertical garden trellis; credit: Ok.ru

7. As a partition between a garden and yard

A simple trellis can help you create a transitional area between your garden and yard. It can also divide different areas of your garden.

Trellis partition

Trellis as partition; credit: HomeTalk

8. At the entrance to your gazebo

Add some colour and fragrance to your gazebo entrance by hanging a trellis above it. Or frame the entrance with two freestanding trellises. Even a small trellis in a planter can make guests feel more welcome.

Gazebo trellis

Gazebo trellis; credit: Wayfair

9. To create a walkway tunnel

Few garden features are more striking than wisteria growing on an arched trellis tunnel. You can opt for a wrought iron trellis or simply build one using arched cattle wire supported by T-posts.

Trellis as tunnel

Trellis as tunnel; credit: Learningandyearning

10. To frame outbuildings

Garden storage spaces may be necessary, but they don’t have to look drab. With trellises, you can frame them in greenery and colour.

Trellis on a shed

Trellis on a shed; credit: Pinterest

11. Over a downspout

Stuck with a downspout that looks at odds with everything else in your garden? Install a trellis over it and grow a climber to make it look as if it’s raining greenery.

Downspout trellis

Downspout trellis; credit: Gardeningforlife

12. As a fence trellis

Whether it’s between neighbours or different parts of your property, a fence trellis is easier to set up than a regular fence and looks way better. It also improves air circulation and requires less maintenance.

Fence trellis

Fence trellis; credit: Danscollectiblesandmore

13. Leaning against a wall

A simple wooden trellis or a repurposed pallet helps you turn an average wall into a green corner. But make sure that the trellis is fixed in place or heavy enough not to be upset by the wind.

Against a wall trellis

Against a wall trellis; credit: BHG

14. As a patio or deck trellis

Got a patio or deck in your garden? You can choose from a variety of standing, hanging, and attachable trellises that can enhance the outside as well as the inside of your lounging space.

Patio trellis

Patio trellis; credit: BHG

15. Just about anywhere else in your garden

You can add more texture, contrast, and height to your garden with freestanding trellises for décor. You can use them to border paths, provide a backdrop for low-growing plants, cover the shaded space between trees, and in many other creative ways. Just make sure to consider the requirements of the plants.

The Trellis Factor

Few garden features highlight plants as well as trellises. Regardless of your gardening style, you can always find a place for a trellis on your green patch, whether it’s dazzlingly ornamental, minimalist, or classic.

But while trellises themselves can be installed just about anywhere, remember that the climbers and creepers growing on them are a bit more pretentious. Let the sun and shade requirements of the plants guide your choice and you won’t ever place a trellis in the wrong place.

WHERE TO PUT A TRELLIS? 15 IDEAS TO USE A TRELLIS IN YOUR GARDEN

Save this pin for later

Why Build a Trellis – 7 Easy & Affordable DIY Trellis Ideas

If you’ve been shopping for a trellis lately, you may have felt the same way as many budget gardeners—that trellises are overpriced.

A simple 1.8 x 1.2 m wooden trellis can cost £50 or more. Large ornamental trellises such as arched ones can cost ten times as much. Meanwhile, the materials from which these are made are often available in the same stores for significantly less.

Read on to find out more about this common problem and how to build a trellis for less.

Why is a trellis so expensive?

Factors driving up trellis prices include material, shape, style, location, and installation. Let’s take a closer look at these.

Material

Wooden trellises pressure-treated to withstand rot are the most expensive, with vinyl, PVC, composite, and plastic trellises following close behind. These can last 10 years or more and require little maintenance. They’re also lightweight, making them easy to install.

At the other end of the scale are metal trellises, with iron and stainless-steel ones being somewhat cheaper. They’re also heavier, and lower-end varieties may be prone to rust.

Shape

Trellis arches, ovals, trees, hearts, and other ornamental shapes cost more than simple square, rectangular, column, or triangular trellises. They do catch the eye, though.

Garden trellis entrance

An arch trellis costs more, but it catches the eye though; credit: Shutterstock

Wooden trellises in the classic diamond pattern often fall somewhere in between in terms of price. Even so, their cost can add up to hundreds of pounds in a small garden.

Style

Modern, abstract, or farmhouse-style trellises can become a centre point in any garden. But as you’ve guessed, they come with a higher price tag. The combination of creative design and higher-end materials that characterize them drives the price.

Location & Installation

Installation can further add to the cost of the trellis. This can vary a lot depending on the provider and where you want the trellis installed, assuming you want to pay a gardening service to do that. Often, you can install it yourself.

Installing downspout, vegetable garden, or garden bed trellis is more affordable than trellis for fencing, patio, walkway, or deck. But it may still feel pricey.

Does all this mean that you should give up on getting a trellis if you’re a budget gardener? Of course not. Few things can enhance a garden better than a trellis.

You could build your own instead. Building a trellis will save you at least half the money you’d normally spend on buying one, and often much more. You can also forget about shipping costs.

It’s not just a question of saving money.

Why Build a Trellis?

More than making your outdoor space look nicer, a trellis increases your gardening space, helps plants develop better, and enables you to create a privacy partition.

Let’s take a closer look at the best reasons to build a DIY trellis.

Increase Your Vertical Gardening Space

Whether you garden indoors or outdoors, a trellis helps you tap into the benefits of vertical gardening to grow more flowers and vegetables. It can transform inaccessible areas of your garden into green corners.

Create a Garden Partition

Thinking about creating a green nook where you can sip some tea and unwind? Trellises can provide privacy without the hassle of building a fence. They also let in air, creating better air circulation for the neighboring plants.

Help Climbing Plants Grow

Climbing plants like honeysuckle, hydrangea, and wisteria will often grow faster with the support of a trellis. What’s more, vertical support increases your plant’s exposure to sunlight and reduces the risk of rot.

Grow Healthy Vegetables

Some vegetables need trellises even more. Cucumbers, peas, vining tomatoes, or pole beans need support to fully develop and grow straight. Some gardeners also use a trellis to grow squash or melons, which otherwise would take a lot of ground space.

Beans in the garden

Some plants need a trellis to grow properly; credit: Shutterstock

Harvest Crops More Easily

You don’t need to suffer from chronic back pain to appreciate the convenience of harvesting cucumbers or peas from a trellis. If you plan to grow a lot of crops, supporting your plants will save you time—and back pain.

Prune and Fertilize More Quickly

You can prune and fertilize trellised plants with less effort. What’s more, a trellis makes it easier to keep an eye on your plants since it’s always there before your eyes. This can make inconveniences like pests easier to spot before they become problems.

7 Simple and Affordable Trellises You Can Build Yourself

Don’t let your plants pine for support. While saving money for your dream trellis or hunting for best buys, you can build a trellis from readily available materials such as bamboo, rods, or PVC pipes.

Here are some of our favourite ideas to get you started.

1. Bamboo and Twigs Trellis

Got some spare bamboo stakes and/or some twigs gathered from the trees in the yard? Get some strong rope or polyester-free string and tie them together in a lattice.

Bamboo and twigs trellis

Bamboo and twigs trellis; credit: Shutterstock

Stake the larger bamboo first and build your trellis around it. If you plan to grow heavy vegetables on it, try to lean it against a wall or fence for extra support.

2. Vertical Rods Trellis

For this one, you’ll need wooden stakes, iron rods, or any other similar materials plus some stretch tape. Gather three stakes or rods and tie them with stretch tape 4/5 of the way.

vertical rods trellis

Vertical rods trellis; credit: Shutterstock

Stretch them out and you’ll get a simple and durable triangular trellis for peas, beans, and small simple ornamentals.

3. PVC Pipes Trellis

You’ll need PVC pipes, corners, and T-connectors. Assemble the pipes into an A-shape, making the structure as long and as tall as needed. Tie strings from the top section on to small twigs and insert these into the ground next to your plants. Done!

PVC pipes trellis

PVC pipes trellis; credit: DIY network

4. String Trellis Via Posts, Walls, and Fences

Add stainless steel hooks and wire to any existing wooden structure such as wooden posts, the wall of a shed, or an old fence. Then simply string the wire horizontally.

Close up of peas growing up on a trellis

Simple string trellis; credit: Shutterstock

For extra support, you can add vertical wire as well to create a mesh. Opt for a weatherproof, eco-friendly wire.

5. Standing Wooden Garden Trellis

Wooden DIY trellises require a bit more work. But you can save four times or more the cost compared to buying a similar one in a store.

You can build them out of 1x2s and 2x2s. Choose pressure-treated wood for it to last. You’ll also need nuts, bolts, a nail gun, and a drill.

Standing wooden trellis

Standing wooden trellis; credit: Crazy Laura

Cut the wood according to the desired size and nail the horizontal bars to the longer vertical ones. Building a waist-high, A-shaped trellis this way takes less than an hour.

6. Repurposed Window Frame Trellis

Any wooden frame will do. You can also use an old door you no longer need. Staple some chicken wire to it and place it against a wall or in a corner where plants can climb on it. Use this approach to create a DIY partition for a patio or porch.

Repurposed Window Frame Trellis

Repurposed Window Frame Trellis; credit: Pinterest

7. Arched Trellis

You can build a simple arch trellis that can last many years in just half an hour. You’ll need two T-posts, stainless steel wire mesh, and zip ties. The arched wire mesh goes between the T-posts. For a longer arch, increase the number of T-posts.

diy arched trellis-wire mesh

Image Source: Moolton. Arched wire trellises can be simple to make and look fantastic once plants start to fill it out.

Start by driving the T-posts into the ground and then place the arched wire mesh between them. Tie the mesh to each T-post with the zip ties.

It’s that simple. Over time, you may need to add new zip ties. But other than that, you won’t have to do any maintenance. This arch is strong enough to support cucumbers and squash.

Trellis Up Your Garden

Trellises add flair to your garden while helping you grow more plants vertically. They may be expensive in most garden stores, but you can always build your own for less from readily available materials.

In the end, remember that trellises are not just a way to style your garden. They’re simply useful to have. Just look at those beans or peas climbing on them, and you’ll understand perfectly what we mean.

WHY BUILD A TRELLIS – 7 EASY & AFFORDABLE DIY TRELLIS IDEAS-min

Save this pin for later

Square Foot Gardening: Tips and Tricks

As the growing season gets underway, we’ve spent a lot of time looking at different crops you can plant in your garden. From towering corn stalks, to hanging baskets of strawberries and tomatoes – we’ve got growing guides on all the best edible plants for beginners to grow.

If you’ve been browsing inspiration for your own vegetable patch, chances are you’ve come across those incredibly photogenic plots that are portioned out (rather satisfyingly) into smaller squares, with different leafy bits in each section. This is known as square-foot gardening – a technique that lots of gardeners swear by. So, what’s the deal with square-foot gardening? Let’s take a look!

What is square foot gardening?

Square-foot gardening is a method of intensive planting, based on growing things in squares of roughly 30cm (or, a foot, hence the name). The idea is to create an orderly gardening system that makes it easier to plant lots of vegetables in a given space.

The original square foot gardening was based on a raised bed of 4ft x 4ft (1.2m x 1.2m), divided into 16 squares. A different crop would be planted in each square, with either 1, 4, 9 or 16 individual plants, depending on the eventual size of the crop. For example, you might only have space for one bushy tomato plant, but sixteen radishes could grow quite comfortably in the same space. Organised, right?!

a large vegetable patch in a garden, using square foot gardening methods

What are the benefits of square foot gardening?

Square foot gardening is a great way to maximise a limited space, and condensing your work area does reduce the effort needed to look after it, to some extent.

However, there are some clear advantages – for example: dense, tightly-packed foliage will make it much harder for weeds to grow in your beds. It will also make companion planting more effective at repelling pests and enhancing flavours.

a raised vegetable bed for intensive crop growing

Closely-grown crops will also retain more heat, boosting growth and offering some protection against cooler weather. The limited size of the vegetable beds also make it easier to cover them with fleece, netting or a cold frame.

Some things won’t change though, like crop rotation. It’s still important to replace your harvested vegetables with a crop from a completely different plant family. To prevent a build-up of pests and soil pathogens attracted to one type of plant.

Are there drawbacks to square foot gardening?

This intensive style of gardening doesn’t suit every type of crop, so if you’re keen to grow perennial produce, or larger vegetables (like squash, bushes or fruit trees), you’re better off using a different method.

Also, while a single 4×4 grid is practical for small gardens, it can be expensive and laborious to set up multiple grids to fill a bigger space. The soil itself is a considerable investment, and these intensive plots do need a lot of watering in summer.

How many crops can you grow in each square?

Once your square foot gardening grid is set up, it’s time to get planting. Here’s a (non-exhaustive) guide to give you an idea of how many of each type of crop you can grow inside your squares.

1 plant per square:

4 plants per square

9 plants per square:

16 plants per square:

Larger vegetables

If there are some larger crops that you want to grow, it’s possible to grow certain plants across two squares. These plants need the extra space to grow fully without crowding out other plants nearby:

square foot gardening methods mean you can grow more crops in a small space

More tips for square foot gardening:

In addition to growing the right number of crops in each square, there are a few bits of good advice that will help you grow a healthy vegetable patch.

  1. Maintain a variety of plants. We mentioned crop rotation earlier, but it really is important to keep a diverse selection of plants when you’re growing intensively. It helps to keep the nutrients in the soil balanced, and reduces the risk of one type of disease or pest building up.
  2. Think about height and light – keep tall-growing plants (like tomatoes or peppers) on the north side of your vegetable bed, so that shorter sun-loving crops can still get plenty of light. Alternatively, if you’re growing any of these shade-loving vegetables, grow them behind (to the north of) taller crops.
  3. Companion planting is about growing certain crops near each other to create benefits. For example, luring pests away from more valuable crops, or enticing more pollinators for a better harvest. Take a look at our more in-depth guide to companion planting (as well as some good crop pairings) to help you boost your yield and maintain a healthy vegetable patch in a crowded space.

Using the square foot gardening method is a practical and easy way to grow crops – perfect for small spaces and handy for beginners. Although there are some drawbacks in terms of initial efforts, the results are absolutely worthwhile once you get the hang of it!

SQUARE FOOT GARDENING TIPS AND TRICKS-min

Save this pin for later

Raised Bed Gardening Ideas

Raised beds can make messy gardens look neat and orderly, or bring an exciting new dimension to an otherwise bare space. There are many benefits to growing plants above the ground – for example, it’s easier on your back, and containers generally limit the amount of upkeep each bed needs. Plus, raised bed gardening ideas are a fun way to add style and character to your garden aesthetic.

The only drawback to raised bed gardening is that you have to prepare your garden beds before doing anything else – so, without further ado, let’s take a look at how to get started.

a raised planter filled with poppies and wildflowers

What is raised bed gardening?

In case you need a reminder, raised bed gardening is a method that simply moves plant beds above ground, rather than in-ground. Raised beds are conventionally about a metre wide, and can be anywhere from 15cm above the ground to waist-height.

Raised bed gardening helps you control the condition of the soil within the beds, and makes it easier to conserve water (especially if you stagger raised beds down a natural slope in your garden). It’s also possible to implement square foot gardening principles and companion planting, allowing you to grow plants (particularly vegetables) much more intensively than conventional rows of crops.

Because of their size and shape, it’s easier to cover raised beds and protect your crops from cold and pests, extending the growing season. Being closer to eye-level makes it easier to spot pests in the first place, and to watch out for signs of disease. Dense planting also means that, once your crops or flowers get established, it’s much harder for weeds to break though (more tips on keeping flower beds weed-free).

Raised beds also keep plants out of reach of children or pets – useful if you’re growing anything that could be toxic – and, by the same logic, make it easier for adults to reach the beds. If you’re growing a sensory garden for people with physical impairments, raised bed gardening ideas are the way to go.

a raised planter made from reclaimed railway sleepers filled with edible plants

Planning your raised bed garden

A little planning goes a long way when it comes to a raised bed garden. It’s very difficult to change the materials of your beds, or rearrange them, once they’re in place, so take the time to figure out how you want them to look from the start.

Raised bed layouts

The best position for your raised bed will be somewhere that gets full sun throughout the day (at least 6 hours). The majority of crops need full sun to flourish, and if you end up growing vegetables that prefer shade then you can always create more cover at a later point.

You don’t need a lot of space to build your raised bed garden, and you can always start with one or two beds and slowly expand as they become established.

Another thing to consider is water access. Although you can obviously use a hose to take water from one end of your garden to the other, long-term you’ll thank yourself for keeping your raised beds as close to the spigot as possible. You’ll be watering your raised bed at least every few days, so having water within easy reach will be a huge convenience.

Materials for building raised beds

The essential thing to consider when you’re deciding on the materials for building your raised garden beds is that you don’t want chemicals to leach into the soil. This is important for the health of your plants, but even more so when you’re growing anything you intend to eat! Be cautious of pressure-treated timbers (which are often treated with chemicals), and opt for untreated hardwood, concrete, or reclaimed timber sleepers.

The safest option may be to buy prefabricated materials intended for building raised planters. These will typically be rated for food safety and offer the durability needed for outdoor conditions. Look for features like double-skinned walls (which provide insulation against sudden temperature changes and moisture loss), or options that come with plastic lids or covers for extra protection against the elements.

What’s your garden environment like?

Both the position and material of your raised beds will be affected by the weather exposure they get in your garden. As well as direct sunlight, you should take into account where your garden seems to catch the most wind, and where water runoff tends to pool. Consider how to protect your plants before you start growing – could you install a screen, or dig better drainage?

Wildlife management

It’s always wonderful to see more birds and wildlife in our gardens… that is, until we notice them nibbling our crops and trampling our seedlings! If you have the pleasure of living in a rural location where foxes, rabbits and deer are frequent visitors, factor this into your raised bed design. For example, surrounding your beds with a perimeter of fences or nets.

raised bed gardening ideas: a vegetable patch and flower beds fenced in with pallets painted white


When it comes to raised bed gardening ideas, there are no right or wrong answers. Just take the time to assess your outdoor space as well as your own growing goals before you start creating your beds. Happy growing!

RAISED BED GARDENING IDEAS

Save this pin for later

13 Garden Focal Point Ideas to Create the Star of Your Garden

Does your garden feel a bit empty? Are you sick of seeing your bins every time you step outside? Knowing how to create a garden focal point is the answer.

Whether it’s an arrangement of plants or a practical structure, having a garden focal point is what gives your landscaping purpose. A focal point will draw the eye towards it, making sure all of the attention is on your favourite garden features and away from less attractive areas.

Let’s take a look at how to create a garden focal point, including what makes a good focal point, and how to make yours the star of your garden.

Garden focal point ideas

The right focal point will transform your garden from a simple space to cast your gaze over, into a more intriguing landscape that deserves a closer look. Whether you choose a practical part of your garden to be the focus (like a deck or greenhouse), or an ornamental feature – like a plant or flower bed – it should connect with its surrounding elements so attention naturally moves across the space to take everything in.

Create a garden focal point with plants

Using plants is a natural way to create a garden focal point, and can be more subtle if you only have a small space. Of course, it doesn’t have to be – here are some ideas for botanical focal points to inspire you:

If you have a large tree in your garden, it’s going to be a focal point whether you like it or not. Enhance its natural beauty by keeping the area around it tidy, and adding nature-friendly decorations, like bird boxes or an insect hotel. You could also surround the base with containers of shade-loving plants, which will happily grow in its shelter.

Climbing plants will take some time to flourish, but if you have the time to wait, they make for stunning focal points. Honeysuckle and climbing roses have the added benefit of being beautifully fragranced, but wisteria or climbing hydrangea will also look gorgeous. Train them over a doorway, pergola, arch or shed.

A cluster of containers looks amazing, especially when they’re in full bloom and colour-coordinated with each other.

We’ve got some container garden inspiration for you to see what I mean. Keep in mind that floral displays will only look their best for a couple of seasons – you might want to arrange them around a larger tree or evergreen topiary to maintain your garden focal point year-round.

Choosing a plant for its intense colour makes it easier to tie other decorative elements into your focal point.

For example, the vibrant pinks and purples of this fuchsia would look great echoed in the cushion covers of a bench on a balcony, or by using pink containers at ground-level.

fuchsia in a hanging basket container garden

Botanical focal points don’t have to be solely ornamental – a vegetable patch or fruit tree can be both an intriguing thing to look at and an excellent conversation point.

Take a look at foodscaping tips if you want to grow plants that are as beautiful as ornamental flowers.

Structural, functional garden focal points

Making the most of your outside space usually means having a number of structures in your garden, like a shed, patio, or shelter.

These are all excellent candidates for becoming a garden focal point. You can complement them with other decorative objects – like fountains or sculpture – especially if your garden is large enough for several focal points in different areas.

Let’s start with garden sheds. If you intend to use a shed as a focal point, make sure it’s in excellent condition, and don’t hold back on decorative features.

Create a path leading to its door (stepping stones look pretty), and keep the surrounding foliage well-pruned. These garden shed ideas will show you all the ways in which your shed can be working harder for you!

a minimalist shed painted black and brown in a gravel garden

Patios and garden decking are usually a place for looking out over your garden, but they can be a focal point in themselves. Add a pergola or gazebo to create structure (and shelter), covering it with lighting and plants.

If you decide to make your seating area a focal point, remember to balance it out with a second point of interest that you can see while you’re relaxing.

Sculptural containers are a good way to break up busy flower beds without overshadowing them. If you like a cottage style garden with waves and waves of flowers, try putting seasonal plants or hanging baskets to pull focus to specific areas. Our vintage garden ideas offer some creative ways of doing this!

Fancy turning up the heat? Having a dedicated BBQ area, or even an outdoor kitchen makes for a fantastic garden focal point.

It’s not up everyone’s street, but take a look at these gorgeous outdoor kitchen designs to see what we mean.

Is your outdoor space a family-friendly zone? There’s no reason why a beautiful playhouse or treehouse can’t be a garden focal point. The key is making sure it’s well-loved, and drawing attention with a path, and coordinating colours across other elements in your garden.

Water features create a soothing ambience in your garden, and are hypnotising to look at – perfect for a focal point.

Would you like a natural-looking feature like a pond, or do you prefer the sound of moving water from a fountain or rill? There’s a style of water feature for every outdoor space.

Building an archway will create a garden focal point if your garden is lacking in structure. Use it to create separate garden areas for different purposes, with privacy screens as a nice addition.

A garden swing seat can be both practical and beautiful, acting as a charming focal point from your garden but also a cosy viewing spot. Choose a style that works with your garden aesthetic.

How to make your garden focal point stand out

There are a few things to keep in mind when you’re planning your garden focal point. Here are some tips to help you ensure yours is the right fit for your garden:

An attractive, visually-pleasing garden focal point needs more thought than simply plopping a nice bench in front of your flowers. Whether you’re looking to add a finishing touch or treating your centrepiece as a starting point for the rest of your garden design, it’s important that there’s a connection between the focus of your garden and its surroundings.

Take a look at lots of garden style inspiration to see what kinds of features might make a good focal point for your space. We’ve got gorgeous Moroccan-themed gardens, pared-back Japanese-inspired gardens and beautiful Grecian-style spaces to get you started. Take your time in choosing the right garden focal point for your home.

13 GARDEN FOCAL POINT IDEAS TO CREATE THE STAR OF YOUR GARDEN-min

Save this pin for later

7 Garden Cinema Ideas to Host a Cinema Party at Home

Outdoor cinema screenings were a huge trend in 2019, and it looks like – despite everything that’s happened since – drive-ins and sit-outs are making a careful comeback. Even so, if you’re not ready to face the crowds (or never were), why not host your own outdoor film party at home?

garden cinema ideas with popcorn and blankets

Garden cinema ideas: setting up your silver screen in seven steps

A garden cinema night is a great way to hang out with people while staying socially distanced, and it’s much more convenient than going out. You always get the best seats, and have full control over the guest-list, menu and dress code… bliss! Plus, you’re not just limited to films – once your garden cinema is set up, you can use it for TV, video streaming or gaming.

What better way to spend the summer than having a mini film-fest at home? You don’t even need a conventional garden – if, like me, you’re currently limited to a balcony or roof terrace. Once your outdoor cinema is set up, it’ll become your go-to spot year after year for parties, date-nights and family hang outs.

Here’s our super-easy seven-step guide to creating the best outdoor viewing experience, along with a bunch of gorgeous garden cinema ideas to inspire you.

Scope out your spot

The ideal location for an outdoor cinema set up needs three key things:

These are really the bare essentials, and anything more than that is going to be a plus, comfort-wise. If you’ve already got some nice garden features – like a patio, deck or covered area, you’ll probably want to try and incorporate them.

If you want a home cinema to become part of your routine, what about a more permanent setup? I can’t think of anything better than turning a she shed or garden man cave into a movie-and-gaming den.

Working with a bare-bones garden? No problem! Try setting up a tent or gazebo to make your film screening more cosy (especially later in the year!)

Prepare a projector

I remember when home projectors used to be seen as some kind of specialist equipment (no thanks to insanely high costs). This just isn’t the case any more, and there are ways to create a garden cinema on any budget. Projectors are also quieter and more compact than ever before, and are capable of producing much better images in partial light.

If you’re happy to make a hefty investment, look for projectors with a high lumen count – at least 3000. The lumen measurement indicates how easily you’ll be able to see the on-screen images in brighter lighting, so if you want to start showing films before dusk, the more lumens the merrier. High-end projectors typically start at about £700 for this kind of cinema-level experience.

Right at the other end of the budget are smartphone projectors. Although the picture quality might not be Oscar-worthy, they can usually give you about 8x screen magnification for around £20. Connect your phone to a bluetooth speaker, and you’ve got yourself an entirely wireless little cinema in the palm of your hand. Perfect for a couple of people watching together, or for a solo movie marathon.

Connect your content

It sounds simple, but don’t leave it to the last minute to hook up your video source – it’s a recipe for technical difficulties! Obviously, there are heaps of options available, so whether you’re connecting your Apple TV, Chromecast, laptop or TV, make sure you’ve got all the wires you need to reach your projector.

Think about sound, too – most projectors have a standard 3.5mm jack that you can plug speakers into, or you could look for a model with bluetooth connectivity if you have a soundbar. Sound dissipates much more outside than it does indoors, so you can probably err on the side of speakers with more power.

Don’t forget about your neighbours though! If you live close to any other houses, keep the sound respectful or connect bluetooth headphones – or, I don’t know, invite them over?

Set up your screen

Just like your projection equipment, there are several options when it comes to outdoor cinema screens at home. Your favourite option will depend on whether you’re trying to create a garden cinema on a budget, and how much use you’re expecting to get out of your screen.

Student film budget: Hang a crisp white sheet from a washing line, from two poles or between two hooks fixed to your wall or shed. You might need to fashion something to weigh the bottom down and stop it flapping in the breeze (like pegs).

Indie film budget: If you want something a little more professional, there are several options for mid-range cinema screens at home. It’s possible to sew a DIY projector screen that works pretty well. Just stitch some blackout lining together (when you go shopping, remember it’s white), and attach strips of timber to the top and bottom. Add screw-hooks to the timber at the top, hammer some nails at the right height onto your fence, and you’ll be able to hang your screen whenever you like.

Or, simply buy a projector screen, which will offer great picture quality and cost somewhere between £20-100. If you’re happy to pay a little bit more, you could get a motorised one that unrolls with a remote control.

Blockbuster budget: As the outdoor cinema trend has been growing, so too have the number of places you can buy (or hire) an inflatable screen. Remember you’ll need a power supply for the air pump, and that these can get quite noisy.

Decide on your decor

Not every movie night needs the outdoor party treatment, but a couple of small touches can make the evening more pleasant while you’re watching.

For example, a little bit of light is helpful while everyone gets settled (and possibly to help people find their path to the toilet mid-movie). Fairy lights or lanterns are subtle – we’ve got loads more garden lighting ideas if you need inspiration. Whatever style of lighting you prefer, check that they’ll be easy to turn off when the film starts.

Finally, stock up on citronella candles and diffusers – biting bugs like mosquitoes hate it!

Create some comfort

The joy of bringing the cinema to you is that there’s no limit on how comfortable you can be. Yes, you could simply lay a blanket and some cushions out on the lawn, but why stop there?

If you haven’t already got a decent set of garden furniture, now could be the time. A cosy sofa, reclining armchair or even a luxurious swing-seat would help you enjoy your film nights in style and comfort.

Or, you could go for more casual seating – a set of chilled-out deck chairs, or a hammock, maybe? I’m also a big fan of outdoor bean bags.

Haven’t tried one? You’re missing out, seriously. Whichever kind of seating you choose, always load your guests up with cushions and blankets to stay snug once the sun sets.

For those of you that are really serious about enjoying yourself, I’ve got some suggestions for you. First: fire pit. Second: hot tub. Either of these little babies will keep you warm all night, and are experiences you just can’t get at a regular cinema. Need a bit more convincing? Check out our fire pit ideas and hot tub ideas next.

Secure your snacks

The final touch to any film night: snacks. It could be as simple as banging some popcorn in the microwave, or as elaborate as nibbles that fit into the theme of your movie. Personally, I’m in favour of ordering a takeaway so someone else gets to do all the hard work.

It’s equally important to keep your guests hydrated throughout the film. Bring a cool box outside with you so that everyone has easy access to a chilled beverage whenever they need one (this also saves you having to pause the film while people top their drinks up)!

That’s really all there is to setting up your own outdoor film fest – hopefully some of these garden cinema ideas have inspired you! Unfortunately, we don’t have a guide for helping you choose what to watch… you’re on your own with that!

7 GARDEN CINEMA IDEAS TO HOST A CINEMA PARTY AT HOME

Save this pin for later

How to Grow Basil in Your Garden

Growing herbs is an easy and practical way to start getting your fingers green, particularly if you only have limited space, or are looking for plants that can survive on a sunny windowsill. Learning how to grow basil will not only reward you with a delicious cooking ingredient, but give you the skills you need to move onto other herbs, like mint, chives, dill and coriander.

If you like Italian dishes – especially tomato-based pasta sauces, homemade pizza or delicious pesto – basil is going to be a great choice for your garden.

several varieties of basil growing in a flower bed herb garden

Growing Basil: Getting Started

For the best results, you should plant basil seeds indoors in the first part of the year and let them develop into seedlings before moving them outdoors a few months later. With the right care, basil plants started in February or March will provide you with delicious, aromatic leaves through summer and autumn.

Sow in: February, March, April, May, June, July

Move outside: June, July, August

Harvest in: June, July,  August, September

Planting basil

Start your basil plants off by planting them in 7.5cm pots. Fill the pot with compost (tips on how to make you brown compost here), then sprinkle a few basil seeds on the surface and cover lightly with vermiculite. Water them, and then cover. Using a propagator tray is recommended, but if you don’t have one then you can fasten a sandwich bag around the top with an elastic band, or you can cut a plastic bottle in half and place it over the seeds. Adding a cover – whichever method you choose – will trap heat and moisture, helping your seeds to germinate.

Leave the cover on for a few weeks, until your seedlings are about 3-5cm tall, and have their first “true” leaves (not the little round ones that sprout first). When they look sturdy enough to handle, you can split them out so you have 1-2 per 7.5cm pot.

How to Grow Basil in Your Garden 12

How to grow basil

Frost will damage your basil, so don’t move it outside until the nights are reliably above freezing. Like tomatoes or chilli peppers, you can harden your basil plant off by putting it outside for a couple of hours, and then bringing it back inside – gradually increasing the amount of time each day. This process helps young plants acclimate to the exposure of outdoors, compared to indoor conditions.

When your basil is ready to move into the ground, choose a sunny spot that’s well-sheltered. You can also leave basil to grow in containers, sizing up every time you notice roots poking out of the bottom. If you’re also growing tomatoes, you might want to position the two near each other – basil is considered a companion plant to tomatoes, and is thought to improve their flavour!

Keep your basil plants healthy and productive by pinching the tips off of branches every so often (focusing growth at the centre of the plant), and removing flowers before they can form. It’s also best to water basil in the morning, as it can sulk if it’s roots are cold and wet overnight.

you can grow basil in a pot, making it ideal for balcony gardens

Harvesting basil

You can harvest basil leaves at pretty much any time, but I do have a few tips for keeping your plant healthy! For example, don’t immediately pick off all the biggest leaves – these are essentially your basil’s power plants that are generating all the energy it needs to grow. Instead, take a combination of larger and medium-sized leaves each time.

When you’re only taking one or two leaves, use the opportunity to pinch off the top of the plant and the ends of any leggy stems. As I mentioned before, it helps your plant focus its growth closer to the middle.

basil plants that have been allowed to flower into purple spires

Common Problems With Basil

If you follow the above tips about pinching off excess growth, harvesting carefully and watering your basil in the morning, you should find it relatively easy to grow a happy, healthy basil plant. However, there are two main pests that you should familiarise yourself with when you’re learning how to grow basil.

  1. Aphids are a pretty common problem when you’re growing edible crops, and basil is no exception. We’ve got a guide to getting rid of aphids that you can check out, but the most important thing to be aware of is that they multiply quickly. If you notice even one of these tiny bugs (they can be white, green, yellow or grey), squish it quickly and rinse any other suspicious bugs off of your plant as soon as possible.
    a cluster of aphids eating a leaf
  2. Slugs and snails like to chomp on basil – look out for slime trails when you go to water your plants first thing in the morning. There are natural ways you can deter slugs and snails… be careful about using pesticides on any plant you intend to eat.
    a brown snail on the edge of a plant pot

Learning how to grow basil is a fun gateway into taking care of more herbs and edible plants. Take a look at our beginner vegetable-growing guides, tips for growing herbs indoors and more kitchen garden ideas.

HOW TO GROW BASIL IN YOUR GARDEN-min

Save this pin for later

6 Bird Friendly Garden Ideas to Attract Our Cute Little Friends

Part of having a garden is being able to enjoy your own little slice of nature, and getting to experience the wildlife that comes with it. Attracting birds to your garden is one of the easiest ways to connect with your local environment, and is possible even in the most urban location. If you’re looking for ways to cultivate a bird friendly garden, you’re in the right place.

a blue tit enjoying peanuts in a bird friendly garden

The benefits of a bird friendly garden

Why should you try and encourage more birds to your garden? Well, firstly, they’re a joy to watch. I used to scoff at my grandparents and, more recently, my parents for just how much they love sitting by a window and watching a flock of sparrows or pigeons hopping around searching for the seed that had been scattered that morning. Except, when I finally paused for five minutes, I discovered that not only is it admittedly pretty pleasant to watch birds do bird stuff, my relatives had managed to attract LOADS of different bird varieties – including wrens, woodpeckers, wagtails and about six different kinds of finch.

Anyway, another huge benefit to having a bird friendly garden is that they’re a natural, pesticide-free way to manage your garden bug population. So, if you’re trying to grow your own vegetables but are constantly battling against the worst kinds of insects, birds are going to act like your own personal army against them.

Providing a habitat for birds is also a wonderful way to introduce children to the natural world, teaching them about respecting wildlife and nurturing other creatures. There are lots of activities to get kids involved with birds, like making feeders, decorating bird boxes and counting the different varieties of birds that appear.

Bird-friendly garden ideas

The quickest way to increase the number of birds in your garden is to make sure you’re meeting as many of their needs as possible.

It’s about more than keeping your bird feeder topped up; you should aim to provide a variety of food, and offer safe places for birds to hide, bathe and nest.

1. Plant bird friendly plants

Birds rely on plants as a primary source of food and as a hunting ground, as well as for shelter. Growing lots of native plants will increase the likelihood of local birds choosing to make your garden part of their home (and they’ll also need less maintenance than trying to grow exotic plants). If you’re not sure which plants are native to your region, a local plant nursery is the best place to ask.

the fiery red berries of a pyracantha hedge

If you only have a limited space, try to include a combination of plants that will mean your garden has something to offer each season. For example choosing, flowering plants that attract pollinating bugs for birds to feed on in spring and summer, shrubs that produce berries and seeds in autumn, and at least one large evergreen plant to provide coverage over winter.

You Might Also Like: 14 Birds You’ll Find in Your Winter Garden

2. Garden design that attracts birds

Most wild animals will avoid spacious lawns and open areas, as it makes them vulnerable to predators, or risk being spotted by prey. This is true for birds as well, so try to limit the amount of empty space in your garden if you want them to feel comfortable. Increase the size of flower beds if you can, plant more shrubs and consider replacing bare fences for hedges.

A stone birdbath nestled between wildflowers in an enchanted garden

Having lots of layers to your garden will make it easier for birds of all sizes to find somewhere to forage and shelter. Try to combine different kinds of shrubs and trees that will grow to different heights. You can surround them with smaller plants and flower beds to create lots of variation, even in a small area.

Another tip is to hold back on pruning, or you can scare off birds that are preparing to nest. Leave undergrowth and leaf litter for them to use as building materials, and avoid disturbing hedges too frequently.

3. Bird feeders

The sheer number of bird feeder options can seem overwhelming, but you can make your decision by understanding how the birds that visit your garden prefer to eat. The RSPB actually has a helpful page with tips about choosing the right bird feeder! As they point out, the most important consideration is bird safety – make sure the feeder(s) you choose can’t trap feet or wings, and can maybe offer some protection from squirrels or cats.

Seed feeders are designed for fine grains, and usually have one or to narrow openings for small birds. A metal seed feeder is generally more durable than plastic, particularly if your garden attracts squirrels, too!

Peanut feeders can be used for both nuts and suet balls, as long as the mesh is fine enough that large chunks don’t get broken off (but isn’t so fine that it causes beak damage).

Ground feeders are good for larger birds, as well as species that forage – like robins and blackbirds. If you know there are cats in your neighbourhood, position the ground feeders in an open space (so it’s harder for them to hide) and consider adding a protective cage with bird-sized holes.

Suet feeders tend to have much larger holes than nut feeders, giving birds somewhere to perch while they peck at the suet balls or cakes. 

a coal tit pecking at suet balls through a wide mesh feeder

4. Build a bird bath

Bird baths provide somewhere for our feathered friends to wash, drink and socialise, and make a beautiful focal point for a bird friendly garden. Bird baths come in lots of different styles, so you should be able to find a design that blends well with the rest of your garden aesthetic. Even a regular ornamental water feature can double as a bird bath, as long as the water is kept fresh.

You can also turn a bird bath into a dust bath, which some species use to reduce excess oil, dirt, and feather mites. To accommodate this, provide a tray (about a metre across, and 5cm deep) filled with a mixture of loose soil, sand and ash (if you have a fireplace). Sieve the mixture to remove large chunks, and position your dust bath in a sunny spot.

5. Bird boxes and houses

Bird boxes, or nesting boxes, are designed to attract birds that are looking for a safe space to make a home. There are lots of styles and sizes available to buy, or you can have a go at making your own. As I mentioned before, it’s a great way to get kids engaged with your garden wildlife!

Make sure to position your bird box somewhere it will be difficult for cats to interfere with it, and set a reminder to empty it out each year.

a small bird box painted pink and mint green, hanging from a tree in a bird friendly garden

6. Make your garden cat proof

Anyone that enjoys watching birds in their garden will have some concerns about cats – even if they’re a ‘cat person’! There are a few ways you can deter cats from your garden and/or protect your birds from lurking felines.

For example, you can get devices that emit a high-pitched noise that cats don’t like, but which is supposed to be inaudible to humans. Obviously, these are no good if you have your own pets, and also be aware that young people can be affected by the noise. Not just teenagers, either – I’m rapidly approaching 30 and find it impossible to sit in my grandmother’s garden unless she switches the device off.

Instead, I would recommend just making it harder for cats to stalk birds in your garden. Put your feeders in open spaces, or above prickly shrubs that cats won’t want to hide in.


It takes time to attract wildlife to you garden, and birds are no exception. Adding these features to your garden is the first step, but you’ll need to employ some patience before your efforts pay off! Don’t forget to take a look at our tips for attracting butterflies and dragonflies into your garden too – you’ll be glad you did.

6 BIRD FRIENDLY GARDEN IDEAS TO ATTRACT OUR CUTE LITTLE FRIENDS-min

Save this pin for later

Garden activities for kids: 24 Fun things to do with kids in garden

The weather is finally getting warmer, which means it’s time to get back out into the garden and enjoy having a bit more space at home!

When your little ones have been cooped up over the winter months (or longer), the best thing you can do is to let them blow off some steam outdoors.

Our list of engaging children’s garden ideas on a budget will make it that much easier for you to keep kids of any age entertained in the fresh air – and maybe even have some fun alongside them!

children running downhill together in a group on a sunny day

Reasons to get kids into the garden

I’ll admit that I was very much an “indoor” child, and every sunny weekend would be a battle for my poor mum to encourage me outside to get some sunshine and fresh air.

If you’re looking for reasons to get your kids to play outside, I suspect none of these arguments will work on them, but they might provide the motivation you need to keep trying!

Boosting sensory development

Gardens have so many treats for the senses, and can provide a totally different experience to inside play.

From tickling breezes and tingling sunshine, to rich natural fragrances and the sounds of happy bugs and birds – there are so many new things to see, hear, smell, feel and even taste!

Nurturing healthy minds

Sharing a space with nature encourages children (and adults!) to think about how their choices impact the plants and creatures around us.

Gardens are a small way to practice mindfulness, patience and consideration for the organisms around us. Appreciating nature can help humans of all ages feel restful, calm and confident in our surroundings.

Promoting active bodies

Climbing trees, kicking balls, leaping through water – a lot of garden activities for kids involve action and movement.

Not only does outside play provide the space to improve motor skills and physical strength, it’s also an opportunity to find a fun new hobby to help kids enjoy being active. Admittedly, there will always be that one child that is happy to just lay in the sun and read (yup, that was me)!

Being outdoors is fun!

There’s a whole world to explore out there, with discoveries to be made under every rock and in every puddle.

Grass stains, muddy hands and wet feet are a great part of growing up, and gardens are the perfect environment for letting the imagination run wild.

Gardening activities for kids

Gardens are our opportunity to connect with nature in a personal way. Introducing children to gardening from an early age will begin to get them comfortable with the world around them.

1. Growing flowers.

Learning about seeds and plants is a fun and engaging way for kids to interact with their environment, and seeing (and smelling) lots of fun flowers a few weeks later is an exciting reward for their efforts. We’ve actually got a list of the best plants to grow with children to help you get started.

2. Planting vegetables

Planting vegetables is not only interesting for children, it’s practical for your home. Help them to understand where food comes from, and learn the foundations of sustainable living. It can even help picky eaters feel more comfortable about the veggies on their plate. These are some of the best veggies to start with.

3. Composting

Try composting for kids to teach them about environmental awareness and getting rid of waste responsibly. We’ve got a full guide to composting, but the basics are fairly simple (e.g. one part green to 2-3 parts brown).

You can also link this to learning about worms and insects in general. This post has some good resources for composting activities for kids.

4. Flower clock planting

Plant a flower clock as a way to introduce different plants, the importance of sunlight, and how to help pollinators do their jobs.

The concept is that you choose flowers that open at different times of day, and plant them in a circle (a flower for every hour is ambitious, but you get the idea). You can find some plant suggestions here.

child girl picking daffodils in the garden

Creative garden activities for kids

Inspire your little visionaries by celebrating all of the beauty found in the natural world.

5. Flower pressing

Flower pressing is a wonderful way to save favourite flowers, and turn them into wall art, bookmarks or greetings cards.

You don’t need a proper flower-press, either – simply place petals, flowers and leaves inside a thick book, with the weight of another couple of books on top.

I recommend using tissue paper to protect your pages though! After 3-4 days you can gently retrieve the flowers and use them for crafts.

6. Rock painting

Some kids will use anything as a canvas… use rock painting to direct them away from your walls and into the garden! It’s fairly straightforward, but here are some tips on getting the best results – and remember that shells and branches can get the same treatment!

You’ll have to decide if you want to use eco-friendly paints or chalk that will wash off in the rain, or to use acrylic paint to keep your rocks as permanent decorations. Alternatively, we’ve got some great garden mural ideas if you’re prepared to offer them a larger canvas!

7. Garden collections

Garden collections are a way to harness the enthusiasm of avid collectors. Before going on a walk or heading to the park, give them a small, clear container for them to store their treasures.

It’ll test their motor skills, boost their creativity and also put a cap on the amount of pebbles, twigs and petals that make it back home!

8. Fairy garden

Fairy gardens are a wonderful way to combine gardening and imagination at a child-friendly size. Take a look at our fairy garden ideas for inspiration.

9. Time capsule

Curating a time capsule is an interesting way to reflect on life and explore the meaning of family – past, present and future.

It can also be an introduction to science and sociology in a very simple way, depending on what you decide to include. You’ll need an air-tight/water-tight container to store your items, especially if you intend to bury your time capsule for a long time (which is the point, after all). This site has some interesting tips for preservation!

Children’s Garden Ideas on a Budget

Water play can keep kids entertained for hours, and is perfect for cooling off under a parasol on a hot day. Plus, it’s cheap and doesn’t require much clean up!

10 . Water balloons

Water balloons and water pistols are brilliant for letting off some steam on a hot summer’s day. Just keep the sunblock handy!

11. Paddling pool

For a more chilled out afternoon, fill a paddling pool and position it beneath a parasol for kids to keep cool.

12. Water table

Water physics is an endless source of fascination. Set up a water activity table with plastic pots, tubes, buckets and water bottles with holes in.

You could even add ice! Take a look at this list of 35 more ideas to make a water table more interesting.

13. Toy cleaning session

Are some of your kid’s toys looking grubby? Warm weather is the perfect time to turn a cleaning session into play time.

Plastic dolls and animals can get a dip with a scrubbing brush, and you could even create a “car wash” for toy vehicles. Then check out these garden toy storage ideas to help things stay cleaner for longer.

three tweenage children spraying water hoses at each other in a garden

Outdoor adventure ideas for kids

When you’ve got a budding explorer on your hands, it’s time to up the ante and find new ways to keep them (safely) inquisitive about their surroundings.

14. Obstacle courses

Obstacle courses are fun for parents to set up, and even more fun for kids to complete. We’ve got lots of obstacle course inspiration for all ages, if you need ideas.

15. Sand pits

Sand pits bring out the excavator in every child, whether they’re digging up dinos or creating a construction site. Add toys, bottles, funnels and containers to keep it interesting – you could even add water to make sandcastles and river beds.

16. Garden camping

Garden camping is a fun, low-cost way to ease the pressure when your family is getting cranky with cabin fever.

You could give it a festival theme, or treat yourself to some at-home glamping. Take a look at 5 garden camping ideas.

17. Treasure hunt

Get minds and bodies ticking by setting up an outdoor treasure hunt.

There are loads of ways to mix it up, like hiding certain objects to be found, having a scavenger-hunt type list to complete, or creating riddles and clues that need to be solved.

Wildlife garden activities for kids

There’s no better place to learn about the animal kingdom than your own back garden, so why not plan some activities that help your children get involved?

18. Insect hotel

Building a DIY insect hotel is a fun afternoon project, and an opportunity to explain how “creepy crawlies” are our friends! Using a kid-sized bug collector’s kit to find native insects will give them something to focus on as you find garden debris to turn into a habitat together.

19. Butterfly garden

Create a butterfly garden to encourage these beautiful pollinators to your home with certain plants.

Butterfly spotting can lead to lots of related activities for kids – like drawing the butterflies they see, learning about their fascinating life cycle, and being able to identify other pollinating insects.

20. Bird feeding

Making homemade bird feeders is a fun craft that bridges indoor and outdoor play (see this guide for steps).

When your treats are ready, set up a bird-watching station, with binoculars and an identification guide. Bird tables and bird boxes can stretch this activity out for longer.

a small wooden bug hotel attached to a tree

Imaginative garden activities for kids

It’s amazing what little minds can come up with, and encouraging imaginative play in the garden is a great way to keep your children happy outdoors for hours.

21. Garden Playhouse

A playhouse gives children a whole space to exercise creativity, imagination and agency. You can get kits to build playhouses, or make one from scratch – but buying a plain, child-sized shed is quickest.

Customising it and furnishing it should give you (and your children) long-lasting entertainment. Check out some playhouse inspiration, and treehouse ideas too!

22. Mud kitchens

Mud kitchens are fantastic for sensory development, and are a trick to getting your kids to enjoy playing outdoors on a drizzly day. Of course, it’s going to get very, very messy out there – these mud kitchen tips can help you keep it confined.

23. Kids garden party

Depending on the season, throwing a kids garden party is a practical way to keep messy activities and celebrations outside. Learn how to throw a garden party for kids and your carpet will definitely thank you.

24. Picnics with toys

Make eating outside more fun by creating picnics for cuddly toys, dolls or plastic figurines.

Miniature snack portions and finger food makes it more fun for children to try new things, and make it easier for you to balance treats and more nutritious nibbles.

Tips for getting the most out of garden activities with children

  1. Keep it FUN. When children connect being outside with exciting activities and happy memories, they’ll want to be there more often. If they’re reluctant to completely let go of technology or indoor activities, look for ways to make those hobbies work outdoors.
  2. Start small. Gardening and outdoor DIY projects can be hard work with little instant reward. Do your kids (and yourself) a huge favour by getting in some quick wins early on. For example, planting fast-growing crops while you wait for slower ones to grow, or investing in a premade playhouse instead of designing one from scratch.
  3. Keep momentum. Try to do something outside every week, even if it’s something small or simple, to create a habit. Breaking big exciting activities into smaller chunks is a good way to maintain a steady pace.
  4. Support engagement. Whether it’s getting mucky, feeding animals, planting flowers or anything in between, try to say “yes” as much as possible to encourage curiosity and confidence.
  5. Focus on the visuals. Even the simplest outdoor activities can grab kids’ attention spans with a bit of colour, an image of their favourite fictional character, or kid-sized accessories.
  6. Give your children more of what they like. Sometimes it’s as simple as listening to what outdoor activities your kids want to do, and letting them take the lead.

What garden activities for kids have you got planned for the summer? Will you be trying any of these out?

GARDEN ACTIVITIES FOR KIDS 24 FUN THINGS TO DO WITH KIDS IN GARDEN-min

Save this pin for later

11 Bottle Garden Ideas (Growing Plants in Glass Bottles Made Easy)

At Garden Patch, we’re all about enjoying gardens of every size and style. The thing is, when you’re really short on space, it can take a little creativity to achieve your own little luscious patch of greenery! If you’re craving some nature but are lacking outdoor square footage, it’s time to learn how to grow a bottle garden.

What is a bottle garden?

Bottle gardens are created by growing certain plants inside plastic or glass bottles, often (but not necessarily) completely sealed off from the outside environment. Working in a similar way to terrariums, you can grow a bottle garden for an indefinite period of time, as long as it’s exposed to the right lighting conditions.

Bottle gardens became very popular in the 1960s and 1970s, alongside a boom in high-rise living. When you’re limited to a small balcony or patio (or perhaps no outdoor space at all), a miniature indoor garden is the perfect way to stay connected with the earth.

Because bottle gardens use a self-contained water system, they can be useful environments for growing plants in areas of drought, or even for growing edible plants and vegetables in places where there’s not enough moisture in the soil for healthy crops outdoors.

What do you need to grow a bottle garden?

For a successful, healthy bottle garden, you’ll need a few things:

how to make a bottle garden

Preparing to grow a bottle garden is very similar to planting a terrarium, but the basic steps are:

  1. Make sure your container is clean, then line it with about 3cm of gravel or bark. If your container has a narrow neck, you can create a paper funnel to make this easier!
  2. Pour in a teaspoon (or two teaspoons for large containers) of granulated charcoal.
  3. Add 1-2cm of compost, and then remove your plants from their pots, gently massaging the roots to loosen them.
  4. Gently lower your plants into place through the neck of your container. You don’t need to press or bury them into place, just add some compost to lightly fill the gaps. Leaving a little bit of space between plants and at the edge of your bottle garden is a good idea too – it’ll make it look less cluttered when you’re done!
  5. Add your and decorative elements to the top of the soil.
  6. Pour a little bit of water into your terrarium – if you’ve got soil on the sides of the glass, use this as an opportunity to rinse it down into the bottom of the container.
  7. Give your bottle garden a day or two to settle and allow excess water to evaporate before putting a lid on it (if you want to put a lid on it at all).

I really like this video tutorial on making a retro-inspired bottle garden, if you want to follow along!

In terms of maintenance, sealed bottle gardens need very little. As long as the plants are getting enough light (well-lit, but not direct light as the glass can act like a magnifier), they should naturally respire and photosynthesise to recycle the water trapped inside.

An open bottle garden will still trap some water, but you’ll need to top it up every so often – it’s best to monitor the soil moisture to accurately schedule watering days.

11 Bottle Garden Ideas

Now you’ve got the basics of how to grow a bottle garden, let’s take a look at some fun designs you can use as inspiration.

These “leaning” jars come in all kinds of shapes and sizes (often with lids), and are both pretty and practical containers to grow a bottle garden inside.

The openings are usually big enough for you to fit your hand in, and the jars are typically big enough for several small plants. As you can see, using tongs to place more delicate objects is still a good idea!

someone using tongs to place decorative stones inside a bottle garden jar with a wide neck

I’m a sucker for drinks in unusual bottles, but I never know what to do with them when they’re empty! If you have a similar problem, maybe try turning them into mini bottle gardens, like these!

Can’t decide between a sealed bottle garden or an open one? This beautiful one takes inspiration from both!

The cork stopper will stop a little bit moisture evaporating out of the top, and the plant bursting out of the open front is a really fun idea. I also like the use of small bits of driftwood inside, giving this a slightly beachy feel.

If you want to grow a bottle garden that’s truly breath-taking, make sure to choose a variety of plants.

This gravel-filled jar is very simple in design, but the different pinks and yellows in the foliage inside really make it a striking example.

You don’t have to grow a bottle garden just for plants – little figurines can transform a simple, moss-filled jar into a miniature landscape.

Take a look at our fairy garden ideas for more ways to create a tiny magical world in your home!

I love going hunting out weird and wonderful shaped glassware at car-boot sales and charity shops. You can find vessels like these for next to nothing, and they make very interesting homes for plants.

four glass tumblers and jars of different shapes, with miniature gardens inside

These tiny apothecary bottles must take the prize for smallest gardens ever! They’re SO cute though, and having several clustered together on a shelf or side table would look gorgeous.

This giant jar looks like a little slice of jungle! The different plants inside are really showcasing a variety of shapes, colours and structures, which is exactly what you should be looking for in a multi-plant bottle garden.

Sometimes less is more! These leafy tendrils really stand out against the mounds of fluffy moss, and the overall container design is simple and chic.

Something about it reminds me of minimalist Japanese garden design – take a look at our post on Japanese gardening principles to see if you agree!

a simple glass jar with a single fern sprig surrounded by low mounds of moss


How cool is this giant boiling flask bottle? This would look amazing in a modern home, and make a show-stopping centrepiece in a hallway or living room. The low-lying plants actually work perfectly to show off the shape of the bottle, too.

What’s better than having one bottle garden? Having three! This set of bottle gardens is basically a sculptural triptych, with delicate moss creating a beautiful backdrop for the resin “waterfall” and tiny horse statuette. It might take a little bit of planning to create your own, but I’ve never seen anything like this before and am personally very inspired!

Which of these ideas inspire you to grow a bottle garden of your own? We’d love to see your own designs!

BOTTLE GARDEN GUIDE GROWING PLANTS IN GLASS BOTTLES MADE EASY-min

Save this pin for later

Tips for Getting Rid of Aphids

I’ve spent enough time complaining about aphids that it’s finally time for me to give them their own post. Having lost an entire family of much-loved chilli pepper plants to an aphid infestation a little while ago, I declared these creepy-crawlies my official arch-nemesis. Maybe you don’t feel as strongly as me, or maybe you do – either way, you’ve presumably found yourself on this post because you’re looking for advice on getting rid of aphids.

How to identify aphids

a group of aphids on a rose bud

What exactly are aphids? Also, what’s the problem with them, and how do you tell them apart from other annoying plant pests? Let’s take a look…

For starters, the term “aphid” doesn’t actually refer to one particular insect – in the UK, it actually covers over 500 different species. However, all of these critters have a few things in common. First, they all fall into the scientific classification of “true bug”. Aphids include bugs like greenfly and blackfly, but you’ll also find them in various shades of yellow, white and pink. Aphids are all between 1-7mm in length, and they’re all widely acknowledged to be incredibly destructive to plants. 

How do they cause so much trouble?

Aphids are sap-suckers. They’ll puncture the stem or leaves of a plant, and consume the sap inside, leaving the plant wilting and weak. On top of that, they excrete a sticky “honeydew”, that can attract sooty moulds, further damaging your plants.

You can find aphids on almost any type of plant, including flowers, ornamental plants, fruit and vegetables, house plants and greenhouse plants. Many types of target specific plant species, but there are plenty of aphids that are less picky. They also reproduce relentlessly, so one or two aphids can quickly turn into hundreds – spreading to any nearby plants.

As if that wasn’t enough, some aphids can carry viruses between plants. Brilliant.

Getting rid of aphids

Check your plants regularly, especially if you know you have species that attract aphids. When you’re watering or pruning, pay particular attention to the underside of leaves, the area around new shoots and flower buds. If you do notice individual bugs, or small clusters starting to appear, you need to act quickly!

a close-up of a ladybird getting rid of aphids on a flower bud

Tips for getting rid of aphids without pesticides

Chemical pesticides aren’t everybody’s thing – maybe you’re growing edible plants, are concerned for child or pet safety, or are simply eco-conscious. Getting rid of aphids without pesticides is possible, but they are stubborn little critters.

The most important thing is that eliminating your aphid problem shouldn’t wait – squash any lone rangers that you find to try and limit population growth as much as possible.

If your plants are outside, you should attract predatory insects, like dragonflies, hoverflies, ladybirds and ground beetles. Building a water feature or a bug hotel can help. Bear in mind that it will take several weeks for this method to take effect!

It’s possible to buy hoverfly larvae, parasitic wasps and lacewing larvae to use as a biological control for aphids. This method can be pretty effective in a greenhouse (but obviously, much less so outdoors).

If these methods are getting rid of aphids on your plants, you have a couple of options. Personally, I resorted to just writing off my infested plants. It was incredibly disappointing, but there were only a couple of plants that were really badly affected. If you’re not ready to give up the fight, it’s time to use pesticides.

simple garden bug hotel ideas

Getting rid of aphids with pesticides

If it comes to getting rid of aphids with pesticides, start by looking for products with a shorter lifespan. You may need to reapply them as they wear off, but  they’ll be certified for organic growing and will cause less interference with the natural balance of your garden. Organic sprays that have natural pyrethrum, plant oils or fatty acids as their active ingredient should help you control your aphid population.

In greenhouses, you can use a fumigant to try getting rid of aphids. There are several varieties available, including organic, garlic-based products that’s safe for use on crops.

Over winter, you can destroy dormant aphid eggs on shrubs and fruit trees with a winter wash made with plant oil. Be careful to wait until your trees are dormant too, to save damaging healthy leaves or buds.

You can also find synthetic insecticides if you’re struggling to control your aphid problem. Of course, always follow instructions when you’re using these kinds of chemicals. Don’t use them on plants that are actively flowering or you can cause serious harm to local pollinator populations and, if you’re using chemicals on crops, make sure that the product you have is safe for the specific plants you’re growing.


Are there any methods for getting rid of aphids that we’ve missed? Tell us your thoughts and successes against these pesky pests!

Save this pin for later

TIPS FOR GETTING RID OF APHIDS-min

How to Grow Strawberries in Your Garden

Strawberries are the perfect summer treat, whether you dip them in cream, drop them into lemonade or reduce them down for jam. Learning how to grow strawberries at home is incredibly rewarding, and will save you heaps of money in comparison to buying them from a supermarket. They’ll probably taste better too!

So, whether you’re cultivating a perfect cottage garden or British-themed backyard – or maybe you just want some fresh fruit for your Pimm’s (in which case, check out our guide for growing cucumbers too) – let’s take a look at how to grow strawberries.

Growing Strawberries: Where to Begin?

There are two types of strawberries; summer-fruiting strawberries (which grow large fruit for 2-3 weeks from early to mid summer), and perpetual strawberries, or ‘everbearers’ that will produce clusters of smaller fruit from the beginning of summer to the beginning of autumn. The best type for you will depend on space, and what you’re planning to do with your strawberries.

Sow in: March, April

Harvest in: June, July, August, September, October

You can also plant strawberries in October for the following year.

Planting strawberries

how to grow strawberries, taking young plants from a box and putting them into the ground

Rather than growing strawberries from seed, it’s much easier to buy young plants in pots, or as runners with bare roots. Runners can look a bit uninspiring (like scraps of roots without many leaves), but I promise, they’ll grow! Buying from a reputable supplier, you can be sure of the variety of strawberry plant you’re getting, and that your plants are disease-free.

Strawberries will flourish if you plant them in the ground, especially if you take the time to prepare the soil. Choose a sunny, sheltered and fertile location, avoiding areas that might be struck by a late frost – and don’t plant strawberries in soil directly after potatoes, tomatoes or chrysanthemums because of the diseases that can remain in the soil. Mix a couple of buckets of garden compost or well-rotted manure into the soil, and add a general purpose fertiliser to get started.

Strawberries are traditionally planted in rows, with about 35cm between each plant, and 75cm of space between rows. Strawberry root balls should be about 10cm across (you can trim them a little if they’re much larger), so dig holes to accommodate them comfortably.

As you refill the soil, take care not to cover the crown of the plant (the section where the stems cluster together before separating – it looks a bit like a crown). The crown should be gently resting on the surface, with the roots completely covered.

How to grow strawberries 

row of strawberry plants becoming established in a garden

Keep your plants well-watered as they become established, although try not to let the crowns get too wet (waterlogged crowns will harbour disease and mould). Keep applying fertiliser every week to two weeks during the growing season to help your strawberry plants form healthy delicious fruits.

Depending on the wildlife in your local area, you might find it useful to cover your strawberry plants with a fine mesh, to keep birds from snatching the berries as they form. If squirrels are a problem, a metal mesh is better than a plastic one.

If you’re growing cold-weather everbearers (early spring or in October), pinch off the first bloom of flowers to help your plants grow stronger before they produce fruit. You don’t need to do this with summer varieties unless the plant is looking a bit feeble.

Most gardeners like to cover the ground with a straw mulch, or soft fibre mat, when they notice the first fruits beginning to ripen – it provides a bit of a gentler landing if your fruits drop early (and will also limit weeds and slugs)!

Growing strawberries in pots

strawberries growing out of a hanging pot in a greenhouse

If you know your garden soil isn’t particularly good quality for growing crops, you can cultivate strawberries in lots of other ways, for example:

Container gardening is great for strawberries, as you can move them into more sheltered spots in bad weather, but return them to full-sun to help them ripen. Raised planting gives you a bit more of a defence against pests, too!

Thanks to staying relatively contained, strawberry plants are convenient for balconies, patios and small gardens. They’re also perfectly happy being grown indoors, as long as they have plenty of sunshine – so they’re an ideal plant if you’re looking for indoor garden ideas.

The only thing to keep in mind is that containers and pots dry out much quicker than flower beds, so remember to keep your strawberry plants well-watered. Mixing in a high potash fertiliser during the growing season is a good idea too.

Harvesting strawberries

Your strawberries are ready when they’re a bright red colour all over. It’s generally recommended that harvesting them at the warmest part of the day results in the best flavour. Remember that strawberries don’t keep well, so, unless you’re going to preserve or process them, pick your strawberries as close as possible to when you intend to eat them!

At the end of the cropping season, remove the fibre mat/mulch/plastic from around your plants, and take off the netting – both things will help to limit pests. You should also trim off old leaves from summer-fruiting plants so new leaves can form.

Strawberry plants typically produce fruit for four years, after which you’ll need to replace them. When you buy new plants, it’s best practice to grow them in a new location with fresh soil to keep nutrients balanced and minimise disease.

Common Problems when Growing Strawberries

Strawberry plants are a tender treat for several kinds of organisms, which means that learning how to grow strawberries will involve some level of pest control practice. Here are the most likely threats to your strawberry plants:

  1. Strawberries don’t take well to frost, and a late cold snap can damage and deform your plants. Keep an eye on the weather at the beginning of the season, and gently cover your strawberry patch with horticultural fleece if a frost is forecast.
  2. Like chilli peppers, strawberries can be susceptible to grey mould – a fuzzy fungus that will develop if your plants are too moist. If you notice any spores, it’s best to cut the affected area off completely, clear up any fallen leaves and try to make more room for airflow around your plants.
  3. Powdery mildew is another fungal challenge you’ll face when tackling how to grow strawberries. It looks just like a dusty pale powder on your plants’ leaves, and can usually be remedied with keeping the soil moist and moving your strawberries to a slightly cooler location for a bit.
  4. Vine weevils are pesky critters that leave tell-tale notches chomped out of your plant leaves. Oh, and the larvae at the bottom of the plant will be feasting on the roots of your plants, in a double-pronged attack. The beetles are small, round and dark coloured, while the larvae are mostly white with brown heads. Employing biological control is the best way to tackle these common garden pests.

Now you know the basics of how to grow strawberries in your garden, don’t forget to check out some of our other guides and ideas for making the most out of your outdoor space this summer. Why not spruce up your BBQ area, or indulge in a cosy swinging chair? Tell us what you think!

HOW TO GROW STRAWBERRIES IN YOUR GARDEN

Save this pin for later

How to Grow Chilli Peppers in Your Garden

Welcome, spice fiends! If you like a little bit of kick in your kitchen, learning how to grow chilli peppers is going to be a very satisfying experience. There are lots of chilli pepper varieties, some of which will give your tongue a tantalising tingle, and others that will have you running for a glass of milk.

When you start growing your own chillies, you’ll quickly realise there is a far greater range of colour, shape and size than what you can typically find on the supermarket shelves. Generally speaking, you need higher growing temperatures to reach those higher scoville (spiciness) ratings. However, even in the UK, it’s possible to grow chillies that will bring a little pizzazz to your plate. Let’s take a look at how to grow chilli peppers in your garden.

Growing Chillies: Where to Begin?

a guide to show you how to grow chilli peppers in your garden

As warmth really is essential for achieving that chilli pepper sizzle, it’s best to start your chillies off indoors (under a propagator if you can), and harden them off in a greenhouse or outside in time for summer.

Another factor to consider is that, to get the right balance of root/shoot growth, it’s recommended that you repot chilli peppers several times before they’re mature. This can be a bit of a pain, honestly, but it will lead to better gains. To be fair though, I have found myself short on pots every now and then, and having two plants in the same pot isn’t the end of the world.

Sow in: February, March, April

Move outdoors in: June

Harvest in: July, August, September, October

Sowing chilli peppers

lots of small chilli pepper seedlings growing in potting trays

If you do choose to start your chilli peppers off indoors, you can sow your seeds as early as February, to give your seedlings the best start. Use potting compost in small pots, planting 3-5 seeds per pot (there’s a chance that not all of them will geminate).

You’ll see shoots appear quite quickly, especially if you use a lid or heated propagation station (a sunny kitchen windowsill works perfectly fine though, in my experience). Once you do, you can take off the cover (but keep them warm), and separate them out into larger individual pots once they’re 2-3cm tall.

How to grow chilli peppers

separated pots

Keep an eye out for roots poking out the bottom of the pot, and repot into a 13cm diameter pot when they appear. If your plant starts to lean over or become top heavy (which they might do in the bigger pot, when they start growing over 20cm high, or as they begin to fruit), you can add a slender stake to keep them upright. 

The next step of hot to grow chilli peppers is pinching out. When your plant reaches about 30cm tall, it’s recommended that you pinch (or snip with sharp scissors) the top of the plant off, so it focuses its energy into producing fruit. When it flowers, you can pinch off the ends of branches past the flowering section, too.

When the weather starts staying warm (towards the end of May), you should repot your chilli peppers one last time, into 22cm pots. As I mentioned before, I don’t always do this with every plant – it just depends on what pots I have available – and for the most part, they’re all fine (just some of them are smaller). At this stage, you could also plant them straight into the ground.

Either way, before you move your chillies outside, you should harden them off. Hardening off lets your plant become accustomed to outdoor conditions, and basically involves moving your plants outside for a couple of hours a day, gradually increasing the length of time over the course of two weeks. So, eventually, your plants spend all day and night outside. As chilli plants can stay relatively small, I personally tend to bring mine inside every night, and leave bigger plants (like tomatoes) in my limited garden area outside.

Keep your chilli pepper plants well watered and, when your flowers start to appear, mix in some general fertiliser. I tend to use the same stuff as I do for tomatoes.

Harvesting chilli peppers

large chilli pepper plants growing in planters

The longer you leave your chillies on the plant, the better they generally taste (especially if you’re going to be preserving them. However, the sooner you snip them off, the quicker your chilli pepper plant will start growing more. So, it’s a bit of a delicate balance. You don’t have to wait until the chillies are completely red, though.

Common Problems when Growing Chillies

three tacos filled with peppers, onion, lettuce and fresh chillies

Chilli peppers were my first foray into learning how to grow vegetables at home. So, the first couple of batches were also my first introduction to some of the most irritating bugs I’ve ever come across! Here are the most common problems you’ll encounter when you’re learning how to grow chilli peppers.

  1. Whitefly are tiny white bugs that suck all the sap from your plants, making them limp and struggle to produce fruit. Plus, they excrete a sticky, ‘honeydew’ substance that can cause black sooty mould to grow. An all-round pain, but you might be able to control them with biological control and/or sticky traps.
  2. Aphids – yep, my personal nemesis. I never had a problem with aphids until a babysat a friend’s tomato plant, which must have had aphids hidden away on it somewhere. They basically do the same damage as whitefly, and should be handled in a similar way. In theory, you can wash aphids off (and keep them at bay) with a gentle dish soap/detergent, pinch off carrier leaves, and squish lone rangers. However, I couldn’t stop them from multiplying, so I quarantined my affected plants in order to save my healthy ones. Read more tips on getting rid of aphids.
  3. Grey mould is a fuzzy fungus that will develop and spread if your plants are too moist. I haven’t seen it on chilli peppers before personally, but it can appear on other soft fruit, like strawberries, too. If you notice grey mould on leaves, stems, or debris on the soil, remove it asap and move the plant to somewhere less humid.

I’m hugely biased towards chilli peppers, as they were my starter crop, and I loved adding them to different dishes for a bit of spice. They’re a really easy crop to grow, and learning how to grow chilli peppers is a fun way to introduce children to the process of cultivating and cooking your own food. Take a look at our guides to growing tomatoes, green beans and cucumbers for a whole range!

HOW TO GROW CHILLI PEPPERS IN YOUR GARDEN

Save this pin for later

Companion Planting: Which Vegetables Can Be Grown Together?

As you begin your journey of growing vegetables at home, you might come across the term “companion planting”. It’s a really useful strategy, particularly when you want to grow lots of different vegetables and only have a limited space to do so. Today we’ll be looking into basic companion planting, and which vegetables can be grown together so that they thrive in your garden.

companion planting involves understanding which vegetables can be grown together, like tomatoes and French marigolds

What is Companion Planting?

First things first: let’s get an understanding of what companion planting actually isAt its simplest level, companion planting is where you grow specific plants close to each other so one – or both – grow better.

In some cases, there’s some science behind the benefits of companion gardening. For example, a study has shown that onion flies (a major onion pest) lay fewer eggs when there are marigolds nearby. Other pairings are less researched, but have been passed down anecdotally through generations of gardeners.

How can companion planting help your garden?

Companion planting offers a variety of benefits across your garden, with different pairings helping each other in different ways. Depending on what you’re growing, you might be able to find companion plants that:

The end result? Knowing which vegetables can be grown together can give you healthier growth, better yields, tastier crops and a lower maintenance garden! Plus, it never hurts to have some more variety in your kitchen garden or foodscape.

Which Vegetables Can Be Grown Together?

Time for the good stuff! Now, this won’t be an exhaustive list of which vegetables can be grown together – mostly because everyone’s gardening experience is different, and every gardener will have anecdotal evidence of which companion planting pairings work, and which don’t. Today, I’m going to focus on common crops, and plants that we’ve already talked about in landscaping tips or our growing guides.

General companion planting tips to get started

If you can’t keep track (or don’t want to) of exactly which vegetables can be grown together, don’t worry, here are a few rules of thumb that are a bit easier to remember and will give you a good chance of success.

Although not every companion plant combination has been rigorously researched, these are some of the more common examples that routinely work for gardeners that want to make their gardening a little bit easier. Have you tried any of these companion planting pairs already? Tell us your experience with which vegetables can be grown together!

COMPANION PLANTING WHICH VEGETABLES CAN BE GROWN TOGETHER

Save this pin for later

How to Grow Carrots in Your Garden 

Learning how to grow carrots is the perfect way to start your own kitchen garden. Versatile, delicious and packed with nutrients, carrots are a winner at the dinner table. Although in the UK we’re accustomed to long carrots with a bright orange shade, growing your own carrots is a great time to explore the plethora of shapes and sizes of carrot varieties.

Carrots are very easy to grow, and are the perfect starter crop for beginners or planting with children. In this post, we’ll cover the basics of how to grow carrots – and in just a few weeks you can enjoy having these crunchy treats on your plate.

Growing Carrots: Where to Begin?

Growing carrots in the UK is fairly straightforward, and their long season means that you can start sowing certain varieties as early as February, and continue harvesting them as late as October. The trick is to plant them in small, staggered batches so you can enjoy a regular harvest throughout summer and autumn. 

When it comes to how to grow carrots, the most important factor is your soil quality. It needs to be fertile and well-draining, but should also be clear of debris. Shallow or rocky soil can lead to your carrots becoming stunted or forked – if you’re concerned, try growing your carrots in containers and/or choosing a short-rooted variety. You can also learn how to improve your garden soil.

five large garden planters with carrots growing inside

Plant in: February, March, April, May, June, July

Harvest in: May, June, July, August, September, October

Sowing carrots

Most carrots are sown April-July but, just like potatoes, crops fall into categories of “earlies” and “maincrop” – check the seed packets. If you choose an “early” variety, planting can begin in late February as long as you give your seeds the protection of a cloche, fleece cover or similar (or start them indoors).

Carrot seeds only need to be sown about 1cm deep, about 5-7cm apart from each other and leaving 15-30cm between rows. As your seedlings appear, you can thin them out to create the necessary space.

how to grow carrots in your garden outside

How to grow carrots


You won’t have to worry about watering carrots so much – just give the soil a good soak in long dry spells and hot weather. The bigger concern is weeds, which easily grow between rows and will smother your carrots beneath the surface. Make sure to pull up any interfering growth regularly, and read our tips for keeping weeds out of flower beds.

Be warned that crushing the carrot stems will release a scent that attracts carrot fly – a major carrot pest. You can grow your carrots under a plastic tunnel or mesh to help reduce this worry. Carrots are also a great candidate for companion gardening, as the fragrance of other plants can confuse and deter common pests.

Harvesting carrots

Check on your carrots somewhere between 12-16 weeks, when they should be at their fullest flavour. They will continue to grow if they’re left in the soil longer, but you’ll start to lose their sweetness and taste.

Common Problems When Growing Carrots

a cluster of aphids eating a leaf

There are a couple of pests that you’ll need to tackle as you learn how to grow carrots. Fortunately, there are relatively straightforward ways to prevent the problem and minimise damage.

  1. Carrot fly is the biggest threat to carrots, and it’s much easier to prevent an infestation than to try and eradicate one. Carrot fly larvae develop underground tunnelling into carrot roots, causing them to rot. Make sure you keep you carrots well-spaced, and avoid crushing their leaves, as mentioned before. Cover your growing plants with a horticultural fleece, or surround your crop with a plastic barrier to keep out low-flying female carrot fly.
  2. Aphids are the other main pest when it comes to carrots. Aphids suck the sap out of any host plants, and leave a sticky residue behind. This results in limp foliage, and encourages sooty black mould to grow, slowly killing your crops. Small numbers of aphids can be manually pulled off (and squashed), and larger numbers can be controlled by encouraging predator insects into your garden, or using other forms of biological control. Read more tips for getting rid of aphids.

rows of leafy carrot tips poking out of vegetable patch soil

Learning how to grow carrots is a great way to start your own kitchen garden, and familiarise yourself with the cultivation process. Thanks to their versatility, carrots are a fairly low-stakes crop to grow as you figure out what quantity of home-grown food your household needs, and how to manage ongoing batches of plants. They’re also easy to foist onto friends and neighbours if you overdo it!

Good luck, and happy growing!

HOW TO GROW CARROTS IN YOUR GARDEN

Save this pin for later

How to Grow Cucumbers in Your Garden

Once you’ve tasted a home-grown cucumber, there’s no going back. These sun-loving crops can be a little tricky to grow outdoors, but will thrive in warm temperatures and greenhouse conditions. When you’ve got the hang of how to grow cucumbers, you’ll be glad to have your own crop of these crunchy delights to add freshness and juiciness to a whole host of recipes.

a glass dish filled with slices of fresh cucumber

Growing cucumbers: Where to begin?

Cucumbers can be grown from seeds or, for a slightly better chance of success, from young plants bought at garden centre nurseries. Cucumbers are generally a warm-weather crop, so growing them in a greenhouse is recommended, although we will also cover how to grow cucumbers outdoors in the UK too.

Cucumber varieties grow in one of two ways: vine cucumbers, which have long tendrils that will creep across the ground (unless you train them to grow up a trellis), and bush cucumbers, which will take up less space. It’s also worth noting that cucumbers are typically grown as either ‘slicing’ cucumbers (the kind you’d use in a salad), or ‘pickling’ types that, as the name suggests, generally taste better once they’ve been pickled.

Plant in: March, April, May, June

Move outdoors in: May, June

Harvest in: July, August, September, October

Sowing cucumbers

a potting tray with lots of tiny, healthy cucumber seedlings growing in individual sections

Cucumbers grow best in a medium-weight soil, with plenty of compost or well-rotted manure mixed in. With artificial heat, you can plant your cucumbers from mid-March, but if you can only grow them outdoors, it’s better to wait until May or June.

Even if you’re looking for how to grow cucumbers outdoors, it’s a good idea to start your cucumbers off in potting trays for about 4 weeks, so you can keep them at a consistent temperature for them to germinate. You can also grow 2-3 seeds in a larger (15cm) pot.

Your seeds should be planted ‘sideways’, roughly 1-2cm deep into the soil. Keep your seed trays at 21°C, whether that’s on a sunny kitchen windowsill (with a glass or plastic cover), under a grow-lamp or inside a heated greenhouse.

Your seedlings will be ready to move again (either to a larger pot or outdoors) once they’re about 8cm tall. Move them to a sunny and sheltered position, and space each seedling about 30cm apart. Add a layer of mulch or rich compost to the top of the soil to help them retain moisture.

How to grow cucumbers in a greenhouse

a raised greenhouse planter with flowering cucumber plants growing inside a greenhouse

Growing cucumbers in a greenhouse is an ideal way to control the temperature and protect fragile cucumbers from cold snaps and bad weather. Your young cucumbers will suffer if the temperature drops below 12-15°C, so don’t move any to an unheated greenhouse until at least late May.

When your seedlings are ready for more growing room, plant them individually into 23cm pots, filled with a nutrient-rich compost. You can also grow them in raised greenhouse beds, keeping each plant about 30cm apart. As they grow, you’ll want to train vine cucumbers up a bamboo pole or frame – gently tie longer shoots to the pole with string to get them started.

As your plants start to reach the top of your greenhouse, it’s time to start pruning them back. Pinch off the tip of the main stem to stop the plant getting taller, and to encourage growth elsewhere. Where you see female flowers (the ones with small fruit behind them), move two leaves closer to the end of the vine, and pinch off the tips – again, to focus plant growth on the fruit. Finally, any vines without flowers can also be pinched off when they grow beyond 60cm.

Water your cucumbers little and often, keeping their soil moist but not waterlogged. If you can, raise the humidity when it starts to get warm (watering a warm greenhouse floor is one trick to doing this). Every two weeks, mix in some liquid fertiliser to keep your crops topped up with balanced nutrients.

How to grow cucumbers outdoors

how to grow cucumbers outdoors, a person transplanting cucumber seedlings to garden soil

If you can’t start your cucumbers off indoors, wait until May or June to plant your seeds outside, and cover them with a cloche, fleece, or clear plastic cover to help them retain heat. Planting your cucumbers in beds is the best way to give them enough room to grow (although, just like in a greenhouse, you can train them up a trellis). 

Find an area with maximum sunshine and shelter, and prepare the soil by adding a 7cm layer of compost to the surface, and mixing it at least 30cm deep. Then, sow and grow as you would indoors, planting seeds every 30cm, encouraging them up a trellis (if you want to), and pinching the ends to focus growth in the centre of your cucumber plants.

Make sure to keep your plants watered, especially when your cucumbers begin to flower and then fruit. Don’t water the flowers though – just the base of the plant. Wet flowers can become rotten and upset the whole plant and its yield.

Harvesting cucumbers

growing cucumbers climbing up a metal trellis for support

With the right conditions and care, your cucumber plants should start to mature from about 50 days of growth. If you’re growing a pickling variety, they’ll be ready to pick when they’re between 5-10cm long, and slicing cucumbers are ready once they reach 15-20cm long.

To harvest, either break individual cucumbers off with your hands, or use sharp garden scissors to cut them from the vine. Like many other vegetables, your cucumber plant will continue to produce more cucumbers as you pick them off, so the more frequently you harvest, the more cucumbers you will ultimately grow.

Common problems when growing cucumbers

a close-up of whitefly on a cucumber leaf, a common pest for cucumber plants

Compared to some of the other vegetables we’ve talked about (like tomatoes and green beans), learning how to grow cucumbers can be a bit tricky. One way to ensure you have a successful harvest is to keep an eye out for some of the more common problems with cucumbers.

  1. Cucumber mosaic virus is probably the best-known challenge of growing cucumbers, and causes a distinctive patterning on leaves (which gives it its name). You’ll also notice stunted, deformed vine growth and that your plant struggling to flower. Any fruit that appears will also be stunted, with pitted skin and a hard, inedible texture. Cucumber mosaic virus is spread by aphids, so take precautions that minimise pest insects and be careful to destroy infected plants.
  2. Whitefly is another pest-based problem, where little white flies (again, the clue is in the name) suck the sap from your cucumber plants. This will weaken the vines, and also leave a sticky residue on your plants that in turn causes a sooty mould to grow. Take steps to limit bugs near your cucumbers, like growing them under a mesh outdoors or using sticky traps in your greenhouse.
  3. Powdery mildew is a dusty white mould that will grow across the leaves of your cucumber plant, slowly causing them to shrivel. When the problem is extensive, the overall health of your plant will be affected. If you notice the signs of powdery mildew, make sure you’re keeping the soil around the base of your cucumber plants moist and are allowing cool air to circulate around your plant too.

Learning how to grow cucumbers can be a steeper learning curve than growing herbs or tomatoes, but they’re a really rewarding crop if you can provide the right conditions. Brimming with vitamins and minerals, they’re not only amazing in salads and dips (I’m looking at you, tzatziki), they’re great for garnishing cocktails and even using in home-made beauty treatments.

Don’t forget to check out our other growing guides, helping you to get started with herbs, shade veggies, potatoes, tomatoes and all kinds of other delicious foods. Happy growing!

HOW TO GROW CUCUMBERS IN YOUR GARDEN

Save this pin for later

Garden Vegetables to Plant in Spring

In the UK, we usually associate spring with budding blossom trees and the first bursts of colour from early-blooming flowers. But where does that leave the vegetable patch? Very few crops can handle the frost, so it’s unlikely that you’ve got much going on veg-wise by the time March and April roll around. So, how do you get started on your kitchen garden? Let’s take a look at which garden vegetables to plant in spring and get your growing season off to a great start.

a small green bean seedling growing out of a potting tray

A quick note before we get into it – I’m not going to assume today’s readers have a greenhouse, so will be ignoring the fact that, if you do, you can get a head start on most of these veggies. Hopefully in the future I’ll have time to give you some greenhouse tips for the early part of the year!

What are the best garden vegetables to plant in spring?

green beans and other vegetables in containers outside, next to a cold-frame unit

If you haven’t planted any spring-harvest crops, your garden vegetable patch is probably looking a little barren. Here are some garden vegetables to plant in spring, which will all tolerate cold weather with a little extra love and care.

Of course, climates can vary dramatically across the UK. Always check your growing zone and ask staff at your local nurseries for the best crop varieties to grow in your soil. Gardeners in the north of the country should expect to start planting at least 2 weeks after southern estimates, with yields coming in later too.

Other garden vegetables to plant in spring (indoors)

This might seem contradictory to my “no greenhouses” caveat at the top of the article! The thing is, I only have limited outdoor space. At this time of year, my best gardening is happening on my kitchen windowsill, so that my plants are prepped and ready to go by the time outside warms up! So if, like me, you’re happy to grow some seedlings inside, ready to harden them off later in the season, here are a few options.

There are lots of other garden vegetables to plant in spring indoors, but these are my favourites for being relatively simple.

Ways to help your spring vegetables

indoor herb garden ideas using hydroponics

When planning which garden vegetables to plant in spring, it’s wise to factor in ways you can help them off to a healthy start. For example, cultivating a spacious vegetable patch so you’re not growing crops too close together (which can cause leaves to harbour too much moisture).

Spending a bit of extra time working on your soil can help, too. Pick a well-draining spot, and mix in plenty of well-rotted manure and compost to both provide nutrients for strong growth in harsher weather, and loosen the soil.

Wherever possible, harden young seedlings off each time you move them from a heated indoor space, to an unheated (but sheltered) space, and then to outdoors. Exposing them to their new conditions for a few hours each day and gradually increasing the length over the course of a couple of weeks will do wonders in preparing them for permanent outdoor growth.

Plastic covers – like growing tunnels and propagation lids – will shield tender seedlings from the most damaging wind, rain and cold. Fleece and cloche covers are also an excellent way to protect young plants from late frosts.

What are the challenges of growing vegetables in spring?

Garden vegetables to grow in spring will need protection from cold weather and pests

Starting your growing season early unfortunately doesn’t mean you’ll get a headstart on pests and problems.

Bugs are going to pose a year-round challenge, so make sure you cover early crops with a mesh. If not, caterpillars and beetles will make short work of anything leafy! Look out for whitefly on your cabbages and other brassicas, and treat infestations with a spray as quickly as possible. Don’t forget to take a look at our tips for keeping snails and slugs out of your garden, as wet spring weather can bring them out in droves.

Overall, try to avoid your crops from getting too damp. Club root can affect cabbages (and other brassicas), and mildew can develop in leafy crops and around flowers. Generously spacing your seedlings out will help, and double-checking the moisture of the soil before watering them.


We’ll have heaps more gardening content coming for you in the coming weeks – keep an eye out for our next seasonal growing guides, and don’t forget to check the basics of growing your own vegetables. Which crops are you keen to grow? Let us know, and tell us any tips and tricks you have for keeping them healthy in cold weather!

GARDEN VEGETABLES TO PLANT IN SPRING

Save this pin for later

How to Grow Green Beans in Your Garden 

Green beans, also known as string beans or French beans, are super easy to grow in the UK. Learn how to grow green beans in your own garden, and within just a few weeks you’ll be enjoying your harvest in salads, stir-frys and as a side to delicious hearty meals. Let’s look at what green beans will need to thrive in your garden.

Growing green beans: Where to begin?

Along with providing nutrient-rich soil, the most important thing to remember when learning how to grow green beans is that they really don’t handle the cold. Make sure to keep them safe from frost, and don’t start planting them until the temperatures have started to climb for spring.

Plant in: April, May, June, July

Move outdoors in: June, July

Harvest in: July, August, September

Sowing green beans

a small green bean seedling growing out of a potting tray

Like many other crops, there are two growing varieties of green beans; dwarf (or bush) beans, and climbing (or pole) green beans. Dwarf types grow quickly but will only sprout beans for a few weeks, while climbing beans are a little slower but provide yields through to September.

Both varieties need lots of sunshine and very fertile soil that drains well. When you’re preparing soil, mix in rich compost and well-rotted manure to slowly release nutrients into the soil and create drainage throughout your vegetable patch or pots. You can learn how to generally improve your garden soil condition for better crops all-round.

You can start growing green beans indoors around the start of May, by planting single beans in individual pots. Gently push them about 5cm into the soil, position them on a sunny windowsill and cover them with a clear plastic propagator lid so they can retain plenty of heat. Water them regularly.

Hardening off green beans

green beans and other vegetables in containers outside, next to a cold-frame unit

When you’ve grown seedlings indoors, they will need to be hardened off before they can stay completely outside – and green beans are no exception! Green beans are ready to start being hardened off when they’re about 8cm tall.

You can harden green beans off by moving them outside for a few hours each day, gradually increasing the duration from a couple of hours, to all day, to overnight over about 2 weeks. This will help them acclimatise to the wind, colder temperatures and increased moisture loss. After two weeks (and, again, once you’re sure there won’t be another frost), you can plant them into the soil or move the pots outside permanently.

Planting green beans outdoors

Green beans can generally tolerate being planted outdoors from late spring – towards the end of May. If the temperatures are still low at night, give your seedlings a cloche cover to keep warm, or place pots in a greenhouse or cold-frame.

Sow your green beans in a sunny spot, and use a garden fork to mix in lots of garden compost to prepare the soil. 

Growing green beans

learn how to grow green beans up a trellis or bamboo wigwam for the best crop yield

Dwarf green beans beans, or bush green beans, reach about 45cm in height. Best practice is to grow them in close clusters (about 15cm apart), so that they can use each other for support. Keep dwarf green beans well-watered, and don’t let the soil dry out. Additional compost or a layer of mulch will help with water retention.

Climbing green beans will need a physical support as they grow. There are a few ways you can provide this with bamboo canes, but the two most common are creating double rows of canes, or building tripods or wigwams.

For double rows, buy 1.8m/6ft bamboo canes and push them into the ground at 15cm intervals, with about 45cm between the two rows. Angle them inwards at the top, connect your rows with a horizontal cane, and tie them together with twine.

Tripods can be more space-efficient in certain setups, and are better for container gardening. Using the same length bamboo canes (1.8m/6ft), space 3-5 in a ring about 15cm away from each other and tie at the top. This video about making wigwams for vegetables shows you the steps.

For both formations, plant one beanstalk at the base of each bamboo cane – you might need to gently tie the shoots to the poles to help them initially cling.

Harvesting green beans

a close up of green bean vegetables in a container garden, ripe and ready to harvest

Green bean pods are ready to harvest when they’re about 10cm long, before the beans are visible through the skin of the pod. One way to test their ripeness is whether they snap in half easily.

If you pick of fresh green beans as soon as they’re ready, both bush and climbing green bean varieties will continue produce more beans for several weeks (and even longer for climbing green beans).

Common problems when growing green beans

raised flower beds for growing vegetables in containers, with a trellis and pots nearby

Learning how to grow green beans comes with recognising the signs of problems with your crops. More accurately, you’ll need to know how to deal with the garden pests that are attracted to green bean seedlings and fruits, as these will be the root of most of your challenges!

  1. Slugs (and sometimes snails) are going to want to feast on your seedlings when you first plant them into the soil, destroying the tips and stunting growth. Planting them indoors and moving them outside once they’re tall enough is a good way to limit damage. Read our tips for keeping slugs and snails out of your garden for advice about dealing with them.
  2. Aphids can also affect green beans, but they’re usually more attracted to other crops, so shouldn’t pose too much of a problem. If you do notice aphids, you can pinch off host stems or leaves, or squish individual bugs when you spot them.
  3. Birds can sometimes cause a problem when you’re growing green beans, especially pigeons. The best way to stop birds from getting at your green beans is to cover them with a mesh.

Now you know how to grow green beans, don’t forget to check out our other posts on growing crops in your garden. There’s nothing more satisfying than cultivating enough veggies to keep your table stocked throughout the year – so get planting!

HOW TO GROW GREEN BEANS IN YOUR GARDEN

Save this pin for later

How to Grow Cabbage in Your Garden 

Cabbage is a fantastic crop to start growing at home. Not only is it a healthy plate-filler that can be added to countless recipes, there are so many varieties that it’s possible to have some kind of harvestable cabbage for the majority of the year. If you want to learn how to grow cabbage in your garden and add its magnificent leaves to your foodscaping, you’ve come to the right place!

a head of cabbage with thick, unfurling leaves

Growing cabbage: Where to begin?

Cabbage is part of the brassica family of plants – sometimes referred to as cruciferous vegetables or simply “cabbages”, even though broccoli, cauliflower, Brussel sprouts and mustards fall into the same category. These crops are typically very nutrient-rich. 

Cabbage can grow in all kinds of soil, making it a great starter crop wherever you live. As long as your plants have enough space from other veggies, you can grow cabbage in anything from light, sandy soil to heavy, clay-based terrain. Unlike other plants, cabbage will tolerate a wide pH range too (as long as it’s well-watered). So, if you’re struggling to plant veggies in an exposed or seaside garden, figuring out how to grow cabbage is an excellent place to start.

Cabbage is also tolerant of cooler temperatures, and a light frost in spring or autumn can actually help them taste sweeter. It’s one of the reasons why cabbage is an easy crop to grow almost year-round, from February to late autumn. Here’s a quick growing guide to give you an idea of how to grow cabbage for different seasons:

For summer cabbage: Sow late Feb to early May (covered), plant outdoors in May/June

For winter cabbage: Sow April/May, move outdoors at the end of June

For spring cabbage: Sow July/August, plant outside in September and October

Sowing cabbage

how to grow cabbage in your garden from seedlings in a potting tray

Cabbages start from seeds – buying locally will ensure you’ve got the right crops for your area. It’s also important to rotate your crops when you’re growing brassicas, so you don’t use the same soil two seasons in a row – you can find more info on crop rotation in our post about square-foot gardening.

You can start your cabbages in potting trays, or plant them straight into the ground. Cabbages will also grow in large, deep containers, but small pots or grow-bags won’t be sufficient. Ideally, you should prep the soil several weeks beforehand by mixing in a good garden compost, and leaving it to settle.

When it comes to planting, compact soil is best, but gently rake the top layer to loosen it before planting your cabbage seeds just 1cm deep. Cabbages will need 30-40cm between them to fully grow, but if you’re planning to grow lots of veggies and/or simply don’t have the space to spread them out so far, there’s an alternative. Try starting your cabbages in a separate seed bed, and then moving them into your main vegetable patch when they begin to mature.

Wherever you start growing your cabbage seeds, give them some shelter as they germinate. A cold frame is good if you have one, but a plastic cover or cloche is fine.

Growing cabbages

a small head of cabbage forming in soil

When your cabbage seeds have germinated, you can remove the cover. Just remember that the soil is going to dry out a lot quicker once the seedlings are exposed to the elements, so check on them frequently and keep them moist. When a seedling has 2-3 leaves, you should move it to a separate growing container (if you haven’t been growing them in seed trays).

When your seedlings have 5-6 strong leaves, you can move them into their permanent home, lowering them into soil up to the base of their lowest leaves, and spacing them about 40cm apart, depending on the variety (check each seed packet). Water the soil thoroughly the day before, and again as you transplant them – there’s no such thing as “too much” watering at this stage! When your seedlings are positioned, press the soil down around them firmly.

As with most veggies, young cabbage plants will grow best with a bit of extra heat and sunshine, if you can provide it. Shelter is good, too – tall crops like beans or corn make excellent companion plants to brassicas for this reason.

Keep your cabbages watered as they grow (every 7-10 days), and top the surface of the surrounding soil up with mulch and compost to retain water and slowly release nutrients. When you’re watering, try to aim for the base of the plant – sitting droplets on the cabbage head can cause mildew, and result in a musty flavour (and nobody wants musty coleslaw)!

Harvesting cabbage

Heads will generally appear around 50 days after planting, but cabbages can reach maturity any time between 50-90 days of growth. Cabbage variety will play a big part in this (although there will be some variation within each crop), so you might want to factor this in when you’re choosing which types to plant. With a bit of planning, you can have several weeks of harvest, which also means less waste than everything becoming ripe at the same time!

When a cabbage head is ready, take a sharp knife and cut the stem slightly above the ground. Score a deep (1cm or so) cross in the stump to encourage a second, smaller cabbage growth later in spring or summer. The best time of day to harvest cabbage heads is first thing in the morning, before the heads absorb the heat of the day.

Common problems when growing cabbage

a close-up of caterpillars chomping through a cabbage leaf

Preparing for possible issues with your crop is part of successfully knowing how to grow cabbages (or any vegetable). If you understand what is most likely to plague your wonderful veggies, it’s easier to take preventative measures, or act quickly to stop a problem spreading. Here are some of the most common challenges when you’re growing cabbages:

  1. Slugs and snails will be a major threat to your cabbages in the early stages, as they’ll devour newly forming leaves on young seedlings. Ultimately, this will stunt growth, and kill the plant if the damage is too severe. If you notice slime trails, it’s time to brush up on ways to keep snails out of your garden.
  2. Caterpillars can also pose a problem, as they love to feast on brassicas. You might be able to spot holes chomped through your cabbage leaves, but caterpillars can eat right through to the core, too. One or two insects can just be picked off (having butterflies in your garden is nice, after all), but you can save yourself the effort with a fine, bug-proof mesh cover.
  3. Cabbage root fly is – if the name doesn’t tell you – flies that target your cabbage roots. Well, their larvae do at least. Look for long (5cm) white grubs around the base of your plant and just below the surface of the soil. Again, growing your plants under a horticultural fleece, or bug-proof mesh is the best way to avoid pests like this.
  4. Club root causes cabbage roots to become thick and mutated, usually resulting in wilted, yellowing leaves. Although cabbages generally like plenty of water and are tolerant of acidic and alkaline soil, stop if you notice these symptoms. Hold off on watering, improve drainage and mix some lime into the soil to give the alkaline levels a boost.

Learning how to grow cabbage is the first step on a rewarding journey to crunchy coleslaw, hearty stews and comforting soups. Cabbage can easily be pickled or preserved (check out sauerkraut recipes), meaning that even a small cabbage patch can keep you topped up with veggies all year round.

Don’t forget to take a look at our other growing guides and sustainability tips!

HOW TO GROW CABBAGE IN YOUR GARDEN

Save this pin for later

How to Start Growing Your Own Vegetables

Are you keen to start growing your own vegetables at home? There’s nothing quite as satisfying as serving up a plate with food that’s come from your own garden, but knowing where to start can be daunting.

The good news is that there are lots of options for you to start growing your own vegetables as a beginner, even if you’re low on space or in a rented home. Today I’ll be showing you some of the best starter-veggies that you can take from planter to plate.

Before you get going, it’s worth figuring out which plants will actually be the most practical for your home. Do you want crops that can basically look after themselves, or can you take the time to check on them every day, or every other day? Which veggies are you actually likely to eat? Try starting with native crops you might usually buy from the supermarket or greengrocer, and you’ll end up with less waste and bigger savings.

1. Tomatoes

tomatoes and lettuce in a raised planter

Ignoring any technicalities about tomatoes being a fruit… Tomatoes are at the top of the list because they’re both an incredibly versatile crop AND they’re very easy to grow in any garden space – even in an indoor garden or on a balcony.

You can grow tomatoes from seed packets or from seedlings bought from a store. You can even plant the seeds from your next salad… Although your success might vary depending on the variety.

Tomatoes can be grown in the ground, or in pots, planters or grow-bags, as long as they get full sun – so save a spot in your sunniest corner. Take a look at our guide to growing tomatoes for more details.

2. Spring Onions

a jar of spring onion heads sitting in water

Spring onions are one of the easiest plants to look after when you start growing your own vegetables. A few rings of spring onion make a pretty garnish for stir-frys and rice bowl-style recipes, like poke. For this reason, I actually grow my spring onions on my kitchen windowsill, alongside my indoor herb garden.

To grow spring onions outside, sow your seeds in pots or the ground between March and July. They’ll be ready to harvest about 8 weeks later, and any you don’t use will flower and self-seed for a new batch.

If you don’t have much outdoor space, you can “grow” spring onions in a jar of water. Next time you cook with them, use the tops but save the bottom 2-3 inches. Submerge them in water so the base is covered (but the tops are sticking out), and they’ll slowly re-grow their leaves. Make sure to change the water every couple of days though, or it can start to generate an onion-y smell!

3. Potatoes

clusters of muddy potatoes, pulled straight from the ground

Potatoes are another rewarding crop to start growing your own vegetables, because they’re low-maintenance, high-yield and a dinner table crowd pleaser. Like tomatoes, potatoes are happy grown in soil, pots or grow-bags, and you can get them going 

You can grow potatoes from ones that you have sprouting at home, but it’s better to source ‘seed’ potatoes that are certified to be free from crop viruses. Potatoes take 10 to 20 weeks to grow, and will need to be “earthed up” in the early stages – gradually adding soil until the potatoes are about 30cm deep.

Our guide to growing potatoes in your garden has more details.

4. Peas

plastic containers with pea plant seedlings

Peas are known to be an easy plant to grow, even for beginners, and are another plant that will manage on a sunny kitchen windowsill. For outdoor veggies, plant peas (yep, even leftover fresh peas) into the soil from March to June.

The only challenge of peas is that they need something to climb up, like chicken-wire or staked netting. You should see your first pods appear in June and, if you keep picking them off as they’re ripe, your plants will keep producing until August or September.

5. Radishes

radish seedlings with green leaves and red stems, protruding through the soil in a pot

Radishes are a brilliant way to add colour and crunch to a salad or vegetable rice bowl. They’re also another versatile crop in terms of where they can be planted, so if you’re going to start growing your own vegetables in containers (instead of the ground), radishes are a good choice.

The ‘Scarlet Globe’ variety has the classic pink skin and white centre, and the ‘French Breakfast’ is another delicious option. Their size, speed and simplicity makes radishes one of the best plants to grow with children.

6. Beetroot

beetroot plants sprouting in a garden

Beetroot is another root vegetable that’s super easy to grow. If you like fresh beetroot in salads, enjoy some boiled beetroot with your dinner or want to try your hand at home-pickling, give this veg a go.

Sow beetroot seeds into soil from March to July. When the seedlings sprout, reduce them down so they’re about 5cm apart so they can fill out. Beetroot will take 2+ months to grow, so check on them from May and harvest until September.

7. Lettuce

a container of lettuce plants in a garden

Need some leaves to supplement your salads? Lettuce only takes a month or so to grow, and you can plant it in such a way that it lasts all season. Start lettuces in seed trays to help you with spacing, or thin out seedlings in the bed so they’re about 15cm apart.

Although you can plant lettuce straight into the ground, they’re actually great candidates for container gardening, for example, growing them in stacked troughs to create a kind of vertical wall. This will also help to protect your lettuce from slugs and snails.

If you grow loose-leaf lettuce, you can harvest the outer leaves but keep the head planted to slowly regrow. A lettuce will replenish in about 2 weeks, so stagger your planting/harvesting and you can stay continually topped up with fresh leaves throughout the season.

8. Runner beans

runner beans growing up cane supports

Runner beans need lots of vertical space so, when you start growing your own vegetables, allocate a space near a trellis or wire fence for them to flourish. Like peas, the more you pick runner beans, the more they’ll replenish, so you’ll have a supply of yummy, healthy, homegrown veggies all summer.

Plant runner beans in May and June, and you’ll get your first harvest about two months later. For patio gardens or balconies, try growing runner bean plants in individual 5cm pots.

9. Courgette

how to start growing your own vegetables, like courgette

Courgettes are another plant that might surprise beginners with their high yield. Just one or two plants will keep a small household stocked with these summer squash. As low-growing crops, courgettes are a good candidate for companion planting with a taller plant.

For the most delicious crops, you’ll need to keep your courgette plants topped up with weekly fertiliser (something like tomato food), as well as nutrient-rich compost. It’s best to harvest courgettes when they reach about 10cm long – slightly shorter than your supermarket varieties, but it will result in a stronger plant and generally a better quality harvest.

Start Small and Work Up Gradually

When you’re itching to start growing your own vegetables, it’s tempting to plant heaps of everything and hope for the best. The thing is, if the “best” happens, you’re going to end up with a LOT of crops all at once – and you’ll be forced to foist them on friends, family and neighbours! Or, the worst case scenario happens, and you’ll spend all summer fighting off garden pests and struggling to keep up with the needs of even the most low-maintenance crops.

Unless you’ve got a lot of time and several pairs of helping hands, it’s typically easier to start with small numbers of a limited variety of crops, and expand your kitchen garden from there. Remember to stagger your planting, and you’ll be amazed at your own green thumbs in no time!

HOW TO START GROWING YOUR OWN VEGETABLES

Save this pin for later

7 Natural Ways To Keep Snails Out Of Your Garden

We’ve spoken about ways to attract “friendly” bugs into your garden, but what about keeping pests at bay? Gardeners find slugs and snails are particularly pesky, as they can really chomp their way through beautiful flowers and delicious crops, destroying flower beds and foodscapes alike. So, let’s take a look at some of the natural ways to keep snails out of your garden.

a brown snail on the edge of a plant pot

Why Choose Natural Pest Control?

There are several reasons why you might prefer to use organic pesticides instead of chemicals. For many, it’s just about looking after the environment and not putting harmful substances into the earth. Maybe you’re also wary of putting pesticides on things you’re ultimately going to be eating. Natural bug control methods are also going to generally be safer to use around children or animals (of course, you should still teach them to stay away).

1. Use rosemary and thyme as companion plants

Companion planting is where you grow certain things near each other for a specific reason. For example, you might use companion planting to encourage cross-pollination, or to maximise the available space in a planter.

In this case, both rosemary and thyme act as natural ways to keep snails out of your garden. For some reason, snails (and slugs, and a number of other garden pests) don’t like the smell of these herbs. Mint will work too, but it’s quite invasive so you should grow in separate containers and sprinkle the leaves around the plants you want to protect.

2. Use a rough, gritty mulch

garden tips for selling your home include putting mulch on your flower beds

I love the way mulch makes a garden look much tidier, with uniform soil peeping out from beneath blooms and bushes. Using certain kinds of mulch is one of the natural ways to keep snails out of your garden and away from your plants.

Look for mulch (or make your own) that contains wood ash, bark, eggshells and crushed nut shells. Any ground-crawlers like snails and slugs will typically avoid slithering over rough soil, and the mixture will help keep the composition of your soil balanced.

3. Encourage more birds

Birds are wonderful pest control, and one of the best ways to keep snails out of your garden without having to deal with them yourself. You might even be surprised by how many varieties of feathered friends start visiting when you show them they’re welcome!

Start by investing in some bird feeders and keep them topped up. A bird bath (or shallow water feature) is also great in summer. You might even want to add some bird-boxes, and hang back on raking and tidying so that there’s plenty of nesting material available. Our posts about bird-friendly garden ideas and wildlife gardens will give you more ideas!

4. Get yourself some chickens

Are the wild birds not showing up quick enough? A short cut is to start rearing your own! Chickens and ducks are actually really fun to keep as pets, and will just devour any bugs they find roaming your garden. They’re the perfect addition to any homestead garden.

So, to clarify, just a handful of hens will lay eggs, provide a free way to keep snails off your plants (and other insects) AND result in endless hours of entertainment. It’s not often I offer you a win-win-win solution, but I think I’ve just done it here.

5. Use diatomaceous earth

a gardener holding a trowel of diatomaceous earth, one of the ways to keep snails out of your garden

Diatomite, or diatomaceous earth, is made from a naturally-occurring rock that is ground to a very fine white powder. It’s safe to ingest (it’s actually used as an abrasive in some toothpastes), but is microscopically sharp.

Sprinkle this flour-like substance around your plants, and any slugs or snails that cross it will get hundreds of tiny cuts that cause them to dehydrate and perish.

6. Get them drunk

ways to keep snails off of your garden include beer traps

Does shredding your garden pests make you feel squeamish? Well, what do you want to do, share a beer with them?! Actually, that’s a good idea too. Sink a shallow container (like a tuna tin) into your flower bed up so the rim is at ground-level. Half-fill it with beer and, voila, you’ve made a beer trap.

Slugs, snails and earwigs are totally tempted by this yeasty treat, and will crawl in, start drinking, and eventually drown. Okay, so that isn’t exactly less gruesome than the last method. If you have excess beer, can I recommend opening a garden pub as an alternative?

7. Container gardening

Container gardening is one of the simpler ways to keep snails out of your garden when you raise it up off the ground. Growing valuable plants in a planter or container makes it less of a target for any ground-crawling pests, both because they’re literally further away, and because it can be tricky for bugs to climb up the sides even if they try.

Plus, it’ll be easier to keep an eye on your plants, and pick off the garden pests that would usually lurk under leaves and sneak behind stems. There are lots of perks with container gardening – take a look at our container gardening tips!

What Are Your Organic Gardening Tips?

This season at Garden Patch, we’ll be looking at all the ways you can keep your garden happy while staying in tune with nature. Let us know how you look after your garden, and check out our posts about kitchen gardening, composting, and natural ways to keep other annoying bugs at bay (mosquitoes, we’re coming for you next!)

7 NATURAL WAYS TO KEEP SNAILS OUT OF YOUR GARDEN

Save this pin for later

Which Plants Repel Mosquitoes?

Nobody I know seems to loathe mosquitoes as much as me… but that’s probably because, when I’m out, NOBODY ELSE seems to get bitten by them! I am obviously the mosquito equivalent to a gourmet dinner while my friends and family are essentially plain toast.

Anyway, if you, like me, are absolutely delicious to these little winged monstrosities, then you’ll be glad to know that today’s post is all about which plants repel mosquitoes.

Yes, there are other ways to keep biting insects at bay. However, I am just sick of spraying myself with chemicals (especially if I’ve bothered to wear perfume), and citronella candles never seem to do the trick for those of us that are truly delectable. I know the smoke from a fire pit or BBQ will keep insects away, but who really wants to sit in smoke?!

Anyway, without further ado, here are the answers to your question:

Which Plants Repel Mosquitoes?

1. Lavender

Right at the top of the list is lavender, one of the hardest-working and most stylish garden plants there is. Lavender looks great in any space, from formal French flower beds to cute and cluttered cottage gardens. It’s gentle fragrance is perfect for sensory gardens and, conveniently, repels mosquitoes too.

Lavender is pretty hardy, and makes for a good garden border plant. You just need to plant it in a sunny spot with well-draining soil and it should thrive. Plus, you can trim and dry the stems to use them in homemade beauty products and relaxation aids.

2. Geraniums

a cluster of cranesbill, also known as Johnson's Blue geraniums

Geraniums are another versatile plant that mosquitoes seem to really dislike (again, thanks to their aroma). They’re a great contender for hanging baskets, but geraniums come in so many colours that they will look great in any corner of your garden. They come in different heights, too perfect for pots, planters and flower beds alike.

3. Marigolds

which plants repel mosquitoes? Marigolds blooming in a flower bed

Marigolds are all-round winners, as they not only repel mosquitoes, but will keep a whole variety of insects away from your other precious garden plants. Check out our post on companion planting for more tips like this!

Marigolds don’t like the frost, so wait until the weather starts warming up (just a little) before you plant them – in the ground or into containers. Although they’ll probably die off when winter comes back around, they’re self-seeders, so should reappear next year.

4. Basil

several varieties of basil growing in a flower bed herb garden

If you’re planning an outdoor herb garden this year, make sure basil makes the list. Although it does prefer to live indoors in the UK, it’s mosquito-repellent properties make it worth hardening for your garden.

Basil is actually toxic to mosquito larvae, so if you have any water features (like ponds or water bowls) where these bugs can breed, planting basil can keep their numbers down. Plus, you’ll get to benefit from pesto galore and as many Caprese salads as you can handle.

5. Catnip

a herb garden with catnip and other vegetation

Time to strike a deal with your cat: you supply it with a cache of catnip, and your cat rolls around in it to release its mosquito-repelling chemical into the air. Although some of the plants in this list are anecdotal, SCIENCE has stated that “catnip repels mosquitoes more effectively than DEET”.

Just be aware that planting a patch of catnip will result in some very spaced-out moggies, and your garden may become the new hangout for neighbouring felines, too.

6. Bergamot

which plants repel mosquitoes: a close-up of bergamot flowers

Bergamot, sometimes known as bee balm, is another all-round garden winner. Its frilly pink flowers look and smell fantastic in any flower bed and it grows best in low, moist areas (which is where mosquitoes typically breed).

While it keeps mosquitoes at bay, it also attracts butterflies and bees – making it ideal for planting around insect hotels.

7. Garlic

rows of neatly planted garlic for a kitchen garden

We all know that garlic is good for warding off nasty, bitey, blood-sucking things… and that includes mosquitoes! Garlic is also super easy to grow – simply divide an existing bulb into cloves and plant them. They’ll gradually multiply into a complete bulb again.

Ideally, garlic needs lots of sunshine and some well-draining soil for healthy growth. Growing them in pots as part of an indoor herb garden is great, but if you’re growing them outside or in larger containers, make sure to leave about 12cm between cloves. You’ll know it’s ready when the leaves start turning yellow at the base.


So, now you know which plants repel mosquitoes, you can finally grow a wonderful, fragrant garden and enjoy it at any time of year. Relax on your patio in the early evening, or enjoy a beautiful dinner al fresco – without being a meal yourself!

Don’t forget to take a look at ways to encourage ‘good’ bugs and beasts into your garden, as well as our info on natural pest control for snails and slugs.

WHICH PLANTS REPEL MOSQUITOES

Save this pin for later

The Best Garden Ideas for Wildlife in the UK

Having a garden is like having your own little slice of nature. Personally, I don’t think there’s anything more rewarding than spotting some wild critter frolicking around in your outdoor space – watching wildlife is better than TV! If you’re inclined to agree, hopefully you’ll enjoy some of the simple garden ideas for wildlife I’ll be looking at today.

When you’re trying to attract more birds, bugs and beasts to your garden, the main thing is to give them plenty of places to hide and forage. In this post, you’ll get some garden ideas for wildlife shelters, feeding set ups and other features that can draw them in.

What animals can you see in the UK?

a plump grey squirrel sits atop a grey garden fence

The local wildlife will vary depending on where you live. At the moment, in Brighton, I’m most likely to see squirrels and seagulls (which are universally hated across the city). However, I’m lucky to also overlook a quiet green space that is home to fox cubs each spring. Generally, animals living in built-up areas will have much more limited travel between spaces. Even if you know there are urban foxes and grey squirrels in your city, attracting them will always be hard.

At the other end of the scale, my dad is often sending me pictures of deer, pheasants, badgers, wild rabbits, partridges, canada geese and any number of smaller bird types, all from his rural kitchen window. Where there is lots of open, undisturbed space, you’ll have a much better chance of spotting unusual native animals.

Basically, keep your expectations about the kinds of wildlife that might visit your home low, and you’ll be pleasantly surprised, rather than disappointed. If you’re trying to manage kids’ expectations, try talking to your neighbours about the creatures they’ve spotted to get a better idea. Don’t forget you can also help the National Biodiversity Network monitor national species by contributing to their wildlife watchlist.

How to get more birds in your garden

Birds are the most likely critters to travel between gardens, so if you start enticing them to yours, they’ll probably come. Feeding birds, and giving them somewhere comfortable to nest, is hugely beneficial to your local bird populations. Learn how to attract more birds to your garden.

Hedges and trees are natural nesting spots for birds, but you can add birdhouses to encourage more (especially if you’re concerned about predators climbing into the trees).

Make sure you’re providing lots of different food sources in various kinds of feeders. Fat balls are fun, plastic domes can keep squirrels out, and bird feeder tables accommodate larger feathered friends.

When you start adding more garden ideas for wildlife, it’s a good idea to track the animals that are visiting your garden already – especially birds. That way, you can check in every now and then to see how much progress you’re making with new varieties visiting each season.

Welcoming ground-critters

garden ideas for wildlife can encourage foxes

It’s a bit harder to attract mammals to your garden, as they usually have quite specific habitat requirements that can be hard to replicate in a garden environment – but don’t let that stop you from trying!

One of the best garden ideas for wildlife you can try is to minimise the amount of bare, open space – like short lawns and empty paving. If you have lots of connected flower beds and planters, animals will be more comfortable snooping around.

a crowded, cottage style flower bed

You should also try and grow a range of plants that flower and bloom throughout the year. Not only will this provide consistent coverage for shy critters, but it also gives pollinating insects a great time – more on that later!

Lastly, be prepared to do less garden pruning. Most creatures don’t like being disturbed, so leave your hedges to grow until winter, and hold back on the lawn-mowing. If you really can’t bear to have an untidy garden, how about leaving one section to grow a wild meadow, while keeping the rest short?

Ways to help hedgehogs

An animal that really needs our help right now is the hedgehog. Their numbers have been seriously declining in the UK, not helped by urban developments steadily destroying a hedgehog’s natural habitat. Adding specific wildlife friendly garden ideas aimed at hedgehogs can make a big difference!

There are a few ways to help hedgehogs. First, cut a hole in each fence at the edge of your garden to create a “hedgehog highway”. Ask your neighbours if they’ll get involved – the more linked gardens the better! These cute critters travel about 2km every night, so access is important! Next, build them a home where they can make a nest to hibernate and look after their babies. The wildlife trusts have this useful guide to making a simple hedgehog house.

Inviting insect environments

a large insect hotel with various compartments and a green roof

Image by Sabine Fenner

Insects often go underappreciated in gardens – everyone wants to see fat little squirrels and sparrows, but few people are keen for anything that creeps or crawls. In reality, a diverse collection of minibeasts is a free, natural way to keep your garden looking happy and healthy.

Let nature take the wheel, and you’ll gradually find that plant-friendly bugs help reduce more pesky plant eaters, and also attract more birds and mammals looking for a snack. So, what bug-friendly garden ideas can you install?

Build a bug hotel

Insect hotels are boxes that are designed to provide food and shelter for insects, like caterpillars, solitary bees and woodlice. You can buy them in lots of different, whimsical styles, or make your own as a fun, eco-friendly garden project.

Natural insect habitats

a stumpery made from decaying tree logs

A simple pile of logs, or a layer of sticks and leaves beneath a hedge, can create a home for lots of insect species. You could also create a “stumpery” by embedding logs vertically in the soil of a shady flower bed. Add foliage like moss, ivy or clumps of earth to create humidity, and try not to disturb it too much while gardening.

Creating a butterfly-friendly garden

a butterfly with open wings sitting on a buddleia flower

If you have visions of creating a fairy-tale paradise with endless butterflies, there are a few ways to specifically encourage them. Those with cottage style gardens will likely have the most success, and butterflies tend to prefer patches that are warm and sheltered. Read more tips for attracting butterflies.

Focus on growing flowers with lots of nectar, like buddleia, verbena and hebe (which bees also love). Pink sedum is another good one – look out for this if you’re planning a green roof. Pinch off dead blooms as soon as you see them to encourage more flowering, and make sure your plants are well-watered and fertilised with mulch.

garden ideas for wildlife like planting verbena, a favourite of butterflies

If you’re really keen, combine nectar-rich plants with varieties that provide food and shelter for caterpillars. For example, holly blue butterflies lay their eggs on holly and ivy, and their caterpillars eat the ivy flowers. A wildflower meadow is good for gatekeeper butterflies and Essex skippers, while a nettle patch will attract peacock and red admiral varieties.

For the best chance of seeing these beautiful insects, position rocks in sunny areas where they will often sit and open their wings. You can also create a butterfly feeder to supplement your flowers.

Become a bee buddy

Bees – honeybees, bumblebees and solitary bees – are essential pollinators that depend on our gardens for shelter and sustenance. Having at least two bee-friendly plants flowering at any given time is a great way to help out bee populations, especially as different bee species are active in different seasons. 

a bumblebee enjoying lavender flowers

Some of the best plants for bees include: bellflowers (campanula), bluebells, crocus, dandelions, dicentra (bleeding hearts), buddleia, hollyhocks, honeysuckle, ivy, lavender, nasturtiums, sweet peas, poppies. Even if you have a small garden, many of these flowers will grow in planters or hanging baskets. Check out Beekind for more pollinator-promoting plant advice.

Pass on the pesticides

Pesticides and chemicals will harm bugs and impact the delicate natural ecosystem of your flower beds. Instead of relying on them, grow a wide variety of companion plants that will work harmoniously to keep pests at bay. For example, greenfly hate marigolds and tomatoes, while garlic will keep aphids away.

Wildlife friendly garden design

What other ways are there to generally make your garden a more enticing environment for British wildlife? The main thing I would recommend is to consider all of the garden features you want for your family, and then think about creative ways to make them more creature-friendly.

You might want a lawn, for instance, but instead of a homogeneous patch of turf, let clover and trefoil grow through to encourage bees and hoverflies. Instead of manicured borders, set aside a “wild” patch that gets a bit thicker with self-seeders and undergrowth for birds and hedgehogs to forage.

Cottage gardens

a stone path between two bushy cottage garden flower beds

Cottage gardens have a wild and unruly vibe, and are packed full of flowers and grasses that are ideal for just about every kind of garden critter there is. If you’ve ever fancied adding some cottage garden ideas, now is the perfect time!

Grow a garden glade

In summer, British woodlands come alive with bluebells, foxgloves and snowdrops, sheltering beneath the trees. You can recreate this to a certain extent with careful planting, and waiting until the end of summer to mow and re-fertilise.

Dig a pond

a koi pond in a Japanese style garden

Ponds are great for biodiversity, and they’re a really pleasant garden feature. Shallow or deep, natural-looking or modern – frogs, dragonflies and newts will care to a greater or lesser extent, so create your pond and see what happens

Composting

Composting is an environmentally-conscious way to reduce your household waste and create fertiliser for your garden. An open compost heap provides a home for hibernating animals, and food for all kinds of insects. Just be cautious about disturbing the heap if there could be animals inside! Read more about composting.

Growing a meadow

garden ideas for wildlife include planting lots of high-pollen native flowers

As we’ve mentioned a couple of times already, growing a miniature meadow is great for biodiversity, and they’re also pretty (and low-maintenance) garden features. Look for a flower mix packed with self-seeders, and once your meadow is established it will come back year after year.

Bet on hedges

Again, we’ve mentioned hedges a couple of times already, but they really are one of the top garden ideas for wildlife. Using hedges in place of borders or fences creates food and shelter that can be used for so many species, from tiny bugs to nesting birds. Hedges also let animals pass through your gardens, while providing greenery and privacy for your home.

Why choose a wildlife-friendly garden?

Okay, so just off the top of my head, here are a few reasons why planning garden ideas for wildlife food and habitats can be a win-win.

  1. Your garden will be healthier. Yes, I know I’ve said this so many times already, but once you start seeing the difference, you’ll appreciate it. Hedgehogs eat slugs. Earthworms eat fallen leaves. Foxes eat daddy-long-legs and their larvae. Yep, you might see more scurrying insects, but the good will outweigh the bad.
  2. You’ll witness some of the more spectacular insects, birds and animals the UK has to offer. Look, I’m not knocking sparrows or pigeons… but would you turn down the chance to watch finches, bats or even pheasants, if you could?
  3. Kids will understand and appreciate nature from a young age. I have a vivid memory, from when I was about nine, of being at my dad’s house and tiptoeing downstairs in the wee hours to watch a mother rabbit and her babies nibble at the daffodils in the front garden. It was a magical experience, and taught me about how good being kind to nature can feel.
  4. It’s just nice knowing that you’re not the only one appreciating your garden! If you’re someone that takes pride in their garden (and if you’re on this blog, I’m guessing you are), then it’s really rewarding to see how other creatures enjoy being in your space.

Build slowly, be patient.

Even if you could grow an authentic patch of nature overnight, it would still take time for new animals to find it. It really takes time for most of these garden ideas for wildlife to become established, so plan carefully, build slowly, and watch with patience.

Once your new features start looking like a natural part of your garden, it’s time to pay closer attention to who’s visiting. The best times to take a peek outside will be in the evenings or early mornings, especially in spring.

We have an incredible range of common species across the UK, and encouraging insects, birds and animals into your garden is an easy way to learn more about them. Watching wildlife and appreciating nature is amazing for children, and enjoyable for just about anyone, of any age. Check out www.wildlifetrusts.org for more useful resources, and happy nature watching!

THE BEST GARDEN IDEAS FOR WILDLIFE IN THE UK

Save this pin for later

Garden Style Ideas

garden styled with a wooden gazebo
Upgrade your garden with these simple tips

A well-maintained garden is not only visually appealing but also creates a tranquil and relaxing atmosphere for you and your family. If you’re looking to upgrade your garden, there are several simple tips you can follow to enhance its beauty and functionality. In this article, we will explore some practical ideas and resources to help […]

best trailing plants for winter hanging baskets
9 Best Trailing Plants for Evergreen Winter Hanging Baskets

If you’re keen to add some evergreen interest to a dull winter garden, discover our pick of the best trailing plants for a winter hanging basket.

close up of woman potting geranium flowers
12 Best Bedding Plants for a Colourful Garden

Most bedding plants are a breeze to grow and care for. You can grow blocks of similar-hued bedding plants in clusters or mix and match different plants for colour, texture, and pattern.

why do people use flower pot heaters
Are Terracotta Flower Pot Heaters Safe or Dangerous?

There are many online videos and tutorials detailing ways to heat your space in an emergency using tealight candles and a flower pot.
This article will explain the dangers of flower pot heaters and why you should think twice before using them.

Garden Accessory Ideas

Garden Activities & Events Ideas

what to do in the garden in september
What to Do in the Garden in September: 18 Gardening Jobs to Do Now

September is a time for harvesting, tidying, and preparing the garden and greenhouse for the cooler, more tumultuous months ahead.

what to do in the garden in july
What to Do in the Garden in July: 10 Gardening Jobs to Do Now

Gardening in July is a busy time; jobs include deadheading plants that can bloom again, mowing and fertilising your lawn, harvesting vegetables and fruit trees, and keeping an eye out for pests.

june garden jobs
What to do in the Garden in June – 22 Gardening Jobs to do Now

From sowing salad crops and pruning fruit trees to planting delicious vegetables and harvesting the first of your strawberries, June is a productive month in the gardening calendar.

march lawn care
Lawn Care in March: Can You Mow, Feed or Scarify? (Where to Start)

March is the perfect month to kickstart your lawn care routine. The earth is waking up a little, the days are getting noticeably longer and you can start prepping your winter-stressed lawn.